
Sq. is a full-scale enterprise software that permits organizations to run and develop their ecommerce enterprise, handle payroll, and run enterprise banking companies. Sq. permits for the combination of quite a few third-party functions regarding analytics, tax, accounting, workforce administration, and extra.
This text will exhibit learn how to use the Sq. Node.js SDK to simply combine Sq.’s bank card processing performance into an software. By the top of this tutorial, you’ll have a working code you can begin utilizing to reap the benefits of the various options the Sq. SDK has to supply.
N.B., there’s a depreciated Sq. Join SDK that’s now not supported and shouldn’t be used; in actual fact, a lot of the capabilities on this tutorial can’t be discovered within the depreciated model
Soar forward:
Conditions
To comply with together with this tutorial, you’ll want the next:
- Node.js v12 or larger put in
- Familiarity with React and Vite or Create React App
What’s the Sq. SDK?
To higher perceive what the Sq. SDK is, let’s first rapidly evaluate the definitions of APIs and SDKs.
An API is an middleman that permits functions to entry one another’s capabilities and ship info. Software programming interfaces improve the performance of functions.
In the meantime, an SDK is a set of instruments that permits you to entry an software’s functionalities and companies, together with its APIs. Software program improvement kits simplify app improvement by equipping you with virtually every little thing you want to kickstart your improvement, permitting you to focus in your software enterprise logic.
The Sq. SDK lets you simply combine Sq. into your software. On this tutorial, you’ll see that with the Sq. SDK you don’t have to concern your self with learn how to name an API endpoint or fear about how Sq. processes your fee. You simply have to know what SDK capabilities are required and what information the SDK is anticipating so as full an order.
Establishing Sq.
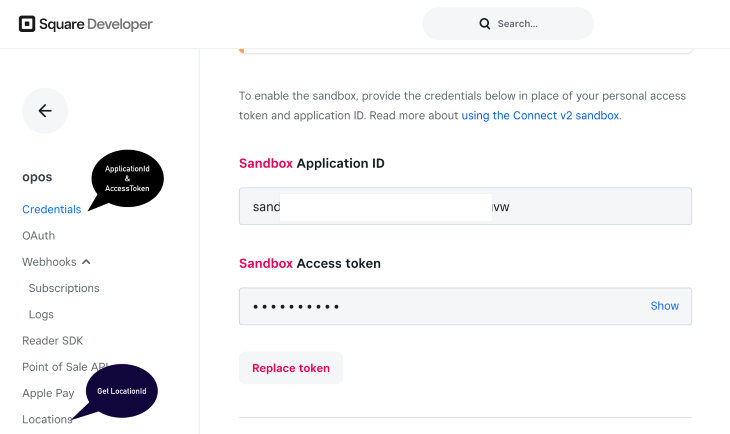
To discover and use Sq.’s suite of enterprise instruments, we’ll have to arrange a Sq. account and get an Software ID, Location ID, and an Entry token. These credentials are required to make use of the Sq. SDK.
Begin by signing up on the Sq. web site as a developer and get your credentials. For this tutorial, we’ll be utilizing the Sandbox surroundings so, make sure you get the Sandbox credentials to comply with alongside.
Log into your dashboard and click on on the Credentials tab to view your Software ID and your Entry token. To get your Location ID, click on on the Areas tab as proven under.
Integrating with a Node.js backend (server)
It’s essential to notice that the Sq. Node.js SDK ought to solely be used within the backend. There are frontend integrations for the Sq. SDK that we’ll evaluate later on this article.
To start out, we’ll create a fundamental server with Fastify, an open supply Node.js framework.
First, initialize the applying utilizing the yarn init command. Then, replace the package deal.json file to incorporate the next dependencies:
"dependencies": {
    "@fastify/cors": "^7.0.0",
    "dotenv": "^16.0.1",
    "fastify": "^3.29.0",
    "sq.": "^19.0.0",
    "uuid4": "^2.0.2"
  }
Now, run the command yarn in your terminal to put in the dependencies.
Subsequent, create an index.js file. This would be the foremost file and likewise the server file. Add the next code:
const { fastify } = require('fastify');
const PORT = 3001;

const app = fastify();
async operate startApp() {
    attempt {
        app.register(require('@fastify/cors'), {
            origin: '*',
        });
        app.submit("/pay", async (request, reply) => {
            // our logic will go right here.
        });
        await app.hear(PORT);
        console.log('listening on port', PORT);
    } catch (e) {
        console.error(e);
    }
}
startApp();
This code will arrange a server for us on PORT 3001 with a submit route /pay.
Subsequent, add your Sq. integration code. As a way to maintain the code clear, create a brand new file referred to as sq..join.js. Now, add the next:
const dotenv = require('dotenv');
const { Consumer, Atmosphere } = require("sq.");
dotenv.config();

const shopper = new Consumer({
  accessToken: course of.env.SQUARE_ACCESS_TOKEN,
  surroundings: Atmosphere.Sandbox,
});

module.exports = shopper;
This code will initialize Sq. after which permit you to authenticate your account together with your entry token. With out this setup, you’ll be unable to entry Sq..
Make sure you add your Sq. Entry token to your .env file utilizing this key: SQUARE_ACCESS_TOKEN.
Subsequent, modify the index file, import uuidv4, and the Sq. shopper you simply initialized. Additionally, modify the /pay endpoint to incorporate the fee API operate.
const { fastify } = require('fastify');
const uuidv4 = require('uuid4');
const { paymentsApi } = require("./join.sq..js");
const PORT = 3001;
const app = fastify();

async operate startApp() {
    attempt {
        app.register(require('@fastify/cors'), {
            origin: '*',
        });
        app.submit("/pay", async (request, reply) => {
            let physique = request.physique;
            physique.idempotencyKey = uuidv4();
            physique.amountMoney = {
                quantity: 1,
                foreign money: 'GBP',
            };
            let paymentResponse = paymentsApi.createPayment(physique);
            paymentResponse.then((response) => {
                console.log(response)
                reply.ship(response)
            })
        });
        await app.hear(PORT);
        console.log('listening on port', PORT);
    } catch (e) {
        console.error(e);
    }
}
startApp();
In the event you study the code fastidiously, you’ll discover a key referred to as idempotencyKey. This can be a requirement that forestalls a consumer from making duplicate transactions; no transaction can have a couple of idempotencyKey.
Usually, you’d generate and retailer this key in your database to validate a transaction, however for this tutorial, we’ll use a universally distinctive identifier, uuidv4, to generate this key after which use it to make funds.
Additionally, you’ll discover that the amountMoney is an object. That is additionally a obligatory requirement as each fee will need to have an quantity to pay. To keep away from exploitation, you must get this worth out of your database, relatively than sending it from the frontend. However for the aim of this tutorial, we’ll exhausting code the amountMoney:
physique.amountMoney = {
    quantity: 1,
    foreign money: 'GBP',
};
You should use any of Stripe’s supported currencies however for the sandbox account, solely GBP is supported.
With this information within the backend, together with one payload from the shopper, you must have the ability to create a fee by calling the createPayment() technique.
paymentsApi.createPayment(physique)
Now that we’ve arrange the Node.js backend and built-in the Sq. Node.js SDK, let’s combine it with a shopper.
Integrating with a React app (shopper)
Let’s create a fundamental React app that can settle for consumer bank card info and funds.
It’s preferable to make use of Vite to arrange the React app, however for those who favor you possibly can arrange the app with Create React App.
Subsequent, set up the Sq. React community-powered internet fee SDK, react-square web-payments-sdk, by operating the next command:
yarn add react-square-web-payments-sdk
Now that you’ve React arrange and the SDK put in, create a element, SqurePayment.jsx, and add the next code:
import * as React from 'react';
import { CreditCard, PaymentForm } from 'react-square-web-payments-sdk';
const SquarePaymentForm = () => (
   {
      console.data({ token, purchaser });
      let physique = JSON.stringify({
        sourceId: token.token
      });
      const paymentResponse = await fetch('http://localhost:3001/pay', {
        technique: 'POST',
        headers: {
          'Content material-Sort': 'software/json',
        },
        physique,
      });
      if (paymentResponse.okay) {
        return paymentResponse.json();
      }
    }}

    /**
     * This operate permits the Robust Buyer Authentication (SCA) movement
     *
     * It is essential you employ this operate to confirm a consumer to cut back the
     * probabilities of fraudulent transactions
     */

    createVerificationDetails={() => ({
      quantity: '1.00',
      /* collected from the customer */
      billingContact: {
        addressLines: ['123 Main Street', 'Apartment 1'],
        familyName: 'Doe',
        givenName: 'John',
        countryCode: 'GB',
        metropolis: 'London',
      },
      currencyCode: 'GBP',
      intent: 'CHARGE',
    })}
    /**
     * Identifies the placement of the service provider that's taking the fee.
     */
    locationId="LPWYFGdds9"
  >


);
export default SquarePaymentForm;
Right here we use the PaymentForm and Card parts to gather the consumer’s bank card particulars and fee info to then ship it to Sq..
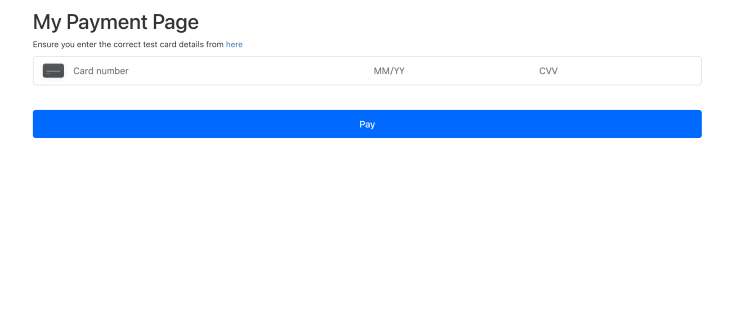
Import this element within the App.jsx file and render it as proven under:
import SquarePaymentForm from './SquarePayment'
import { Button, Container } from 'react-bootstrap';
import './App.css'
operate App() {
  return (
    <Container>
      <h1>My Cost Web page</h1>
      <p>
        Make sure you enter the proper take a look at card particulars from <a href="https://developer.squareup.com/docs/devtools/sandbox/funds" goal="_blank">right here</a>
      </p>
      <p>
        <SquarePaymentForm  />
      </p>
    </Container>
  )
}
export default App
It ought to appear to be this:
You possibly can create a kind to gather the consumer’s billing info as nicely:
billingContact: {
  addressLines: ['123 Main Street', 'Apartment 1'],
  familyName: 'Doe',
  givenName: 'John',
  countryCode: 'GB',
  metropolis: 'London',
},
Now, make the API name to your server, which is able to make a request to the Sq. server and return a response. Keep in mind that we created the /pay endpoint earlier; the request ought to be there with all the data as proven within the code above.
Conclusion
Sq.’s SDK for Node.js provides you the facility to make use of the Sq. API effortlessly. You simply need to deal with calling capabilities, passing information round, and manipulating the response. I hope you discovered this text useful for getting began with integrating Sq. into your Node.js workflow.
The Sq. Node.js SDK affords many options that may be advantageous for bettering the effectiveness of ecommerce enterprise operations. Try the documentation to study extra about all of the issues you are able to do with the Sq. SDK.
Yow will discover all of the code used on this tutorial within the following GitHub repositories:
200’s solely  Monitor failed and sluggish community requests in manufacturing
Deploying a Node-based internet app or web site is the straightforward half. Ensuring your Node occasion continues to serve sources to your app is the place issues get more durable. In the event you’re desirous about guaranteeing requests to the backend or third social gathering companies are profitable, attempt LogRocket.  https://logrocket.com/signup/
LogRocket is sort of a DVR for internet and cellular apps, recording actually every little thing that occurs whereas a consumer interacts together with your app. As a substitute of guessing why issues occur, you possibly can mixture and report on problematic community requests to rapidly perceive the foundation trigger.
LogRocket devices your app to report baseline efficiency timings comparable to web page load time, time to first byte, sluggish community requests, and likewise logs Redux, NgRx, and Vuex actions/state. Begin monitoring without cost.
