This lengthy weblog is multi function model of the sequence on Flutter App Improvement Tutorial. You’ll be able to at all times go to particular person blogs that are chapters on this weblog.
Chapter One: Introduction
Welcome to the weblog for the flutter app growth. That is Nibesh Khadka from Khadka’s Coding Lounge. This weblog goes to be a tutorial on app growth with Flutter. Sure, there’s all the things that is talked about on the Poster.
About App
On this sequence, we’ll be making an app Astha – Being Hindu. This app is our imaginative and prescient of a platform for the Hindu neighborhood. It’s purported to be a one-stop vacation spot for all the things associated to Hinduism, as an illustration, Discovering temples, Discovering clergymen, Venues for marriage and baptisms, Retailers promoting gadgets like incense sticks, flowers, garlands, and so on.
Disclaimer: This tech weblog has no intention to divide any non secular teams or beliefs. That is simply an effort to show an rising tech in a context which may not have been realized earlier than.
Chapters Introductions
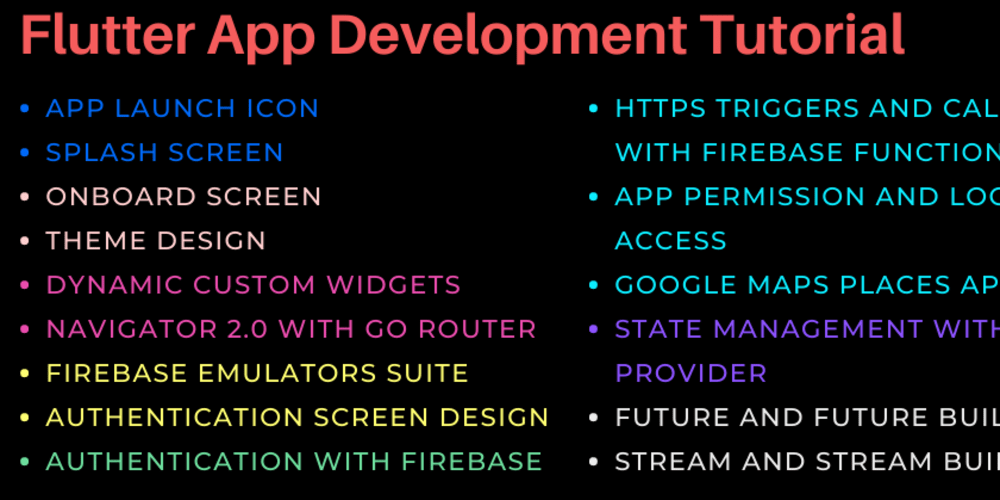
This weblog has been divided into 12 chapters (14 together with this one and the conclusion). We have tried to divide the chapters such that every will signify a single purpose. Their order relies on the user-screen movement. This weblog has additionally been divided right into a sequence, every chapter as a person weblog which will be discovered right here. This very lengthy weblog right here is mashed and edited to take part within the writing competitors on HashNode.
Launch Icon and Splash Display for Flutter App
After creating an preliminary undertaking, this chapter will stroll by means of the steps to arrange the app with a launch icon and in addition create and set a splash display for our app with packages already accessible at Pub.Dev.
Onboarding With Go Router in Flutter
This part will see our app getting a couple of photographs and a really mundane animation, to onboard customers. We’ll make use of Go Router and Shared Preferences to verify onboarding solely happens solely as soon as when the app is launched for the primary time.
Outline Theme In Flutter
After making the onboarding display, we’ll shift our focus to defining a worldwide theme for our software. We’ll use a stupendous font, and a set of colours for our app’s widgets just like the app bar, button, and so forth.
Learn how to Create Customized Widgets: App Bar, Drawer, and Backside Navigation Bar in Flutter
After, defining the theme, we’ll then make some international widgets. We’ll make a customized app bar that’ll have dynamic content material. As a substitute of utilizing the drawer menu, we’ll additionally create a backside navigation bar. Now, as per the drawer, we’ll use it for settings about consumer accounts hyperlinks.
Authentication in Flutter | Person Interface Design
With the app bar and menus in place, we have now to maneuver to the subsequent part. In response to the consumer display movement, the primary display the app will go to is authentication(until onboarding). So, we’ll take our time to create an authentication display, add some animation, create a dynamic enter type, and lots of extra.
The subsequent three chapters, together with this one, have the identical principal purpose i.e Authenticate. However then the chapter obtained very prolonged. So, we needed to divide them into mini-goals, that are UI, Set-Up, and Authentication.
Flutter Firebase Setup | Cloud & Emulator
So as to add customers or to do anything involving knowledge, we’ll want a vital factor: the Database. We’ll use Firebase for all of the backend together with the database. On this quick chapter, we’ll arrange Firebase for our undertaking.
Flutter Firebase Authentication | E mail and Password
After firebase is about up we’ll now write our code to authenticate the customers. We’ll use electronic mail and password to authenticate. Not solely that we’ll additionally use Firebase Cloud Features to be safe and environment friendly.
Enhance Person Expertise with Snack Bars, Alert Dialogs, and Progress Indicators
It is at all times good follow to offer customers suggestions on their actions. There are a lot of methods to take action. A few of them are Snack Bars, Alert Dialogs, Progress Indicators, and so on. We’ll implement it there in our Authentication Display.
Permission Handler and Location
It is necessary to ask for permission to entry native recordsdata and apps. In our app as properly we’ll must entry some options. We’ll entry the consumer’s location and reserve it on the Firebase Firestore.
Google Maps Locations API With Flutter
On this part, we’ll use google’s Place API to accumulate an inventory of temples close by the consumer’s places. The placement might be saved on Firebase Firestore utilizing Firebase Cloud Features.
Flutter Web page Design
Right here we’re again once more to visuals and aesthetics. We’ll make two pages on this half, the homepage and the temple web page.
Realtime Modifications With Flutter and Firebase
Right here, we’ll be utilizing Streams and StreamBuilders to replicate real-time modifications to the Firestore in our app.
Flutter App Improvement | Conclusion
It is a very quick chapter the place we’ll conclude this weblog. Right here, we are going to share some superior programs, books, and blogs on the market. Additionally, a small DIY job has been ready for all of the readers to follow what we have discovered to date within the sequence.
UI/UX
These are two designs we discovered on Figma, we took motivation from:
- https://www.figma.com/neighborhood/file/895207405259865401
- https://www.figma.com/neighborhood/file/1032754160766949478
Screenshots
Listed below are a couple of screenshots of the prototype.

House Display

Temple Record Display

SignIn Display

Registration Display
Person ScreenFlow
The next diagram roughly illustrates the consumer display movement in our app.


Pre-Requisites
Although beginner-friendly it will not be an absolute zero-level weblog. Do not count on a proof of each nook and crannies. We won’t clarify what a widget does, however how does that widget slot in our state of affairs at a selected second. We’re utilizing Linux OS, so codes are examined on android, although flutter will alter it for ios as properly. Undergo the next guidelines earlier than we begin.
- Figma SDK put in.
- Android Emulator put in
- Google Clouds Account with billing enabled, required for Firebase and Google Maps API.
- Have a fundamental understanding of Flutter widgets & Dart.
- We’ll write firebase cloud features in JavaScript, so it’s going to assist if you recognize JS fundamentals.
- Few instructions in Linux OS.
- VS code put in.
Challenge Construction
Let’s take a short second for the folder constructions on the undertaking. At first, we had been following a easy and one layer construction of:
- principal.dart
- Suppliers
- Screens
- Fashions
However because the undertaking obtained larger it obtained messier with this construction. And Therefore, we determined to make use of the identical construction however improve to a extra layered construction, the place every display can have its respective folders as above, whereas a couple of international widgets and settings might be on a worldwide folder.

Conclusion
So, this was a short introduction to the weblog on Flutter App Improvement. We hope you are excited as we’re.
Chapter Two: Launch Icon and Splash Display for Flutter App

Getting Began
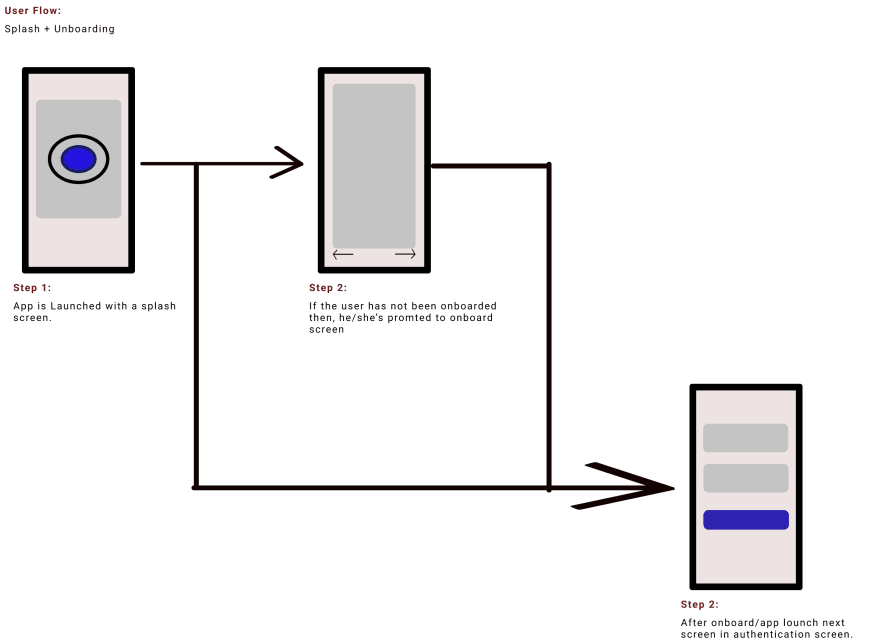
Here is a consumer display movement picture of the primary issues a consumer goes by means of on app launch.
We’ll begin within the order of user-screen movement. Therefore, on this part, we’ll set the launch icon in addition to a splash display for our software. Now let’s get began by creating our software. In your terminal:
# I'm utilizing the Desktop Listing
cd Desktop

# Create a Flutter undertaking
flutter create astha

# Go to the folder and open the folder on VS Code.
cd astha

code .
Property
All of the undertaking photographs might be saved within the belongings folder within the root listing and additional into their related sub-directories. So, let’s create a folder for photographs to retailer.
# In your undertaking root as an illustration /house/<consumer>/Desktop/astha
mkdir belongings  belongings/splash
You need to use the picture of your alternative or obtain the next photographs to make use of. I made them on canva.

Splash Display – Om Splash

App Launch Icon – Om and Lotus Splash Picture
I resized these photographs at imageresizer to realize completely different sizes as talked about within the native splash package deal.
Ensure to obtain them inside belongings/splash. After that to make use of these photographs, we’ll want so as to add them to the pubspec file so. In pubsec.yaml file you will discover the belongings part commented simply uncomment it or change it with the next:
# So as to add belongings to your software, add an belongings part, like this:
# The outer **belongings**  not folder identify
# however a variable that tells flutter SDK the place to search for belongings into
  belongings:
     # Splash Screens
    - belongings/splash/om_splash.png
    - belongings/splash/om_lotus_splash.png
    - belongings/splash/om_lotus_splash_1152x1152.png
Bear in mind any picture sources you will use from native storage must be registered in pubspec.yaml file as above.
Packages
- For the launch icon we’ll use flutter_launcher_icons.
- For our splash display we’ll use flutter_native_splash.
Should you’re gonna use the model I am utilizing then simply paste it inside pubspec.yaml
Set up
# On dependencies part
dependencies:
  flutter:
    sdk: flutter
  flutter_native_splash: ^2.1.1

#On dev_dependencies part
dev_dependencies:
  flutter_test:
    sdk: flutter
  flutter_launcher_icons: ^0.9.2
*Do thoughts the indentation and in addition be sure to go to every package deal’s web page and observe the readme directions for the setup if something’s modified. *
Observe: Please do not forget that the settings will solely work as much as Android 11 as supposed. From Android 12+, the splash display will solely present up on launch from emulator icon faucet however not on app run from VS Code(for some motive it hasn’t labored in mine/is being overridden by launcher icon). One other factor to recollect is that the splash display might be clipped as a spherical picture within the heart. I attempted to vary the window background however failed nonetheless.
Set Up
Now that we have added the packages we’re gonna want to offer a couple of extra settings. So, once more in pubspec.yaml file:
#Simply add these in direction of the tip
# Launch icon settings
flutter_icons:
  android: true
  ios: true
  image_path: "belongings/splash/om_splash.png"
  adaptive_icon_background: "#FFD1A6"
  adaptive_icon_foreground: "belongings/splash/om_splash.png"

# Splash Display Settings
flutter_native_splash:
  #normal
  coloration: "#ffffff"
  picture: belongings/splash/om_lotus_splash.png
  android_12:
    picture: belongings/splash/om_lotus_splash_1152x1152.png
    # icon_background_color: "#FFD1A6"
Now save the file and go to the VS Code terminal and run these instructions.
# For splash display
flutter pub run flutter_native_splash:create

# For launch icon
flutter pub run flutter_launcher_icons:principal
Attainable Error
Whereas operating the second command I encountered an error, it seems to be an SDK model’s incompatibility challenge. Therefore, on android>app>construct.gradle, discover and alter Compiled, Minimal, and Goal SDK variations.
# Solely change these values do not delete anything.
android {
.......
    compileSdkVersion 31
...

defaultConfig {
         applicationId "com.instance.astha"
        minSdkVersion 21
        targetSdkVersion 30
....
}
After this save the file and in your terminal run the next command once more.
# For launch icon
flutter pub run flutter_launcher_icons:principal
House Web page
In upcoming chapters, we’ll create onboard and lock our app for under registered customers. However for now, to check our launcher icon and splash display let’s create a easy house display.
On principal.dart file:
import 'package deal:flutter/materials.dart';
import 'package deal:flutter/providers.dart';

void principal() async {
  //  concrete binding for purposes primarily based on the Widgets framewor
  WidgetsFlutterBinding.ensureInitialized();

  SystemChrome.setSystemUIOverlayStyle(
    SystemUiOverlayStyle.darkish.copyWith(statusBarColor: Colours.black38),
  );

  // Firebase initalize
  runApp(const House());
}

class House extends StatefulWidget {
  const House({Key? key}) : tremendous(key: key);

  @override
  State<House> createState() => _HomeState();
}

class _HomeState extends State<House> {
  @override
  Widget construct(BuildContext context) {
    return const MaterialApp(
      house: Scaffold(
        physique: Heart(youngster: Textual content("House Web page")),
      ),
    );
  }
}
Take a look at this quick clip on what we did to date.
Abstract
Alright, with this the primary a part of the Flutter App Improvement sequence is accomplished.
- We carried out Launch Icon in android with the flutter_launcher_icons package deal.
- We additionally carried out a splash display for our app with the flutter_native_splash package deal.
- We’re additionally engaged on some anticipated breakage for Android 12.
Chapter Three: Onboarding With Go Router in Flutter
About
On this chapter of the tutorial, we are going to make an onboarding display and apply it to our app. For that, we’ll set up GoRouter, Supplier, and Shared_Preferences packages for our app.
To Onboard Or Not
Let’s once more take a look on the user-screen movement from the picture beneath.
Let’s go over the routing logic we’ll be utilizing for onboarding.
Has the consumer/app been onboarded?
-> If sure, then no must onboard till the lifetime of the appliance i.e till the app is uninstalled.
-> If no, then go to the onboarding display, simply as soon as after which by no means within the app’s lifetime.
*So, how are we going to realize this? *
It’s easy, you see go router has redirect possibility accessible, the place the state property of redirect, can be utilized to put in writing examine statements, to inquire about present routes: the place is it now, the place is it heading, and such. With this, we are able to redirect to onboard or not.
That is nice however what/how will we examine?
That is the place shared preferences are available. We will retailer easy knowledge in native storage utilizing shared preferences. So throughout app initialization:
-
We’ll fetch an integer/key saved in native storage, that is accountable to maintain depend of onboard state, through shared preferences.
-
When the app is launched for the primary time, the shared preferences will return null as a result of the integer doesn’t exist but. For us, it is equal to the concept of by no means having been onboarded.
-
After that on the router we’ll examine if the integer is null, in that case then go to the onboard display.
-
When onboarding is finished, right here we’ll lastly set that non-existent integer to a non-null worth and reserve it within the native storage utilizing the Supplier package deal.
-
Now once we launch an app once more for the second time, the router will discover that the integer will not be a null worth anymore, so it’s going to redirect to our subsequent web page as a substitute of the onboard display.
Set up Packages
You will discover the code of the undertaking up till now on this repository. So, let’s go to our initiatives pubspec.yaml file and add the next packages.
dependencies:
  flutter:
    sdk: flutter
  flutter_native_splash: ^2.1.1
# Our new pacakges
  go_router: ^3.0.5
  shared_preferences: ^2.0.13
  supplier: ^6.0.2
Reformat
Earlier than we begin doing issues, let’s do some modifications to our undertaking. First, we’ll create some recordsdata and folders.
#Your cursor must be inside lib your lib folder
# make some folder
mkdir globals screens  globals/suppliers globals/settings  globals/settings/router globals/settings/router/utils  screens/onboard  screens/house

# make some recordsdata
contact app.dart globals/suppliers/app_state_provider.dart  globals/settings/router/app_router.dart  globals/settings/router/utils/router_utils.dart screens/onboard/onboard_screen.dart  screens/house/house.dart
The primary.dart file is like this now.
import 'package deal:flutter/materials.dart';
import 'package deal:flutter/providers.dart';

void principal()  {
  //  concrete binding for purposes primarily based on the Widgets framewor
  WidgetsFlutterBinding.ensureInitialized();

  SystemChrome.setSystemUIOverlayStyle(
    SystemUiOverlayStyle.darkish.copyWith(statusBarColor: Colours.black38),
  );

  runApp(const House());
}

class House extends StatefulWidget {
  const House({Key? key}) : tremendous(key: key);

  @override
  State<House> createState() => _HomeState();
}

class _HomeState extends State<House> {
  @override
  Widget construct(BuildContext context) {
    return const MaterialApp(
      house: Scaffold(
        physique: Heart(youngster: Textual content("House Web page")),
      ),
    );
  }
}
Let’s transfer the House class to the house.dart file. Now our recordsdata appear like this:
principal.dart
import 'package deal:flutter/materials.dart';
import 'package deal:flutter/providers.dart';
import 'package deal:temple/screens/house/house.dart';

void principal()  {
  //  concrete binding for purposes primarily based on the Widgets framewor
  WidgetsFlutterBinding.ensureInitialized();

  SystemChrome.setSystemUIOverlayStyle(
    SystemUiOverlayStyle.darkish.copyWith(statusBarColor: Colours.black38),
  );

  runApp(const House());
}
house.dart
import 'package deal:flutter/materials.dart';

class House extends StatefulWidget {
  const House({Key? key}) : tremendous(key: key);

  @override
  State<House> createState() => _HomeState();
}

class _HomeState extends State<House> {
  @override
  Widget construct(BuildContext context) {
    return const MaterialApp(
      house: Scaffold(
        physique: Heart(youngster: Textual content("House Web page")),
      ),
    );
  }
}
Router Utils
Whereas routing we’ll want to offer a number of properties like Router Path, Named Route, Web page Title, and such. Will probably be environment friendly if these values will be outsourced from a module. Therefore, we created utils/router_utils.dart file.
router_utils.dart
// Create enum to signify completely different routes
enum APP_PAGE {
  onboard,
  auth,
  house,
}


extension AppPageExtension on APP_PAGE {
  // create path for routes
  String get routePath {
    change (this) {
      case APP_PAGE.house:
        return "https://dev.to/";

      case APP_PAGE.onboard:
        return "/onboard";

      case APP_PAGE.auth:
        return "/auth";

      default:
        return "https://dev.to/";
    }
  }

// for named routes
  String get routeName {
    change (this) {
      case APP_PAGE.house:
        return "HOME";

      case APP_PAGE.onboard:
        return "ONBOARD";

      case APP_PAGE.auth:
        return "AUTH";

      default:
        return "HOME";
    }
  }

// for web page titles to make use of on appbar
  String get routePageTitle {
    change (this) {
      case APP_PAGE.house:
        return "Astha";

      default:
        return "Astha";
    }
  }
}
Go Router
Lastly, we are able to go to the router file the place we’ll create routes and redirect logic. So, on app_router.dart file.
Create an AppRouter class.
import 'package deal:go_router/go_router.dart';
import 'package deal:temple/screens/house/house.dart';
import 'utils/router_utils.dart';

class AppRouter  {
  get router => _router;

  last _router = GoRouter(
      initialLocation: "https://dev.to/",
      routes: [
        GoRoute(
          path: APP_PAGE.home.routePath,
          name: APP_PAGE.home.routeName,
          builder: (context, state) => const Home(),
        ),
      ],
      redirect: (state) {});
}
The AppRouter is a router class we’ll use as a supplier. The router we simply created now has one router** “https://dev.to/”** which is the path to our house web page. Likewise, the initialLocation property tells the router to go to the homepage instantly after the app begins. However, if some situations are met then, it may be redirected to some other place, which is finished by means of redirect. Nevertheless, we have now but to implement our router. To take action let’s head to the app.dart file.
Use Router as a substitute of Navigator
MaterialApp.Router creates a MaterialApp that makes use of the Router as a substitute of a Navigator. Take a look at the variations right here. We’ll want to make use of the declarative method for our go_router.
app.dart
import 'package deal:flutter/materials.dart';
import 'package deal:go_router/go_router.dart';
import 'package deal:supplier/supplier.dart';
import 'package deal:temple/globals/settings/router/app_router.dart';

class MyApp extends StatefulWidget {
  const MyApp({Key? key}) : tremendous(key: key);

  @override
  State<MyApp> createState() => _MyAppState();
}

class _MyAppState extends State<MyApp> {
  @override
  Widget construct(BuildContext context) {
    return MultiProvider(
      suppliers: [
        Provider(create: (context) => AppRouter()),
      ],
      youngster: Builder(
        builder: ((context) {
          last GoRouter router = Supplier.of<AppRouter>(context).router;

          return MaterialApp.router(
              routeInformationParser: router.routeInformationParser,
              routerDelegate: router.routerDelegate);
        }),
      ),
    );
  }
}
MyApp class would be the mother or father class for our app i.e class utilized in runApp(). Therefore, that is the place we’ll use a router. Furthermore, we’re returning MultiProvider, as a result of because the app grows we’ll use many different suppliers.
As talked about earlier than we have to cross the MyApp class in runApp() methodology in our principal.dart file.
// Insde principal() methodology
void principal() {
............
// Solely change this line
  runApp(const MyApp());
//
}
Now save all of the recordsdata and run the app in your emulator. You will see a homepage that’ll appear like this.

Supplier
We’ll be writing our logic concerning the onboard standing on a supplier class, and since, it is a international state we’ll write it on the app_state_provider.dart file contained in the “lib/globals/suppliers” folder.
app_state_provider.dart
import 'package deal:flutter/basis.dart';
import 'package deal:shared_preferences/shared_preferences.dart';

class AppStateProvider with ChangeNotifier {

// lets outline a technique to examine and manipulate onboard standing
  void hasOnboarded() async {
    // Get the SharedPreferences occasion
    SharedPreferences prefs = await SharedPreferences.getInstance();
    // set the onBoardCount to 1
    await prefs.setInt('onBoardCount', 1);
    // Notify listener supplies transformed worth to all it listeneres
    notifyListeners();
  }
}
Inside hasOnboarded() perform, we set the integer of onBoardCount to 1 or non-null worth, as talked about beforehand.
Now, are you aware the best way to implement this supplier in our app? Sure, we’ll want so as to add one other supplier to the app.dart’s MultiProvider.
app.dart
import 'package deal:temple/globals/suppliers/app_state_provider.dart';

....
  .....
MultiProvider(
      suppliers: [
        ChangeNotifierProvider(create: (context) => AppStateProvider()),
        Provider(create: (context) => AppRouter())
 ]
Ensure to declare AppStateProvider earlier than AppRouter, which we’ll talk about later. For now, we’ll make a quite simple onboard display for testing functions.
Onboard Display
onboard_screen.dart
import 'package deal:flutter/materials.dart';
import 'package deal:go_router/go_router.dart';
import 'package deal:supplier/supplier.dart';
import 'package deal:temple/globals/suppliers/app_state_provider.dart';

class OnBoardScreen extends StatefulWidget {
  const OnBoardScreen({Key? key}) : tremendous(key: key);

  @override
  State<OnBoardScreen> createState() => _OnBoardScreenState();
}

void onSubmitDone(AppStateProvider stateProvider, BuildContext context) {
  // When consumer pressed skip/carried out button we'll lastly set onboardCount integer
  stateProvider.hasOnboarded();
  // After that onboard state is finished we'll go to homepage.
  GoRouter.of(context).go("https://dev.to/");
}

class _OnBoardScreenState extends State<OnBoardScreen> {
  @override
  Widget construct(BuildContext context) {
    last appStateProvider = Supplier.of<AppStateProvider>(context);
    return Scaffold(
      physique: Heart(
          youngster: Column(
        youngsters: [
          const Text("This is Onboard Screen"),
          ElevatedButton(
              onPressed: () => onSubmitDone(appStateProvider, context),
              child: const Text("Done/Skip"))
        ],
      )),
    );
  }
}
On this file, a stateful widget class was created. The primary factor to note right here for now could be onSubmitDone() perform. This perform we’ll be known as when the consumer both pressed the skip button throughout onboarding or the carried out button when onboarding is finished. Right here, it calls the hasOnboarded methodology we outlined earlier within the supplier which units issues in movement.
After that, our router will take us to the homepage.
Now we’re carried out!, or Are we? We nonetheless have not launched redirect directions to our router. Therefore, let’s make some modifications to our app router.
Go-Router Redirect
app_router.dart
// Packages
import 'package deal:go_router/go_router.dart';
import 'package deal:shared_preferences/shared_preferences.dart';
//Customized recordsdata
import 'package deal:temple/screens/house/house.dart';
import 'utils/router_utils.dart';
import 'package deal:temple/screens/onboard/onboard_screen.dart';
import 'package deal:temple/globals/suppliers/app_state_provider.dart';

class AppRouter {
  //=======================change #1 begin ===========/
  AppRouter({
    required this.appStateProvider,
    required this.prefs,
  });

  AppStateProvider appStateProvider;
  late SharedPreferences prefs;
  //=======================change #1 finish===========/
  get router => _router;

// change last to late last to make use of prefs inside redirect.
  late last _router = GoRouter(
      refreshListenable:
          appStateProvider, //=======================change #2===========/
      initialLocation: "https://dev.to/",
      routes: [
        GoRoute(
          path: APP_PAGE.home.routePath,
          name: APP_PAGE.home.routeName,
          builder: (context, state) => const Home(),
        ),
        // Add the onboard Screen
        //=======================change #3  start===========/

        GoRoute(
            path: APP_PAGE.onboard.routePath,
            name: APP_PAGE.onboard.routeName,
            builder: (context, state) => const OnBoardScreen()),
        //=======================change #3  end===========/
      ],
      redirect: (state) {
        //=======================change #4  begin===========/

        // outline the named path of onboard display
        last String onboardPath =
            state.namedLocation(APP_PAGE.onboard.routeName); //#4.1

        // Checking if present path is onboarding or not
        bool isOnboarding = state.subloc == onboardPath; //#4.2

        // examine if sharedPref as onBoardCount key or not
        //if is does then we cannot onboard else we are going to
        bool toOnboard =
            prefs.containsKey('onBoardCount') ? false : true; //#4.3

        //#4.4
        if (toOnboard) {
          // return null if the present location is already OnboardScreen to stop looping
          return isOnboarding ? null : onboardPath;
        }
        // returning null will inform router to do not thoughts redirect part
        return null; //#4.5
        //=======================change #4  finish===========/
      });
}
Let’s undergo the modifications we made.
-
We created two fields: appStateRouter and prefs. The SharedPrefences occasion prefs is required to examine whether or not we have now already onboarded or not, primarily based on the existence of the onboard depend integer. The appStateProvider will present all of the modifications that matter to the router.
-
The router property refreshListenableTo is about to hearken to the modifications from appStateProvider.
-
We added the OnBoardScreen path to the routes checklist.
-
Right here we,
- First created a named location for the onboard display.
- Then isOnboarding checks whether or not the present route(state.subloc) is headed in direction of the onboard display or not.
- If native storage already has onBoardCount integer then we’ll not onboard else we are going to.
- Based mostly on the worth of toOnboard we’ll return both null or onBoardPath to redirect in direction of. We checked if the present route goes in direction of onBoardScreen with isOboarding and in that case returned null. We have to do that, if we do not then the router will enter a loop and trigger an error.
- Lastly, if we do not have to redirect wherever then return null which tells the router to disregard redirect for now.
(PS: I have never talked about modifications in import.)
Proxy Supplier For Router
Alright, so at this level, you in all probability have your linter screaming errors with pink colours. It is the results of us declaring two fields in AppRouter, but we aren’t offering their values in our app.dart. So, let’s repair it.
app.dart
import 'package deal:flutter/materials.dart';
import 'package deal:go_router/go_router.dart';
import 'package deal:supplier/supplier.dart';
import 'package deal:shared_preferences/shared_preferences.dart';
import 'package deal:temple/globals/suppliers/app_state_provider.dart';
import 'package deal:temple/globals/settings/router/app_router.dart';

class MyApp extends StatefulWidget {
// Declared fields prefs which we are going to cross to the router class
  //=======================change #1==========/
  SharedPreferences prefs;
  MyApp({required this.prefs, Key? key}) : tremendous(key: key);
  //=======================change #1 finish===========/
  @override
  State<MyApp> createState() => _MyAppState();
}

class _MyAppState extends State<MyApp> {
  @override
  Widget construct(BuildContext context) {
    return MultiProvider(
      suppliers: [
        ChangeNotifierProvider(create: (context) => AppStateProvider()),
        //=======================change #2==========/
        // Remove previous Provider call and create new proxyprovider that depends on AppStateProvider
        ProxyProvider<AppStateProvider, AppRouter>(
            update: (context, appStateProvider, _) => AppRouter(
                appStateProvider: appStateProvider, prefs: widget.prefs))
      ],
      //=======================change #2 finish==========/
      youngster: Builder(
        builder: ((context) {
          last GoRouter router = Supplier.of<AppRouter>(context).router;

          return MaterialApp.router(
              routeInformationParser: router.routeInformationParser,
              routerDelegate: router.routerDelegate);
        }),
      ),
    );
  }
}
- First, create a subject prefs, we have to cross it as the worth on our principal.dart file which is the place we name MyApp class.
- We’ll create a Proxy AppRouter supplier, that’ll rely upon the AppStateProvider. The proxy supplier will not be the one method to cross a price.
principal.dart
Now, there’s one other pink warning, as a result of we have now but to cross our prefs subject in the primary.dart file.
import 'package deal:flutter/materials.dart';
import 'package deal:flutter/providers.dart';
import 'package deal:shared_preferences/shared_preferences.dart';
import 'package deal:temple/app.dart';

//=======================change #1==========/
// make app an async funtion to instantiate shared preferences
void principal() async {
  //  concrete binding for purposes primarily based on the Widgets framewor
  WidgetsFlutterBinding.ensureInitialized();

  //=======================change #2==========/
// Instantiate shared pref
  SharedPreferences prefs = await SharedPreferences.getInstance();
  SystemChrome.setSystemUIOverlayStyle(
    SystemUiOverlayStyle.darkish.copyWith(statusBarColor: Colours.black38),
  );
  //=======================change #3==========/
// Move prefs as worth in MyApp
  runApp(MyApp(prefs: prefs));
}
Right here we merely transformed the principal() methodology to an async methodology. We did it to instantiate the shared preferences, which then is handed as worth for MyApp class’s prefs subject. Now, while you run the app, it ought to work as supposed.
OnBoardScreen UI & Animation
Now, that we have made the performance work. Let’s do one thing concerning the onboard display itself. You’ll be able to obtain the next photographs or use your individual. I created them at canva without spending a dime.


onboard_screen.dart
import 'package deal:flutter/materials.dart';
import 'package deal:go_router/go_router.dart';
import 'package deal:supplier/supplier.dart';
import 'package deal:temple/globals/suppliers/app_state_provider.dart';

class OnBoardScreen extends StatefulWidget {
  const OnBoardScreen({Key? key}) : tremendous(key: key);

  @override
  State<OnBoardScreen> createState() => _OnBoardScreenState();
}

void onSubmitDone(AppStateProvider stateProvider, BuildContext context) {
  // When consumer pressed skip/carried out button we'll lastly set onboardCount integer
  stateProvider.hasOnboarded();
  // After that onboard state is finished we'll go to homepage.
  GoRouter.of(context).go("https://dev.to/");
}

class _OnBoardScreenState extends State<OnBoardScreen> {
// Create a personal index to trace picture index
  int _currentImgIndex = 0; // #1

// Create checklist with photographs to make use of whereas onboarding
  // #2
  last onBoardScreenImages = [
    "assets/onboard/FindTemples.png",
    "assets/onboard/FindVenues.png",
    "assets/onboard/FindTemples.png",
    "assets/onboard/FindVenues.png",
  ];

// Perform to show subsequent picture within the checklist when subsequent button  is clicked
  // #4
  void nextImage() {
    if (_currentImgIndex < onBoardScreenImages.size - 1) {
      setState(() => _currentImgIndex += 1);
    }
  }

// Perform to show earlier picture within the checklist when earlier button  is clicked
  // #3
  void prevImage() {
    if (_currentImgIndex > 0) {
      setState(() => _currentImgIndex -= 1);
    }
  }

  @override
  Widget construct(BuildContext context) {
    last appStateProvider = Supplier.of<AppStateProvider>(context);
    return Scaffold(
        physique: SafeArea(
            youngster: Container(
                coloration: const Shade.fromARGB(255, 255, 209, 166),
                padding: const EdgeInsets.all(10.0),
                youngster: Column(
                  youngsters: [
                    // Animated switcher class to animated between images
                    // #4
                    AnimatedSwitcher(
                      switchInCurve: Curves.easeInOut,
                      switchOutCurve: Curves.easeOut,
                      transitionBuilder: ((child, animation) =>
                          ScaleTransition(scale: animation, child: child)),
                      duration: const Duration(milliseconds: 800),
                      child: Image.asset(
                        onBoardScreenImages[_currentImgIndex],
                        top: MediaQuery.of(context).measurement.top * 0.8,
                        width: double.infinity,
                        // Secret is wanted since widget sort is similar i.e Picture
                        key: ValueKey<int>(_currentImgIndex),
                      ),
                    ),
                    // Container to that incorporates set butotns
                    // #5
                    Container(
                        coloration: Colours.black26,
                        youngster: Row(
                          mainAxisAlignment: MainAxisAlignment.spaceBetween,
                          youngsters: [
                            IconButton(
                              // Change visibility by currentImgIndex
                              // #6
                              onPressed: prevImage,
                              icon: _currentImgIndex == 0
                                  ? const Icon(null)
                                  : const Icon(Icons.arrow_back),
                            ),
                            IconButton(
                              // Change visibility by currentImgIndex
                              // #7
                              onPressed: _currentImgIndex ==
                                      onBoardScreenImages.length - 1
                                  ? () =>
                                      onSubmitDone(appStateProvider, context)
                                  : nextImage,
                              icon: _currentImgIndex ==
                                      onBoardScreenImages.length - 1
                                  ? const Icon(Icons.done)
                                  : const Icon(Icons.arrow_forward),
                            )
                          ],
                        ))
                  ],
                ))));
  }
}
I do know it’s kind of an excessive amount of code. So, let’s undergo them a bit at a time.
// Create a personal index to trace picture index
  int _currentImgIndex = 0; // #1

// Create checklist with photographs to make use of whereas onboarding
  // #2
  last onBoardScreenImages = [
    "assets/onboard/FindTemples.png",
    "assets/onboard/FindVenues.png",
    "assets/onboard/FindTemples.png",
    "assets/onboard/FindVenues.png",
  ];
- A personal variable _currentIndex is created to maintain monitor of photographs.
- Pictures within the checklist onBoardScreenImages, might be proven on the display primarily based on _currentIndex.
// Perform to show subsequent picture within the checklist when subsequent button  is clicked
  // #1
  void nextImage() {
    if (_currentImgIndex < onBoardScreenImages.size - 1) {
      setState(() => _currentImgIndex += 1);
    }
  }

// Perform to show earlier picture within the checklist when earlier button  is clicked
  // #2
  void prevImage() {
    if (_currentImgIndex > 0) {
      setState(() => _currentImgIndex -= 1);
    }
  }
These features will hold monitor of currentIndex by managing the native state correctly.
// Animated switcher class to animated between photographs
               AnimatedSwitcher(
                      switchInCurve: Curves.easeInOut,
                      switchOutCurve: Curves.easeOut,
                      transitionBuilder: ((youngster, animation) =>
                          ScaleTransition(scale: animation, youngster: youngster)),
                      length: const Length(milliseconds: 800),
                      youngster: Picture.asset(
                        onBoardScreenImages[_currentImgIndex],
                        top: MediaQuery.of(context).measurement.top * 0.8,
                        width: double.infinity,
                         // Secret is wanted since widget sort is similar i.e Picture
                        key: ValueKey<int>(_currentImgIndex),
                      ),
                    ),
We’re utilizing AnimatedSwitcher to change between our picture widgets whereas utilizing ScaleTransition. BTW, should you take away the transitionBuilder property you will get the default FadeTransition.
Container(
                        coloration: Colours.black26,
                        youngster: Row(
                          mainAxisAlignment: MainAxisAlignment.spaceBetween,
                          youngsters: [
                            IconButton(
                              // Change visibility by currentImgIndex
                              // #1
                              onPressed: prevImage,
                              icon: _currentImgIndex == 0
                                  ? const Icon(null)
                                  : const Icon(Icons.arrow_back),
                            ),
                            IconButton(
                              // Change visibility by currentImgIndex
                              // #2
                              onPressed: _currentImgIndex ==
                                      onBoardScreenImages.length - 1
                                  ? () =>
                                      onSubmitDone(appStateProvider, context)
                                  : nextImage,
                              icon: _currentImgIndex ==
                                      onBoardScreenImages.length - 1
                                  ? const Icon(Icons.done)
                                  : const Icon(Icons.arrow_forward),
                            )
                          ],
                        ))
                  ],
                ))
This container is the place we change the button look primarily based on the index.
- The again arrow will disappear in case the picture is the primary on the checklist of photographs.
- The entrance arrow might be changed by the carried out icon if the picture is the final one on the checklist of photographs. If it is the subsequent button, the nextImage() perform might be triggered on click on. Whereas, the carried out button will set off the submitButton().
Homework
Check what you have discovered to date, and the way far are you able to go. I will not present supply code for the homework, please escape the tutorial hell by making errors and fixing them by your self.
-
Once you save and restart the app, you will seemingly encounter an error associated to the picture. Repair it by your self, we have now carried out this within the earlier a part of this sequence.
-
Create Skip Button.
- Skip Button must be a textual content button.
- Place it on the backside Heart however contained in the container of different buttons.
- The textual content must be pink in coloration.
- Implement the identical logic as submit button.
Should you’ve carried out this half then share the screenshot within the remark part.
Abstract
On this chapter, we created an onboard display with GoRouter, Shared Preferences, and Supplier packages. Listed below are the issues we did in short:
- We created router utils file for environment friendly work.
- We additionally used MaterialApp.Router to implement declarative routing utilizing the GoRouter package deal.
- Then we used the SharedPreferences package deal to retailer onboard data on native storage.
- With AppStateProvider class we wrote our onboard logic and redirected our routes inside AppRouter class.
- We additionally created a easy onboard display with a ScaleTransition animation.
Progress till now appears like this:
Chapter 4: Outline A Flutter Theme
Intro
On this quick chapter, we are going to outline a worldwide theme for our purposes. We’ll primarily work on two points colours and fonts. Take a look at the type information beneath.
Please discover the supply code for the progress so removed from right here. Now, since this software is for Hindus, I attempted to use a couple of holy colours like Saffron as the first coloration, pink as an accent/secondary coloration, and Inexperienced because the background coloration of the app. The textual content colours are the results of experimenting with coloration distinction. For the font, I’m utilizing Proxima Nova. You’ll be able to obtain your fonts from right here.
Styling Your Flutter App
Alright, now that we have seen what our app’s roughly going to appear like. Let’s create a theme folder and a file *app_theme.dart * contained in the globals folder.
# on the foundation of the undertaking
mkdir lib/globals/theme

# Create file
contact lib/globals/theme/app_theme.dart
Defining Themes With ColorScheme
Now contained in the app_theme file let’s outline the colours that our app goes to make use of.
app_theme.dart
import 'package deal:flutter/materials.dart';

// Instantiate new  theme knowledge
last ThemeData asthaTutorialTheme = _asthaTutorialTheme();

//Outline Base theme for app
ThemeData _asthaTutorialTheme() {
// We'll simply overwrite no matter's already there utilizing ThemeData.gentle()
  last ThemeData base = ThemeData.gentle();

  // Make modifications to gentle() theme
  return base.copyWith(
    colorScheme: base.colorScheme.copyWith(

      major: const Shade.fromARGB(255, 255, 153, 51),
      onPrimary: Colours.white,
      secondary: const Shade.fromARGB(255, 223, 27, 12),
      onSecondary: Colours.white,
      background: const Shade.fromARGB(255, 228, 243, 228),
      onBackground: Colours.black,
    ),
  );
}
Flutter ColorScheme can be utilized to outline the colours of many parts. Copying the Gentle theme leaves us much less work to do. Nevertheless, should you’ve tried the darkish theme you are gonna must experiment slightly bit, trigger some colours would possibly get overwritten. The first coloration is for navigation/app bars whereas the secondary is the accent coloration. We should outline types for buttons individually with the respective ButtonTheme class.
Defining Textual content Theme
As talked about earlier than we’ll be utilizing ProximaNova font. Create fonts folder inside belongings folder and obtain the font should you’ll be utilizing the identical one. Now, as we have carried out beforehand we have to inform flutter to search for the font by including a path on the pubspec file.
The fonts part must be commented on within the pubspec file, add the next directions.
 fonts:
    - household: Proxima Nova Rg Common
      fonts:
        - asset: belongings/fonts/ProximaNovaRegular.ttf
Let’s now head again to our theme and start writing directions for what our texts are gonna appear like. We’ll create a separate perform _asthaTutorialTextTheme to maintain our principal perform lean.
 // Exterior of _asthaTutorialTheme perform  create one other perform

TextTheme _asthaTutorialTextTheme(TextTheme base) => base.copyWith(
// This'll be our appbars title
      headline1: base.headline1!.copyWith(
          fontFamily: "Proxima Nova Rg Common",
          fontSize: 30,
          fontWeight: FontWeight.w500,
          coloration: Colours.white),
// for widgets heading/title
      headline2: base.headline2!.copyWith(
        fontFamily: "Proxima Nova Rg Common",
        fontSize: 26,
        fontWeight: FontWeight.w400,
        coloration: Colours.black,
      ),
// for sub-widgets heading/title
      headline3: base.headline3!.copyWith(
        fontFamily: "Proxima Nova Rg Common",
        fontSize: 24,
        fontWeight: FontWeight.w400,
        coloration: Colours.black,
      ),
// for widgets contents/paragraph
      bodyText1: base.bodyText1!.copyWith(
          fontFamily: "Proxima Nova Rg Common",
          fontSize: 20,
          fontWeight: FontWeight.w300,
          coloration: Colours.black),
// for sub-widgets contents/paragraph
      bodyText2: base.bodyText2!.copyWith(
          fontFamily: "Proxima Nova Rg Common",
          fontSize: 18,
          fontWeight: FontWeight.w300,
          coloration: Colours.black),
    );
In flutter, TextTheme is a cloth design class for textual content . I’ve tried to offer font measurement and font weight to take care of a hierarchy and be much less bland.
After defining the perform, we’ll must cross it to our principal perform:* _asthaTutorialTheme*.
// Inside the bottom.copyWith methodology
....
  return base.copyWith(
    colorScheme: base.colorScheme.copyWith(
   // Go away it as it's
      ....    ),
    // Add textual content theme
    textTheme: _asthaTutorialTextTheme(base.textTheme),
  );
Elevated Button Theme in Flutter
ElevatedButtonThemeData is a button type that overrides the default appearances of ElevatedButtons. Like beforehand, we’ll create a separate perform to outline the button type.
ElevatedButtonThemeData _elevatedButtonTheme(ElevatedButtonThemeData base) =>
    ElevatedButtonThemeData(
      type: ButtonStyle(
        backgroundColor: MaterialStateProperty.all<Shade>(
          const Shade.fromARGB(255, 223, 27, 12),
        ),
        foregroundColor: MaterialStateProperty.all<Shade>(Colours.white),
      ),
    );
Materials StateProperty incorporates the state of a widget’s materials. Button like elevated, textual content or define consists of many materials state properties corresponding to background coloration, that is why we’re defining coloration property as such above.
With that out of the best way, let’s cross this perform to the elevatedButtonTheme property inside a replica of the bottom theme.
    // beneath textual content theme add this
    // Outline types for elevated button
    elevatedButtonTheme: _elevatedButtonTheme(base.elevatedButtonTheme),
Styling Enter Widgets in Flutter
We will be utilizing enter kinds for authentication afterward within the sequence. We’ll want so as to add a couple of types for that as properly.
InputDecorationTheme _inputDecorationTheme(InputDecorationTheme base) =>
    const InputDecorationTheme(
// Label coloration for the enter widget
      labelStyle: TextStyle(coloration: Colours.black),
// Outline border of enter type whereas centered on
      focusedBorder: OutlineInputBorder(
        borderSide: BorderSide(
          width: 1.0,
          coloration: Colours.black,
          type: BorderStyle.strong,
        ),
      ),
    );
We have made enter such that when centered on it’s going to have a strong border with a width of 1px. Equally, colours for each textual content and border might be black.
Are you able to add the _inputDecorationTheme perform to our principal perform? I am going to depart it to you then.
Now, placing all of it collectively:
app_theme.dart
import 'package deal:flutter/materials.dart';
// Kinda like a getter to import theme from different recordsdata
last ThemeData asthaTutorialTheme = _asthaTutorialTheme();

//Outline Base theme for app
ThemeData _asthaTutorialTheme() {
  last ThemeData base = ThemeData.gentle();

  return base.copyWith(
    colorScheme: base.colorScheme.copyWith(
      major: const Shade.fromARGB(255, 255, 153, 51),
      onPrimary: Colours.white,
      secondary: const Shade.fromARGB(255, 223, 27, 12),
      onSecondary: Colours.white,
      error: Colours.pink,
      background: const Shade.fromARGB(255, 228, 243, 228),
      onBackground: Colours.black,
    ),
    textTheme: _asthaTutorialTextTheme(base.textTheme),
    // beneath textual content theme add this
    // Outline types for elevated button
    elevatedButtonTheme: _elevatedButtonTheme(base.elevatedButtonTheme),

    // Set Themes for Enter Your homework

    // Outline theme for textual content enter

  );
}

// Exterior of _asthaTutorialTheme perform  create one other perform

TextTheme _asthaTutorialTextTheme(TextTheme base) => base.copyWith(
// This'll be our appbars title
      headline1: base.headline1!.copyWith(
          fontFamily: "Proxima Nova Rg Common",
          fontSize: 30,
          fontWeight: FontWeight.w500,
          coloration: Colours.white),
// for widgets heading/title
      headline2: base.headline2!.copyWith(
        fontFamily: "Proxima Nova Rg Common",
        fontSize: 26,
        fontWeight: FontWeight.w400,
        coloration: Colours.black,
      ),
// for sub-widgets heading/title
      headline3: base.headline3!.copyWith(
        fontFamily: "Proxima Nova Rg Common",
        fontSize: 24,
        fontWeight: FontWeight.w400,
        coloration: Colours.black,
      ),
// for widgets contents/paragraph
      bodyText1: base.bodyText1!.copyWith(
          fontFamily: "Proxima Nova Rg Common",
          fontSize: 20,
          fontWeight: FontWeight.w300,
          coloration: Colours.black),
// for sub-widgets contents/paragraph
      bodyText2: base.bodyText2!.copyWith(
          fontFamily: "Proxima Nova Rg Common",
          fontSize: 18,
          fontWeight: FontWeight.w300,
          coloration: Colours.black),
    );

InputDecorationTheme _inputDecorationTheme(InputDecorationTheme base) =>
    const InputDecorationTheme(
// Label coloration for the enter widget
      labelStyle: TextStyle(coloration: Colours.black),
// Outline border of enter type whereas centered on
      focusedBorder: OutlineInputBorder(
        borderSide: BorderSide(
          width: 1.0,
          coloration: Colours.black,
          type: BorderStyle.strong,
        ),
      ),
    );

ElevatedButtonThemeData _elevatedButtonTheme(ElevatedButtonThemeData base) =>
    ElevatedButtonThemeData(
      type: ButtonStyle(
        backgroundColor: MaterialStateProperty.all<Shade>(
          const Shade.fromARGB(255, 223, 27, 12),
        ),
        foregroundColor: MaterialStateProperty.all<Shade>(Colours.white),
      ),
    );
Including Theme to GoRouter
We’re utilizing MaterialApp.router class for declarative routing. It supplies a property theme to outline a worldwide theme for its youngsters. So, in our app.dart file the place we name upon this class, let’s add the theme we simply outlined.
app.dart
// import theme at prime
import 'package deal:temple/globals/theme/app_theme.dart';

//In MaterialApp.router
          return MaterialApp.router(
              routeInformationParser: router.routeInformationParser,
              theme: asthaTutorialTheme, // add our theme right here.
              routerDelegate: router.routerDelegate);
A form reminder, your package deal identify will be completely different whereas importing
Check Theme
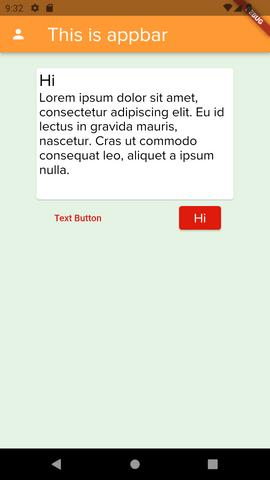
I’ve modified the House display slightly bit, to check our theme. Please be happy to experiment by yourself.
import 'package deal:flutter/materials.dart';

class House extends StatefulWidget {
  const House({Key? key}) : tremendous(key: key);

  @override
  State<House> createState() => _HomeState();
}

class _HomeState extends State<House> {
  @override
  Widget construct(BuildContext context) {
    return Scaffold(
      appBar: AppBar(
        main: Icon(Icons.particular person),
        title: Textual content(
          "That is appbar",
          type: Theme.of(context).textTheme.headline1,
        ),
      ),
      physique: SafeArea(
        youngster: Container(
            padding: const EdgeInsets.all(20),
            coloration: Theme.of(context).colorScheme.background,
            youngster:
                Column(mainAxisAlignment: MainAxisAlignment.begin, youngsters: [
              Card(
                child: Container(
                  width: 300,
                  height: 200,
                  padding: const EdgeInsets.all(4),
                  child: Column(
                      crossAxisAlignment: CrossAxisAlignment.start,
                      children: [
                        Text(
                          "Hi",
                          style: Theme.of(context).textTheme.headline2,
                          textAlign: TextAlign.left,
                        ),
                        Text(
                          "Lorem ipsum dolor sit amet, consectetur adipiscing elit. Eu id lectus in gravida mauris, nascetur. Cras ut commodo consequat leo, aliquet a ipsum nulla.",
                          style: Theme.of(context).textTheme.bodyText1,
                        )
                      ]),
                ),
              ),
              Row(
                mainAxisAlignment: MainAxisAlignment.spaceAround,
                youngsters: [
                  TextButton(
                    child: const Text("Text Button"),
                    onPressed: () {},
                  ),
                  ElevatedButton(
                    child: Text(
                      "Hi",
                      style: Theme.of(context).textTheme.bodyText1!.copyWith(
                            color: Colors.white,
                          ),
                    ),
                    onPressed: () {},
                  ),
                ],
              )
            ])
           ),
      ),
    );
  }
}
The code yielded the next display.
Homework
Do me a favor I’ve forgotten so as to add the textual content theme within the code, are you able to add it by your self?
Abstract
On this chapter we:
- We outlined a set of colours for our app.
- We additionally added font after which outlined types for texts.
- We gave a border to the enter type that our app will use.
- Then we additionally examined the theme with a mock web page.
If you wish to study extra, go to Google Shrine App Tutorial, MDC-103.
Chapter 5: Learn how to Create Customized Widgets: App Bar, Drawer, and Backside Navigation Bar in Flutter
Intro
On this part, we’ll work on three widgets that’ll be a part of each display within the app. Three international widgets we’re constructing are App Bar, Backside Navigation Bar, and Drawer. All of those three widgets a available in Flutter SDK. So often, you do not have to make customized ones.
Because the app grows, the dynamic content material for the app bar additionally will increase, therefore it is higher to put in writing it as soon as and use it in all places with slight modification. So far as navigation goes, we aren’t going to make use of a drawer as a substitute, we’ll be utilizing the backside navigation bar. However we’ll be utilizing a drawer to handle navigation duties associated to the Person Account, as an illustration, logout, consumer profile settings, order historical past, and so on.
You will discover the supply code up till now from this repo.
Creating Customized App Bar
We’ll first create an app bar. First, let’s create a folder and file for our app bar contained in the globals folder.
# Cursor on root folder
# Create widgets and app_bar folder
mkdir lib/globals/widgets lib/globals/widgets/app_bar

# Create app_bar.dart
contact lib/globals/widgets/app_bar/app_bar.dart
Earlier than we work on the app bar let’s take into account some options our app bar can have and the way can we make it extra versatile.
-
Is the present display a principal display or sub-screen? If it is a sub-screen we’ll should show the again arrow whereas hiding it on the primary display.
-
For instance we have now search performance, which is triggered by clicking the search icon. In doing so we’ll should go to a sub-page like talked about beforehand. Furthermore, we’ll have to make use of navigation options as properly.
-
We’ll additionally want an individual icon someplace within the app bar, which we’ll set off the customized drawer we’ll create later.
-
Possibly we’ll need to add icons like purchasing cart, bell icon, and extra relying on the web page, we’re on.
app_bar.dart
import 'package deal:flutter/materials.dart';
import 'package deal:go_router/go_router.dart';
import 'package deal:temple/globals/settings/router/utils/router_utils.dart';

class CustomAppBar extends StatefulWidget with PreferredSizeWidget {
  // Preffered measurement required for PreferredSizeWidget extension
  last Dimension prefSize;
  // App bar title relying on the display
  last String title;
  // A bool to examine whether or not its a subpage or not.
  last bool isSubPage;
  // An instance of search icon press.
  last bool hasSearchFunction;

  CustomAppBar(
      {required this.title,
      this.isSubPage = false,
      this.hasSearchFunction = false,
      this.prefSize = const Dimension.fromHeight(56.0),
      Key? key})
      : tremendous(key: key);

  @override
  Dimension get preferredSize => const Dimension.fromHeight(56.0);

 @override
  State<CustomAppBar> createState() => _CustomAppBarState();
}

class _CustomAppBarState extends State<CustomAppBar> {
  @override
  Widget construct(BuildContext context) {
    return AppBar(
      title: Textual content(widget.title),
      automaticallyImplyLeading: false,
      main: widget.isSubPage
          ? IconButton(
              icon: const Icon(Icons.arrow_back),
              onPressed: () => GoRouter.of(context).pop(),
            )
          : null,
      actions: [
        widget.hasSearchFunction
            ? IconButton(
                onPressed: () =>
                    GoRouter.of(context).goNamed(APP_PAGE.search.routeName),
                icon: const Icon(Icons.search))
            : const Icon(null),
        IconButton(
            onPressed: () {
              print("Don't poke me!!");
            },
            icon: const Icon(Icons.person))
      ],
    );
  }
}
In Flutter, PreferredSizeWidget is a category interface that can be utilized to offer default measurement to a widget that in any other case is unconstrained. The getter perform preferredSize is one thing that the PrefferedSized class requires you to offer and default worth we’re utilizing 56px. As for the sphere prefSize, we’ll present the identical worth for top to the app bar and infinite width as with getter.
Different fields we have declared are all dynamic and want to offer worth when known as on their related pages. The sector isSubPage helps to find out if the icons like Again Arrow and Search will seem on a display or not. Likewise, the particular person icon will ultimately slide the Drawer out and in.
The automaticallyImplyLeading property helps to find out what must be on the entrance: the title or the again arrow.
Now, let’s go to the homepage and change the app bar there with the customized app bar.
house.dart
// Modified to customized appbar
      appBar: CustomAppBar(
        title: APP_PAGE.house.routePageTitle,
      ),
// =====//
Apart from the title, all different fields have default values. The title of the web page will be derived from RouterUtils we made earlier on within the onboard part. That is what the app bar appears like for now.

We’ll must make some modifications once we create the consumer drawer however for now, let’s make the underside navigation bar.
Create Backside Navigation Bar
These days, there is a development to make the underside nav bar the primary navigation bar with tabs on every web page because the sub-nav bars, like within the google play retailer app. After some consideration, we have determined that our principal navigation can have hyperlinks to a few screens: House, Favorites, and Store. Beforehand we created the router_utils file to maintain the route requirements like route path, named route path, and web page title. Earlier than we proceed by means of the underside navigation bar, let’s make some modifications within the router_utils file first.
enum APP_PAGE {
  onboard,
  auth,
  house,
  search,
  store,
  favourite,
}

extension AppPageExtension on APP_PAGE {
  // create path for routes
  String get routePath {
    change (this) {
      case APP_PAGE.house:
        return "https://dev.to/";

      case APP_PAGE.onboard:
        return "/onboard";

      case APP_PAGE.auth:
        return "/auth";

      case APP_PAGE.search:
        return "/serach";

      case APP_PAGE.favourite:
        return "/favourite";

      case APP_PAGE.store:
        return "/store";
      default:
        return "https://dev.to/";
    }
  }

// for named routes
  String get routeName {
    change (this) {
      case APP_PAGE.house:
        return "HOME";

      case APP_PAGE.onboard:
        return "ONBOARD";

      case APP_PAGE.auth:
        return "AUTH";

      case APP_PAGE.search:
        return "Search";
      case APP_PAGE.favourite:
        return "Favourite";

      case APP_PAGE.store:
        return "Store";

      default:
        return "HOME";
    }
  }

// for web page titles

  String get routePageTitle {
    change (this) {
      case APP_PAGE.house:
        return "Astha";

      case APP_PAGE.auth:
        return "Register/SignIn";

      case APP_PAGE.store:
        return "Retailers";

      case APP_PAGE.search:
        return "Search";

      case APP_PAGE.favourite:
        return "Your Favorites";

      default:
        return "Astha";
    }
  }
}
Lastly, Let’s create related recordsdata and folders in globals.
# Cursor on root folder
# Create bottom_nav_bar folder
mkdir lib/globals/widgets/bottom_nav_bar

# Create bottom_nav_bar.dart
contact lib/globals/widgets/bottom_nav_bar/bottom_nav_bar.dart
bottom_nav_bar.dart
Flutter supplies a Backside Navigation Bar widget which is what we’ll use to create our backside navigation bar.
import 'package deal:flutter/materials.dart';
import 'package deal:go_router/go_router.dart';
import 'package deal:temple/globals/settings/router/utils/router_utils.dart';
import 'package deal:flutter/materials.dart';
import 'package deal:go_router/go_router.dart';
import 'package deal:temple/globals/settings/router/utils/router_utils.dart';

class CustomBottomNavBar extends StatefulWidget {
  // create index to pick from the checklist of route paths
  last int navItemIndex; //#1

  const CustomBottomNavBar({required this.navItemIndex, Key? key})
      : tremendous(key: key);

  @override
  _CustomBottomNavBarState createState() => _CustomBottomNavBarState();
}

class _CustomBottomNavBarState extends State<CustomBottomNavBar> {
  // Make an inventory of routes that you will need to go to
  // #2
  static last Record<String> _widgetOptions = [
    APP_PAGE.home.routeName,
    APP_PAGE.favorite.routeName,
    APP_PAGE.shop.routeName,
  ];

// Perform that handles navigation primarily based of index acquired
// #3
  void _onItemTapped(int index) {
    GoRouter.of(context).goNamed(_widgetOptions[index]);
  }

  @override
  Widget construct(BuildContext context) {
    return BottomNavigationBar(
      // Record of icons that signify display.
      // # 4
      gadgets: const [
        BottomNavigationBarItem(
          icon: Icon(Icons.home),
          label: 'Home',
        ),
        BottomNavigationBarItem(
          icon: Icon(Icons.favorite),
          label: 'Favorites',
        ),
        BottomNavigationBarItem(
          icon: Icon(Icons.shop),
          label: 'Shop',
        ),
      ],

      // Backgroud coloration
      // ==========================================//
      // #5
      backgroundColor: Theme.of(context).colorScheme.major,

      currentIndex: widget.navItemIndex, // present chosen index
      selectedItemColor:
          Theme.of(context).colorScheme.onPrimary, // chosen merchandise coloration

      selectedIconTheme: IconThemeData(
        measurement: 30, // Make chosen icon larger than the remainder
        coloration: Theme.of(context)
            .colorScheme
            .onPrimary, // chosen icon might be white
      ),
      unselectedIconTheme: const IconThemeData(
        measurement: 24, // Dimension of non-selected icons
        coloration: Colours.black,
      ),
      selectedLabelStyle: const TextStyle(
        fontSize: 20, // When chosen make textual content larger
        fontWeight: FontWeight.w400, // and bolder however not so thick
      ),
      unselectedLabelStyle: const TextStyle(
        fontSize: 16,
        coloration: Colours.black,
      ),
      onTap: _onItemTapped,
    );
    // ==========================================//
  }
}
Many issues are taking place right here.
-
We created a navItemIndex subject, its worth might be completely different for every display CustomBottomNavBar known as. The worth ranges from 0 to 2 since we’re solely utilizing three screens. Bear in mind in programming, index and place are completely different.
-
Record of Named Routes for Go_Router to navigate to. The worth of navItemIndex we get from the three screens i.e House, Favourite, and Store, and the order of the paths on this checklist ought to match, or else it’s going to navigate to the fallacious display.
-
The _onItemTapped perform is accountable to offer the proper route primarily based on the index. Have you ever seen that we’re not passing any index to the perform when it is known as down beneath to the onTap property? That is as a result of we do not have to, the onTap property is constructed that method.
-
Icons that’ll get displayed on the screens. Right here, the House Icon is the primary icon. So, we must always name the underside nav bar at HomeScreen with navItemIndex of 0 and so forth.
-
Right here, we type our Navigation Bar, and alter the dimensions and coloration of chosen gadgets.
With this the navigation bar is prepared. It is time to try it out on the homepage.
house.dart
Scaffold class has a property bottomNavigationBar the place we’ll cross the customized navigation bar.
appBar:....
bottomNavigationBar: const CustomBottomNavBar(
        navItemIndex: 0,
      ),
physique:...

Create Customized Drawer
It is now time to create a Person drawer, that’ll solely deal with the navigation of user-related settings, as an illustration, logout, order historical past, profile, and so on. It’s going to slide in as soon as we click on the particular person icon within the app bar. Let’s proceed to create recordsdata and folders first.
# Cursor on root folder
# Create user_drawer folder
mkdir lib/globals/widgets/user_drawer

# Create user_drawer.dart file
contact lib/globals/widgets/user_drawer/user_drawer.dart
Let’s go over the design, simply to be clear what can we imply by Person Drawer. The scaffold has a drawer property, which is configured to slip a panel, often a Drawer class when triggered. This panel is popularly used as a menu that slides in when a hamburger icon is clicked. Nevertheless, we have already got the underside nav menu. Furthermore, the drawer menu additionally covers the entire machine’s top and a lot of the width which we do not need. So, will not use the Drawer class, as a substitute, we’ll cross a alert dialog to the drawer/endDrawer property of Scaffold. The alert dialog might be centered and might have desired dimensions as properly.
user_drawer.dart
import 'package deal:flutter/materials.dart';

class UserDrawer extends StatefulWidget {
  const UserDrawer({Key? key}) : tremendous(key: key);

  @override
  _UserDrawerState createState() => _UserDrawerState();
}

class _UserDrawerState extends State<UserDrawer> {
  @override
  Widget construct(BuildContext context) {
    return AlertDialog(
      backgroundColor: Theme.of(context).colorScheme.major,
      actionsPadding: EdgeInsets.zero,
      scrollable: true,
      form: RoundedRectangleBorder(
        borderRadius: BorderRadius.round(15),
      ),
      title: Textual content(
        "Astha",
        type: Theme.of(context).textTheme.headline2,
      ),
// A line between the title part and the checklist of hyperlinks
      content material: const Divider(
        thickness: 1.0,
        coloration: Colours.black,
      ),
      actions: [
        // Past two links as list tiles
        ListTile(
            leading: Icon(
              Icons.person_outline_rounded,
              color: Theme.of(context).colorScheme.secondary,
            ),
            title: const Text('User Profile'),
            onTap: () {
              print("User Profile Button Pressed");
            }),
        ListTile(
            leading: Icon(
              Icons.logout,
              color: Theme.of(context).colorScheme.secondary,
            ),
            title: const Text('Logout'),
            onTap: () {
              print("Log Out Button Pressed");
            }),
      ],
    );
  }
}
We’re utilizing checklist tiles that’ll act as particular person hyperlinks.
Our drawer is prepared, however for it to work correctly it isn’t sufficient to be added on the house web page as worth to the endDrawer property of the scaffold. We’ve to grasp and implement the next:
-
Scaffold is answerable for opening & closing a drawer. Every web page has its scaffold. So, we have to differentiate them with a singular key representing Scaffold State for every scaffold.
-
The identical scaffold key must be handed down the Customized App Bar, the place we set off the alert dialog by urgent the particular person icon.
International Scaffold Key
Let’s go to the house web page to create a scaffold key for the house web page.
Create International Key
class _HomeState extends State<House> {
  // create a worldwide key for scafoldstate
  // #1
  last GlobalKey<ScaffoldState> _scaffoldKey = GlobalKey();
........
Present Scaffold key to the important thing properties
return Scaffold(
      // Present key to scaffold
      // #2
      key: _scaffoldKey,
.....
Move the important thing to Customized App Bar
 appBar: CustomAppBar(
        title: APP_PAGE.house.routePageTitle,
        // cross the scaffold key to customized app bar
        // #3
        scaffoldKey: _scaffoldKey,
      ),
You will get an error as a result of there is no scaffoldKey subject in Customized App Bar, ignore it, for now, we’ll repair it in a second.
Move the Drawer to the drawer property
 // #4
      // Move our drawer to drawer property
      // if you wish to slide left to proper use
      // drawer: UserDrawer(),
      // if you wish to slide proper to left use
      endDrawer: const UserDrawer(),
Observe: Bear in mind to repeat this course of for every principal display handed onto the underside navigation bar.
The entire house web page now appears like this:
import 'package deal:flutter/materials.dart';
import 'package deal:temple/globals/widgets/app_bar/app_bar.dart';
import 'package deal:temple/globals/settings/router/utils/router_utils.dart';
import 'package deal:temple/globals/widgets/bottom_nav_bar/bottom_nav_bar.dart';
import 'package deal:temple/globals/widgets/user_drawer/user_drawer.dart';

class House extends StatefulWidget {
  const House({Key? key}) : tremendous(key: key);

  @override
  State<House> createState() => _HomeState();
}

class _HomeState extends State<House> {
  // create a worldwide key for scafoldstate
  // #1
  last GlobalKey<ScaffoldState> _scaffoldKey = GlobalKey();

  @override
  Widget construct(BuildContext context) {
    return Scaffold(
      // Present key to scaffold
      // #2
      key: _scaffoldKey,
      // Modified to customized appbar
      appBar: CustomAppBar(
        title: APP_PAGE.house.routePageTitle,
        // cross the scaffold key to customized app bar
        // #3
        scaffoldKey: _scaffoldKey,
      ),
      // #4
      // Move our drawer to drawer property
      // if you wish to slide lef to proper use
      // drawer: UserDrawer(),
      // if you wish to slide proper to left use
      endDrawer: const UserDrawer(),

      bottomNavigationBar: const CustomBottomNavBar(
        navItemIndex: 0,
      ),
      major: true,

      physique: SafeArea(
        youngster: Container(
            padding: const EdgeInsets.all(20),
            coloration: Theme.of(context).colorScheme.background,
            youngster:
                Column(mainAxisAlignment: MainAxisAlignment.begin, youngsters: [
              Card(
                child: Container(
                  width: 300,
                  height: 200,
                  padding: const EdgeInsets.all(4),
                  child: Column(
                      crossAxisAlignment: CrossAxisAlignment.start,
                      children: [
                        Text(
                          "Hi",
                          style: Theme.of(context).textTheme.headline2,
                          textAlign: TextAlign.left,
                        ),
                        Text(
                          "Lorem ipsum dolor sit amet, consectetur adipiscing elit. Eu id lectus in gravida mauris, nascetur. Cras ut commodo consequat leo, aliquet a ipsum nulla.",
                          style: Theme.of(context).textTheme.bodyText1,
                        )
                      ]),
                ),
              ),
              Row(
                mainAxisAlignment: MainAxisAlignment.spaceAround,
                youngsters: [
                  TextButton(
                    child: const Text("Text Button"),
                    onPressed: () {},
                  ),
                  ElevatedButton(
                    child: Text(
                      "Hi",
                      style: Theme.of(context).textTheme.bodyText1!.copyWith(
                            color: Colors.white,
                          ),
                    ),
                    onPressed: () {},
                  ),
                ],
              )
            ])),
      ),
    );
  }
}
Open Drawer Utilizing ScaffoldKey
Now, we have to make modifications to the customized app bar.
Create and cross the International Scaffold Key
// Declare new  international key subject of sort ScaffoldState
  // #1
  last GlobalKey<ScaffoldState> scaffoldKey;

  const CustomAppBar(
      {required this.title,
      required this.scaffoldKey, //#2 cross the brand new scaffold key to constructor
      this.isSubPage = false,
      this.hasSearchFunction = false,
      this.prefSize = const Dimension.fromHeight(56.0),
      Key? key})
      : tremendous(key: key);
This could repair the error we’re going through.
Pop Alert Dialog On Faucet
 IconButton(
          icon: const Icon(Icons.particular person),
          // #3
          // Slide proper to left
          onPressed: () => widget.scaffoldKey.currentState!.openEndDrawer(),
          // slide lef to proper
          // onPressed: () => widget.scaffoldKey.currentState!.openDrawer(),
        ),
Now, the alert dialog will work as a customized consumer drawer. Take a look at this quick clip about its workings.
Homework
Listed below are a couple of duties so that you can follow:
- Create A easy favourite and store display.
- Hyperlink your backside navigation bar to those screens.
- Solely on the store web page show a purchasing cart within the app bar.
- Create a search web page:
- It must be a sub-page of the house web page. You need to use a search icon, that’ll navigate to the search web page, on faucet.
- It ought to solely show the again arrow icon as a number one icon.
- Urgent the again arrow ought to take you again to the house web page.
- Sub-pages do not have a backside navigation bar, so do not show it there.
Abstract
With this comes an finish to the 4th chapter, which was devoted to creating international widgets that’ll be used all through the appliance. Right here,
- We created a customized app bar, which can show icons primarily based on the situations we have supplied.
- We additionally made a menu that’ll stick on the backside of our software as a substitute of sliding out and in.
- We additionally created a secondary menu that’ll be answerable for navigating to the consumer’s settings like profile, order historical past, logging the consumer out, and so on.
Chapter Six: Authentication in Flutter | Person Interface Design

Introduction
This chapter is among the most necessary components of this weblog as you may inform from the chapter’s title as a result of now, in accordance with our user-flow display given beneath, we have now to authenticate the consumer.

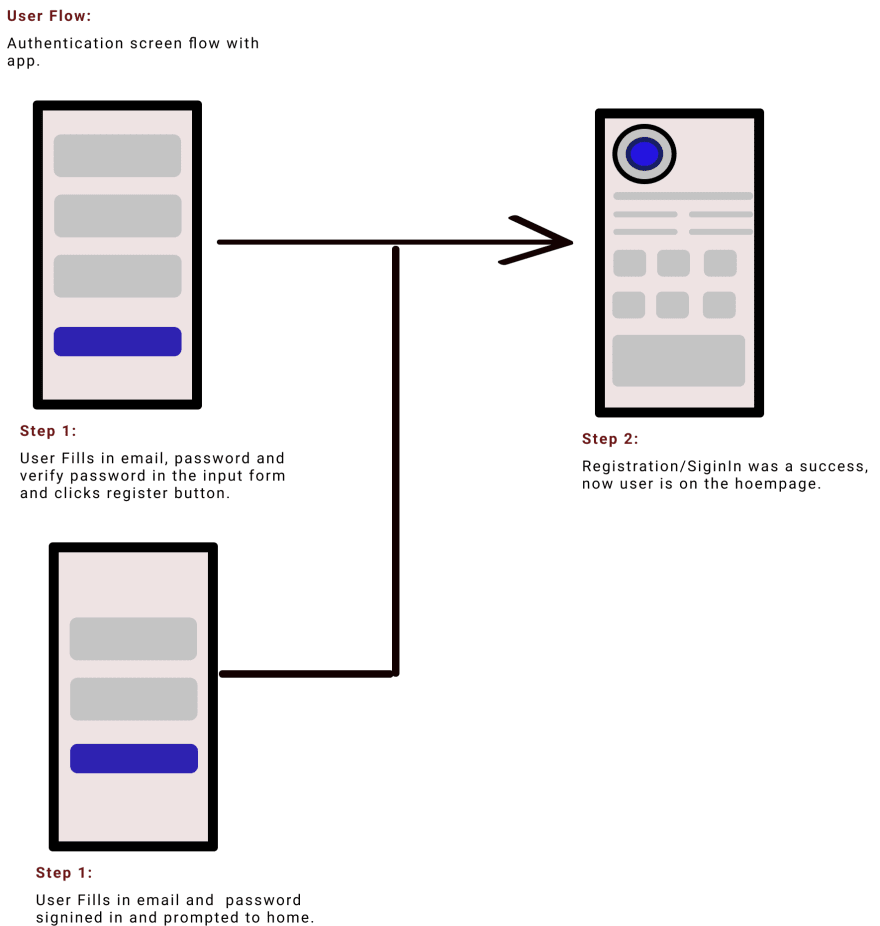
Authentication is a fundamental but crucial facet of any software no matter platform. Serverless/Headless apps are on development today. Amongst them, Google’s Firebase is among the common ones, particularly for cell purposes. On this chapter of the sequence, we’ll create an authentication UI. We’ll create a dynamic enter type widget to be extra environment friendly. We’ll additionally write some validations for the enter, and animate sign up <-> registration type transitions.
You will discover code up till from right here.
Create Authentication Kind In Flutter
We will make a easy type. For registration, we’ll have 4 inputs: electronic mail, username, password, and ensure password inputs, whereas the sign-in type solely makes use of two inputs: electronic mail and password.
Let’s create related recordsdata and folders in our undertaking.
# cursor on root folder
# create folders
mkdir lib/screens/auth lib/screens/auth/widgets lib/screens/auth/suppliers  lib/screens/auth/utils

# Create recordsdata
contact lib/screens/auth/auth_screen.dart   lib/screens/auth/suppliers/auth_provider.dart lib/screens/auth/widgets/text_from_widget.dart  lib/screens/auth/widgets/auth_form_widget.dart lib/screens/auth/utils/auth_validators.dart lib/screens/auth/utils/auth_utils.dart
Create Dynamic Textual content Kind Widget
Earlier than we create our dynamic textual content type subject widget, let’s go over the small print of how dynamic it’ll be.
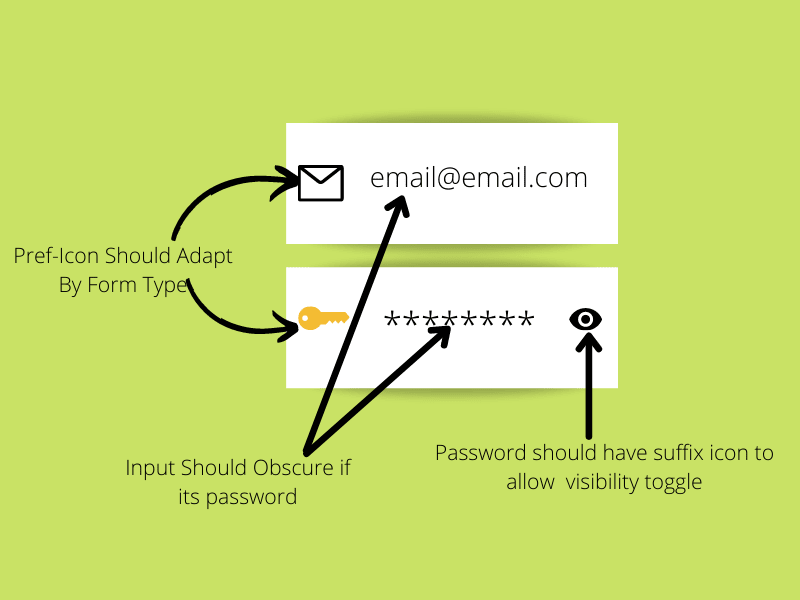
We’ll make our dynamic textual content type widget in text_from_widget.dart file.
import 'package deal:flutter/materials.dart';

class DynamicInputWidget extends StatelessWidget {
  const DynamicInputWidget(
      {required this.controller,
      required this.obscureText,
      required this.focusNode,
      required this.toggleObscureText,
      required this.validator,
      required this.prefIcon,
      required this.labelText,
      required this.textInputAction,
      required this.isNonPasswordField,
      Key? key})
      : tremendous(key: key);

  // bool to examine if the textual content subject is for password or not
  last bool isNonPasswordField;
  // Controller for the textual content subject
  last TextEditingController controller;
  // Functio to toggle Textual content obscuractio on password textual content subject
  last VoidCallback? toggleObscureText;
  // to obscure textual content or not bool
  last bool obscureText;
  // FocusNode for enter
  last FocusNode focusNode;
  // Validator perform
  last String? Perform(String?)? validator;
  // Prefix icon for enter type
  last Icon prefIcon;
  // label for enter type
  last String labelText;
  // The key phrase motion to show
  last TextInputAction textInputAction;

  @override
  Widget construct(BuildContext context) {
    return TextFormField(
      controller: controller,
      ornament: InputDecoration(
        // Enter with border outlined
        border: const OutlineInputBorder(
          // Make border edge round
          borderRadius: BorderRadius.all(Radius.round(10.0)),
        ),
        label: Textual content(labelText),
        prefixIcon: prefIcon,
        suffixIcon: IconButton(
          onPressed: toggleObscureText,
          // If is non-password filed like emal the suffix icon might be null
          icon: isNonPasswordField
              ? const Icon(null)
              : obscureText
                  ? const Icon(Icons.visibility)
                  : const Icon(Icons.visibility_off),
        ),
      ),
      focusNode: focusNode,
      textInputAction: textInputAction,
      obscureText: obscureText,
      validator: validator,
      // onSaved: passwordVlidator,
    );
  }
}
Let’s go over a couple of necessary fields of our dynamic enter widget class.
// bool to examine if the textual content subject is for password or not
  last bool isNonPasswordField; //# 1
   // Perform to toggle Textual content obscuraction on password textual content subject
  last VoidCallback? toggleObscureText; //# 2
  // to obscure textual content or not bool
  last bool obscureText;
   // Validator perform
  last String? Perform(String?)? validator; //# 3
- We’re checking if the enter sort is a password or not. We will want that to find out whether or not to show a suffix icon that toggles the visibility of the password.
- Boolean obscure textual content will change the password’s visibility from asterisks to strings and vice-versa.
- Validator is a perform of a property validator in TextFormField. It returns null when legitimate and a customized string when invalid.
Enter Validation in Flutter
Now, that our dynamic enter is prepared. Let’s write some validators earlier than we transfer on to create our type. We created a separate file auth_validators.dart for this sole function. We’ll write three features, which can individually validate E mail, Password, and Verify Passwords for consumer enter.
Create E mail Validator in Flutter
class AuthValidators {
  // Create error messages to ship.
 // #1
  static const String emailErrMsg =  "Invalid E mail Tackle, Please present a legitimate electronic mail.";
  static const String passwordErrMsg = "Password will need to have no less than 6 characters.";
  static const String confirmPasswordErrMsg = "Two passwords do not match.";

// A easy electronic mail validator that  checks presence and place of @
// #2
  String? emailValidator(String? val)  indexOfAt == electronic mail.size - 1) return emailErrMsg;

    // Else its legitimate
    return null;

}
Contained in the auth_validators.dart, we create a AuthValidators class.
- Then we created three error messages that’ll be despatched as output to the related error.
- E mail Validator Perform that takes enter worth from its enter type.
- E mail is invalid if its size <=3.
- (4&7) Checks if there is a @ image and returns the error message on absence.
- (5&9) Checks the place of @. If the place is to start with or on the finish, which means the e-mail is invalid.
- (6&8) If the variety of @ is kind of than one, then the enter is an invalid electronic mail.
That was a quite simple validator, the place we checked 4 issues: if the enter for electronic mail is empty, the size of the e-mail enter is lower than 4, and the place and quantity @ within the enter.
Reminder: Don’t change the order of return statements. It can trigger an error.
Create Password Validator in Flutter
We’ll proceed with the second validator for the password. We’ll solely validate the password if it isn’t empty and its size is bigger than 5. So, as soon as once more inside AuthValidator class, we’ll create a brand new perform passwordValidator.
// Password validator
  String? passwordVlidator(String? val)
Create Verify Password Validator in Flutter
Throughout registration, there might be two password enter fields, the second is to substantiate the given password. Our confirmPassword validator will take two inputs: the unique password and the second password.
// Verify password
  String? confirmPasswordValidator(String? val, firstPasswordInpTxt) {
    last String firstPassword = firstPasswordInpTxt;
    last String secondPassword = val as String;
    // If both of the password subject is empty
    // Or if thier size don't match then we need not evaluate their content material
// #1
    if (firstPassword.isEmpty ||
        secondPassword.isEmpty ||
        firstPassword.size != secondPassword.size) {
      return confirmPasswordErrMsg;
    }

    //  If two passwords don't match then ship error message
// #2
    if (firstPassword != secondPassword) return confirmPasswordErrMsg;

    return null;
  }
For password affirmation, we checked:
- If both of the 2 passwords is empty or if their lengths do not match one another. If that’s the case, then return the error message.
- The second situation compares the content material of two passwords, if they do not match then returns the error message.
Like this our three validators are prepared for motion.
Altogether AuthValidators Class appears like this.
class AuthValidators {
  // Create error messages to ship.
  static const String emailErrMsg =
      "Invalid E mail Tackle, Please present a legitimate electronic mail.";
  static const String passwordErrMsg =
      "Password will need to have no less than 6 characters.";
  static const String confirmPasswordErrMsg = "Two passwords do not match.";

// A easy electronic mail validator that  checks presence and place of @
  String? emailValidator(String? val)  indexOfAt == electronic mail.size - 1) return emailErrMsg;

    // Else its legitimate
    return null;


  // Password validator
  String? passwordVlidator(String? val)

  // Verify password
  String? confirmPasswordValidator(String? val, firstPasswordInpTxt) {
    last String firstPassword = firstPasswordInpTxt;
    last String secondPassword = val as String;
    // If both of the password subject is empty
    // Or if thier size don't match then we need not evaluate their content material
    if (firstPassword.isEmpty ||
        secondPassword.isEmpty ||
        firstPassword.size != secondPassword.size) {
      return confirmPasswordErrMsg;
    }

    //  If two passwords don't match then ship error message
    if (firstPassword != secondPassword) return confirmPasswordErrMsg;

    return null;
  }
}
Homework on Validators
Here is one thing so that you can follow.
- xyz..abc@mail.com is an invalid electronic mail tackle as a result of symbols(_, ., -) ought to at all times be adopted by letters or numbers. Are you able to write a validator for this error?.
- On the password validator, examine that it ought to comprise each numbers and letters to be legitimate.
- Add a username validator, examine that it shouldn’t be the identical as an electronic mail tackle. By the best way, the username is the optionally available enter.
Learn how to create Register & Check in Kind in Flutter?
Auth Kind Widget: Short-term
Now, that we have made our dynamic enter in addition to validator it is time to put them collectively to create an authentication type visuals. We’ll create our type widget within the auth_form_widget.dart file which might be displayed in auth_screen.dart file.
auth_form_widget.dart
import 'package deal:flutter/materials.dart';

class AuthFormWidget extends StatefulWidget {
  const AuthFormWidget({Key? key}) : tremendous(key: key);

  @override
  State<AuthFormWidget> createState() => _AuthFormWidgetState();
}

class _AuthFormWidgetState extends State<AuthFormWidget> {
  // Outline Kind key
  last _formKey = GlobalKey<FormState>();

  @override
  Widget construct(BuildContext context) {
    return Padding(
      padding: const EdgeInsets.all(8),
      youngster: Kind(
        key: _formKey,
        youngster: TextFormField(),
      ),
    );
  }
}
In flutter Kind class can act as a container to show TextFormFields(if they’re multiple). It additionally requires a FormState which will be obtained through the worldwide key of sort FormState as we did simply now. Earlier than this manner widget bulks up let’s join it to the auth_screen and show it on the app. We’ll change it afterward after connecting auth display to the router.
Authentication Display
auth_screen.dart
import 'package deal:flutter/materials.dart';
import 'package deal:temple/globals/settings/router/utils/router_utils.dart';
import 'package deal:temple/screens/auth/widgets/auth_form_widget.dart';

class AuthScreen extends StatelessWidget {
  const AuthScreen({Key? key}) : tremendous(key: key);

  @override
  Widget construct(BuildContext context) {
    return Scaffold(
      appBar: AppBar(title: Textual content(APP_PAGE.auth.routePageTitle)),
      physique:
      // Protected space prevents secure gards widgets to transcend machine edges
       SafeArea(
        //===========//
        // to dismiss key phrase on faucet exterior use listener
        youngster: Listener(
          onPointerDown: (PointerDownEvent occasion) =>
              FocusManager.occasion.primaryFocus?.unfocus(),
          //===========//
          youngster: SingleChildScrollView(
            youngster: SizedBox(
              width: double.infinity,
              youngster: Column(youngsters: [
                // Display a welcome user image
                Padding(
                  padding: const EdgeInsets.all(8.0),
                  child: Image.asset(
                    'assets/AuthScreen/WelcomeScreenImage_landscape_2.png',
                    fit: BoxFit.fill,
                  ),
                ),
                const AuthFormWidget()
              ]),
            ),
          ),
        ),
      ),
    );
  }
}
Right here is auth_screen.dart, that is it, we’ll not make any modifications sooner or later.
Because the app is just accessible to registered customers, the authentication display would be the first display our consumer might be prompted to after onboarding. So, we need not show user_drawer or the underside navbar.
Dismissal of the lively keyboard, when tapped exterior, is a vital attribute to have. Listener class responds to gesture occasions like a mouse click on, faucet, and so on. Along with FocusManager we are able to monitor the main focus node tree and unfocus the lively keyboard. You is perhaps questioning why am I utilizing it on auth_screen as a complete as a substitute of auth_form_widget. That is as a result of gesture detector occasions ought to cowl the entire seen space which on this case is SingleChildScrollView.
Subsequent, is the picture part, should you’re utilizing the supply code from the GitHub repo picture ought to already be within the AuthScreen folder inside belongings. Let’s add the trail within the pubspec file.
belongings:
    # Splash Screens
    - belongings/splash/om_splash.png
    - belongings/splash/om_lotus_splash.png
    - belongings/splash/om_lotus_splash_1152x1152.png
    # Onboard Screens
    - belongings/onboard/FindTemples.png
    - belongings/onboard/FindVenues.png
// New line
    # Auth Screens
    - belongings/AuthScreen/WelcomeScreenImage_landscape_2.png
It is time to add auth_screen to app_router.dart
Join Auth Display to Router
app_router.dart
 routes: [
        GoRoute(
          path: APP_PAGE.home.routePath,
          name: APP_PAGE.home.routeName,
          builder: (context, state) => const Home(),
        ),
        // Add the onboard Screen
        GoRoute(
            path: APP_PAGE.onboard.routePath,
            name: APP_PAGE.onboard.routeName,
            builder: (context, state) => const OnBoardScreen()),
        // New line from here
        // Add Auth Screen on Go Router
        GoRoute(
            path: APP_PAGE.auth.routePath,
            name: APP_PAGE.auth.routeName,
            builder: (context, state) => const AuthScreen()),
      ],
Short-term Navigation To AuthScreen
We’re but to put in writing a backend/enterprise logic on this weblog. However we do have to check UI. So, let’s create a short lived hyperlink in our user_drawer.dart file that’ll take us to auth_screen.
user_drawer.dart
...............
 actions: [

        ListTile(
            leading: Icon(
              Icons.person_outline_rounded,
              color: Theme.of(context).colorScheme.secondary,
            ),
            title: const Text('User Profile'),
            onTap: () {
              print("User Profile Button Pressed");
            }),
 // ============================//
    // A temporarry link to auth screen
        ListTile(
            leading: Icon(
              Icons.login,
              color: Theme.of(context).colorScheme.secondary,
            ),
            title: const Text('Register/Login'),
            onTap: () => GoRouter.of(context).goNamed(APP_PAGE.auth.routeName)),
 // ============================//
        ListTile(
            leading: Icon(
              Icons.logout,
              color: Theme.of(context).colorScheme.secondary,
            ),
            title: const Text('Logout'),
            onTap: () {
              print("Log Out Button Pressed");
            }),
      ],
.....
Put it aside all and run the app, navigate to auth_screen from the consumer drawer(press the particular person icon for the drawer), and you will see auth display. Now that we are able to see the authentication display, let’s create a full-fledged auth type.
A Full Auth Kind Widget
The codes for auth_form_widget.dart file is basically lengthy. So, let’s go over it a couple of items at a time first.
Instantiate AuthValidators inside _AuthFormWidgetState class.
  // Instantiate validator
  last AuthValidators authValidator = AuthValidators();
Create controllers and focus nodes.
// controllers
  late TextEditingController emailController;
  late TextEditingController usernameController;
  late TextEditingController passwordController;
  late TextEditingController confirmPasswordController;

// create focus nodes
  late FocusNode emailFocusNode;
  late FocusNode usernameFocusNode;
  late FocusNode passwordFocusNode;
  late FocusNode confirmPasswordFocusNode;
Create obscure textual content bool
// to obscure textual content default worth is fake
  bool obscureText = true;
Auth Mode
As a substitute of making two separate screens for registering and signing in, we’ll simply toggle between the few inputs displayed, on and off. For that, let’s create a boolean to regulate authMode.
 // It will require toggling between register and signin mode
  bool registerAuthMode = false;
Instantiate and Dispose
Instantiate all of the textual content enhancing controllers and focus nodes on initState perform. Equally, these all additionally have to be disposed of as soon as carried out so let’s do this as properly with the dispose methodology.
@override
  void initState() {
    tremendous.initState();
    emailController = TextEditingController();
    usernameController = TextEditingController();
    passwordController = TextEditingController();
    confirmPasswordController = TextEditingController();

    emailFocusNode = FocusNode();
    usernameFocusNode = FocusNode();
    passwordFocusNode = FocusNode();
    confirmPasswordFocusNode = FocusNode();
  }

@override
  void dispose() {
    tremendous.dispose();

    emailController.dispose();
    usernameController.dispose();
    passwordController.dispose();
    confirmPasswordController.dispose();

    emailFocusNode.dispose();
    usernameFocusNode.dispose();
    passwordFocusNode.dispose();
    confirmPasswordFocusNode.dispose();
  }
Password Visibility Handler
Create a perform that’ll toggle the password’s visibility on the related icon faucet.
 void toggleObscureText() {
    setState(() {
      obscureText = !obscureText;
    });
  }
Snackbar Widget
Let’s create a snack bar to pop information on numerous circumstances.
// Create a scaffold messanger
  SnackBar msgPopUp(msg) {
    return SnackBar(
        content material: Textual content(
      msg,
      textAlign: TextAlign.heart,
    ));
  }
Put together for Record of Widgets In Column
Let’s change the kid of Kind we’re returning to a column.
@override
  Widget construct(BuildContext context) {
    return Padding(
      padding: const EdgeInsets.all(8),
      youngster: Kind(
        key: _formKey,
        youngster: Column(youngsters: [],)
      ),
    );
  }
Enter Widgets
It is time to create our electronic mail, username, password, and ensure password enter kinds. Inside column’s youngsters for from widget, we’ll add inputs one after the other.
E mail Enter
    // E mail
            DynamicInputWidget(
              controller: emailController,
              obscureText: false,
              focusNode: emailFocusNode,
              toggleObscureText: null,
              validator: authValidator.emailValidator,
              prefIcon: const Icon(Icons.mail),
              labelText: "Enter E mail Tackle",
              textInputAction: TextInputAction.subsequent,
              isNonPasswordField: true,
            ),
            const SizedBox(
              top: 20,
            ),
Ensure to import DynamicInput Widget
Username Enter
    // Username
              DynamicInputWidget(
                controller: usernameController,
                obscureText: false,
                focusNode: usernameFocusNode,
                toggleObscureText: null,
                validator: null,
                prefIcon: const Icon(Icons.particular person),
                labelText: "Enter Username(Optionally available)",
                textInputAction: TextInputAction.subsequent,
                isNonPasswordField: true,
              ),
               const SizedBox(
                top: 20,
              ),
Password Enter
// password
  DynamicInputWidget(
              controller: passwordController,
              labelText: "Enter Password",
              obscureText: obscureText,
              focusNode: passwordFocusNode,
              toggleObscureText: toggleObscureText,
              validator: authValidator.passwordVlidator,
              prefIcon: const Icon(Icons.password),
              textInputAction: registerAuthMode
                  ? TextInputAction.subsequent
                  : TextInputAction.carried out,
              isNonPasswordField: false,
            ),

            const SizedBox(
              top: 20,
            ),
Verify Password Enter
// verify password
DynamicInputWidget(
                controller: confirmPasswordController,
                focusNode: confirmPasswordFocusNode,
                isNonPasswordField: false,
                labelText: "Verify Password",
                obscureText: obscureText,
                prefIcon: const Icon(Icons.password),
                textInputAction: TextInputAction.carried out,
                toggleObscureText: toggleObscureText,
                validator: (val) => authValidator.confirmPasswordValidator(
                    val, passwordController.textual content),
              ),

              const SizedBox(
                top: 20,
              ),
Regsiter/SignIn Button
In a while, we’ll additionally must create and toggle features to register and sign up as soon as we arrange the firebase back-end. For now, we’ll simply toggle the register/sign-in texts of the elevated button.
// Toggle register/singin button textual content. In a while we'll additionally must toggle register or signin perform
Row(
              mainAxisAlignment: MainAxisAlignment.finish,
              youngsters: [
                TextButton(
                  onPressed: () {},
                  child: const Text('Cancel'),
                ),
                const SizedBox(
                  width: 20,
                ),
                ElevatedButton(
                  onPressed: () {},
                  child: Text(registerAuthMode ? 'Register' : 'Sign In'),
                  style: ButtonStyle(
                    elevation: MaterialStateProperty.all(8.0),
                  ),
                ),
              ],
            ),
Toggle Auth Mode
Handle authentication mode with setState().
 Row(
              mainAxisAlignment: MainAxisAlignment.heart,
              youngsters: [
                Text(registerAuthMode
                    ? "Already Have an account?"
                    : "Don't have an account yet?"),
                TextButton(
                  onPressed: () =>
                      setState(() => registerAuthMode = !registerAuthMode),
                  child: Text(registerAuthMode ? "Sign In" : "Regsiter"),
                )
              ],
            )
Register/Sigin Animated Transition
Should you save the file and run it. You in all probability discover the toggle would not work. That is as a result of we have not carried out animated transition but. Two enter widgets: username and *verify password * widgets have to be hidden throughout the sign-in course of however seen on registration. So, we’ll use the toggle visibility base on the worth of the variable registerAuthMode we created earlier. We’ll use animation for a easy transition throughout the toggle.
AnimatedContainer class can be utilized for animation, whereas AnimatedOpacity class can be utilized for fade in/out widgets. With the mixture of those two, we’ll toggle enter with animated opacity whereas the animated container will squeeze/fill the house occupied by enter easily.
So, let’s animate the username, sized-box widget following it, and confirm-password enter widget.
    // Username
              AnimatedContainer(
                length: const Length(milliseconds: 500),
                top: registerAuthMode ? 65 : 0,
                youngster: AnimatedOpacity(
                  length: const Length(milliseconds: 500),
                  opacity: registerAuthMode ? 1 : 0,
                  youngster: DynamicInputWidget(
                    controller: usernameController,
                    obscureText: false,
                    focusNode: usernameFocusNode,
                    toggleObscureText: null,
                    validator: null,
                    prefIcon: const Icon(Icons.particular person),
                    labelText: "Enter Username(Optionally available)",
                    textInputAction: TextInputAction.subsequent,
                    isNonPasswordField: true,
                  ),
                ),
              ),
// We'll additionally must fade in/out sizedbox
              AnimatedOpacity(
              length: const Length(milliseconds: 500),
              opacity: registerAuthMode ? 1 : 0,
              youngster: const SizedBox(
                top: 20,
              ),
            ),

// Verify password
 AnimatedContainer(
                length: const Length(milliseconds: 500),
                top: registerAuthMode ? 65 : 0,
                youngster: AnimatedOpacity(
                  length: const Length(milliseconds: 500),
                  opacity: registerAuthMode ? 1 : 0,
                  youngster: DynamicInputWidget(
                    controller: confirmPasswordController,
                    focusNode: confirmPasswordFocusNode,
                    isNonPasswordField: false,
                    labelText: "Verify Password",
                    obscureText: obscureText,
                    prefIcon: const Icon(Icons.password),
                    textInputAction: TextInputAction.carried out,
                    toggleObscureText: toggleObscureText,
                    validator: (val) => authValidator.confirmPasswordValidator(
                        val, passwordController.textual content),
                  ),
                ),
              ),
After this, you’ll see two inputs on the authentication display, trigger sign-in mode is our default mode. Now, our Kind Widget UI is prepared. Do not be confused, yow will discover all auth_form_widget.dart as a complete down beneath.
import 'package deal:flutter/materials.dart';
import 'package deal:temple/screens/auth/utils/auth_validators.dart';
import 'package deal:temple/screens/auth/widgets/text_from_widget.dart';

class AuthFormWidget extends StatefulWidget {
  const AuthFormWidget({Key? key}) : tremendous(key: key);

  @override
  State<AuthFormWidget> createState() => _AuthFormWidgetState();
}

class _AuthFormWidgetState extends State<AuthFormWidget> {
  // Outline Kind key
  last _formKey = GlobalKey<FormState>();

  // Instantiate validator
  last AuthValidators authValidator = AuthValidators();

// controllers
  late TextEditingController emailController;
  late TextEditingController usernameController;
  late TextEditingController passwordController;
  late TextEditingController confirmPasswordController;

// create focus nodes
  late FocusNode emailFocusNode;
  late FocusNode usernameFocusNode;
  late FocusNode passwordFocusNode;
  late FocusNode confirmPasswordFocusNode;

  // to obscure textual content default worth is fake
  bool obscureText = true;
  // It will require to toggle between register and sigin in mode
  bool registerAuthMode = false;

// Instantiate all of the *textual content enhancing controllers* and focus nodes on *initState* perform
  @override
  void initState() {
    tremendous.initState();
    emailController = TextEditingController();
    usernameController = TextEditingController();
    passwordController = TextEditingController();
    confirmPasswordController = TextEditingController();

    emailFocusNode = FocusNode();
    usernameFocusNode = FocusNode();
    passwordFocusNode = FocusNode();
    confirmPasswordFocusNode = FocusNode();
  }

// These all have to be disposed of as soon as carried out so let's do this as properly.
  @override
  void dispose() {
    tremendous.dispose();

    emailController.dispose();
    usernameController.dispose();
    passwordController.dispose();
    confirmPasswordController.dispose();

    emailFocusNode.dispose();
    usernameFocusNode.dispose();
    passwordFocusNode.dispose();
    confirmPasswordFocusNode.dispose();
  }

// Create a perform that'll toggle the password's visibility on the related icon faucet.
  void toggleObscureText() {
    setState(() {
      obscureText = !obscureText;
    });
  }

// Let's create a snack bar to pop information on numerous circumstances.
// Create a scaffold messanger
  SnackBar msgPopUp(msg) {
    return SnackBar(
        content material: Textual content(
      msg,
      textAlign: TextAlign.heart,
    ));
  }

  @override
  Widget construct(BuildContext context) {
    return Padding(
      padding: const EdgeInsets.all(8),
      youngster: Kind(
        key: _formKey,
        youngster: Column(
          youngsters: [
            // Email
            DynamicInputWidget(
              controller: emailController,
              obscureText: false,
              focusNode: emailFocusNode,
              toggleObscureText: null,
              validator: authValidator.emailValidator,
              prefIcon: const Icon(Icons.mail),
              labelText: "Enter Email Address",
              textInputAction: TextInputAction.next,
              isNonPasswordField: true,
            ),
            const SizedBox(
              height: 20,
            ),
            // Username
            AnimatedContainer(
              duration: const Duration(milliseconds: 500),
              height: registerAuthMode ? 65 : 0,
              child: AnimatedOpacity(
                duration: const Duration(milliseconds: 500),
                opacity: registerAuthMode ? 1 : 0,
                child: DynamicInputWidget(
                  controller: usernameController,
                  obscureText: false,
                  focusNode: usernameFocusNode,
                  toggleObscureText: null,
                  validator: null,
                  prefIcon: const Icon(Icons.person),
                  labelText: "Enter Username(Optional)",
                  textInputAction: TextInputAction.next,
                  isNonPasswordField: true,
                ),
              ),
            ),

            AnimatedOpacity(
              duration: const Duration(milliseconds: 500),
              opacity: registerAuthMode ? 1 : 0,
              child: const SizedBox(
                height: 20,
              ),
            ),

            DynamicInputWidget(
              controller: passwordController,
              labelText: "Enter Password",
              obscureText: obscureText,
              focusNode: passwordFocusNode,
              toggleObscureText: toggleObscureText,
              validator: authValidator.passwordVlidator,
              prefIcon: const Icon(Icons.password),
              textInputAction: registerAuthMode
                  ? TextInputAction.next
                  : TextInputAction.done,
              isNonPasswordField: false,
            ),

            const SizedBox(
              height: 20,
            ),

            AnimatedContainer(
              duration: const Duration(milliseconds: 500),
              height: registerAuthMode ? 65 : 0,
              child: AnimatedOpacity(
                duration: const Duration(milliseconds: 500),
                opacity: registerAuthMode ? 1 : 0,
                child: DynamicInputWidget(
                  controller: confirmPasswordController,
                  focusNode: confirmPasswordFocusNode,
                  isNonPasswordField: false,
                  labelText: "Confirm Password",
                  obscureText: obscureText,
                  prefIcon: const Icon(Icons.password),
                  textInputAction: TextInputAction.done,
                  toggleObscureText: toggleObscureText,
                  validator: (val) => authValidator.confirmPasswordValidator(
                      val, passwordController.text),
                ),
              ),
            ),
            const SizedBox(
              height: 20,
            ),

            Row(
              mainAxisAlignment: MainAxisAlignment.end,
              children: [
                TextButton(
                  onPressed: () {},
                  child: const Text('Cancel'),
                ),
                const SizedBox(
                  width: 20,
                ),
                ElevatedButton(
                  onPressed: () {},
                  child: Text(registerAuthMode ? 'Register' : 'Sign In'),
                  style: ButtonStyle(
                    elevation: MaterialStateProperty.all(8.0),
                  ),
                ),
              ],
            ),

            const SizedBox(
              top: 20,
            ),
            Row(
              mainAxisAlignment: MainAxisAlignment.heart,
              youngsters: [
                Text(registerAuthMode
                    ? "Already Have an account?"
                    : "Don't have an account yet?"),
                TextButton(
                  onPressed: () =>
                      setState(() => registerAuthMode = !registerAuthMode),
                  child: Text(registerAuthMode ? "Sign In" : "Regsiter"),
                )
              ],
            )
          ],
        ),
      ),
    );
  }
}
Our validator’s nonetheless not going to work, as a result of we nonetheless have not dealt with what to do on type submission. However let’s take a look at the results of our arduous work.
Abstract
Let’s summarize what we did to date.
- Created Dynamic Enter Widget.
- Wrote our validators for the inputs we’ll be taking in.
- Create each sign-in and registration kinds on one display.
- Animated the transition between Registration and Signal In authentication.
Chapter Seven: Flutter Firebase Setup | Cloud & Emulator

Intro
We’ll now Create Firebase Challenge; Join the Firebase cloud undertaking with a Flutter undertaking from the Command Line Terminal; Set up the Firebase and FlutterFire CLI; Arrange Firebase regionally with the native emulator suite.
Setting Up
The undertaking supply code till the final half will be discovered on this folder.
Create A Firebase Challenge
Please, create a Firebase undertaking on the console. When you’ve got by no means created a Firebase undertaking then observe the directions from this code lab by google.
Set up Firebase CLI
We’ll depend on FlutterFire package deal for our growth. Configuring the FlutterFire package deal will be carried out with FlutterFire CLI. However FlutterFire CLI depends on the Firebase CLI.
Comply with the instruction right here to put in the CLI after which login into the Firebase account. No, must initialize Firebase, for now, we are going to do it afterward after FlutterFire CLI configurations.
Set up Dependencies
After the firebase CLI set up, earlier than we hyperlink our undertaking to the firebase undertaking, we’ll set up some dependencies. In your terminal:
# Root of the flutter undertaking
# Firebase core
flutter pub add firebase_core

# Firebase Auth
flutter pub add firebase_auth

# Firebase Firestore
flutter pub add cloud_firestore

# Firebase Cloud Features
flutter pub add cloud_functions

# Firebase Storage
flutter pub add firebase_storage
We have put in Firebase Core, Firebase Auth, Firebase Cloud Features, and Firebase Storage packages for flutter.
Set up and Configure FlutterFire CLI
Let’s set up and configure the CLI on the terminal
# Set up Firebase CLI
dart pub international activate flutterfire_cli

# On the foundation of your undertaking
# configur cli
flutterfire configure
Through the configuration course of:
- You will be requested to decide on the suitable undertaking from the checklist(if there are a number of).
- You will even be requested to decide on apps for the undertaking. Selected solely android and ios. You’ll be able to choose/deselect with the house bar.
- You will be requested to offer the bundle id for IOS. I simply gave the identical one as android: com.instance.flutterfirebase_practice.
Now we’re carried out with flutter fireplace set up and configurations, and subsequent, we have to initialize it.
Firebase Initialization
On the principal.dart file of the undertaking let’s initialize firebase.
// Import
import 'package deal:firebase_core/firebase_core.dart';
import 'firebase_options.dart';

// Inside principal() methodology

// Initialize Firebase
  await Firebase.initializeApp(
    choices: DefaultFirebaseOptions.currentPlatform,
  );
Now our principal.dart file ought to appear like this.
import 'package deal:flutter/materials.dart';
import 'package deal:flutter/providers.dart';
import 'package deal:shared_preferences/shared_preferences.dart';
import 'package deal:temple/app.dart';
import 'package deal:firebase_core/firebase_core.dart';
import 'firebase_options.dart';

void principal() async {
  //  concrete binding for purposes primarily based on the Widgets framewor
  WidgetsFlutterBinding.ensureInitialized();

// Instantiate shared pref
  SharedPreferences prefs = await SharedPreferences.getInstance();
  SystemChrome.setSystemUIOverlayStyle(
    SystemUiOverlayStyle.darkish.copyWith(statusBarColor: Colours.black38),
  );
  // Initialize Firebase
  await Firebase.initializeApp(
    choices: DefaultFirebaseOptions.currentPlatform,
  );

// Move prefs as worth in MyApp
  runApp(MyApp(prefs: prefs));
}
Set-Up Firebase Backend: Cloud and Emulator
We’ll be writing a whole lot of code as backend, separate from our flutter aspect to maintain it safe and clear. So, let’s arrange firebase individually for each cloud and emulators.
*Reminder: Earlier than we begin configuration, be sure to create a Firestore database(on take a look at mode) from the firebase console of the undertaking you have created. In any other case, you will get an error throughout the course of telling you there is no database created. *
# On the foundation of your undertaking
firebase init
- You will be requested to select from completely different Firebase merchandise. Select 4: Firestore, Firebase Storage, Cloud Features, and Emulators.
- Subsequent, it’s important to select the Firebase undertaking or create one. Since we have already created one, selected the suitable undertaking from the prevailing ones.
- Simply press enter, on all of the file choices supplied there.
- Choose JavaScript because the language to make use of for firebase features.
- Choose ‘y’ for each linter and installations.
- Through the course of, you will be prompted to Emulators settings. Right here, please choose 4 merchandise: Authentication, Firestore, Storage, and Features Emulators.
- Simply press enter to pick the default ports.
- Enter “Y” to allow emulator UI.
- Press enter for the remainder.
Now, we have arrange all of the requirements. Wait there’s nonetheless extra, we nonetheless have not linked the flutter undertaking to Firebase Emulator Suite.
Join Firebase Emulator Suite to Flutter Challenge.
To connect with the emulator we as soon as once more must make some modifications to the **principal.dart **file.
Import required dependencies if you have not already
import 'dart:io' present Platform; // Its required for emulator
import 'package deal:cloud_firestore/cloud_firestore.dart';
import 'package deal:cloud_functions/cloud_functions.dart';
import 'package deal:firebase_auth/firebase_auth.dart';
import 'package deal:firebase_storage/firebase_storage.dart';
Create International Boolean
// Exterior of any class or strategies, earlier than principal()
const bool _useEmulator = true;
Connection Handler
Create a perform that’ll connect with the emulator with the required settings.
// Exterior of principal, ideally on the finish of the file


// Settings for firebase emulator connection
Future _connectToEmulator() async {
  // Present url to the emulator, localhost may not work on android emulator.
  last host = Platform.isAndroid ? '10.0.2.2' : 'localhost'; //#1
  // Present port for all of the native emulator prodcuts
  // #2
  const authPort = 9099;
  const firestorePort = 8080;
  const functionsPort = 5001;
  const storagePort = 9199;

  // Simply to verify we're operating regionally
  print("I'm operating on emulator");

  // Instruct all of the related firebase merchandise to make use of the firebase emulator
  // # 3
  await FirebaseAuth.occasion.useAuthEmulator(host, authPort);
  FirebaseFirestore.occasion.useFirestoreEmulator(host, firestorePort);
  FirebaseFunctions.occasion.useFunctionsEmulator(host, functionsPort);
  FirebaseStorage.occasion.useStorageEmulator(host, storagePort);
}
Let’s undergo the vitals.
- When operating on an android emulator it isn’t localhost. So, it may give you errors so, examine the platform and supply the suitable URL.
- Every firebase product will run on its port. So, present the suitable port. You will discover the port for all merchandise within the firebase.json file.
- Instruct all of the merchandise to make use of Firebase Emulator if it is operating.
Initalize Emulator On Major
Now, we have to name this perform on the** principal()** methodology proper after you initialize firebase.
// Set app to run on firebase emulator
  if (_useEmulator) {
    await _connectToEmulator();
  }
Full Code
We’re all set to make use of the emulator now. The ultimate type of our principal.dart is:
import 'dart:io' present Platform;
import 'package deal:cloud_firestore/cloud_firestore.dart';
import 'package deal:cloud_functions/cloud_functions.dart';
import 'package deal:firebase_auth/firebase_auth.dart';
import 'package deal:firebase_storage/firebase_storage.dart';
import 'package deal:flutter/materials.dart';
import 'package deal:flutter/providers.dart';
import 'package deal:shared_preferences/shared_preferences.dart';
import 'package deal:firebase_core/firebase_core.dart';
import 'firebase_options.dart';
// Customized modules
import 'package deal:temple/app.dart';

const bool _useEmulator = true;

void principal() async {
  //  concrete binding for purposes primarily based on the Widgets framewor
  WidgetsFlutterBinding.ensureInitialized();

// Instantiate shared pref
  SharedPreferences prefs = await SharedPreferences.getInstance();
  SystemChrome.setSystemUIOverlayStyle(
    SystemUiOverlayStyle.darkish.copyWith(statusBarColor: Colours.black38),
  );
  // Initialize Firebase
  await Firebase.initializeApp(
    choices: DefaultFirebaseOptions.currentPlatform,
  );

  // Set app to run on firebase emulator
  if (_useEmulator) {
    await _connectToEmulator();
  }

// Move prefs as worth in MyApp
  runApp(MyApp(prefs: prefs));
}

// Settings for firebase emulator connection
Future _connectToEmulator() async {
  // Present url to the emulator, localhost may not work on android emulator.
  last host = Platform.isAndroid ? '10.0.2.2' : 'localhost';
  // Present port for all of the native emulator prodcuts
  const authPort = 9099;
  const firestorePort = 8080;
  const functionsPort = 5001;
  const storagePort = 9199;

  // Simply to verify we're operating regionally
  print("I'm operating on emulator");

  // Instruct all of the related firebase merchandise to make use of firebase emulator
  await FirebaseAuth.occasion.useAuthEmulator(host, authPort);
  FirebaseFirestore.occasion.useFirestoreEmulator(host, firestorePort);
  FirebaseFunctions.occasion.useFunctionsEmulator(host, functionsPort);
  FirebaseStorage.occasion.useStorageEmulator(host, storagePort);
}
Begin Emulator
To run the firebase emulator sort the next command.
// On terminal
firebase emulators:begin
Once you run your android emulator you need to see the “I’m operating on emulator” message(emulator must be operating).
Error: Couldn’t begin Firestore Emulator, port taken.
In some unspecified time in the future once we unintentionally neglect to shut the port, we’ll get an error that the port is already taken. To repair that we have now to kill the port.
# Present the port that has been given in an error message like 8080
npx kill-port 8080
Now, that the lively port has been terminated, you can begin the emulator once more, which can appear like the picture beneath.

Abstract
On this very quick chapter, we linked our temple app to the Firebase undertaking. Let’s retrace our steps, we:
- Created Firebase Challenge & Firestore DB.
- Put in Firebase CLI & FlutterFire CLI.
- We put in Firestore, Features, Storage, and Authentication packages.
- We then linked these Firebase merchandise to the cloud Firebase undertaking on Firebase Init.
- Through the initialization, we additionally put in Firebase Emulator and did all of the configuration.
- We then wrote a easy and straightforward perform that handles Native Emulator Connection for us.
- Now know the best way to resolve the port unavailable error challenge.
Chapter Eight: Flutter Firebase Authentication | E mail and Password

Intro
Within the final two chapters, we created a Login/Register UI and Set-Up connection of our Flutter undertaking to the Firebase undertaking. By the tip of the chapter, we’ll have the ability to authenticate customers in our app. Earlier than that, yow will discover the progress to date on this folder of the repo.
Authentication Utilizing E mail and Password
Redirect Router On Authentication Standing
Our user-screen movement is such that after onboarding we examine if the consumer is authenticated or not. If not go to the authentication display else go to the homepage. So, we have now to inform the router to redirect on authentication standing modifications.
Let’s accomplish that on our app_router.dart file. We’ll should make modifications contained in the redirect methodology of Go Router.
...
redirect: (state) {
       ....
        // outline the named path of auth display
        // #1
        last String authPath = state.namedLocation(APP_PAGE.auth.routeName);

        // Checking if present path is auth or not
        // # 2
        bool isAuthenticating = state.subloc == authPath;


        // Test if consumer is loggedin or not primarily based on userLog Standing
        // #3
        bool isLoggedIn =
            FirebaseAuth.occasion.currentUser != null ? true : false;

        print("isLoggedIn is: $isLoggedIn");

        if (toOnboard) {
          // return null if the present location is already OnboardScreen to stop looping
          return isOnboarding ? null : onboardPath;
        }
        // solely authenticate if a consumer will not be logged in
         // #4
        else if (!isLoggedIn) {
          return isAuthenticating ? null : authPath; // #5
        }

        // returning null will inform the router to do not thoughts redirecting the part
        return null;
      });
So, what we did was:
- We outlined a named path for the authentication display.
- Equally, a boolean to examine if the app is en path to auth display already.
- FirebaseAuth.occasion.currentUser returns the standing of the present consumer: null if absent(logged out principally), true if logged in.
- If the consumer is absent then redirect from no matter route presently you are now to the authentication route.
- Except the present route is already an authentication route then return null. You see should you do not examine the present route, then the router could enter an infinite loop.
Firebase Person Authentication In With E mail and Password
We’re utilizing Native Emulator. However in case you are utilizing Firebase Cloud, then first you’ll have to go to the firebase console of your undertaking, then allow E mail/Password SignIn from the Authentication.
Now, on the auth_providers.dart file from screens/auth/suppliers we’ll add authentication features.
Import the next recordsdata
import 'package deal:cloud_firestore/cloud_firestore.dart';
import 'package deal:firebase_auth/firebase_auth.dart';
import 'package deal:flutter/materials.dart';
import 'package deal:go_router/go_router.dart';
import 'package deal:temple/globals/settings/router/utils/router_utils.dart';
Create Class and Instantiate
Let’s create AuthStateProvider Class and instantiate FirebaseAuth.
class AuthStateProvider with ChangeNotifier {
  FirebaseAuth authInstance = FirebaseAuth.occasion;
}
Registration with E mail and Password
Write a Registration methodology.
  // Our Perform will take electronic mail,password, username and buildcontext
 // #1
void register(String electronic mail, String password, String username,
      BuildContext context) async {
    strive {
      // Get again usercredential future from createUserWithEmailAndPassword methodology
    // # 2
      UserCredential userCred = await authInstance
          .createUserWithEmailAndPassword(electronic mail: electronic mail, password: password);
          // Save username identify
      await userCred.consumer!.updateDisplayName(username);

    // After that entry "customers" Firestore in firestore and save username, electronic mail and userLocation
     // # 3
      await FirebaseFirestore.occasion
          .assortment('customers')
          .doc(userCred.consumer!.uid)
          .set(
        {
          'username': username,
          'electronic mail': electronic mail,
          'userLocation': null,
        },
      );

      // if all the things goes properly consumer might be registered and logged in
      // now go to the homepage
      // #4
      GoRouter.of(context).goNamed(APP_PAGE.house.routeName);
    } on FirebaseAuthException catch (e) {
      // In case of error
      // if electronic mail already exists
      // # 5
      if (e.code == "email-already-in-use") {
        print("The account with this electronic mail already exists.");
      }
      if (e.code == 'weak-password') {
        // If password is simply too weak
        // #6
        print("Password is simply too weak.");
      }
    } catch (e) {
      // For anything
      // #6
      print("One thing went fallacious please strive once more.");
    }
  // notify the listeneres
       notifyListeners();
  }
Let’s go over the small print:
- Our perform will take within the electronic mail tackle, password, username, and BuildContext. We’ll want the construct context for routing.
- We use the createUserWithEmailAndPassword methodology made accessible by FlutterFire.
- After registration of the consumer, we’ll additionally write a brand new doc within the ‘customers’ assortment on Firestore . Ignore the sphere userLocation for now. After we will cope with that in upcoming components.
-
If the operation is profitable, then go to the house web page. Firebase robotically logs in new customers so we do not have to do this ourselves. Now, the currentUser will not be null anymore, the router will redirect the consumer to the homepage.
-
(5 & 6) In case of errors ship the consumer an acceptable message. Proper now, we’re simply printing the message. Later, we’ll implement a snack bar and alert bins to show messages on the appliance display.
Signal In With E mail and Password
Now that, we have made our registration perform, let’s make the sign-in perform as properly.
 // Our Perform will take electronic mail, password and construct context
  void login(String electronic mail, String password, BuildContext context) async {
    strive {
      // strive signing in
     # 1
      UserCredential userCred = await authInstance.signInWithEmailAndPassword(
          electronic mail: electronic mail, password: password);
      // if succesfull depart auth display and go to homepage
      GoRouter.of(context).goNamed(APP_PAGE.house.routeName);
    } on FirebaseAuthException catch (e) {
      // On error
      // If consumer will not be discovered
      if (e.code == 'user-not-found') {
        print("No consumer discovered for that electronic mail.");
      }
      // If password is fallacious
      if (e.code == 'wrong-password') {
        print("Incorrect password.");
      }
    } catch (e) {
      print("One thing went fallacious please strive once more");
    }
    // notify the listeners.
    notifyListeners();
  }
We’re utilizing the sign-in methodology from FlutterFire. Every part else is similar as within the registration methodology.
The Signal-Out Methodology
Signal-Out is a really fundamental and easy methodology.
  void logOut() async {
    await authInstance.signOut();
    notifyListeners();

  }
Placing All Items Collectively
Our AuthStateProvider Class appears like this now.
import 'package deal:cloud_firestore/cloud_firestore.dart';
import 'package deal:firebase_auth/firebase_auth.dart';
import 'package deal:flutter/materials.dart';
import 'package deal:go_router/go_router.dart';
import 'package deal:temple/globals/settings/router/utils/router_utils.dart';

class AuthStateProvider with ChangeNotifier {
  FirebaseAuth authInstance = FirebaseAuth.occasion;

 // Our Perform will take electronic mail,password, username and buildcontext
  void register(String electronic mail, String password, String username,
      BuildContext context) async {
    strive {
      // Get again usercredential future from createUserWithEmailAndPassword methodology
      UserCredential userCred = await authInstance
          .createUserWithEmailAndPassword(electronic mail: electronic mail, password: password);
      // Save username identify
      await userCred.consumer!.updateDisplayName(username);

      // After that entry "customers" Firestore in firestore and save username, electronic mail and userLocation
      await FirebaseFirestore.occasion
          .assortment('customers')
          .doc(userCred.consumer!.uid)
          .set(
        {
          'username': username,
          'electronic mail': electronic mail,
          'userLocation': null,
        },
      );
      // if all the things goes properly consumer might be registered and logged in
      // now go to the homepage
      GoRouter.of(context).goNamed(APP_PAGE.house.routeName);
    } on FirebaseAuthException catch (e) {
      // In case of error
      // if electronic mail already exists
      if (e.code == "email-already-in-use") {
        print("The account with this electronic mail already exists.");
      }
      if (e.code == 'weak-password') {
        // If password is simply too weak
        print("Password is simply too weak.");
      }
    } catch (e) {
      // For anything
      print("One thing went fallacious please strive once more.");
    }
    // notify listeneres
    notifyListeners();
  }

  // Our Perform will take electronic mail, and password and construct context

  void login(String electronic mail, String password, BuildContext context) async {
    strive {
      // strive signing in
      UserCredential userCred = await authInstance.signInWithEmailAndPassword(
          electronic mail: electronic mail, password: password);
      // if succesfull depart auth display and go to homepage
      GoRouter.of(context).goNamed(APP_PAGE.house.routeName);
    } on FirebaseAuthException catch (e) {
      // On error
      // If consumer will not be discovered
      if (e.code == 'user-not-found') {
        print("No consumer discovered for that electronic mail.");
      }
      // If password is fallacious
      if (e.code == 'wrong-password') {
        print("Incorrect password.");
      }
    } catch (e) {
      print("One thing went fallacious please strive once more");
    }
    // notify the listeners.
    notifyListeners();
  }

  void logOut() async {
    await authInstance.signOut();
    notifyListeners();
  }
}
Add Supplier To Widget Tree
Our first beta model of authentication features is able to be examined. So, let’s first enlist our supplier within the widget tree with MultipleProviders.
app.dart
 suppliers: [
        ChangeNotifierProvider(create: (context) => AppStateProvider()),
         // Add authStateProvider
        ChangeNotifierProvider(create: (context) => AuthStateProvider()),
        // Remove previous Provider call and create new proxyprovider that depends on AppStateProvider
        ProxyProvider<AppStateProvider, AppRouter>(
            update: (context, appStateProvider, _) => AppRouter(
                  appStateProvider: appStateProvider,
                  prefs: widget.prefs,
                ))
      ],
Deal with Kind Submission On Click on
Let’s now go to auth_form_widget.dart file in** lib/display/auth/widgets/ . Right here we’ll have to put in writing perform that we’ll get triggered on register/sigin button click on. We’ll name that perform **_submitForm(). Add this perform proper after the msgPopUp() methodology.
// Submit type will take AuthStateProvider, and BuildContext
// #1
void _submitForm(
      AuthStateProvider authStateProvider, BuildContext context) async {
    // Test if the shape and its enter are legitimate
   // #2
    last isValid = _formKey.currentState!.validate();

    // Trim the inputs to take away further areas round them
   // #3
    String username = usernameController.textual content.trim();
    String electronic mail = emailController.textual content.trim();
    String password = passwordController.textual content.trim();

    // if the shape is legitimate
    // #4
    if (isValid) {
      // Save present state if type is legitimate
      _formKey.currentState!.save();

      // Strive Signal In Or Register baed on if its register Auth Mode or not
      // #5
      if (registerAuthMode) {
        authStateProvider.register(electronic mail, password, username, context);
      }
    } else {
      authStateProvider.login(electronic mail, password, context);
    }
  }
Let’s go over the small print.
- Our perform will take AuthStateProvider & Construct Context as arguments.
- We will examine if the shape is legitimate with formKey.currentState!.validate().
- Trim the enter to take away the additional areas, in the event that they exist.
- If the shape/enter is legitimate, then let’s transfer on to the authentication.
- Relying on the authMode we’ll both register or signal within the consumer.
Instantiate Supplier
Inside BuildContext let’s first name the AuthStateProvider.
@override
  Widget construct(BuildContext context) {
   // Instantiate AuthStateProvider
    last AuthStateProvider authStateProvider = Supplier.of<AuthStateProvider>(context);
Assign Submission Handler
Let’s go method down the place our solely ElevatedButton is and assign the _submitForm methodology.
 ElevatedButton(
                  onPressed: () {
                    // name _submitForm on faucet
                    _submitForm(authStateProvider, context);
                  },
                  youngster: Textual content(registerAuthMode ? 'Register' : 'Signal In'),
                  type: ButtonStyle(
                    elevation: MaterialStateProperty.all(8.0),
                  ),
                ),
AuthForm Widget
Our auth_form_widget.dart appears like this now.
import 'package deal:flutter/materials.dart';
import 'package deal:supplier/supplier.dart';
import 'package deal:temple/screens/auth/suppliers/auth_provider.dart';
import 'package deal:temple/screens/auth/utils/auth_validators.dart';
import 'package deal:temple/screens/auth/widgets/text_from_widget.dart';

class AuthFormWidget extends StatefulWidget {
  const AuthFormWidget({Key? key}) : tremendous(key: key);

  @override
  State<AuthFormWidget> createState() => _AuthFormWidgetState();
}

class _AuthFormWidgetState extends State<AuthFormWidget> {
  // Outline Kind key
  last _formKey = GlobalKey<FormState>();

  // Instantiate validator
  last AuthValidators authValidator = AuthValidators();

// controllers
  late TextEditingController emailController;
  late TextEditingController usernameController;
  late TextEditingController passwordController;
  late TextEditingController confirmPasswordController;

// create focus nodes
  late FocusNode emailFocusNode;
  late FocusNode usernameFocusNode;
  late FocusNode passwordFocusNode;
  late FocusNode confirmPasswordFocusNode;

  // to obscure textual content default worth is fake
  bool obscureText = true;
  // It will require to toggle between register and sigin in mode
  bool registerAuthMode = false;

// Instantiate all of the *textual content enhancing controllers* and focus nodes on *initState* perform
  @override
  void initState() {
    tremendous.initState();
    emailController = TextEditingController();
    usernameController = TextEditingController();
    passwordController = TextEditingController();
    confirmPasswordController = TextEditingController();

    emailFocusNode = FocusNode();
    usernameFocusNode = FocusNode();
    passwordFocusNode = FocusNode();
    confirmPasswordFocusNode = FocusNode();
  }

// These all have to be disposed of as soon as carried out so let's do this as properly.
  @override
  void dispose() {
    tremendous.dispose();

    emailController.dispose();
    usernameController.dispose();
    passwordController.dispose();
    confirmPasswordController.dispose();

    emailFocusNode.dispose();
    usernameFocusNode.dispose();
    passwordFocusNode.dispose();
    confirmPasswordFocusNode.dispose();
  }

// Create a perform that'll toggle the password's visibility on the related icon faucet.
  void toggleObscureText() {
    setState(() {
      obscureText = !obscureText;
    });
  }

// Let's create a snack bar to pop information on numerous circumstances.
// Create a scaffold messanger
  SnackBar msgPopUp(msg) {
    return SnackBar(
        content material: Textual content(
      msg,
      textAlign: TextAlign.heart,
    ));
  }

// Submit type will take AuthStateProvider, and BuildContext
  void _submitForm(
      AuthStateProvider authStateProvider, BuildContext context) async {
    // Test if the shape and its enter are legitimate
    last isValid = _formKey.currentState!.validate();

    // Trim the inputs to take away further areas round them
    String username = usernameController.textual content.trim();
    String electronic mail = emailController.textual content.trim();
    String password = passwordController.textual content.trim();

    // if the shape is legitimate
    if (isValid) {
      // Save present state if type is legitimate
      _formKey.currentState!.save();

      // Strive Sigin Or Register baed on if its register Auth Mode or not
      if (registerAuthMode) {
        authStateProvider.register(electronic mail, password, username, context);
      }
    } else {
      authStateProvider.login(electronic mail, password, context);
    }
  }

  @override
  Widget construct(BuildContext context) {
    last AuthStateProvider authStateProvider =
        Supplier.of<AuthStateProvider>(context);
    return Padding(
      padding: const EdgeInsets.all(8),
      youngster: Kind(
        key: _formKey,
        youngster: Column(
          youngsters: [
            // Email
            DynamicInputWidget(
              controller: emailController,
              obscureText: false,
              focusNode: emailFocusNode,
              toggleObscureText: null,
              validator: authValidator.emailValidator,
              prefIcon: const Icon(Icons.mail),
              labelText: "Enter Email Address",
              textInputAction: TextInputAction.next,
              isNonPasswordField: true,
            ),
            const SizedBox(
              height: 20,
            ),
            // Username
            AnimatedContainer(
              duration: const Duration(milliseconds: 500),
              height: registerAuthMode ? 65 : 0,
              child: AnimatedOpacity(
                duration: const Duration(milliseconds: 500),
                opacity: registerAuthMode ? 1 : 0,
                child: DynamicInputWidget(
                  controller: usernameController,
                  obscureText: false,
                  focusNode: usernameFocusNode,
                  toggleObscureText: null,
                  validator: null,
                  prefIcon: const Icon(Icons.person),
                  labelText: "Enter Username(Optional)",
                  textInputAction: TextInputAction.next,
                  isNonPasswordField: true,
                ),
              ),
            ),

            AnimatedOpacity(
              duration: const Duration(milliseconds: 500),
              opacity: registerAuthMode ? 1 : 0,
              child: const SizedBox(
                height: 20,
              ),
            ),

            DynamicInputWidget(
              controller: passwordController,
              labelText: "Enter Password",
              obscureText: obscureText,
              focusNode: passwordFocusNode,
              toggleObscureText: toggleObscureText,
              validator: authValidator.passwordVlidator,
              prefIcon: const Icon(Icons.password),
              textInputAction: registerAuthMode
                  ? TextInputAction.next
                  : TextInputAction.done,
              isNonPasswordField: false,
            ),

            const SizedBox(
              height: 20,
            ),

            AnimatedContainer(
              duration: const Duration(milliseconds: 500),
              height: registerAuthMode ? 65 : 0,
              child: AnimatedOpacity(
                duration: const Duration(milliseconds: 500),
                opacity: registerAuthMode ? 1 : 0,
                child: DynamicInputWidget(
                  controller: confirmPasswordController,
                  focusNode: confirmPasswordFocusNode,
                  isNonPasswordField: false,
                  labelText: "Confirm Password",
                  obscureText: obscureText,
                  prefIcon: const Icon(Icons.password),
                  textInputAction: TextInputAction.done,
                  toggleObscureText: toggleObscureText,
                  validator: (val) => authValidator.confirmPasswordValidator(
                      val, passwordController.text),
                ),
              ),
            ),
            const SizedBox(
              height: 20,
            ),

            Row(
              mainAxisAlignment: MainAxisAlignment.end,
              children: [
                TextButton(
                  onPressed: () {},
                  child: const Text('Cancel'),
                ),
                const SizedBox(
                  width: 20,
                ),
                ElevatedButton(
                  onPressed: () {
                    // call _submitForm on tap
                    _submitForm(authStateProvider, context);
                  },
                  child: Text(registerAuthMode ? 'Register' : 'Sign In'),
                  style: ButtonStyle(
                    elevation: MaterialStateProperty.all(8.0),
                  ),
                ),
              ],
            ),

            const SizedBox(
              top: 20,
            ),
            Row(
              mainAxisAlignment: MainAxisAlignment.heart,
              youngsters: [
                Text(registerAuthMode
                    ? "Already Have an account?"
                    : "Don't have an account yet?"),
                TextButton(
                  onPressed: () =>
                      setState(() => registerAuthMode = !registerAuthMode),
                  child: Text(registerAuthMode ? "Sign In" : "Regsiter"),
                )
              ],
            )
          ],
        ),
      ),
    );
  }
}
Calling Log Out
We’ve not added the logout methodology. Let’s do this contained in the user_drawer.dart file in lib/globals/widgets/user_drawer/. Additionally whereas we’re right here, let’s take away that non permanent authentication route.
import 'package deal:flutter/materials.dart';
import 'package deal:go_router/go_router.dart';
import 'package deal:supplier/supplier.dart';
import 'package deal:temple/globals/settings/router/utils/router_utils.dart';
import 'package deal:temple/screens/auth/suppliers/auth_provider.dart';

class UserDrawer extends StatefulWidget {
  const UserDrawer({Key? key}) : tremendous(key: key);

  @override
  _UserDrawerState createState() => _UserDrawerState();
}

class _UserDrawerState extends State<UserDrawer> {
  @override
  Widget construct(BuildContext context) {
    return AlertDialog(
      backgroundColor: Theme.of(context).colorScheme.major,
      actionsPadding: EdgeInsets.zero,
      scrollable: true,
      form: RoundedRectangleBorder(
        borderRadius: BorderRadius.round(15),
      ),
      title: Textual content(
        "Astha",
        type: Theme.of(context).textTheme.headline2,
      ),
      content material: const Divider(
        thickness: 1.0,
        coloration: Colours.black,
      ),
      actions: [
        // Past two links as list tiles
        ListTile(
            leading: Icon(
              Icons.person_outline_rounded,
              color: Theme.of(context).colorScheme.secondary,
            ),
            title: const Text('User Profile'),
            onTap: () {
              print("User Profile Button Pressed");
            }),

        ListTile(
            leading: Icon(
              Icons.logout,
              color: Theme.of(context).colorScheme.secondary,
            ),
            title: const Text('Logout'),
            onTap: () {
              Provider.of<AuthStateProvider>(context, listen: false).logOut();
              GoRouter.of(context).goNamed(APP_PAGE.auth.routeName);
            }),
      ],
    );
  }
}
Now, the consumer can sign off.
Firebase Features: Cloud Firestore Triggers
Firebase supplies background triggers, which get known as robotically when an occasion it is hooked up to happens. There are 4 triggers: onCreate, onUpdate, onDelete, and onWrite. We’ll use the onCreate set off when a brand new consumer registers so as to add a time-stamp subject createdAt that information the time of registration. We’ll write our perform on the index.js file contained in the features folder.
index.js
// Import modules
// #1
const features = require("firebase-functions"),
    admin = require('firebase-admin');

// at all times initialize admin
// #2
admin.initializeApp();

// create a const to signify firestore
// #3
const db = admin.firestore();


// Create a brand new background set off perform
// #4
exports.addTimeStampToUser = features.runWith({
    timeoutSeconds: 240,  // Give timeout // #5
    reminiscence: "512MB" // reminiscence allotment // #5
}).firestore.doc('customers/{userId}').onCreate(async (_, context) => {
    // Get present timestamp from server
   // #6
    let curTimeStamp = admin.firestore.Timestamp.now();
    // Print present timestamp on server
   // # 7
    features.logger.log(`curTimeStamp ${curTimeStamp.seconds}`);

    strive {
        // add the brand new worth to new customers doc
        // #8
        await db.assortment('customers').doc(context.params.userId).set({ 'registeredAt': curTimeStamp, 'favTempleList': [], 'favShopsList': [], 'favEvents': [] }, { merge: true });
        // if its carried out print in logger
        // #7
        features.logger.log(`The present timestamp added to customers assortment:  ${curTimeStamp}`);
        // at all times return one thing to finish the perform execution
        return { 'standing': 200 };
    } catch (e) {
        // Print error incase of errors
       // #7
        features.logger.log(`One thing went fallacious couldn't add timestamp to customers collectoin ${curTimeStamp}`);
        // return standing 400 for error
        return { 'standing': 400 };
    }
});
I hope readers are acquainted with JavaScript and Node.js. Let’s go over the necessary particulars on index.js.
- We import firebase features and firebase-admin.
- All the time keep in mind to initialize admin.
- Create a relentless to signify the Firebase Firestore.
- We create our first perform, addTimeStampToUser which can get triggered every time a brand new doc is created contained in the “customers” assortment.
- We will present restrictions to a perform with runWtih() methodology. It is necessary typically to simply terminate perform to free reminiscence and to avoid wasting ourselves from terrifying payments. However it’s important to experiment with it.
- We will get a time-stamp from the server. Effectively, it is only a placeholder, not a time. Please learn this good article to search out out extra about it.
- We print the logs to see the progress.
- We will save new fields in a doc with db.assortment(‘collection_name’).doc(documentId).set(worth). Few issues to level out right here. Because the consumer is being created, there is no context.auth.uid, however we are able to get the brand new id to be, from context’s paramsId. Discover out extra on EventContext. One other factor, while you’re updating/including a brand new worth, it’s important to present merge choices to verify the brand new worth would not overwrite the earlier ones(electronic mail&username in our case).
You noticed ‘favTempleList’, ‘favShopsList’, and ‘favEvents’ fields being added to the consumer doc. Don’t be concerned about it for now. These arrays might be crammed in afterward within the tutorial. In your emulator, you will see these fields and logs once we register a brand new consumer.


If you wish to deploy features on the cloud, first you will should improve plans to the paid plan. Once you’re carried out upgrading use the next command to deploy features.
firebase deploy --only features
Should you’re having hassle deploying the place you will get an error like **npm –prefix “$RESOURCE_DIR” run lint, it is an error associated to eslint, nothing talked about right here labored for me both, so, I simply uninstalled eslint and deployed features on cloud.
Watch this playlist from Google to grasp extra about Firebase Features.
Abstract
We did fairly a couple of duties on this chapter. Let’s retrace our steps:
- We arrange the AppRouter to redirect to the authentication display on the app launch if the consumer will not be logged in.
- We created Registration, Login, and LogOut features utilizing the FlutterFire package deal.
- We additionally wrote a easy background set off for Firebase Features which can auto-save the time when a consumer registers on our app.
Chapter 9: Enhance Person Expertise in Flutter With Snack Bars, Progress Indicators, and Alert Dialogs

Intro
Snack Bars, Alert Dialogs, ProgressIndicators, and comparable gadgets are very important instruments to reinforce the consumer expertise on an software no matter platform.
Within the final two chapters, we created UI and wrote the backend for registration and sign-in strategies to make use of with the Firebase undertaking. On this chapter, we’ll use options from flutters to offer visible suggestions to customers.
You will discover the supply code from right here.
Present Progress Indicator Throughout Registration/Signal In
Head over to auth_state_provider.dart class and make some modifications.
Create an enum exterior of sophistication, to toggle the Software Course of State State.
// Exterior of any class or perform
// Make an enum to togggle progrss indicator
enum ProcessingState {
  carried out,
  ready,
}
Inside Supplier class let’s create a subject of sort ProcessingState and a perform that switches these values/states.
  ProcessingState _processingState = ProcessingState.carried out;
  // getter
  ProcessingState get processingState => _processingState;

  void setPrcState(ProcessingState prcsState) {
    _processingState = prcsState;
    notifyListeners();
  }
We’ll show the CircularProgressIndicator every time the appliance is busy and take away it when carried out. As an illustration, after urgent the register/sign-in button we are able to show the progress indicator instead of the button after which take away it when firebase sends a response.
So, let’s first begin by including the perform contained in the register perform. We’ll make modifications inside auth_form_widget.dart recordsdata after this.
Replace Processing State In Register Perform
// Our Perform will take electronic mail,password, username and buildcontext
  void register(String electronic mail, String password, String username,
      BuildContext context) async {
    // Begin loading progress indicator as soon as submit button is hit
    // #1
    setPrcState(ProcessingState.ready);
    strive {
      // Get again usercredential future from createUserWithEmailAndPassword methodology
      UserCredential userCred = await authInstance
          .createUserWithEmailAndPassword(electronic mail: electronic mail, password: password);
      // Save username identify
      await userCred.consumer!.updateDisplayName(username);

      // After that entry "customers" Firestore in firestore and save username, electronic mail and userLocation
      await FirebaseFirestore.occasion
          .assortment('customers')
          .doc(userCred.consumer!.uid)
          .set(
        {
          'username': username,
          'electronic mail': electronic mail,
          'userLocation': null,
        },
      );
      // if all the things goes properly consumer might be registered and logged in
      // now go to the homepage
      GoRouter.of(context).goNamed(APP_PAGE.house.routeName);
    } on FirebaseAuthException catch (e) {
      // In case of error
      // if electronic mail already exists
      if (e.code == "email-already-in-use") {
        print("The account with this electronic mail already exists.");
      }
      if (e.code == 'weak-password') {
        // If password is simply too weak
        print("Password is simply too weak.");
      }

    // #2
      setPrcState(ProcessingState.carried out);
    } catch (e) {
      // For anything
      print("One thing went fallacious please strive once more.");
      // #3
      setPrcState(ProcessingState.carried out);
    }
    // notify listeneres
    notifyListeners();
  }
- Within the registration perform, we’ll begin to toggle the ProcessState to ready(which’s carried out by default) proper earlier than the Strive block.
- (#2&3) We’ll solely change it again to carried out as soon as the servers ship an error response, on the finish of the Catch block. We’ll not change it again on the finish of the strive block as a result of, in case of success, we’ll transfer on to the subsequent web page in addition to show a SnackBar which we’ll implement after this.
Please make comparable modifications to the Signal In and the Log Out features by your self.
Now, we’ll want to inform the appliance, when the processing state is in ready, show a progress indicator, after which take away the indicator as soon as the processing state is finished. To take action let’s head over to auth_form_widget.dart. Proper after we instantiate an AuthStateProvider, create a brand new variable of the sort ProcessState whose worth is the same as that of AuthStateProvider’s course of state.
 Widget construct(BuildContext context) {
    last AuthStateProvider authStateProvider =
        Supplier.of<AuthStateProvider>(context);

    // make new ProcessState var
    ProcessingState prcState = authStateProvider.processingState;
After that, down the place we have now our elevated button, let’s make it a conditionally rendering widget.
  if (prcState == ProcessingState.ready) const CircularProgressIndicator(),
  if (prcState == ProcessingState.carried out)
              Row(
                mainAxisAlignment: MainAxisAlignment.finish,
                youngsters: [
                  TextButton(
                    onPressed: () {},
                    child: const Text('Cancel'),
                  ),
                  const SizedBox(
                    width: 20,
                  ),
                  ElevatedButton(
                    onPressed: () {
                      // call _submitForm on tap
                      _submitForm(authStateProvider, context);
                    },
                    child: Text(registerAuthMode ? 'Register' : 'Sign In'),
                    style: ButtonStyle(
                      elevation: MaterialStateProperty.all(8.0),
                    ),
                  ),
                ],
              ),
With this, the progress indicator will activate and deactivate on the proper time.
Show Data on Snackbar
As talked about earlier, we’ll be utilizing Snackbar to show data like “Authentication Profitable”, “Welcome Again”, and so on. To take action let’s once more create a easy perform on AuthStateProvider class.
// Proper after setPrcState perform
 //  create perform to deal with popups
  SnackBar msgPopUp(msg) {
    return SnackBar(
        content material: Textual content(
      msg,
      textAlign: TextAlign.heart,
    ));
  }
This perform will take a customized message and return a SnackBar to show on the display. Snackbar works along with ScaffoldMessenger class. So, we’ll cross this msgPopUp methodology in ScaffoldMessenger.of(context) on the finish of the strive block operations, and simply earlier than we name GoRouter.
Inside Registration Perform
ScaffoldMessenger.of(context)
          .showSnackBar(msgPopUp("The account has been registered."));
// Earlier than GoRouter
GoRouter.of(context).goNamed(APP_PAGE.house.routeName);
Inside Login Perform
ScaffoldMessenger.of(context).showSnackBar(msgPopUp("Welcome Again"));
With this when the authentication operation succeeds consumer will see a snack bar on the backside of the appliance.

Alert Error on Authentication With Alert Dialog
The snack bar is helpful as a result of it subtly shows quick messages. Nevertheless, due to its subtlety, it isn’t very acceptable for use in case of errors. In such instances, it is higher to alert customers utilizing a dialog pop-up such because the AlertDialog widget. So, proper after the msgPopUp perform, let’s create one other perform.
  // #1
  AlertDialog errorDialog(BuildContext context, String errMsg) {
    return AlertDialog(
      title: Textual content("Error",
          type: TextStyle(
            //textual content coloration might be pink
            // #2
            coloration: Theme.of(context).colorScheme.error,
          )),
      content material: Textual content(errMsg,
          type: TextStyle(
            //textual content coloration might be pink
             // #3
            coloration: Theme.of(context).colorScheme.error,
          )),
      actions: [
        TextButton(
          // On button click remove the dialog box
           // #2
          onPressed: () => Navigator.of(context).pop(),
          child: const Text('OK'),
        ),
      ],
    );
  }
- Our methodology will take two arguments: an error message and a construct context.
- Our alert field can have texts with the colour pink.
- On click on, the dialog field might be faraway from the display. The construct context is required right here to name Navigator.pop methodology.
On each registration and sign-in strategies, we’re solely printing the error messages. Now, let’s change these print statements with errorDialog() and cross the identical messages into the perform.
Inside Register Perform’s Catch Blocks
on FirebaseAuthException catch (e) {
      // In case of error
      // if electronic mail already exists
      if (e.code == "email-already-in-use") {
        showDialog(
            context: context,
            builder: (context) => errorDialog(
                context, "The account with this electronic mail already exists."));
      }
      if (e.code == 'weak-password') {
        // If password is simply too weak
        showDialog(
            context: context,
            builder: (context) =>
                errorDialog(context, "Password is simply too weak."));
      }
      setPrcState(ProcessingState.carried out);
    } catch (e) {
      // For anything
      showDialog(
          context: context,
          builder: (context) =>
              errorDialog(context, "One thing went fallacious please strive once more."));
      setPrcState(ProcessingState.carried out);
    }
That is what the field will appear like. 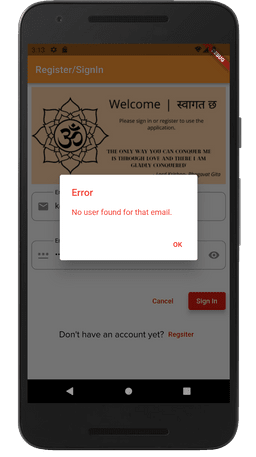
Please, add these alerts to your sign-in methodology by your self.
Abstract
Few modifications had been made in AuthStateProvider and AuthFormWidget lessons.
- We created an Enum to handle course of states.
- Progress indicators had been carried out primarily based on Processing Standing.
- A easy snack bar perform was constructed to show data for customers when authentication succeeds.
- An error handler was created to show error messages on an alert dialog field.
Chapter Ten: Permission Handler and Location Entry In Flutter
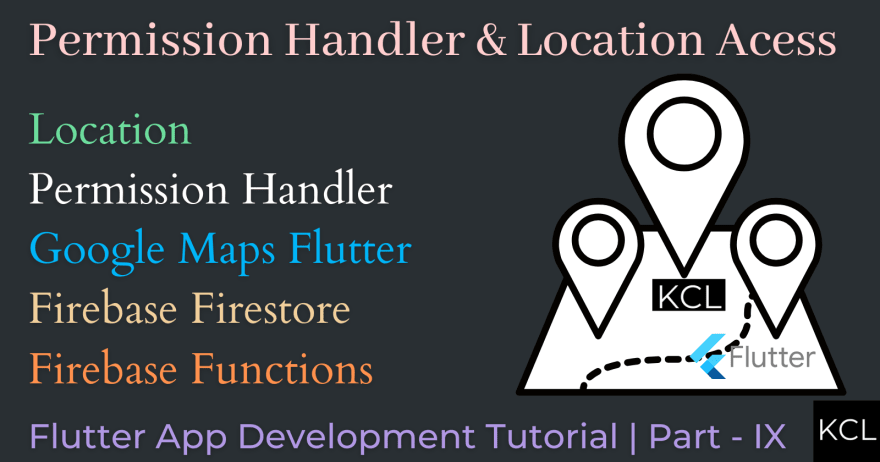
Intro
As part of the user-screen movement, we are actually on the stage the place we have to entry the consumer location. So, we’ll ask for the consumer’s location as quickly because the consumer authenticates and reaches the homepage. We’ll additionally Firebase Cloud Features to avoid wasting the consumer’s location on the ‘customers/userId’ doc on Firebase Firestore. Discover the supply code to start out this part from right here.
Packages
In earlier endeavors, we have already put in and arrange Firebase packages. For now, we’ll want three extra packages: Location, Google Maps Flutter and Permission Handler. Comply with the instruction on the packages house web page or add simply use the model I’m utilizing beneath.
The placement package deal itself is sufficient to get each permission and placement. Nevertheless, permission_handler can get permission for different duties like digicam, native storage, and so forth. Therefore, we’ll use each, one to get permission and one other for location. For now, we’ll solely use the google maps package deal to make use of Latitude and Longitude knowledge varieties.
Set up
On the command Terminal:
# Set up location
flutter pub add location

# Set up Permission Handler
flutter pub add permission_handler

# Set up Google Maps Flutter
flutter pub add google_maps_flutter
Setting Up Packages
Location Package deal
For the Location package deal, to have the ability to ask for the consumer’s permission we have to add some settings.
Android
For android at “android/app/src/principal/AndroidManifest.xml” earlier than the software tag.
<!--
    Web permissions don't have an effect on the `permission_handler` plugin however are required in case your app wants entry to
    the web.
    -->
    <uses-permission android:identify="android.permission.INTERNET" />
   <!-- Permissions choices for the `location` group -->
    <uses-permission android:identify="android.permission.ACCESS_FINE_LOCATION" />
    <uses-permission android:identify="android.permission.ACCESS_COARSE_LOCATION" />
    <uses-permission android:identify="android.permission.ACCESS_BACKGROUND_LOCATION" />


<!-- Earlier than software tag-->
 <software android:label="astha" android:identify="${applicationName}" android:icon="@mipmap/launcher_icon">
IOS
For ios, in “ios/Runner/Information.plist”, add the next settings ultimately of dict tag.
    <!-- Permissions checklist begins right here -->
        <!-- Permission whereas operating on backgroud -->
        <key>UIBackgroundModes</key>
        <string>location</string>
        <!-- Permission choices for the `location` group -->
        <key>NSLocationWhenInUseUsageDescription</key>
        <string>Want location when in use</string>
        <key>NSLocationAlwaysAndWhenInUseUsageDescription</key>
        <string>All the time and when in use!</string>
        <key>NSLocationUsageDescription</key>
        <string>Older units want location.</string>
        <key>NSLocationAlwaysUsageDescription</key>
        <string>Can I've location at all times?</string>
        <!-- Permission choices for the `appTrackingTransparency` -->
        <key>NSUserTrackingUsageDescription</key>
        <string>appTrackingTransparency</string>
        <!-- Permissions lists ends right here -->
Permission Handler
Android
For android on “android/gradle.properties” add these settings if it is already not there.
android.useAndroidX=true
android.enableJetifier=true
On “android/app/construct.gradle” change compiled SDK model to 31 if you have not already.
android {
    compileSdkVersion 31
...
}
As for the permission API, we have already added them within the AndroidManifest.XML file.
IOS
We have already added permissions on information.plist already. Sadly, I’m utilizing VS Code and couldn’t discover the POD file on the ios listing.
Google Maps Flutter
To make use of google maps you will want an API key for it. Get it from Google Maps Platform. Comply with the directions from the package deal’s readme on the best way to create an API key. Create two credentials every for android and ios. After that, we’ll have so as to add it to each android and ios apps.
Android
Go to the AndroidManifest.xml file once more.
<manifest ...
  <software ...
    <meta-data android:identify="com.google.android.geo.API_KEY"
               android:worth="YOUR KEY HERE"/>
<exercise ...
Within the ” android/app/construct.gradle” file change the minimal SDK model to 21 if you have not already.
...
 defaultConfig {
     ...
        minSdkVersion 21
...
IOS
In ios/Runner/AppDelegate.swift file add the api key for ios.
// import gmap
import GoogleMaps

@UIApplicationMain
@objc class AppDelegate: FlutterAppDelegate {
  ...
-> Bool {
// Add api key do not take away anything
    GMSServices.provideAPIKey("API KEY Right here")
    ...
}
DO NOT SHARE YOUR API KEY, ADD ANDROID MANIFEST AND APPDELEGATE FILE TO GITIGNORE BEFORE PUSHING
Reminder: Take a look at the learn me in packages pages if something would not work.
Acess Location of Person
Let’s go over the sequence of occasions that’ll happen within the tiny second consumer goes from the authentication display to the house display.
- Person might be requested for permission to grant location entry.
- If permission is optimistic, the consumer’s location might be accessed and given to an HTTPS callable cloud perform.
- Callable will then get the present consumer’s id. With that ID callable will learn the proper doc from the “customers” collections.
- It’s going to examine if the placement subject is both empty or not.
- If it is empty it’s going to write a brand new doc merge so as to add location.
- If it isn’t empty, then the perform will simply not write something and return.
Since because the app grows the variety of app permissions wanted also can carry on growing and permission can also be a worldwide issue, let’s create a supplier class that’ll deal with permissions in “globals/suppliers” folders.
In your terminal
# Make folder
mkdir lib/globals/suppliers/permissions
// make file
contact lib/globals/suppliers/permissions/app_permission_provider.dart
App’s Permission standing is of 4 varieties: which is both granted, denied, restricted, or completely denied. Let’s first make an enum to change these values in our app.
app_permission_provider.dart
enum AppPermissions {
  granted,
  denied,
  restricted,
  permanentlyDenied,
}
Let’s create a supplier class proper beneath the enum. As talked about earlier, we’ll use permission_handler to get permission and the placement package deal to get the placement.
import 'package deal:cloud_functions/cloud_functions.dart';
import 'package deal:firebase_auth/firebase_auth.dart';
import 'package deal:flutter/basis.dart';
import 'package deal:google_maps_flutter/google_maps_flutter.dart';
import 'package deal:permission_handler/permission_handler.dart';
import 'package deal:location/location.dart'
    as location_package; // to keep away from confusion with google_maps_flutter package deal


class AppPermissionProvider with ChangeNotifier {
  // Begin with default permission standing i.e denied
// #1
  PermissionStatus _locationStatus = PermissionStatus.denied;

  // Getter
// #2
  get locationStatus => _locationStatus;

// # 3
  Future<PermissionStatus> getLocationStatus() async {
    // Request for permission
    // #4
     last standing = await Permission.location.request();
    // change the placement standing
   // #5
    _locationStatus = standing;
    print(_locationStatus);
    // notify listeners
    notifyListeners();
    return standing;

  }
}
- We begin with default permission which is denied.
- A getter of Location standing.
- A technique that returns a way forward for the sort Permission Standing. We’ll want it afterward.
- A technique from Permission Handler(request) that asks for the consumer’s permission.
- Assign new standing after which notify listeners.
Now, let’s transfer to the subsequent step of the mission, which is definitely to fetch the placement and reserve it on Firestore. We will add some new variables and cases that’ll assist us obtain it. Add the next code earlier than getLocationStatus methodology.
 // Instantiate FIrebase features
// #1
  FirebaseFunctions features = FirebaseFunctions.occasion;
  // Create a LatLng sort that'll be consumer location
 // # 2
  LatLng? _locationCenter;
  // Provoke location from location package deal
 // # 3
  last location_package.Location _location = location_package.Location();
 // # 4
  location_package.LocationData? _locationData;

  // Getter
 // # 5
  get location => _location;
  get locationStatus => _locationStatus;
  get locationCenter => _locationCenter as LatLng;
Let’s clarify codes, we could?
- Firebase features occasion is required as a result of after this we’ll create a https callable perform to deal with the placement submission.
- Location of the consumer that’ll be returned by HTTPS callable perform.
- Instantiate location package deal.
- Location to be given by Location package deal.
- The getters for fetching non-public values from this class.
Firebase Perform: HTTPS Callable
Our getLocation methodology for AppPermissionProvider, which we’ll create later, will name for HTTPS callable inside it. So, let’s head over to the index.js to create the onCall methodology from the firebase perform.
index.js
// Create a perform named addUserLocation
exports.addUserLocation = features.runWith({
    timeoutSeconds: 60,  // #1
    reminiscence: "256MB" //#1
}).https.onCall(async (knowledge, context) => {

    strive {
       // Fetch appropriate consumer doc with consumer id.
       // #2
        let snapshot = await db.assortment('customers').doc((context.auth.uid)).get();
       // features.logger.log(snapshot['_fieldsProto']['userLocation']["valueType"] === "nullValue");
        // Get Location Worth Sort
        // #3
        let locationValueType = snapshot['_fieldsProto']['userLocation']["valueType"];
        // Test if subject worth for location is null
       // # 4
        if (locationValueType == 'nullValue') {
    // # 5
            await db.assortment('customers').doc((context.auth.uid)).set({ 'userLocation': knowledge.userLocation }, { merge: true });

            features.logger.log(`Person location added ${knowledge.userLocation}`);
        }
        else {
    // # 6
            features.logger.log(`Person location not modified`);

        }

    }
    catch (e) {
    // # 7
        features.logger.log(e);
        throw new features.https.HttpsError('inner', e);
    }
    // #7
    return knowledge.userLocation;
});
Within the addUserLocation callable perform above we’re:
- Present reminiscence allocation for features with runWith() methodology.
- Get the consumer doc primarily based on the consumer id supplied by EventContext.
- Get the worth sort of the Location subject. Should you keep in mind we saved the filed userLocation as null throughout the registration course of in our auth_state_provider.dart file. This lengthy snapshot[‘_fieldsProto’][‘userLocation’][“valueType”] is one thing I obtained from experimenting and printing values. That is why is greatest to make use of emulators.
- If the locationValueType is null then implies that the consumer location has by no means been saved earlier than. Therefore, we’ll proceed to put in writing a brand new doc.
- Replace the consumer doc with the userLocation from the knowledge property of the onCall methodology. It’s the similar location that’ll be handed from the supplier class to this perform. Sure, the identical one was fetched by the placement package deal.
- If the locationValueType will not be null then, we cannot write a brand new doc.
- Return the consumer location. It is necessary to finish the callables with a return, if not perform would possibly find yourself operating longer leading to reminiscence consumption that may trigger further payments from Firebase amongst different issues.
Utilizing HTTPS Callable with Location Package deal in Flutter
With our callable prepared, let’s now create a Future methodology that’ll be utilized by the app. In app_permission_provider.dart file after the getLocationStatus methodology create getLocation methodology.
Future<void> getLocation() async {
    // Name Location standing perform right here
    // #1
    last standing = await getLocationStatus();
    // if permission is granted or restricted name perform
    // #2
    if (standing == PermissionStatus.granted ||
        standing == PermissionStatus.restricted) {
      strive {
        // assign location knowledge that is returned by Location package deal
        // #3
        _locationData = await _location.getLocation();
        // Test for null values
       // # 4
        last lat = _locationData != null
            ? _locationData!.latitude as double
            : "Not accessible";
        last lon = _locationData != null
            ? _locationData!.longitude as double
            : "Not accessible";

        // Instantiate a callable perform
       // # 5
        HttpsCallable addUserLocation =
            features.httpsCallable('addUserLocation');

        // lastly name the callable perform with consumer location
         // #6
        last response = await addUserLocation.name(
          <String, dynamic>{
            'userLocation': {
              'lat': lat,
              'lon': lon,
            }
          },
        );
        // get the response from callable perform
        // # 7
        _locationCenter = LatLng(response.knowledge['lat'], response.knowledge['lon']);
      } catch (e) {
        // incase of error location witll be null
          // #8
        _locationCenter = null;
        rethrow;
      }
    }
// Notify listeners
    notifyListeners();
  }
}
What we did right here was:
- Ask for the consumer’s permission to entry the placement.
- If the permission is Granted/Restricted i.e at all times permit/permit whereas utilizing the app, then we’ll attempt to entry the placement.
- Person Location packages getLocation methodology to entry location knowledge. It’s going to return a LatLng object sort.
- Test if the information returned is null or not, in that case then deal with it appropriately.
- (5&6)Contained in the strive block, we instantiate HTTPS callable perform as described by the FlutterFire package deal. Our callable perform takes the parameter “userLocation” as a dictionary with lat and lon as keys. After this perform known as within the background, it then returns a LatLng object, which will be accessed from the information object of response.
- In case of error the consumer location is decided null.
Now, that the consumer location is up to date the corresponding widgets listening to the strategy might be notified. However for widgets to entry the Supplier, we’ll want so as to add the supplier within the checklist of MultiProvider in our app.dart file.
...
 suppliers: [
        ...
        ChangeNotifierProvider(create: (context) => AppPermissionProvider()),
        ...
      ],
FutureBuilder To The Rescue
Our operation to get the placement of the consumer is an asynchronous one which returns a Future. Future can take time to return the consequence, therefore regular widget will not work. FutureBuilder class from flutter is supposed for this job.
We’ll name the getLocation methodology from the House widget in house.dart file because the future property of FutureBuilder class. Whereas ready for the placement to be saved we are able to simply show a progress indicator.
// Import the supplier Package deal
import 'package deal:temple/globals/suppliers/permissions/app_permission_provider.dart';

// Inside Scaffold physique
...
physique: SafeArea(
        youngster: FutureBuilder(
            // Name getLocation perform as future
            // its very crucial to set hearken to false
           // #1
            future: Supplier.of<AppPermissionProvider>(context, hear: false)
                .getLocation(),
            // do not want context in builder for now
            builder: ((_, snapshot) {
              // if snapshot connectinState is none or ready
             // # 2
              if (snapshot.connectionState == ConnectionState.ready ||
                  snapshot.connectionState == ConnectionState.none) {
                return const Heart(youngster: CircularProgressIndicator());
              } else {
                // if snapshot connectinState is lively
                // # 3
                if (snapshot.connectionState == ConnectionState.lively) {
                  return const Heart(
                    youngster: Textual content("Loading..."),
                  );
                }
                // if snapshot connectinState is finished
              // #4
                return const Heart(
                  youngster: Directionality(
                      textDirection: TextDirection.ltr,
                      youngster: Textual content("This Is house")),
                );
              }
            })),
      ),
...
Within the house Widget after importing AppPermissionProvider class we returned FutureBuilder because the youngster of the Protected Space widget. In there we:
-
Person getLocation of AppPermissionProvider as future. It is crucial to recollect to set hearken to false. In any other case, the construct will carry on reloading and features will get executed many times.
-
We return CircularProgressIndicator whereas ready for the consequence to be completed within the background. For now, plainly there is no level on this as a result of we’re not utilizing the placement of the consumer in our app. So, why the progress indicator? It is for later, the place we’ll once more use this second to fetch one other knowledge from firebase which can even be asynchronous.
-
When the long run is lively, we show textual content that claims loading.
-
After the long run is finished we load or easy house web page.
Last Code
app_permission_provider.dart
import 'package deal:cloud_functions/cloud_functions.dart';
import 'package deal:flutter/basis.dart';
import 'package deal:google_maps_flutter/google_maps_flutter.dart';
import 'package deal:permission_handler/permission_handler.dart';
import 'package deal:location/location.dart'
    as location_package; // to keep away from confusion with google_maps_flutter package deal

enum AppPermissions {
  granted,
  denied,
  restricted,
  permanentlyDenied,
}

class AppPermissionProvider with ChangeNotifier {
  // Begin with default permission standing i.e denied
  PermissionStatus _locationStatus = PermissionStatus.denied;

  // Instantiate FIrebase features
  FirebaseFunctions features = FirebaseFunctions.occasion;

  // Create a LatLng sort that'll be consumer location
  LatLng? _locationCenter;
  // Provoke location from location package deal
  last location_package.Location _location = location_package.Location();
  location_package.LocationData? _locationData;

  // Getter
  get location => _location;
  get locationStatus => _locationStatus;
  get locationCenter => _locationCenter as LatLng;

  Future<PermissionStatus> getLocationStatus() async {
    // Request for permission
    last standing = await Permission.location.request();
    // change the placement standing
    _locationStatus = standing;
    // notiy listeners
    notifyListeners();
    print(_locationStatus);
    return standing;
  }

  Future<void> getLocation() async {
    // Name Location standing perform right here
    last standing = await getLocationStatus();
    print("I'm insdie get location");
    // if permission is granted or restricted name perform
    if (standing == PermissionStatus.granted ||
        standing == PermissionStatus.restricted) {
      strive {
        // assign location knowledge that is returned by Location package deal
        _locationData = await _location.getLocation();
        // Test for null values
        last lat = _locationData != null
            ? _locationData!.latitude as double
            : "Not accessible";
        last lon = _locationData != null
            ? _locationData!.longitude as double
            : "Not accessible";

        // Instantiate a callable perform
        HttpsCallable addUserLocation =
            features.httpsCallable('addUserLocation');

        // lastly name the callable perform with consumer location
        last response = await addUserLocation.name(
          <String, dynamic>{
            'userLocation': {
              'lat': lat,
              'lon': lon,
            }
          },
        );
        // get the response from callable perform
        _locationCenter = LatLng(response.knowledge['lat'], response.knowledge['lon']);
      } catch (e) {
        // incase of error location witll be null
        _locationCenter = null;
        rethrow;
      }
    }
// Notify listeners
    notifyListeners();
  }
}
index.js
// Import modiules
const features = require("firebase-functions"),
    admin = require('firebase-admin');

// at all times initialize admin
admin.initializeApp();

// create a const to signify firestore
const db = admin.firestore();


// Create a brand new background set off perform
exports.addTimeStampToUser = features.runWith({
    timeoutSeconds: 240,  // Give timeout
    reminiscence: "512MB" // reminiscence allotment
}).firestore.doc('customers/{userId}').onCreate(async (_, context) => {
    // Get present timestamp from server
    let curTimeStamp = admin.firestore.Timestamp.now();
    // Print present timestamp on server
    features.logger.log(`curTimeStamp ${curTimeStamp.seconds}`);

    strive {
        // add the brand new worth to new customers doc i
        await db.assortment('customers').doc(context.params.userId).set({ 'registeredAt': curTimeStamp, 'favTempleList': [], 'favShopsList': [], 'favEvents': [] }, { merge: true });
        // if its carried out print in logger
        features.logger.log(`The present timestamp added to customers assortment:  ${curTimeStamp.seconds}`);
        // at all times return one thing to finish the perform execution
        return { 'standing': 200 };
    } catch (e) {
        // Print error incase of errors
        features.logger.log(`One thing went fallacious couldn't add timestamp to customers collectoin ${curTimeStamp.seconds}`);
        // return standing 400 for error
        return { 'standing': 400 };
    }
});

// Create a perform named addUserLocation
exports.addUserLocation = features.runWith({
    timeoutSeconds: 60,
    reminiscence: "256MB"
}).https.onCall(async (knowledge, context) => {

    strive {
       // Fetch appropriate consumer doc with consumer id.
        let snapshot = await db.assortment('customers').doc((context.auth.uid)).get();
        // Test if subject worth for location is null
        // features.logger.log(snapshot['_fieldsProto']['userLocation']["valueType"] === "nullValue");
        let locationValueType = snapshot['_fieldsProto']['userLocation']["valueType"];
        if (locationValueType == 'nullValue') {
            await db.assortment('customers').doc((context.auth.uid)).set({ 'userLocation': knowledge.userLocation }, { merge: true });
            features.logger.log(`Person location added    ${knowledge.userLocation}`);
                return knowledge.userLocation;

        }
        else {
            features.logger.log(`Person location not modified`);

        }

    }
    catch (e) {
        features.logger.log(e);
        throw new features.https.HttpsError('inner', e);
    }
    return knowledge.userLocation;

});
house.dart
import 'package deal:flutter/materials.dart';
import 'package deal:supplier/supplier.dart';
// Customized
import 'package deal:temple/globals/suppliers/permissions/app_permission_provider.dart';
import 'package deal:temple/globals/widgets/app_bar/app_bar.dart';
import 'package deal:temple/globals/settings/router/utils/router_utils.dart';
import 'package deal:temple/globals/widgets/bottom_nav_bar/bottom_nav_bar.dart';
import 'package deal:temple/globals/widgets/user_drawer/user_drawer.dart';

class House extends StatefulWidget {
  const House({Key? key}) : tremendous(key: key);

  @override
  State<House> createState() => _HomeState();
}

class _HomeState extends State<House> {
  // create a worldwide key for scafoldstate
  last GlobalKey<ScaffoldState> _scaffoldKey = GlobalKey();

  @override
  Widget construct(BuildContext context) {
    return Scaffold(
      // Present key to scaffold
      key: _scaffoldKey,
      // Modified to customized appbar
      appBar: CustomAppBar(
        title: APP_PAGE.house.routePageTitle,
        // cross the scaffold key to customized app bar
        // #3
        scaffoldKey: _scaffoldKey,
      ),
      // Move our drawer to drawer property
      // if you wish to slide proper to left use
      endDrawer: const UserDrawer(),
      bottomNavigationBar: const CustomBottomNavBar(
        navItemIndex: 0,
      ),
      major: true,
      physique: SafeArea(
        youngster: FutureBuilder(
            // Name getLocation perform as future
            // its very crucial to set hearken to false
            future: Supplier.of<AppPermissionProvider>(context, hear: false)
                .getLocation(),
            // do not want context in builder for now
            builder: ((_, snapshot) {
              // if snapshot connectinState is none or ready
              if (snapshot.connectionState == ConnectionState.ready ||
                  snapshot.connectionState == ConnectionState.none) {
                return const Heart(youngster: CircularProgressIndicator());
              } else {
                // if snapshot connectinState is lively

                if (snapshot.connectionState == ConnectionState.lively) {
                  return const Heart(
                    youngster: Textual content("Loading..."),
                  );
                }
                // if snapshot connectinState is finished
                return const Heart(
                  youngster: Directionality(
                      textDirection: TextDirection.ltr,
                      youngster: Textual content("This Is house")),
                );
              }
            })),
      ),
    );
  }
}
Abstract
This chapter was devoted to permission dealing with and placement entry. Duties completed listed below are as follows:
- Put in three packages: Location, Permission Handler, and Google Maps Flutter.
- Spend a short while updating the settings required to make use of these packages.
- Created a supplier class that’ll ask for the consumer’s permission to entry the placement.
- Identical class additionally has a technique that may entry location and name the HTTPS callable perform.
- Created HTTPS perform which can replace the consumer’s location on Firebase Firestore.
- Carried out supplier class with the assistance of Future Builder in our app.
Chapter Eleven: Google Maps Locations API With Flutter

Intro
As part of the user-screen movement, we have already got entry to the consumer location. On this 10th chapter, we’ll use the consumer’s location to fetch the closest twenty temples utilizing google’s Locations API. We’ll fetch locations with the HTTP package deal, then we’ll write one other HTTPS Callable with Firebase Features to retailer these temples in Firestore. Since we’re utilizing an API key, we’ll use the flutter_dotenv package deal to maintain it secret. Discover the supply code to start out this part from right here.
Packages
DotEnv
So, first lets set up flutter_dotenv package deal.
flutter pub add flutter_dotenv
Create a .env file on the root of your undertaking.
contact .env
Add the .env file in .gitignore file.
#DOT ENV
*.env
Initialize .env file in principal() methodology of our principal.dart file.
import 'package deal:flutter_dotenv/flutter_dotenv.dart';

void principal() async {
....

 // Initialize dot env
  await dotenv.load(fileName: ".env");
// Move prefs as worth in MyApp
  runApp(MyApp(prefs: prefs));
}
We additionally want so as to add the .env file to the belongings part of the pubspec.yaml file.
#discover belongings part
belongings:
    # Splash Screens
    - belongings/splash/om_splash.png
    - belongings/splash/om_lotus_splash.png
    - belongings/splash/om_lotus_splash_1152x1152.png
    # Onboard Screens
    - belongings/onboard/FindTemples.png
    - belongings/onboard/FindVenues.png
    # Auth Screens
    - belongings/AuthScreen/WelcomeScreenImage_landscape_2.png
// add this right here
   # Dotenv flie
    - .env
Google Maps Locations API
To make use of the google locations API we’ll want the locations API key. For that please go to google cloud console, arrange a billing account, and create a brand new API key for Goog Locations API. Then add that API key within the .env file.
.env
#With out quotes
GMAP_PLACES_API_KEY = Your_API_KEY
HTTP
Set up the HTTP package deal.
flutter pub add http
There is no want for further setup with the HTTP package deal.
Folder Constructions
Like House and Auth Folders, the temples listing can have all of the recordsdata related to temples. So, let’s create numerous recordsdata and folders we’ll use to fetch & show temples.
# Make folders
mkdir  lib/screens/temples lib/screens/temples/suppliers lib/screens/temples/screens lib/screens/temples/widgets lib/screens/temples/fashions lib/screens/temples/utils

# Make recordsdata
contact lib/screens/temples/suppliers/temples_provider.dart lib/screens/temples/screens/temples_screen.dart  lib/screens/temples/widgets/temples_item_widget.dart lib/screens/temples/fashions/temple.dart lib/screens/temples/utils/temple_utils.dart
Just like the chapters earlier than it, we’ll hold our all apps logic contained in the supplier file. On prime of that, we’ll additionally want a utils file to retailer a couple of features that we’ll use on the supplier class. So, first, let’s create two easy features of temple_utils.dart.
Utilities
temple_utils.dart
import 'package deal:flutter_dotenv/flutter_dotenv.dart';
import 'package deal:google_maps_flutter/google_maps_flutter.dart';

class TemplesUtils {
  // Base url for google maps nearbysearch
  // #1
  static const String _baseUrlNearBySearch =
      "https://maps.googleapis.com/maps/api/place/nearbysearch/json?";
  // get api key
  // #2
  last String _placesApi = dotenv.env['GMAP_PLACES_API_KEY'] as String;

  // Create a technique that'll parse full url and return it utilizing http package deal
  // #3
  Uri searchUrl(LatLng userLocation) {
    // Create variables that'll cross maps API parmas as string
  // # 4
//===================//
    last api = "&key=$_placesApi";

    last location =
        "location=${userLocation.latitude},${userLocation.longitude}";

    const sort = "&sort=hindu_temple";
    // Closest first
  // #5
    const rankBy = "&rankby=distance";
//=====================//
    // Parse URL to get a brand new uri object
  // #6
    last url =
        Uri.parse(_baseUrlNearBySearch + location + rankBy + sort + api);

    return URL;
  }
}
- Google Maps NearbySearch takes a number of parameters, amongst them we’ll use location(required parameter), rankby and sort .
- Import API key from .env file.
- Search Url is a perform that’ll take consumer location then, mix the bottom URL acceptable parameter by search API and return parsed URI.
- The API key is a should, on each URL to get a consequence again from API.
- The rankby=”distance” kinds the search outcomes primarily based on distance. After we’re utilizing rankby the sort parameter is required.
- The ultimate URL for use by the HTTP package deal to seek for temples.
*Observe: Should you’re from a spot that does not have temples(some or by no means) you in all probability will not see any outcomes. So, use one thing else for the institution sort. *
One other methodology might be a easy mapper, its sole function is to map the incoming checklist into an inventory of TempleModels(which we’ll create subsequent) and return it as such. It will make our code later a lot cleaner.
 Record<TempleModel> mapper(Record outcomes) {
    last newList = outcomes
        .map(
          (temple) => TempleModel(
            identify: temple['name'],
            tackle: temple['address'],
            latLng: LatLng(
              temple['latLng']['lat'],
              temple['latLng']['lon'],
            ),
            imageUrl: temple['imageRef'],
            placesId: temple['place_id'],
          ),
        )
        .toList();

    return newList;
  }
Temple Mannequin
The Temple mannequin class will outline a framework for the knowledge to be saved concerning the temple. On the temple.dart file inside fashions let’s create a temple mannequin.
import 'package deal:google_maps_flutter/google_maps_flutter.dart';

class TempleModel {
  // identify of temple
  last String identify;
  // the tackle
  last String tackle;
  // geo location
  last LatLng latLng;
  // ImageUrls
  last String imageUrl;
  // id given to every merchandise by locations api
  last String placesId;

  const TempleModel(
      {required this.identify,
      required this.tackle,
      required this.latLng,
      required this.imageUrl,
      required this.placesId});
}
Every temple that’ll be saved in Firestore can have a reputation, tackle, geographical coordinates, imageUrl, and an ID given by google’s place API.
Google Place API with HTTP and Supplier
Now, it is time to write a supplier class that’ll maintain fetching the close by temples checklist. This might be an extended file with many issues to clarify. So, we’ll go piece by piece codes from prime to backside.
Import Modules and Create a supplier class.
import 'dart:convert';
import 'dart:math';
import 'package deal:cloud_firestore/cloud_firestore.dart';
import 'package deal:cloud_functions/cloud_functions.dart';
import 'package deal:firebase_auth/firebase_auth.dart';
import 'package deal:firebase_storage/firebase_storage.dart' as firbase_storage;
import 'package deal:flutter/basis.dart';
import 'package deal:google_maps_flutter/google_maps_flutter.dart';
import 'package deal:http/http.dart' as http;

//customized modules
import 'package deal:temple/screens/temples/fashions/temple.dart';
import 'package deal:temple/screens/temples/utils/temple_utils.dart';

class TempleProvider with ChangeNotifier {}
Inside the category, instantiate Firebase Merchandise we might be utilizing.
// Instantiate FIbrebase merchandise
  last FirebaseAuth auth = FirebaseAuth.occasion;
  last FirebaseFunctions features = FirebaseFunctions.occasion;
  last FirebaseFirestore firestore = FirebaseFirestore.occasion;
  // Estabish sotrage occasion for bucket of our alternative
  // as soon as e mulator runs yow will discover the bucket identify at storage tab
  last firbase_storage.FirebaseStorage storage =
      firbase_storage.FirebaseStorage.instanceFor(
          bucket: 'astha-being-hindu-tutorial.appspot.com');
With the Firebase Storage we won’t use a default bucket to retailer photographs whose URL might be fetched to avoid wasting on Firestore. So, what’s up with this logic? You see google locations API would not present photographs, it is supplied by particulars api. We’ll not be utilizing it. However as a substitute, I’ve some random(4 in numbers) Hindu photographs that I downloaded from Unsplash, which I am going to retailer in storage and fetch a random URL amongst photographs and assign it to the temple mannequin. You do not have to do it and supply the hardcoded picture URL for imageRef, however it’s to follow studying storage.
Different Fields and Getters
// Instantiate Temple Utils
last TemplesUtils templesUtils = TemplesUtils();
  // Create the faux checklist of temples
  Record<TempleModel>? _temples = [];
  // Person location from db
  LatLng? _userLocation;

// Getters
  Record<TempleModel> get temples => [..._temples as List];
  LatLng get userLocation => _userLocation as LatLng;

// Record of Pictures

  static const Record<String> imagePaths = [
    'image_1.jpg',
    'image_2.jpg',
    'image_3.jpg',
    'image_4.jpg',
  ];
The imagePaths is an inventory of actually the identify of photographs that I’ve uploaded in a folder named “TempleImages” inside our bucket we referenced earlier in Emulator’s Storage.
Future To Return Locations API Outcome
// Future methodology to get temples
   Future<Record<TempleModel>?> getNearyByTemples(LatLng userLocation) async {
    // Get urls from the temple utils
    // #1
    Uri url = templesUtils.searchUrl(userLocation);

    strive {
      // Arrange references for firebase merchandise.
      // Callable getNearbyTemples
       // #2
      HttpsCallable getNearbyTemples =
          features.httpsCallable('getNearbyTemples');
      // Assortment reference for temples
      // # 3
      CollectionReference templeDocRef = firestore.assortment('temples');
      // Get one doc from temples assortment
      // #4
      QuerySnapshot querySnapshot = await templeDocRef.restrict(1).get();
      // A reference to a folder in storage that has photographs.
      // #5
      firbase_storage.Reference storageRef = storage.ref('TempleImages');

      // We'll solely get close by temples if the temple's assortment empty
      // #6
      if (querySnapshot.docs.isEmpty) {
        print("Temple assortment is empty");
        // get the consequence from api search
       // #7
        last res = await http.get(url);
        // decode to json consequence
       // #8
        last decodedRes = await jsonDecode(res.physique) as Map;
        // get consequence as checklist
       // #9
        last outcomes = await decodedRes['results'] as Record;
        // Get random picture url from accessible ones to place as photographs
        // Since we have now 4 photographs we'll get 0-3 values from Random()
       // #10
        last imgUrl = await storageRef
            .youngster(imagePaths[Random().nextInt(4)])
            .getDownloadURL();
        // Name the perform
       // #11
        last templesListCall = await getNearbyTemples.name(<String, dynamic>{
          'templeList': [...results],
          'imageRef': imgUrl,
        });

        // map the templesList returned by https callable
       // we'll use utils mapper right here
       // #12
        last newTempleLists = templesUtils.mapper(templesListCall.knowledge['temples']);
        // replace the brand new temples checklist
       // #13
        _temples = [...newTempleLists];
      } else {
        // If the temples assortment already has temples then we cannot write
        // however simply fetch temples assortment
       // #14
        print("Temple assortment will not be empty");
        strive {
          // get all temples paperwork
          last tempSnapShot = await templeDocRef.get();
          // fetch the values as checklist.
          last tempList = tempSnapShot.docs[0]['temples'] as Record;
          // map the outcomes into an inventory
          last templesList = templesUtils.mapper(tempList);
          // replace temples
          _temples = [...templesList];
        } catch (e) {
          // incase of error temples checklist in empty
       // # 15
          _temples = [];
        }
      }
    } catch (e) {
      // incase of error temples checklist in empty
      _temples = [];
    }
// notify all of the listeners
    notifyListeners();
 // #16
  return _temples;
  }
Alright, now the primary methodology that’ll do all the things we have labored on to date on this weblog “getNearyByTemples” has been created. Let’s go by numbers:
-
Person the temple utils we created earlier to get the URL prepared for use by the HTTP package deal.
-
Reference to the HTTP callable getNearyByTemples, which we’ll create after this supplier session. It is accountable to avoid wasting the checklist of all of the temples we fetch throughout this search.
-
Reference to temple assortment.
-
Temple reference be used to learn a single doc from the gathering.
-
References to a folder named “TempleImages” contained in the bucket of storage.
-
We’re checking if the temple doc we fetched earlier is empty. The logic is that we do not need to name for Place Api, Firestores, and Features each time consumer makes use of our app. We’ll solely fetch temples and save them on FireStore if the temple’s assortment is empty or would not exist.
-
HTTP get() methodology can be utilized to fetch the outcomes. You need to use software program just like the postman or only a chrome browser to see the outcomes of the get request.
-
Json Decode Perform parses strings to json knowledge varieties.
-
Locations API supplies the response of an inventory of temples as an inventory with outcomes as its key. We’ll extract that because the Record sort.
-
Firebase Storage supplies a way to obtain URL from the reference. We’re randomly downloading a URL and assigning it to imageRef property wanted in our HTTPS callable.
-
We name our HTTPS callable now, present with temples checklist and picture’s Url. It’s going to save the checklist in Firesotre’s Temples assortment and return that checklist.
-
The returned checklist might be now used to replace our Record of Temple Fashions utilizing the mapper methodology of Temple Utils.
-
This similar checklist might be utilized by our app to show a stupendous checklist of temple playing cards on the temple display.
-
The else block solely executes if the temple’s assortment already has an inventory of temples. In that case in contrast to in if block we don’t fetch the temples checklist from API, we simply learn all of the paperwork which can be saved within the temple’s assortment. After this course of is similar as above.
-
In case of errors, the temple checklist might be empty.
-
It is extremely necessary to return this new checklist. We’ll want this Record as QurerySnapshot knowledge fetched by FutureBuilder to show it on our app.
Write Google Locations API Search Outcomes On FireStore With Firebase Features
Contained in the index.js file we’ll now create one other HTTPS callable perform “getNearbyTemples”. This methodology will create an array with the checklist of temple objects after which reserve it to the temples assortment.
exports.getNearbyTemples = features.https.onCall(async (knowledge, _) => {

    strive {
        // Notify perform's been known as
        features.logger.log("Add close by temples perform was known as");
        // Create array of temple objects.
        let temples = knowledge.templeList.map((temple) => {
            return {
                'place_id': temple['place_id'],
                'tackle': temple['vicinity'] ? temple['vicinity'] : 'Not Obtainable',
                'identify': temple['name'] ? temple['name'] : 'Not Obtainable',
                'latLng': {
                    'lat': temple.hasOwnProperty('geometry') ? temple['geometry']['location']['lat'] : 'Not Obtainable', 'lon': temple.hasOwnProperty('geometry') ? temple['geometry']['location']['lng'] : 'Not Obtainable',
                    'dateAdded': admin.firestore.Timestamp.now()
                },
                'imageRef': knowledge.imageRef
            }
        }

        );

        // save the temples array to temples assortment as one doc named temples
        await db.assortment('temples').add({ temples: temples });

    } catch (e) {
        // if error return errormsg
        return { 'Error Msg': e };
    }
    // If all the things's advantageous return the temple array.
    return temples;
});
I’ve not allotted reminiscence for this operation. It was very difficult and time-consuming. If you’d like you may experiment. A firebase doc can retailer as much as 1MB in measurement. So, our checklist no less than for this app won’t ever develop past 20. So, contained in the temple’s assortment, we aren’t saving 20 paperwork however one doc with 20 gadgets as a subject “temples”, db.assortment(‘temples’).add({ temples: temples }).
Deal with Updates With Firestore Triggers
For instance the consumer modified location or a brand new temple has been added to the google database. It must be mirrored within the Firestore Temples assortment. However we must always deal with updates fastidiously and solely write new paperwork if there are any modifications to the outdated ones. For our temples assortment, we are able to simply match the places_id, and solely take motion accordingly. Firebase supplies onUpdate() set off to deal with such a work. Now, let’s write some code on the index.js.
// When the temple Record Updates
exports.updateNearbyTemples = features.runWith({
    timeoutSeconds: 120,
    reminiscence: "256MB"
}).firestore.doc('temples/{id}').onUpdate(async (change, context) => {
    // If theres each new and outdated worth
    if (change.earlier than.exists && change.after.exists) {
        // temples checklist each new and outdated
        let newTemplesList = change.after.knowledge()['temples'];
        let oldTemplesList = change.earlier than.knowledge()['temples'];

        // Locations Id checklist from each new and outdated checklist
        let oldTemplesIdList = oldTemplesList.map(temple => temple['place_id']);
        let newTemplesIdList = newTemplesList.map(temple => temple['place_id']);

        // Lets discover out if theres new temples id by filtering with outdated one
        let filteredList = newTemplesIdList.filter(x => !oldTemplesIdList.contains(x));

        // if the size will not be similar of fileted checklist has
        //size of 0 then nothing new is there so simply return
        if (oldTemplesIdList.size != newTemplesIdList.size || filteredList.size == 0) {
            features.logger.log("Nothing is modified so onUpdate returned");
            return;
        }
        // If somethings modified then
        strive {
            features.logger.log("On Replace was known as ");
            // Make new checklist of temples
            let temples = newTemplesList.map((temple) => {
                return {
                    'place_id': temple['place_id'],
                    'tackle': temple['vicinity'] ? temple['vicinity'] : 'Not Obtainable',
                    'identify': temple['name'] ? temple['name'] : 'Not Obtainable',
                    'latLng': {
                        'lat': temple.hasOwnProperty('geometry') ? temple['geometry']['location']['lat'] : 'Not Obtainable', 'lon': temple.hasOwnProperty('geometry') ? temple['geometry']['location']['lng'] : 'Not Obtainable',
                        'dateAdded': admin.firestore.Timestamp.now()
                    }
                }
            }
            );
            // use the present context id to replace temples, no must merge
            await db.assortment('temples').doc(context.params.id).set({ 'palces_id_list': newTemplesIdList, temples: temples });
        }
        catch (e) { throw e; }
        return { 'standing': 200 };
    }
    // return nothing
    return null;
});
Modifications.earlier than.knowledge offers values already within the Firestore and modifications.after.knowledge offers worth newly gotten from the API. With this replace, the perform won’t run each time the consumer hundreds the temples display. It can save us a lot of cash on manufacturing mode.
Making Supplier Class accessible for Widgets
Now, our lessons are prepared for work. So, let’s make them accessible by updating the MultiProviders checklist within the **app.dart **file.
 MultiProvider(
      suppliers: [
       ...
        ChangeNotifierProvider(create: (context) => TempleProvider()),
        ...
      ],
...
Now, the GetNearbyTemples methodology is accessible for all of the descendants of MultiProviders. So, the place precisely are we going to name this methodology? Effectively within the subsequent chapter, We’ll make our house web page slightly bit higher trying. On that homepage, there might be a hyperlink to Temple Record Display. The tactic might be executed when the hyperlink is clicked. For now, let’s finish this chapter earlier than we derail from the primary theme for this part.
Last Code
temple_provider.dart
import 'dart:convert';
import 'dart:math';
import 'package deal:cloud_firestore/cloud_firestore.dart';
import 'package deal:cloud_functions/cloud_functions.dart';
import 'package deal:firebase_auth/firebase_auth.dart';
import 'package deal:firebase_storage/firebase_storage.dart' as firbase_storage;
import 'package deal:flutter/basis.dart';
import 'package deal:google_maps_flutter/google_maps_flutter.dart';
import 'package deal:http/http.dart' as http;

//customized modules
import 'package deal:temple/screens/temples/fashions/temple.dart';
import 'package deal:temple/screens/temples/utils/temple_utils.dart';

class TempleProvider with ChangeNotifier {
  // Instantiate FIbrebase merchandise
  last FirebaseAuth auth = FirebaseAuth.occasion;
  last FirebaseFunctions features = FirebaseFunctions.occasion;
  last FirebaseFirestore firestore = FirebaseFirestore.occasion;
  // Estabish sotrage occasion for bucket of our alternative
  // as soon as e mulator runs yow will discover the bucket identify at storage tab
  last firbase_storage.FirebaseStorage storage =
      firbase_storage.FirebaseStorage.instanceFor(
          bucket: 'astha-being-hindu-tutorial.appspot.com');

// Instantiate Temple Utils
  last TemplesUtils templesUtils = TemplesUtils();
  // Create the faux checklist of temples
  Record<TempleModel>? _temples = [];
  // Person location from db
  LatLng? _userLocation;

// Getters
  Record<TempleModel> get temples => [..._temples as List];
  LatLng get userLocation => _userLocation as LatLng;

// Record of Pictures
  static const Record<String> imagePaths = [
    'image_1.jpg',
    'image_2.jpg',
    'image_3.jpg',
    'image_4.jpg',
  ];

// Future methodology to get temples
  Future<void> getNearyByTemples(LatLng userLocation) async {
    // Get urls from the temple utils
    Uri url = templesUtils.searchUrl(userLocation);

    strive {
      // Arrange references for firebase merchandise.
      // Callable getNearbyTemples
      HttpsCallable getNearbyTemples =
          features.httpsCallable('getNearbyTemples');
      // COllection reference for temples
      CollectionReference templeDocRef = firestore.assortment('temples');
      // Get one doc from temples assortment
      QuerySnapshot querySnapshot = await templeDocRef.restrict(1).get();
      // A reference to a folder in storage that has photographs.
      firbase_storage.Reference storageRef = storage.ref('TempleImages');

      // We'll solely get close by temples if the temples assortment empty
      if (querySnapshot.docs.isEmpty) {
        print("Temple assortment is empty");
        // get the consequence from api search
        last res = await http.get(url);
        // decode the json consequence
        last decodedRes = await jsonDecode(res.physique) as Map;
        // get consequence as checklist
        last outcomes = await decodedRes['results'] as Record;
        // Get random picture url from accessible ones to place as photographs
        // Since we have now 4 photographs we'll get 0-3 values from Random()
        last imgUrl = await storageRef
            .youngster(imagePaths[Random().nextInt(4)])
            .getDownloadURL();
        // Name the perform
        last templesListCall = await getNearbyTemples.name(<String, dynamic>{
          'templeList': [...results],
          'imageRef': imgUrl,
        });

        // map the templesList restured by https callable
        last newTempleLists = templesListCall.knowledge['temples']
            .map(
              (temple) => TempleModel(
                identify: temple['name'],
                tackle: temple['address'],
                latLng: LatLng(
                  temple['latLng']['lat'],
                  temple['latLng']['lon'],
                ),
                imageUrl: temple['imageRef'],
                placesId: temple['place_id'],
              ),
            )
            .toList();
        // replace the brand new temples checklist
        _temples = [...newTempleLists];
      } else {
        // If the temples assortment already has temples then we cannot write
        // however simply fetch temples assortment
        print("Temple assortment will not be empty");

        strive {
          // get all temples paperwork
          last tempSnapShot = await templeDocRef.get();
          // fetch the values as checklist.
          last tempList = tempSnapShot.docs[0]['temples'] as Record;
          // map the outcomes into an inventory
          last templesList = tempList
              .map(
                (temple) => TempleModel(
                  identify: temple['name'],
                  tackle: temple['address'],
                  latLng: LatLng(
                    temple['latLng']['lat'],
                    temple['latLng']['lon'],
                  ),
                  imageUrl: temple['imageRef'],
                  placesId: temple['place_id'],
                ),
              )
              .toList();
          // replace temples
          _temples = [...templesList];
        } catch (e) {
          // incase of error temples checklist in empty
          _temples = [];
        }
      }
    } catch (e) {
      // incase of error temples checklist in empty

      _temples = [];
    }
// notify all of the listeners
    notifyListeners();
  }
}
index.js
// Import modiules
const features = require("firebase-functions"),
    admin = require('firebase-admin');

// at all times initialize admin
admin.initializeApp();

// create a const to signify firestore
const db = admin.firestore();


// Create a brand new background set off perform
exports.addTimeStampToUser = features.runWith({
    timeoutSeconds: 240,  // Give timeout
    reminiscence: "512MB" // reminiscence allotment
}).firestore.doc('customers/{userId}').onCreate(async (_, context) => {
    // Get present timestamp from server
    let curTimeStamp = admin.firestore.Timestamp.now();
    // Print present timestamp on server
    features.logger.log(`curTimeStamp ${curTimeStamp.seconds}`);

    strive {
        // add the brand new worth to new customers doc i
        await db.assortment('customers').doc(context.params.userId).set({ 'registeredAt': curTimeStamp, 'favTempleList': [], 'favShopsList': [], 'favEvents': [] }, { merge: true });
        // if its carried out print in logger
        features.logger.log(`The present timestamp added to customers assortment:  ${curTimeStamp.seconds}`);
        // at all times return one thing to finish the perform execution
        return { 'standing': 200 };
    } catch (e) {
        // Print error incase of errors
        features.logger.log(`One thing went fallacious couldn't add timestamp to customers collectoin ${curTimeStamp.seconds}`);
        // return standing 400 for error
        return { 'standing': 400 };
    }
});

// Create a perform named addUserLocation
exports.addUserLocation = features.runWith({
    timeoutSeconds: 60,
    reminiscence: "256MB"
}).https.onCall(async (knowledge, context) => {

    strive {
        // Fetch appropriate consumer doc with consumer id.
        let snapshot = await db.assortment('customers').doc((context.auth.uid)).get();
        // Test if subject worth for location is null
        // features.logger.log(snapshot['_fieldsProto']['userLocation']["valueType"] === "nullValue");
        let locationValueType = snapshot['_fieldsProto']['userLocation']["valueType"];
        if (locationValueType == 'nullValue') {
            await db.assortment('customers').doc((context.auth.uid)).set({ 'userLocation': knowledge.userLocation }, { merge: true });
            features.logger.log(`Person location added    ${knowledge.userLocation}`);
            return knowledge.userLocation;

        }
        else {
            features.logger.log(`Person location not modified`);

        }

    }
    catch (e) {
        features.logger.log(e);
        throw new features.https.HttpsError('inner', e);
    }
    return knowledge.userLocation;

});


exports.getNearbyTemples = features.https.onCall(async (knowledge, _) => {

    strive {
        // Notify perform's been known as
        features.logger.log("Add close by temples perform was known as");
        // Create array of temple objects.
        let temples = knowledge.templeList.map((temple) => {
            return {
                'place_id': temple['place_id'],
                'tackle': temple['vicinity'] ? temple['vicinity'] : 'Not Obtainable',
                'identify': temple['name'] ? temple['name'] : 'Not Obtainable',
                'latLng': {
                    'lat': temple.hasOwnProperty('geometry') ? temple['geometry']['location']['lat'] : 'Not Obtainable', 'lon': temple.hasOwnProperty('geometry') ? temple['geometry']['location']['lng'] : 'Not Obtainable',
                    'dateAdded': admin.firestore.Timestamp.now()
                },
                'imageRef': knowledge.imageRef
            }
        }

        );

        // save the temples array to temples assortment as one doc named temples
        await db.assortment('temples').add({ temples: temples });

    } catch (e) {
        // if error return errormsg
        return { 'Error Msg': e };
    }
    // If all the things's advantageous return the temple array.
    return temples;
});


// When the temple Record Updates
exports.updateNearbyTemples = features.runWith({
    timeoutSeconds: 120,
    reminiscence: "256MB"
}).firestore.doc('temples/{id}').onUpdate(async (change, context) => {
    // If theres each new and outdated worth
    if (change.earlier than.exists && change.after.exists) {
        // temples checklist each new and outdated
        let newTemplesList = change.after.knowledge()['temples'];
        let oldTemplesList = change.earlier than.knowledge()['temples'];

        // Locations Id checklist from each new and outdated checklist
        let oldTemplesIdList = oldTemplesList.map(temple => temple['place_id']);
        let newTemplesIdList = newTemplesList.map(temple => temple['place_id']);

        // Lets discover out if theres new temples id by filtering with outdated one
        let filteredList = newTemplesIdList.filter(x => !oldTemplesIdList.contains(x));

        // if the size will not be similar of fileted checklist has
        //size of 0 then nothing new is there so simply return
        if (oldTemplesIdList.size != newTemplesIdList.size || filteredList.size == 0) {
            features.logger.log("Nothing is modified so onUpdate returned");
            return;
        }
        // If somethings modified then
        strive {
            features.logger.log("On Replace was known as ");
            // Make new checklist of temples
            let temples = newTemplesList.map((temple) => {
                return {
                    'place_id': temple['place_id'],
                    'tackle': temple['vicinity'] ? temple['vicinity'] : 'Not Obtainable',
                    'identify': temple['name'] ? temple['name'] : 'Not Obtainable',
                    'latLng': {
                        'lat': temple.hasOwnProperty('geometry') ? temple['geometry']['location']['lat'] : 'Not Obtainable', 'lon': temple.hasOwnProperty('geometry') ? temple['geometry']['location']['lng'] : 'Not Obtainable',
                        'dateAdded': admin.firestore.Timestamp.now()
                    }
                }
            }
            );
            // use the present context id to replace temples, no must merge
            await db.assortment('temples').doc(context.params.id).set({ 'palces_id_list': newTemplesIdList, temples: temples });
        }
        catch (e) { throw e; }
        return { 'standing': 200 };
    }
    // return nothing
    return null;
});
Abstract
Earlier than we depart let’s summarize what we did to date.
- We created google maps locations API.
- By putting in the Flutter_DotEnv package deal, we secured the API from being public.
- HTTP package deal was additionally added which performed a significant position in fetching temple lists from API.
- We created a utility file although with only one util. In a while, in order for you, you may write a distance calculator methodology from consumer to temple to signify in google Maps.
- We then wrote a technique in our supplier class, that fetched a search checklist, and passes it to firebase cloud features.
- The firebase perform saves the temple lists to Firestore if the gathering is empty.
- We then wrote an replace set off, that’ll solely run when the worth is modified.
Chapter Twelve: Flutter Web page Design

About
On this chapter, we are going to create new card buttons, that’ll be displayed within the grid view. Every button UI will take the consumer to a sub-page like Occasions, Temples, and so on. There can even be one other widget, let’s name it a quote card, on the prime of the house display. It’s going to have lovely quotes from Hinduism displayed there. We’ll additionally make a Temples Display, it’s going to show an inventory of temples we fetched within the final part. Every temple might be a Temple Merchandise Widget which might be a card with data on a temple from the checklist. You will discover the supply code for the progress to date on this hyperlink right here.
Constructions
Let’s go to our favourite VS Code with the undertaking opened and make a file the place we’ll create a dynamic Card that might be used as a button on our house web page. We can’t be utilizing each the cardboard buttons and quote card exterior of the house display, they are going to be an area widget and the identical goes for the temples card widget. Therefore, we want new recordsdata and folders for each house and temple screens.
# make folder first
mkdir lib/screens/house/widgets

#make file for house
contact lib/screens/house/widgets/card_button_widget.dart lib/screens/house/widgets/quote_card_widget.dart

# make recordsdata for temples
contact lib/screens/temples/widgets/temple_item_widget.dart lib/screens/temples/screens/temples_screen.dart
House Display
By the tip, our house display will appear like this.
Card Button
card_button_widget.dart
import 'package deal:flutter/materials.dart';
import 'package deal:go_router/go_router.dart';

class CardButton extends StatelessWidget {
  // Outline Fields
  // Icon for use
  // #1
  last IconData icon;
  // Tittle of Button
  last String title;
  // width of the cardboard
  // #2
  last double width;
  // Path to go to
   // #3
  last String routeName;

  const CardButton(this.icon, this.title, this.width, this.routeName,
      {Key? key})
      : tremendous(key: key);

  @override
  Widget construct(BuildContext context) {
    return Card(
      elevation: 4,
      // Make the border spherical
     // #4
      form: const RoundedRectangleBorder(
        borderRadius: BorderRadius.all(Radius.round(10.0)),
      ),
      youngster:
          // We'll make the entire card tappable with inkwell
         // #5
          InkWell(
        // ON faucet go to the respective widget
        onTap: () => GoRouter.of(context).goNamed(routeName),
        youngster: SizedBox(
          width: width,
          youngster: Column(
              mainAxisAlignment: MainAxisAlignment.spaceAround,
              crossAxisAlignment: CrossAxisAlignment.heart,
              youngsters: [
                const SizedBox(
                  height: 40,
                ),
                Expanded(
                  flex: 2,
                  child:
                      // Icon border should be round and partially transparent
                     // #6
                      CircleAvatar(
                    backgroundColor: Theme.of(context)
                        .colorScheme
                        .background
                        .withOpacity(0.5),
                    radius: 41,
                    child:
                        // Icon
                        Icon(
                      icon,
                      size: 35,
                      // Use secondary color
                      color: Theme.of(context).colorScheme.secondary,
                    ),
                  ),
                ),
                Expanded(
                  child: Padding(
                    padding: const EdgeInsets.all(8.0),
                    child: Text(
                      title,
                      style: Theme.of(context).textTheme.bodyText1,
                    ),
                  ),
                )
              ]),
        ),
      ),
    );
  }
}
Let’s clarify a couple of issues, we could?
- Since, the icon itself will differ, we’ll take the icon as a subject.
- The width worth is for the SizedBox that’ll act to comprise the cardboard and forestall overflow. Not solely that SizedBox additionally permits the usage of the Expanded widget.
- On the finish of the day these playing cards are hyperlinks to a different web page, so we’ll want routes as properly.
- We’ll make the sides of the cardboard spherical with RoundedRectangleBorder.
- When InkWell is tapped, we’ll go to the respective sub-page. Inkwell offers off a ripple impact when tapped which is sweet for the consumer expertise.
- Icon might be contained in the Round Avatar.
Quote Card
Now, let’s make a quote card. Sometimes quotes might be refreshed each day by admin, however we’ll use a hardcoded one. Let’s head over to the quote_card_widget.dart file.
import 'package deal:flutter/materials.dart';

class DailyQuotes extends StatelessWidget {
  // width for our card
 // #1
  last double width;
  const DailyQuotes(this.width, {Key? key}) : tremendous(key: key);

  @override
  Widget construct(BuildContext context) {
    return Container(
      constraints:
          // Regulate the peak by content material
          // #2
          const BoxConstraints(maxHeight: 180, minHeight: 160),
      width: width,
      alignment: Alignment.heart,
      padding: const EdgeInsets.all(2),
      youngster: Card(
          elevation: 4,
          form: const RoundedRectangleBorder(
            borderRadius: BorderRadius.all(Radius.round(10.0)),
          ),
          youngster: Row(
            mainAxisAlignment: MainAxisAlignment.spaceBetween,
            crossAxisAlignment: CrossAxisAlignment.begin,
            youngsters: [
              // #3
              Expanded(
                flex: 2,
                child: Column(
                  mainAxisAlignment: MainAxisAlignment.start,
                  crossAxisAlignment: CrossAxisAlignment.start,
                  children: [
                    Padding(
                      // Adjust padding
                     // #2
                      padding: const EdgeInsets.only(
                          top: 10, left: 4, bottom: 10, right: 4),
                      child: Text(
                        "Bhagavad Gita",
                        style: Theme.of(context).textTheme.headline2,
                      ),
                    ),
                    Padding(
                      padding: const EdgeInsets.only(top: 6, left: 4, right: 4),
                      child: Text(
                        "Calmness, gentleness, silence, self-restraint, and purity: these are the disciplines of the mind.",
                        style: Theme.of(context).textTheme.bodyText2,
                        overflow: TextOverflow.clip,
                        softWrap: true,
                      ),
                    ),
                  ],
                ),
              ),
              Expanded(
                youngster: ClipRRect(
                  borderRadius: const BorderRadius.solely(
                      topRight: Radius.round(10.0),
                      bottomRight: Radius.round(10.0)),
                  youngster: Picture.asset(
                    "belongings/photographs/image_3.jpg",
                    match: BoxFit.cowl,
                  ),
                ),
              )
            ],
          )),
    );
  }
}
Let’s go over minor particulars:
- The cardboard could cause an overflow error so it is necessary to have mounted width.
- Content material particularly the quote if dynamic could cause overflow error, so adjustable top will be supplied with constraints.
- The cardboard has been divided into Textual content and Picture part with Row, whereas textual content occupies 2/3 house accessible with Expanded and flex.
Reminder: You need to use the picture of your alternative, however be sure so as to add the trail on the pubspec file.
Placing All of the Items Collectively
Now, that our widgets are prepared let’s add them to the house display. Presently, our house display’s code is:
import 'package deal:flutter/materials.dart';
import 'package deal:supplier/supplier.dart';
// Customized
import 'package deal:temple/globals/suppliers/permissions/app_permission_provider.dart';
import 'package deal:temple/globals/widgets/app_bar/app_bar.dart';
import 'package deal:temple/globals/settings/router/utils/router_utils.dart';
import 'package deal:temple/globals/widgets/bottom_nav_bar/bottom_nav_bar.dart';
import 'package deal:temple/globals/widgets/user_drawer/user_drawer.dart';

class House extends StatefulWidget {
  const House({Key? key}) : tremendous(key: key);

  @override
  State<House> createState() => _HomeState();
}

class _HomeState extends State<House> {
  // create a worldwide key for scafoldstate
  last GlobalKey<ScaffoldState> _scaffoldKey = GlobalKey();

  @override
  Widget construct(BuildContext context) {
    return Scaffold(
      // Present key to scaffold
      key: _scaffoldKey,
      // Modified to customized appbar
      appBar: CustomAppBar(
        title: APP_PAGE.house.routePageTitle,
        // cross the scaffold key to customized app bar
        // #3
        scaffoldKey: _scaffoldKey,
      ),
      // Move our drawer to drawer property
      // if you wish to slide proper to left use
      endDrawer: const UserDrawer(),
      bottomNavigationBar: const CustomBottomNavBar(
        navItemIndex: 0,
      ),
      major: true,
      physique: SafeArea(
        youngster: FutureBuilder(
            // Name getLocation perform as future
            // its very crucial to set hearken to false
            future: Supplier.of<AppPermissionProvider>(context, hear: false)
                .getLocation(),
            // do not want context in builder for now
            builder: ((_, snapshot) {
              // if snapshot connectinState is none or ready
              if (snapshot.connectionState == ConnectionState.ready ||
                  snapshot.connectionState == ConnectionState.none) {
                return const Heart(youngster: CircularProgressIndicator());
              } else {
                // if snapshot connectinState is lively

                if (snapshot.connectionState == ConnectionState.lively) {
                  return const Heart(
                    youngster: Textual content("Loading..."),
                  );
                }
                // if snapshot connection state is finished
              //==========================//
             // Exchange this part
                return const Heart(
                  youngster: Directionality(
                      textDirection: TextDirection.ltr,
                      youngster: Textual content("This Is house")),
                );
              //==========================//
              }
            })),
      ),
    );
  }
}
First, we’ll must caculate the accessible width for the widgets. MediaQurery class can be utilized to take action. So, add the next code proper after the BuildContext methodology and earlier than we return Scaffold.
  // Gadget width
    last deviceWidth = MediaQuery.of(context).measurement.width;
    // Obtainable width
    last availableWidth = deviceWidth -
        MediaQuery.of(context).padding.proper -
        MediaQuery.of(context).padding.left;
Are you able to calculate the accessible top of the machine?
Now, so as to add our widgets to the house display, we’ll change the part that handles the “*Snapshot.carried out *” with the code beneath.
return SafeArea(
                // Entire view might be scrollable
                // #1
                youngster: SingleChildScrollView(
                    // Column
                    youngster: Column(youngsters: [
                  // FIrst child would be quote card
                  // #2
                  DailyQuotes(availableWidth),
                  // Second child will be GriDview.count with padding of 4
                  // #2
                  Padding(
                    padding: const EdgeInsets.all(4),
                    child: GridView.count(
                      // scrollable
                      physics: const ScrollPhysics(),
                      shrinkWrap: true,
                      // two grids
                      crossAxisCount: 2,
                      //  Space between two Horizontal axis
                      mainAxisSpacing: 10,
                      //  Space between two vertical axis
                      crossAxisSpacing: 10,
                      children: [
                        // GridView Will have children
                       // #3
                        CardButton(
                          Icons.temple_hindu_sharp,
                          "Temples Near You",
                          availableWidth,
                          APP_PAGE.temples.routeName, // Route for temples
                        ),
                        CardButton(
                          Icons.event,
                          "Coming Events",
                          availableWidth,
                          APP_PAGE.home.routeName, // Route for homescreen we are not making these for MVP
                        ),
                        CardButton(
                          Icons.location_pin,
                          "Find Venues",
                          availableWidth,
                          APP_PAGE.home.routeName,
                        ),
                        CardButton(
                          Icons.music_note,
                          "Morning Prayers",
                          availableWidth,
                          APP_PAGE.home.routeName,
                        ),
                        CardButton(
                          Icons.attach_money_sharp,
                          "Donate",
                          availableWidth,
                          APP_PAGE.home.routeName,
                        ),
                      ],
                    ),
                  )
                ])),
              );
- Our house web page might be SingleChildScrollView with a column as its youngsters.
- The column can have two youngsters, the primary one is the quote card and the second might be GridView.Depend.
- The GridView does have all of the hyperlinks that might be current within the production-ready app. However for now, we’ll solely use the primary card that takes us to the temple display.
Create New Route
You will get an error mentioning no temples route identify, that is as a result of we have not but created a temples route. To take action let’s head over to router_utils.dart file within the “libs/settings/router/utils” folder.
// add temples within the checklist of enum choices
enum APP_PAGE { onboard, auth, house, search, store, favourite, temples }

extension AppPageExtension on APP_PAGE {
  // add temple path for routes
    change (this) {
...
// Do not put "https://dev.to/" infront of path
      case APP_PAGE.temples:
        return "house/temples";
...
    }
  }

// for named routes
  String get routeName {
    change (this) {
...
         case APP_PAGE.temples:
        return "TEMPLES";
...
     }
  }

// for web page titles

  String get routePageTitle {
    change (this) {
   ...
      case APP_PAGE.temples:
        return "Temples Close to You";
     ...
    }
  }
}
Temple might be a sub-page of the house web page, therefore the route path might be “house/temples” with no “https://dev.to/” on the entrance.
Temples Display
Now we have to add the respective routes to AppRouter, however we’ll do this later, first, we’ll create the temple display with the checklist of temple widgets.
Temple Merchandise Widget
We’ve already made the temple_item_widget.dart file, let’s create a card widget that’ll show data on the temple we fetch from google’s place API.
temple_item_widget.dart
import 'package deal:flutter/materials.dart';

class TempleItemWidget extends StatefulWidget {
  // Fields that'll form the Widget
  last String title;
  last String imageUrl;
  last String tackle;
  last double width;
  last String itemId;

  const TempleItemWidget(
      {required this.title,
      required this.imageUrl,
      required this.tackle,
      required this.width,
      required this.itemId,

      // required this.establishedDate,
      Key? key})
      : tremendous(key: key);

  @override
  State<TempleItemWidget> createState() => _TempleItemWidgetState();
}

class _TempleItemWidgetState extends State<TempleItemWidget> {
  @override
  Widget construct(BuildContext context) {
    return SizedBox(
      // Card can have top of 260
      top: 260,
      width: widget.width,
      youngster: Card(
        key: ValueKey<String>(widget.itemId),
        elevation: 4,
        form: RoundedRectangleBorder(
          borderRadius: BorderRadius.round(10),
        ),
        margin: const EdgeInsets.all(10),
        youngster: Column(
          // Column can have two youngsters stack and a row
           // #1
          youngsters: [
            // Stack will have two children image and title text
            Stack(
              children: [
                ClipRRect(
                  borderRadius: const BorderRadius.only(
                    topLeft: Radius.circular(10),
                    topRight: Radius.circular(10),
                  ),
                  child: Image.network(
                    widget.imageUrl,
                    fit: BoxFit.cover,
                    width: widget.width,
                    height: 190,
                  ),
                ),
                Positioned(
                  bottom: 1,
                  child: Container(
                    color: Colors.black54,
                    width: widget.width,
                    height: 30,
                    child: Text(
                      widget.title,
                      style: Theme.of(context)
                          .textTheme
                          .headline3!
                          .copyWith(color: Colors.white),
                      // softWrap: true,
                      overflow: TextOverflow.fade,
                      textAlign: TextAlign.center,
                    ),
                  ),
                ),
              ],
            ),
            Row(
                // Rows can have two icons as youngsters
              // #2
                crossAxisAlignment: CrossAxisAlignment.heart,
                mainAxisAlignment: MainAxisAlignment.spaceEvenly,
                youngsters: [
                  Expanded(
                    child: IconButton(
                      onPressed: () {
                        print("Donate Button Pressed");
                      },
                      icon: Icon(
                        Icons.attach_money,
                        color: Colors.amber,
                      ),
                    ),
                  ),
                  Expanded(
                    child: IconButton(
                        onPressed: () {
                          print("Toggle Fav Button Pressed");
                        },
                        icon: const Icon(
                          Icons.favorite,
                          color: Colors.red,
                        )),
                  )
                ]),
          ],
        ),
      ),
    );
  }
}
There are two issues completely different from the customized widgets we have now already made beforehand from this card. This widget can have a column with two youngsters, Stack and a Row.
- Stack will use the picture as its background. The title might be positioned on the backside of the stack. The textual content widget is contained in the container with a clear black background. It is carried out to make it extra seen.
- The Row might be consisting of two icon buttons, Favourite and Donation.
Within the subsequent half, we are going to add toggle Favourite performance however Donation will stay hardcoded for this tutorial.
Are you able to recommend to me a greater icon for donation?
Temples Record Display
By the tip, our temple display web page will appear like this.

We spent fairly a while within the earlier chapter fetching close by temples from google’s Place API. Now, it is time to see our leads to fruition. The futureBuilder methodology might be greatest fitted to this situation. As for the long run property of the category, we’ll present the getNearbyPlaes() methodology we created in TempleStateProvider class.
It is a lengthy code, so let’s go over it a small chunk at a time.
Imports and Class
import 'package deal:flutter/materials.dart';
import 'package deal:google_maps_flutter/google_maps_flutter.dart';
import 'package deal:supplier/supplier.dart';
import 'package deal:temple/globals/suppliers/permissions/app_permission_provider.dart';
import 'package deal:temple/globals/settings/router/utils/router_utils.dart';
import 'package deal:temple/globals/widgets/app_bar/app_bar.dart';
import 'package deal:temple/globals/widgets/user_drawer/user_drawer.dart';
import 'package deal:temple/screens/temples/suppliers/temple_provider.dart';
import 'package deal:temple/screens/temples/widgets/temple_item_widget.dart';

class TempleListScreen extends StatefulWidget {
  const TempleListScreen({Key? key}) : tremendous(key: key);

  @override
  State<TempleListScreen> createState() => _TempleListScreenState();
}

class _TempleListScreenState extends State<TempleListScreen> {
  last GlobalKey<ScaffoldState> _scaffoldKey = GlobalKey();
  // location is required as enter for getNearbyTemples methodology
  LatLng? _userLocation;

  @override
  void didChangeDependencies() {
    // after the construct load get the consumer location from AppPermissionProvider
    _userLocation = Supplier.of<AppPermissionProvider>(context, hear: false)
        .locationCenter;
    tremendous.didChangeDependencies();
  }
This half is the place we import modules and declare a StatefulWidget Class. The necessary half to note right here is didChangeDependencies(), the place we’re getting the consumer location from AppPermissionProvider class. Why? as a result of we’ll want the consumer’s location to get temples close to to the consumer.
Gadget Width and Again Arrow
...
 @override
  Widget construct(BuildContext context) {
    // Gadget width
    last deviceWidth = MediaQuery.of(context).measurement.width;
    // Subtract paddings to calculate accessible dimensions
    last availableWidth = deviceWidth -
        MediaQuery.of(context).padding.proper -
        MediaQuery.of(context).padding.left;

    return Scaffold(
      key: _scaffoldKey,
      drawer: const UserDrawer(),
      appBar: CustomAppBar(
        scaffoldKey: _scaffoldKey,
        title: APP_PAGE.temples.routePageTitle,
        // Its a subpage so we'll use backarrow and now backside nav bar
        isSubPage: true,
      ),
      major: true,
      physique: SafeArea(
        youngster: ....
Like earlier than we’ll now return a scaffold with an app bar, accessible width, and so forth. Two issues are completely different from another screens right here. First is that this can be a sub-page, so our dynamic app bar might be consisting of a back-arrow. The second is that since this web page is a sub-page there will not be Backside Nav Bar as properly.
FutureBuilder With API’s Outcomes
Persevering with from earlier than:
...
FutureBuilder(
          // cross the getNearyByTemples as future
         // #1
          future: Supplier.of<TempleProvider>(context, hear: false)
              .getNearyByTemples(_userLocation as LatLng),
          builder: (context, snapshot) {
                     if (snapshot.connectionState == ConnectionState.ready ||
                snapshot.connectionState == ConnectionState.none) {
              return const Heart(youngster: CircularProgressIndicator());
            } else {
              if (snapshot.connectionState == ConnectionState.lively) {
                return const Heart(youngster: Textual content("Loading..."));
              } else {
                // After the snapshot connectionState is finished
                // if theres an error return house
               // # 2
                if (snapshot.hasError) {
                  Navigator.of(context).pop();
                }

                //  examine if snapshot has knowledge return on temple widget checklist
               if (snapshot.hasData) {
                   // # 3
                  last templeList = snapshot.knowledge as Record;
                  return SizedBox(
                    width: availableWidth,
                    youngster: Column(
                      youngsters: [
                        Expanded(
                            child: ListView.builder(
                          itemBuilder: (context, i) => TempleItemWidget(
                            address: templeList[i].tackle,
                            imageUrl: templeList[i].imageUrl,
                            title: templeList[i].identify,
                            width: availableWidth,
                            itemId: templeList[i].placesId,
                          ),
                          itemCount: templeList.size,
                        ))
                      ],
                    ),
                  );
                } else {
                  //  examine if snapshot is empty return textual content widget
                   // # 3
                  return const Heart(
                      youngster: Textual content("There are not any temples round you."));
                }
              }
            }
          },
        )
FutureBuilder to the rescue.
- This FutureBuilder is utilizing the getNearyByTemples() methodology from TemplesProvider class we created within the earlier session.
- Right here, we’re checking if the QuerySnapshot(a consequence from an async operation) encountered an error. If that’s the case, we’ll pop this route and return to the homepage. If you’d like you need to use an alert field or SnackBar to let customers know. Just a little one thing to follow for your self.
- If QuerySnapshot has knowledge, we’ll map it right into a ListBuilder consisting of TempleItem Widgets.
- If QuerySnapshot is empty then simply return a textual content letting the consumer know of the state of affairs.
Here is the entire file, should you’re confused with my chunking ability.
import 'package deal:flutter/materials.dart';
import 'package deal:google_maps_flutter/google_maps_flutter.dart';
import 'package deal:supplier/supplier.dart';
import 'package deal:temple/globals/suppliers/permissions/app_permission_provider.dart';
import 'package deal:temple/globals/settings/router/utils/router_utils.dart';
import 'package deal:temple/globals/widgets/app_bar/app_bar.dart';
import 'package deal:temple/globals/widgets/user_drawer/user_drawer.dart';
import 'package deal:temple/screens/temples/suppliers/temple_provider.dart';
import 'package deal:temple/screens/temples/widgets/temple_item_widget.dart';

class TempleListScreen extends StatefulWidget {
  const TempleListScreen({Key? key}) : tremendous(key: key);

  @override
  State<TempleListScreen> createState() => _TempleListScreenState();
}

class _TempleListScreenState extends State<TempleListScreen> {
  last GlobalKey<ScaffoldState> _scaffoldKey = GlobalKey();
  // location is required as enter for getNearbyTemples methodology
  LatLng? _userLocation;

  @override
  void didChangeDependencies() {
    // after the construct load get the consumer location from AppPermissionProvider
    _userLocation = Supplier.of<AppPermissionProvider>(context, hear: false)
        .locationCenter;
    tremendous.didChangeDependencies();
  }

  @override
  Widget construct(BuildContext context) {
    // Gadget width
    last deviceWidth = MediaQuery.of(context).measurement.width;
    // Subtract paddings to calculate accessible dimensions
    last availableWidth = deviceWidth -
        MediaQuery.of(context).padding.proper -
        MediaQuery.of(context).padding.left;

    return Scaffold(
      key: _scaffoldKey,
      drawer: const UserDrawer(),
      appBar: CustomAppBar(
        scaffoldKey: _scaffoldKey,
        title: APP_PAGE.temples.routePageTitle,
        // Its a subpage so we'll use backarrow and now backside nav bar
        isSubPage: true,
      ),
      major: true,
      physique: SafeArea(
        youngster: FutureBuilder(
          // cross the getNearyByTemples as future
          future: Supplier.of<TempleProvider>(context, hear: false)
              .getNearyByTemples(_userLocation as LatLng),
          builder: (context, snapshot) {
            if (snapshot.connectionState == ConnectionState.ready ||
                snapshot.connectionState == ConnectionState.none) {
              return const Heart(youngster: CircularProgressIndicator());
            } else {
              if (snapshot.connectionState == ConnectionState.lively) {
                return const Heart(youngster: Textual content("Loading..."));
              } else {
                // After the snapshot connectionState is finished
                // if theres an error return house
                if (snapshot.hasError) {
                  Navigator.of(context).pop();
                }

                //  examine if snapshot has knowledge return on temple widget checklist
                if (snapshot.hasData) {
                  last templeList = snapshot.knowledge as Record;
                  return SizedBox(
                    width: availableWidth,
                    youngster: Column(
                      youngsters: [
                        Expanded(
                            child: ListView.builder(
                          itemBuilder: (context, i) => TempleItemWidget(
                            address: templeList[i].tackle,
                            imageUrl: templeList[i].imageUrl,
                            title: templeList[i].identify,
                            width: availableWidth,
                            itemId: templeList[i].placesId,
                          ),
                          itemCount: templeList.size,
                        ))
                      ],
                    ),
                  );
                } else {
                  //  examine if snapshot is empty return textual content widget
                  return const Heart(
                      youngster: Textual content("There are not any temples round you."));
                }
              }
            }
          },
        ),
      ),
    );
  }
}
Add Temple’s Display to AppRouter
All that is left now could be so as to add Temples Display to the app’s router’s checklist. Let’s do it shortly on app_router.dart.
...
 routes: [
        // Add Home page route
        GoRoute(
            path: APP_PAGE.home.routePath,
            name: APP_PAGE.home.routeName,
            builder: (context, state) => const Home(),
            routes: [
              GoRoute(
                path: APP_PAGE.temples.routePath,
                name: APP_PAGE.temples.routeName,
                builder: (context, state) => const TempleListScreen(),
              )
            ]),
...
The temple display is a sub-page, so add it as a sub-route of the homepage.
Error: Associated to Storage Ref
Should you encountered an error associated to storage ref, that is as a result of in our TemplesProvider class we’re referencing a folder named “TempleImages” which has photographs we’re studying. Create that folder in your storage, then add the pictures. They need to have the identical identify as in our imagePaths checklist in the identical class. Should you can’t make it work one way or the other, then take away all of the codes associated to Firebase Storage and simply present a hardcoded URL as a picture reference.
Abstract
Let’s summarize what we did on this part.
- We added new recordsdata and folders in a structured method.
- We created a Dynamic Card Button and Each day Quotes Show widget, that is making our homepage lovely.
- We added the primary subpage of our app, the temples checklist display.
- Temples Display has an inventory of Card Widgets to show data on temples.
- Temples Display has made good use FutureBuilder.
Chapter 13: RealTime Modifications With Flutter and Firebase

Intro
We’ll now toggle the favourite icon for temples. We’ll use Firestore to retailer all of the favorites checklist for every consumer’s doc within the “customers” assortment. The Firebase Perform will assist us fetch the instant checklist and replace it. Whereas Stream will present the modifications in real-time for customers to see. You will discover the supply code so removed from right here.
Firebase Cloud Features To Replace Firestore In RealTime
Now, we’ll create a cloud perform in our index.js file. This perform will take an “id” as enter. This id is place_id supplied by Google Maps Locations API.
- It’s going to search and fetch the present consumer’s doc. We have already created an array favTempleList whereas registering with the onCreate set off.
- The perform then will look by means of the checklist and toggle the worth.
// Add temple to my fav checklist:
exports.addToFavList = features.runWith({
    timeoutSeconds: 120,
    reminiscence: "128MB"
}).https.onCall(async (knowledge, context) => {
    const templeId = knowledge.templeId;
    strive {
        // Get consumer doc
        let userDocRef = await db.assortment('customers').doc(context.auth.uid).get();

        // extract favTempleLis from the doc
       // #1
        let favTempleList = userDocRef._fieldsProto.favTempleList;

        // if fav checklist is empty
        // #2
     //============================//
        if (favTempleList.arrayValue.values.size === 0) {
            // Put the id within the checklist
            const templeList = [templeId];
            features.logger.log("Fav checklist is empty");

            // Replace the favTemple checklist
            await db.assortment('customers').doc(context.auth.uid).set({ favTempleList: templeList }, { merge: true });
//============#2 ends right here=====================//
        } else {
            features.logger.log("Fav Temple Record will not be empty");

            // Make checklist of accessible ids
            // firebase suppliers arrays values as such fileName.arrayValue.values array
            // consisting dictionary with stringValue as key and its worth is the merchandise saved
            // #3
            features.logger.log(favTempleList.arrayValue.values[0]);
            let tempArrayValList = favTempleList.arrayValue.values.map(merchandise => merchandise.stringValue);

            // if not empty Test if the temple id already exists
           // #4
            let hasId = tempArrayValList.contains(templeId);

            // in that case take away the id if no simply add the checklist
           // #5
//============================//
            if (hasId === true) {

                // Usr filter to take away worth if exists
                let newTemplesList = tempArrayValList.filter(id => id !== templeId);

                await db.assortment('customers').doc(context.auth.uid).set({ favTempleList: newTemplesList }, { merge: true });
//==============#5 ends right here===========//
            }
            // If the id doesnot already exists
           // #6
//============================//

            else {
                // first create a recent copy
                let idList = [...tempArrayValList];

                // add the brand new id to the recent checklist
                idList.push(templeId);

                // replace the recent checklist to the firesotre
                await db.assortment('customers').doc(context.auth.uid).set({ favTempleList: idList }, { merge: true });
//==============#6 ends right here===========//

            }

        }

    } catch (e) { features.logger.log(e); }

    // Return the Strig carried out.
    //#7
    return "Completed";
});
A few strains of codes listed below are on different features and triggers we have already carried out. So, let’s solely go over a couple of necessary ones:
-
We’re extracting the firebase subject named “favTempleList” from the consumer documentation. That subject is an array.
-
We’re checking if that array is empty. If that’s the case, we are able to simply add the brand new place_id we obtained from the perform name to the array after which replace the doc. One factor to note right here is that I’m utilizing the merge possibility for an empty array. That is as a result of this set() methodology would not simply set/replace a subject in a doc, it units/updates the entire doc itself. So, if the **{merge: true} **possibility will not be supplied it’s going to overwrite each subject there, in our case username, electronic mail, location, and so forth.
-
Now, we enter the part the place the temple checklist will not be empty. Then first we have to extract the checklist of values(id’s) which can be already current there.
-
Test if the brand new ID, we obtained from the strategy name, is already current within the checklist we obtained from Firestore.
-
If the id is already there then we have to take away it. We’ll accomplish that by combining filter() and contains() strategies. After filtering the present place_id, we’ll replace the Firestore consumer doc with the recent checklist of ids.
-
If the place_id will not be there then we have to add it. We’ll push the present place_id into the checklist. After which replace the doc like earlier than.
-
Bear in mind we must always at all times terminate Firebase features ultimately. We do not want any knowledge from this so we’ll simply terminate it by returning a string.
Supplier
Now, we’ll want so as to add a technique in our Supplier class that’ll name the HTTPS callable perform we simply created. In our TempleProvider class let’s add one other methodology addToFavList.
 void addToFavList(String templeId) async {
    // Instantiate callable from index.js
    HttpsCallable addToFav = features.httpsCallable('addToFavList');
    strive {
      // Run the callable with the passing the present temples ID
      await addToFav.name(<String, String>{
        'templeId': templeId,
      });
    } catch (e) {
      rethrow;
    }
  }
We’re not updating or returning something right here. That is as a result of we are able to get knowledge from snapshots from a stream, as you will see later. BTW, you possibly can add this methodology to AuthStateProvider as a result of it offers with consumer assortment.
Use Stream & StreamBuilder To Output Modifications In RealTime
We will merely use the streams for this. So, we’ll join with Firesotre with streams and replace the display with StreamBuilder. So, the place precisely are we utilizing this StreamBuilder?
Good query, you see getting real-time updates, means reloading(re-reading) the identical collections on each change. It’s clearly reminiscence costly. However it could possibly value costly as properly since Firebase fees for a number of reads. So, we do not need to load the checklist of temples, many times, to toggle a single favourite icon. So, as a substitute, let’s simply wrap solely our favourite icon with stream builder.
On temple_item_widget.dart make these modifications.
Create a perform that’ll name the addToFavList methodology from the supplier class.
  // perform to name addToFavList from supplier class
  // It's going to take id and providerclass as enter
  void toggleFavList(String placeId, TempleProvider templeProvider) {
    templeProvider.addToFavList(placeId);
  }
Contained in the construct methodology of sophistication earlier than the return assertion.
// Fetch the consumer doc as a stream
//#1
 Stream<DocumentSnapshot> qSnapShot = FirebaseFirestore.occasion
        .assortment('customers')
        .doc(FirebaseAuth.occasion.currentUser!.uid)
        .snapshots();

// Instantiate supplier methodology to cross as argument for tooggle FavList
//#2
    TempleProvider templeProvider =
        Supplier.of<TempleProvider>(context, hear: false);
- As talked about earlier than we’ll get the Stream from Firestore, a doc utilizing the present consumer’s ID.
- Instantiate supplier methodology to cross as an argument for toggleFavList perform. However be sure to show off the listener.
Exchange FavIcon Part With StreamBuilder
 StreamBuilder(
                      // Use newest replace supplied by stream
                      // #1
                      stream: qSnapShot,
                      builder: (context, snapshot) {
                        if (snapshot.connectionState ==
                                ConnectionState.ready ||
                            snapshot.connectionState == ConnectionState.none) {
                          return const CircularProgressIndicator();
                        } else {
                          // Get documentsnaphot which is given from the stream
                         // #2
                          last docData = snapshot.knowledge as DocumentSnapshot;

                          // Fetch favTempleList array from consumer doc
                         // # 3
                          last favList = docData['favTempleList'] as Record;

                          // Test if the curent widget id is among the many favTempLlist
                         // #4
                          last isFav = favList.incorporates(widget.itemId);

                          return Expanded(
                            youngster: IconButton(
                                // Name toggleFavlist methodology on faucet
                               // #5
                                onPressed: () => toggleFavList(
                                    widget.itemId, templeProvider),
                                icon: Icon(
                                  Icons.favourite,
                                  // Present coloration by worth of isFav
                                 // #6
                                  coloration: isFav ? Colours.pink : Colours.gray,
                                )),
                          );
                        }
                      })
Right here, within the StreamBuilder Class we:
- Used the stream we obtained from Firestore ‘customers’ assortment as a stream. That method the most recent change is
mirrored asap. - When the ConnectionState is finished, first we get the most recent knowledge from the snapshot, which would be the present consumer’s doc.
- Get the most recent up to date favTempleList array as a Record from the doc.
- Test if the present ID exists within the favItemList, which is the itemId subject handed down from the temples display.
- On press of the center icon button name the toggleFavList methodology of the category.
- Change the colour of the center icon primarily based on the presence or absence of itemId on favTempleList.
And with that newest real-time modifications might be mirrored within the app.
Last Code
The temple_item_widget.dart file appears like this after the modifications.
import 'package deal:cloud_firestore/cloud_firestore.dart';
import 'package deal:firebase_auth/firebase_auth.dart';
import 'package deal:flutter/materials.dart';
import 'package deal:supplier/supplier.dart';
import 'package deal:temple/screens/temples/suppliers/temple_provider.dart';

class TempleItemWidget extends StatefulWidget {
  // Fields that'll form the Widget
  last String title;
  last String imageUrl;
  last String tackle;
  last double width;
  last String itemId;

  const TempleItemWidget(
      {required this.title,
      required this.imageUrl,
      required this.tackle,
      required this.width,
      required this.itemId,

      // required this.establishedDate,
      Key? key})
      : tremendous(key: key);

  @override
  State<TempleItemWidget> createState() => _TempleItemWidgetState();
}

class _TempleItemWidgetState extends State<TempleItemWidget> {
  // perform to name addToFavList from supplier class
  // It's going to take id and providerclass as enter
  void toggleFavList(String placeId, TempleProvider templeProvider) {
    templeProvider.addToFavList(placeId);
  }

  @override
  Widget construct(BuildContext context) {
    // Fetch the consumer doc as stream
    Stream<DocumentSnapshot> qSnapShot = FirebaseFirestore.occasion
        .assortment('customers')
        .doc(FirebaseAuth.occasion.currentUser!.uid)
        .snapshots();

// Instantiate supplier methodology to cross as argument for tooggle FavList
    TempleProvider templeProvider =
        Supplier.of<TempleProvider>(context, hear: false);

    return SizedBox(
      // Card can have top of 260
      top: 260,
      width: widget.width,
      youngster: Card(
        key: ValueKey<String>(widget.itemId),
        elevation: 4,
        form: RoundedRectangleBorder(
          borderRadius: BorderRadius.round(10),
        ),
        margin: const EdgeInsets.all(10),
        youngster: Column(
          // Column can have two youngsters stack and a row
          youngsters: [
            // Stack will have two children image and title text
            Stack(
              children: [
                ClipRRect(
                  borderRadius: const BorderRadius.only(
                    topLeft: Radius.circular(10),
                    topRight: Radius.circular(10),
                  ),
                  child: Image.network(
                    widget.imageUrl,
                    fit: BoxFit.cover,
                    width: widget.width,
                    height: 190,
                  ),
                ),
                Positioned(
                  bottom: 1,
                  child: Container(
                    color: Colors.black54,
                    width: widget.width,
                    height: 30,
                    child: Text(
                      widget.title,
                      style: Theme.of(context)
                          .textTheme
                          .headline2!
                          .copyWith(color: Colors.white),
                      // softWrap: true,
                      overflow: TextOverflow.fade,
                      textAlign: TextAlign.center,
                    ),
                  ),
                ),
              ],
            ),
            Row(
                // Rows can have two icons as youngsters

                crossAxisAlignment: CrossAxisAlignment.heart,
                mainAxisAlignment: MainAxisAlignment.spaceEvenly,
                youngsters: [
                  Expanded(
                    child: IconButton(
                      onPressed: () {
                        print("Donate Button Pressed");
                      },
                      icon: const Icon(
                        Icons.attach_money,
                        color: Colors.amber,
                      ),
                    ),
                  ),
                  StreamBuilder(
                      // User the ealier stream
                      stream: qSnapShot,
                      builder: (context, snapshot) {
                        if (snapshot.connectionState ==
                                ConnectionState.waiting ||
                            snapshot.connectionState == ConnectionState.none) {
                          return const CircularProgressIndicator();
                        } else {
                          // Get documentsnaphot which is given from the stream
                          final docData = snapshot.data as DocumentSnapshot;
                          // Fetch favTempleList array from user doc
                          final favList = docData['favTempleList'] as Record;
                          // Test if the curent widget id is among the many favTempLlist
                          last isFav = favList.incorporates(widget.itemId);
                          return Expanded(
                            youngster: IconButton(
                                // Name toggleFavlist methodology on faucet
                                onPressed: () => toggleFavList(
                                    widget.itemId, templeProvider),
                                icon: Icon(
                                  Icons.favourite,
                                  // Present coloration by worth of isFav
                                  coloration: isFav ? Colours.pink : Colours.gray,
                                )),
                          );
                        }
                      })
                ]),
          ],
        ),
      ),
    );
  }
}
Abstract
On this thrilling quick chapter we:
- Created a Firebase HTTP Callable perform to replace a doc in Firestore.
- We additionally wrote a easy instruction within the supplier class to deal with the callable.
- Lastly utilizing stream and stream builder we displayed real-time modifications on our display.
Chapter Fourteen: Flutter App Improvement | Conclusion

Intro
This would be the final chapter of this weblog. Let’s go over the issues we did on this very lengthy weblog.
- App Launch Icon was created.
- Carried out a Splash display.
- Designed International Theme for our app.
- Created dynamic widgets like App Bar, Backside Navigation Bar, and Drawer.
- Set Up Firebase native in addition to within the cloud.
- Design Authentication Display with little animation.
- Person Firebase Authentication for our app.
- Used Permission Handler and Location Packages to entry consumer location.
- We additionally fetched close by temples utilizing Google Place API and consumer location.
- Created some customized buttons for our software.
- We then used Streams and StreamBuilder to toggle favourite temples in real-time.
The place to Go From Right here?
You are able to do a couple of issues to enhance this app(in any order).
- Replace the Favourite Display such that it will show an inventory of your favourite temples and retailers(extra on that on #2).
- You will discover a hardcoded model of the store web page on this repo. Similar to within the temple, create a Firestore assortment and fetch knowledge from there. Do not change the design, it is to offer you an impression that you simply’re working with a designer.
- Add a save/favourite icon, within the store gadgets, it must be robotically up to date within the favorites display identical to the favourite temples checklist.
- We’ve not a lot labored on firebase safety guidelines. You’ll be able to add these by yourself for follow. Furthermore, you may as well add perform triggers to validate and filter undesirable consumer conduct.
- Throughout registration we aren’t verifying electronic mail. Add verification steps to the authentication.
- Make a subpage like a temple checklist, from any of the button playing cards. As an illustration, add a donation portal. You’ll be able to even add a well-liked cost gateway like Stripe to follow.
Simply use your creativeness. Should you occur to enhance the app simply I hope you will share it with everybody.
Referrals
This was a incredible journey, however I did not do all of it on my own. There are a number of blogs, programs, and books which have helped me perceive the flutter programming language. So, I want to share a few of my suggestions if you wish to study additional.
Dart
- Dart Programming for Flutter: Newbies Tutorial, a free video tutorial on YouTube for absolute learners.
You do not have to dwell extra right here since you’ll study dart as you make the flutter app.
Flutter
- Flutter & Dart – The Full Information [2022 Edition] by Academind. If I’ve to suggest just one course for flutter then it’s going to be this one. That is paid course on Udemy that value round 13 USD, however it’s value it.
- Flutter & Dart crash course, one other course by Academind, however its free and accessible on youtube. So, do test it out.
- Here is the weblog which helped me to grasp authentication movement, clear coding, and way more.
- Should you desire to learn books then strive Flutter Apprentice by raywenderlich Tutorial Staff. An entire and insightful e-book for flutter fanatics.
Firebase
- Cloud Features for Firebase, a really useful tutorial on firebase features on YouTube.
- Should you perceive Hindi, then take a look at this tutorial sequence on YouTube by Mukesh Joshi.
- Get to know Firebase for Flutter from the Firebase crew, though it isn’t quite simple for learners.
- Get to know Cloud Firestore, a tutorial sequence to grasp the basics of Firebase Firestore.
Others
The world of growth on any platform with any programming language is huge. Many people suggest/study a couple of packages which we really feel are vital typically to develop extra different occasions to get a job.
I’d suggest you to study one other state-management package deal for the reason that supplier will not be an ideal one. There are solely two packages I like to recommend both Riverpod or Bloc. There are different packages too that are good however I’d study animation and designs as a substitute of studying state-management one after one other.
Make easy video games like these offline video games in chrome and play retailer. Make a easy Mario sport. That is all to study animation within the Flutter.
Dive deeper into the go router package deal. Be taught extra about cell app architectures.
Should you’re not a designer go to Figma. You will discover many designs underneath CC 4.0 license.
Strive studying books like Lean Begin-Up and implement the precept in your software and enterprise.

Abstract
No matter you do, do not ever simply watch/learn tutorials and never follow. Should you do not strive by your self you will by no means discover and perceive minor issues and silly errors which can be edited out in tutorials. Write blogs like this to reinforce your expertise as a result of instructing is among the greatest methods to study.
Present Help
Thanks for studying this weblog. Greater than something we hope that you’ll create no less than a easy software after this flutter app growth sequence. Please do like and share the weblog. Give us some suggestions on how can we enhance the content material.
We’re Khadka’s Coding Lounge. We create extremely invaluable web sites and cell purposes at an reasonably priced worth. Rent us

