
Nuxt.js, like Vue, helps plugins, which will be of three sorts: custom-built plugins, Vue plugins, and exterior packages and modules. Whereas the Nuxt docs talk about the final two intimately, they solely briefly clarify the best way to construct and use a {custom} plugin in your Nuxt software.
A world {custom} plugin can come in useful in a few conditions. For instance, let’s think about that you may’t discover an open supply plugin for a characteristic you’re making an attempt to implement, otherwise you’re not fully happy with those you discovered. Or, possibly you’re feeling a bit bit artistic and you’ve got a while in your fingers.
On this tutorial, we’ll cowl two completely different choices to construct our personal {custom} plugin, utilizing each Vue and JavaScript. For instance, our {custom} plugin will show my birthday within the console of your Nuxt app, however you possibly can personalize it to suit your challenge’s wants. Let’s get began!
Constructing the element
Step one is to construct the Vue element. For this text, we’ll use a fundamental toast element that can show easy success and error messages. I’ve already constructed one for this text, and we’ll go over it intimately later:
<template>
  <div class="toast-element">
    <div :class="['toast-container', { success: state === 'success', error: state === 'error' }]">
      <div class="icon">
        <svg
          v-if="state === 'success'"
          width="8"
          peak="7"
          viewBox="0 0 8 7"
          fill="none"
          xmlns="http://www.w3.org/2000/svg"
        >
          <path d="M6.96304 0.962891L2.88896 5.37647L1.03711 3.3703" stroke="white" stroke-width="1.5" stroke-linecap="spherical" stroke-linejoin="spherical" />
        </svg>
        <svg
          v-else
          width="3"
          peak="10"
          viewBox="0 0 3 10"
          fill="none"
          xmlns="http://www.w3.org/2000/svg"
        >
          <path d="M1 1.6665V4.99984" stroke="white" stroke-width="2" stroke-linecap="spherical" stroke-linejoin="spherical" />
          <path d="M1 8.3335H1.00833" stroke="white" stroke-width="2" stroke-linecap="spherical" stroke-linejoin="spherical" />
        </svg>
      </div>
      <p>
        {{ message }}
      </p>
    </div>
  </div>
</template>

<script>
export default {
  information () {
    return {
      toastIsVisible: false,
      message: '',
      state: ''
    }
  },
  mounted () {
    this.$retailer.subscribe((mutation, state) => {
      if (mutation.kind === 'toast/showToast') {
        this.message = state.toast.content material
        this.state = state.toast.state
        this.toastIsVisible = true
        doc.querySelector('.toast-element').classList.add('enter')
        setTimeout(() => {
          if (this.toastIsVisible) {
            this.removeToast()
          }
        }, 3000)
      }
    })
  },
  strategies: {
    removeToast () {
      doc.querySelector('.toast-element').classList.change('enter', 'depart')
      setTimeout(() => {
        this.toastIsVisible = false
      }, 240)
    }
  }
}
</script>

<fashion scoped>
.toast-element {
  place: fastened;
  prime: -90px;
  left: 0;
  width: 100%;
  peak: max-content;
  show: flex;
  justify-content: middle;
  align-items: middle;
  z-index: 7;
  opacity: 0;
  transition: all 240ms cubic-bezier(0, 0.0, 0.2, 1) 0s;
}
.enter {
  prime: 20px;
  opacity: 1;
}
.depart {
  prime: 20px;
  rework: scale(0.9);
}
.toast-container {
  width: fit-content;
  border: 1px stable clear;
  border-radius: 5px;
  padding: 0.9375rem 1.875rem;
  show: grid;
  grid-template-columns: repeat(2, max-content);
  column-gap: 0.9375rem;
  align-items: middle;
}
.success {
  border-color: #037F10;
  background-color: #F4FFF6;
}
.error {
  border-color: #FF2525;
  background-color: #FFF4F4;
}
.icon {
  border-radius: 50%;
  show: flex;
}
.success .icon {
  padding: 6px;
  background-color: #037F10;
}
.error .icon {
  padding: 5px 8px 5px 9px;
  background-color: #FF2525;
}
p {
  width: max-content;
  font-size: 1.0625rem;
  font-weight: 400;
}
.success p {
  coloration: #037F10;
}
.error p {
  coloration: #FF2525;
}
</fashion>
The toast element creates two buttons that appear to be the next:
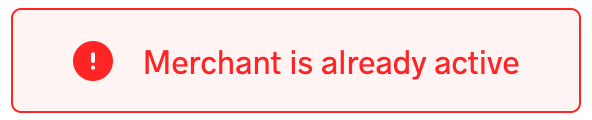

When you assessment the toast element, you’ll discover a name to the shop’s subscribe() methodology. As a result of our element is dynamic, we’ll have to get the content material from someplace, particularly, the shop.
The shop
In our toast element, there are two variables, the toast message and its state, both success or error. With the assistance of Vuex, we’ll retailer the state in our Nuxt app. Subsequently, we’ll want a retailer, ideally a special one from the app’s common retailer:
export const state = () => ({
  content material: '',
  state: ''
})

export const mutations = {
  showToast (state, payload) {
    state.content material = payload.content material
    state.state = payload.state
  }
}
Subscribe the element to the shop
Now that our retailer is prepared, we have to arrange a communication channel between the shop and the toast element. Right here, the subscribe() methodology is useful, subscribing the element to the shop’s mutations. Subsequently, it’s referred to as after each mutation of the shop, receiving the mutation and state objects as arguments. To be taught extra concerning the subscribe() methodology, try the subscribe part on the Vuex API web page.
As a result of the subscribe() methodology known as after every mutation of the shop, we have to affirm that the toast retailer was mutated. As soon as we’ve confirmed that, we are able to go forward and replace the element’s variables, the message, and its state:
this.$retailer.subscribe((mutation, state) => {
  if (mutation.kind === 'toast/showToast') {
    this.message = state.toast.content material
    this.state = state.toast.state
    this.toastIsVisible = true
    doc.querySelector('.toast-element').classList.add('enter')
    setTimeout(() => {
      if (this.toastIsVisible) {
        this.removeToast()
      }
    }, 3000)
  }
})
We verify that the mutation’s kind is toast/showToast as a result of our toast retailer is in toast.js and the mutation is the showToast() methodology.
Initialize the plugin
Now that we’re completed constructing the element and implementing its performance, we have to make it obtainable within the Nuxt app in order that we are able to name a present methodology to point out the toast element after we want it; we’ll achieve this within the plugins folder.
Making the plugin obtainable throughout the app can be referred to as injecting the plugin, and Vue supplies the inject() perform for this objective. This, in flip, prefixes the thing of the present methodology with a $:
export default ({ app, retailer }, inject) => {
  inject('toaster', {
    showToast ({ content material="", state="" }) {
      retailer.commit('toast/showToast', { content material, state })
    }
  })
}
Subsequently, each time we name this $toaster.showToast() methodology in our Nuxt app, we have to cross within the content material and state parameters as effectively.
Nonetheless, in case your plugin is for some JavaScript performance, like in our instance, displaying my birthday, you then’ll solely want the code beneath:
export default ({ app }, inject) => {
  inject('displayBirthday', () => {
    console.log(`March third!`)
  })
}
$displayBirthday() will log my birthday to your console. For a case like this, you wouldn’t want a retailer or a element.
When you’ve paid shut consideration to the 2 code snippets, you’ll discover that the varieties of the second parameter of the inject() perform range. The primary one is an object, whereas the second is a perform. The item kind is beneficial when your plugin may require a number of actions, whereas the perform is greatest for a single motion. Nonetheless, the thing can have only a single methodology in it.
Outline and register the plugin
Earlier than we render the plugin, our Nuxt app wants to substantiate that the toast plugin exists. We will add the code for this utilizing the plugins property within the nuxt.config.js file:
Extra nice articles from LogRocket:
export default {
  plugins: [
    { src: '~/plugins/toaster' }
  ]
}
The plugin injection code is within the plugins/toaster.js file.
Utilizing the plugin
With that, our plugin is able to use! To see our plugin in motion, first, the toast element must be current on the web page. Then, we are able to name the $toaster.showToast() methodology of our retailer and cross alongside the content material and state parameters:
this.$toaster.showToast({
  content material: 'Efficiently logged in!',
  state: 'success'
})
Conclusion
On this article, we’ve discovered the best way to construct a world {custom} plugin in a Nuxt app utilizing Vue and JavaScript. You should use this element to implement several types of functionalities in your software, and it is useful when you possibly can’t discover an open supply plugin that matches your challenge’s wants. We additionally mentioned the best way to go about utilizing a element for the plugin and what to do when the plugin doesn’t want a element.
Whereas our instance for this tutorial demonstrated pretty easy performance, displaying a date within the console, be happy to construct on this challenge and customise it to suit your wants. For extra data on Nuxt plugins, I like to recommend testing the Nuxt Docs. Joyful constructing!
