
On this article, we’ll learn to create a notes app in React and combine the app with localStorage. The principle features of our app will embrace making a be aware, setting a personality restrict, deleting notes, and saving them in localStorage. Let’s get began!
Creating a brand new React app
To get began, we have to create a clean React app for our undertaking. Use the next instructions to create a React app from scratch:
npx create-react-app my-app
cd my-app
npm begin
Subsequent, delete the entire content material from the App.js file in order that it’s clean. We’ll add all of our elements right here.
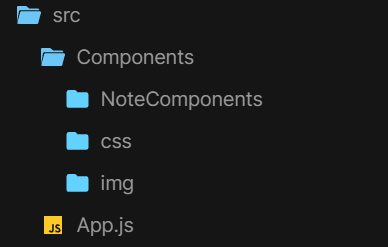
File construction
Since we’ll have many information for our app, file construction is necessary. First, create a Elements folder within the src folder. Throughout the Elements folder, create three extra folders referred to as NoteComponents, css, and img.
Your listing could appear to be the next:
Subsequent, create a brand new file referred to as App.css throughout the CSS folder and add the next code to your App.js file:
import { React } from "react";
import "./Elements/css/App.css";
perform App() {
  return (
    <div className="foremost">
    </div>
  );
}
export default App;
The notes grid
Within the App.css file, we have to model the web page and the principle div. Along with that, we’ll use CSS Grid to create a 3 column grid of notes and make it responsive. Due to this fact, on tablets, we’ll have two columns, and on cellular units, we’ll have a single column.
I’ve additionally added a background picture, however you may exchange it with any picture of your alternative. The picture is saved within the img folder that we created beforehand.
@import url('https://fonts.googleapis.com/css2?household=Montserrat:[email protected];800&show=swap');
physique {
    background-image: url("../img/background.jpg");
    background-repeat: no-repeat;
    background-size: cowl;
    font-family: "Montserrat";
}
.foremost {
    max-width: 960px;
    margin: 0px auto;
    padding: 0px 15px;
    min-height: 100vh;
}
.header {
    show: flex;
    width: 100%;
    justify-content: space-between;
    align-items: heart;
    margin: 10px 0px;
}
.notes__title {
    shade: #fff;
    font-size: 38px;
    font-family: "Montserrat";
    font-weight: 400;
}
.notes {
    max-width: 1200px;
    margin: 0 auto;
    show: grid;
    grid-gap: 1rem;
    grid-template-columns: repeat(3, minmax(300px, 1fr));
}
@media display screen and (max-width: 900px) {
    .notes {
        grid-template-columns: repeat(2, minmax(300px, 1fr));
    }
}
@media display screen and (max-width: 500px) {
    .notes {
        grid-template-columns: repeat(1, minmax(300px, 1fr));
    }
}
Including the title
Now, we have to create a file referred to as Header.js contained in the NoteComponents folder. Header.js will comprise the web page title, so it’s totally non-compulsory:
import React from "react";
perform Header() {
  return (
    <div className="header">
      <h1 className="notes__title">Notes</h1>
    </div>
  );
}
export default Header;
Creating the be aware
Let’s create the next primary structure and template for a single be aware that we’ll use later:
- The be aware physique: Incorporates the consumer enter textual content
- The be aware footer: Incorporates the delete icon
Moreover, the footer could have an add button and a personality counter. Now, create a brand new file referred to as Notice.js and add the next code:
import React from "react";
import DeleteForeverOutlinedIcon from "@mui/icons-material/DeleteForeverOutlined";
perform Notice() {
  return (
    <div className="be aware">
      <div className="note__body"></div>
      <div className="note__footer" model={{ justifyContent: "flex-end" }}>
        <DeleteForeverOutlinedIcon
          className="note__delete"
          aria-hidden="true"
        ></DeleteForeverOutlinedIcon>
      </div>
    </div>
  );
}
export default Notice;
The delete icon is imported from MUI icons. You possibly can set up MUI icons with the next command:
npm set up @mui/icons-material
Including styling
Subsequent, create a brand new CSS file referred to as Notice.css, which can comprise the types for the notes. We’ll use glassmorphism to enhance the look of the be aware. Glassmorphism is a UI design development that imitates the look of frosted glass. It’s achieved by utilizing semi-transparent backgrounds and blur results.
The CSS code beneath additionally accommodates the types for the Notice Kind that we’ll create later. Add the next code to Notice.css:
.be aware {
    background: rgba(255, 255, 255, 0.1);
    backdrop-filter: blur(5px);
    box-shadow: inset -6px -4px 2px rgba(255, 255, 255, 0.03);
    border-radius: 15px;
    border: 1.5px stable rgba(255, 255, 255, 0.326);
    shade: #fff;
    padding: 15px;
    min-height: 140px;
    show: flex;
    flex-direction: column;
    justify-content: space-between;
    word-wrap: break-word;
}
.note__footer {
    show: flex;
    align-items: heart;
    justify-content: space-between;
    margin-bottom: 15px;
}
.be aware textarea {
    white-space: pre-wrap;
    background: clear;
    border: none;
    shade: #fff;
    resize: none;
    font-size: 18px;
}
.be aware textarea:focus {
    define: none;
}
.be aware textarea::placeholder {
    shade: #fff;
}
.note__save {
    background: clear;
    transition: 0.1s ease-in-out;
    border: 1.5px stable #fff;
    border-radius: 10px;
    shade: #fff;
    padding: 4px 10px;
    font-size: 13px;
    cursor: pointer;
}
.note__save:hover {
    background: #fff;
    border: 1.5px stable #fff;
    shade: #4b1589;
}
.note__delete {
    cursor: pointer;
}
.note__delete:hover {
    remodel: scale(1.1);
}
.char__progress {
    background-color: #fff!necessary;
}
Creating the notes container
Now, we’ll create a brand new file referred to as Notes.js throughout the NoteComponents folder. Notes.js will comprise all of the states and features, and it’ll hyperlink collectively all of the elements. Inside Notes.js, we’ll first import the Notice part that we simply created in addition to the Notice.css file:
import { React, useState, useEffect } from "react";
import "../css/Notice.css";
import Notice from "./Notice"
perform Notes() {
  return (
    <div className="notes">
      <Notice />
      <Notice />
      <Notice />
    </div>
  );
}
export default Notes;
Within the code above, I’m rendering just a few instance notes to see what our app seems to be like. Keep in mind to import the Header.js and the Notes.js information into App.js. To this point, your App.js file ought to appear to be the next:
import { React } from "react";
import "./Elements/css/App.css";
import Header from "./Elements/NoteComponents/Header";
import Notes from "./Elements/NoteComponents/Notes";
perform App() {
  return (
    <div className="foremost">
      <Header />
      <Notes />
    </div>
  );
}
export default App;
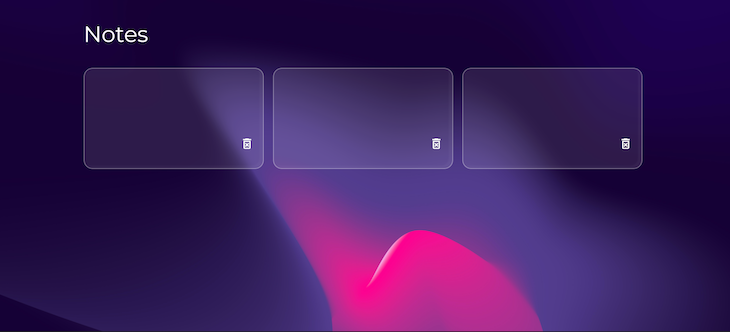
At this level, your app ought to appear to be the next picture:
Now, we’ll create two states within Notes.js. The primary will retailer all our notes as an array, and the second will retailer the enter textual content:
//states
const [notes, setNotes] = useState([]);
const [inputText, setInputText] = useState("");
Creating the be aware type
Now, we’ll create a hard and fast be aware that will likely be used as a type. It should have the same look to a daily be aware, however as a substitute of a delete icon, it’s going to have a save button and a personality counter with a progress bar. Throughout the mounted be aware, the consumer will enter the textual content within the texarea, and so they can create a brand new be aware by clicking the save button.
Create a brand new file referred to as CreateNote.js, then add the next code to it:
import { React } from "react";
perform CreateNote() {
  return (
    <div className="be aware" model={{ background: "rgba(255, 255, 255, 0)" }}>
      <textarea
        cols="10"
        rows="5"
        placeholder="Sort...."
        maxLength="100"
      ></textarea>
      <div className="note__footer">
        <span className="label"> left</span>
        <button className="note__save">Save</button>
      </div>
    </div>
  );
}
export default CreateNote;
You might discover the maxLength attribute on the texarea. This limits the variety of characters a consumer can enter to a specified worth, 100 in our case. That is needed, in any other case, a consumer may enter as many characters as they need, inflicting points with the states and the UI. Go forward and import the CreateNote part:
import CreateNote from "./CreateNote";
Now, name it throughout the Notes.js file:
<div className="notes">
  <Notice />
  <Notice />
  <CreateNote />
</div>
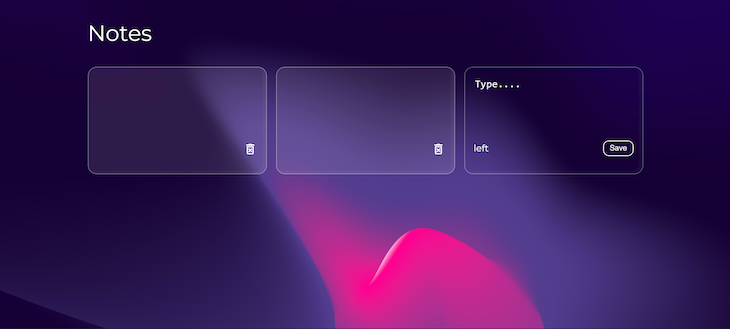
Your web page ought to appear to be the next:
The principle features
At this level, we’ve principally created the principle elements for our instance software. Now, we have to create just a few features that may take the consumer enter from the shape, reserve it within the enter state, after which use that to generate a brand new be aware every time the consumer clicks the save button.
All of those features will likely be added within the Notes.js file, which is the principle file that connects every particular person be aware and the shape.
Enter textual content perform
The enter textual content perform will take the consumer enter and set it to the enter state. Later, we’ll name this within the be aware type as a prop:
// get textual content and retailer in state
const textHandler = (e) => {
  setInputText(e.goal.worth);
};
Save be aware perform
The save be aware perform will run when the consumer clicks the save button on the shape. We may even name this within the be aware type later as a prop.
Firstly, the save be aware perform will create a brand new be aware within the be aware state. It should take the consumer enter from the enter state and, together with a novel ID, create an object throughout the array. Secondly, it’s going to clear the textual content space in order that after submitting, the field is empty.
uuid v4 will create the distinctive ID, which may even be used as a key mapping out the notes. You possibly can set up uuid v4 utilizing the next command:
npm set up uuidv4
Use it as follows:
import { v4 as uuid } from "uuid";
Beneath is the entire code for the save button perform:
// add new be aware to the state array
const saveHandler = () => {
  setNotes((prevState) => [
    ...prevState,
    {
      id: uuid(),
      text: inputText,
    },
  ]);
  //clear the textarea
  setInputText("");
};
Delete be aware perform
When the consumer clicks on the delete icon, we’ll run the delete be aware perform, which can take away the be aware from the array by filtering it out. The ID parameter would be the distinctive ID of the be aware being clicked:
//delete be aware perform
const deleteNote = (id) => {
  const filteredNotes = notes.filter((be aware) => be aware.id !== id);
  setNotes(filteredNotes);
};
Linking the features
Now that we’ve created our features, we have to cross them to our be aware type. We’ll use props for this. To cross the props to the CreateNote part, make the next adjustments within the Notes.js file:
<CreateNote
  textHandler={textHandler}
  saveHandler={saveHandler}
  inputText={inputText}
/>
Now, the save and textual content features, together with the enter state, are handed to the CreateNote part. Subsequent, throughout the CreateNote.js file, name the props as follows:
perform CreateNote({ textHandler, saveHandler, inputText })
We are going to use these in three locations:
- We are going to set the worth of the
textareatoinputText - We are going to run the
textHandlerperform when any change occurs to thetextareautilizingonChange - We are going to run the
saveHandlerperformonClickon the save button
Your CreateNote.js file ought to now appear to be the next code:
import { React } from "react";
perform CreateNote({ textHandler, saveHandler, inputText }) {
  return (
    <div className="be aware" model={{ background: "rgba(255, 255, 255, 0)" }}>
      <textarea
        cols="10"
        rows="5"
        worth={inputText}
        placeholder="Sort...."
        onChange={textHandler}
        maxLength="100"
      ></textarea>
      <div className="note__footer">
        <span className="label"> left</span>
        <button className="note__save" onClick={saveHandler}>
          Save
        </button>
      </div>
    </div>
  );
}
export default CreateNote;
Displaying the notes
A couple of sections again, we rendered just a few Notice elements to see how they search for testing functions solely. To make the applying dynamic, we’ll map out the notes from the notes array. The map() perform creates a brand new array by calling a perform for each array factor, which is the notes array in our case.
We’ve added the map() perform contained in the return perform throughout the Notes.js file:
return (
  <div className="notes">
    {notes.map((be aware) => (
      <Notice
        key={be aware.id}
        id={be aware.id}
        textual content={be aware.textual content}
        deleteNote={deleteNote}
      />
    ))}
    <CreateNote
      textHandler={textHandler}
      saveHandler={saveHandler}
      inputText={inputText}
    />
  </div>
);
The code above goes by every factor within the notes array. Then, it creates a brand new be aware utilizing the consumer enter and the distinctive ID that we created. The ID will likely be used for the parameter of the delete perform
A key is a particular string attribute that it’s good to embrace when creating lists of parts, like notes in our case.
As you may see within the code above, we’re passing the delete perform and the textual content to the Notice part as a prop. Now, contained in the Notice.js file, we will add the textual content and the delete perform to the be aware physique and the delete icon, respectively:
perform Notice({ id, textual content, deleteNote }) {
  return (
    <div className="be aware">
      <div className="note__body">{textual content}</div>
      <div className="note__footer" model={{ justifyContent: "flex-end" }}>
        <DeleteForeverOutlinedIcon
          className="note__delete"
          onClick={() => deleteNote(id)}
          aria-hidden="true"
        ></DeleteForeverOutlinedIcon>
      </div>
    </div>
  );
}
Now, our notes app is absolutely purposeful!
Including the character counter
We’ve already added a personality restrict to the textarea once we had been creating the be aware type, in addition to a label that may present us the remaining characters.
Now, let’s calculate what number of characters are neglected of 100 and show it in our app.
Within the CreateNote.js file, add the next code earlier than the return assertion:
//character restrict
const charLimit = 100;
const charLeft = charLimit - inputText.size;
The code above calculates the characters left by subtracting the present enter size, which we have now acquired as a prop, from 100. Because the consumer is typing, this worth will carry on lowering.
We are able to merely name it throughout the span tag:
<span className="label">{charLeft} left</span>
Including a progress bar
We are able to additional enhance the shape by including a linear progress bar to reflect the character depend. The linear progress bar will likely be used from MUI, which has many prebuilt progress bars. You possibly can set up MUI with the next command:
npm set up @mui/materials
Import it within the CreateNote.js file like this:
import LinearProgress from "@mui/materials/LinearProgress";
To match our necessities, we’ll set its variant to discriminant and its worth to the charLeft that we already calculated.
Your full CreateNote.js file will appear to be the next code:
import { React } from "react";
import LinearProgress from "@mui/materials/LinearProgress";
perform CreateNote({ textHandler, saveHandler, inputText }) {
  //character restrict
  const charLimit = 100;
  const charLeft = charLimit - inputText.size;
  return (
    <div className="be aware" model={{ background: "rgba(255, 255, 255, 0)" }}>
      <textarea
        cols="10"
        rows="5"
        worth={inputText}
        placeholder="Sort...."
        onChange={textHandler}
        maxLength="100"
      ></textarea>
      <div className="note__footer">
        <span className="label">{charLeft} left</span>
        <button className="note__save" onClick={saveHandler}>
          Save
        </button>
      </div>
      <LinearProgress
        className="char__progress"
        variant="determinate"
        worth={charLeft}
      />
    </div>
  );
}
export default CreateNote;
Saving the notes to localStorage
Lastly, we have to save the notes to our browser localStorage in order that our information shouldn’t be misplaced once we refresh the web page or shut it after which open it.
Within the Notes.js file, we’ll create two features: one to avoid wasting the information and one to learn it. We are going to run the code to avoid wasting the information inside useEffect and add the notes state as a second argument in order that we save the information every time it’s modified:
//saving information to native storage
useEffect(() => {
  localStorage.setItem("Notes", JSON.stringify(notes));
}, [notes]);
We’re utilizing JSON.stringify to transform the article to a string in order that it may be saved. Equally, to learn the information, we may even use the useEffect Hook. Nevertheless, this time, the second argument will likely be an empty array as a result of we solely need to get information as soon as on web page load:
//get the saved notes and add them to the array
useEffect(() => {
  const information = JSON.parse(localStorage.getItem("Notes"));
  if (information) {
    setNotes(information);
  }
}, []);
Conclusion
And we’re accomplished! You will discover the entire code on CodeSandbox.
On this article, we constructed a notes app from scratch utilizing React and localStorage. Our app has all of the required functionalities, for instance, storing a consumer enter, saving it, and deleting it. We used localStorage to persist the information to our browser. Due to this fact, it’s not misplaced once we refresh the web page. We even went a step additional so as to add a personality depend and a progress bar so the consumer is aware of how a lot house they’ve left to kind.
I hope you loved this text, and you’ll want to depart a remark when you’ve got any questions. Thanks for studying!
Full visibility into manufacturing React apps
Debugging React purposes might be troublesome, particularly when customers expertise points which are onerous to breed. Should you’re fascinated about monitoring and monitoring Redux state, robotically surfacing JavaScript errors, and monitoring gradual community requests and part load time, strive LogRocket. 

LogRocket is sort of a DVR for internet and cellular apps, recording actually all the pieces that occurs in your React app. As an alternative of guessing why issues occur, you may combination and report on what state your software was in when a problem occurred. LogRocket additionally screens your app’s efficiency, reporting with metrics like shopper CPU load, shopper reminiscence utilization, and extra.
The LogRocket Redux middleware bundle provides an additional layer of visibility into your consumer periods. LogRocket logs all actions and state out of your Redux shops.
Modernize the way you debug your React apps — begin monitoring without cost.
