APIs are the driving power behind nearly each utility you’ll construct as a developer, serving as a channel of communication between two or extra software program elements.
Nonetheless, the consequence of the sort of system is that the failure of 1 part can have a major affect on the opposite elements that depend upon it. Due to this fact, it’s essential to check your APIs extensively to make sure the correctness and predictability of your utility.
There are various other ways you possibly can take a look at your APIs, and whichever technique or mixture of strategies you select will finally rely in your present enterprise wants, accessible assets, and implementation particulars.
On this article, we’ll discover the way to write automated practical and integration exams to your APIs that may run in a CI/CD pipeline.
Why must you automate your API exams?
Writing exams helps to make sure the predictability and correctness of your purposes at any given time. Due to this fact, it is best to run exams as typically as your codebase modifications. Repetitive duties like this are sometimes good candidates for automation.
Automated exams provide the confidence to make modifications and add new options to your utility as a result of you possibly can all the time depend on your exams to level out bugs that you just may need launched.
Writing API exams with Postman
Postman is a platform that gives a whole set of instruments for constructing, testing, documenting, and mocking APIs. As a developer, you’ve more than likely used Postman to make requests to your backend utility whereas creating regionally, however you are able to do much more with it.
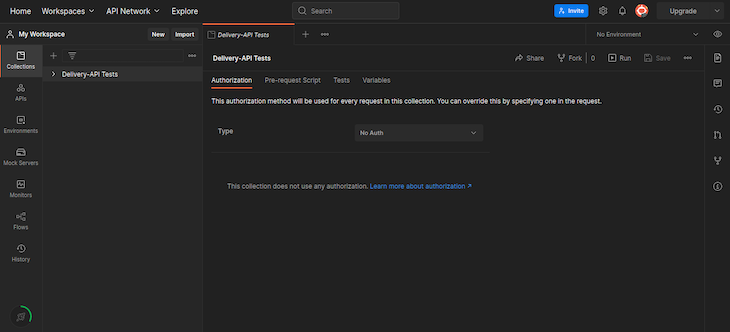
Organising Postman
To observe together with this tutorial, you’ll want a Postman account. If you happen to don’t have already got one, create a free account. Then, navigate to your Postman workspace to get began.
We’ll create a brand new assortment referred to as Supply-API Checks the place we’ll write some practical and integration exams for a supply API that we’ll create later on this part. A practical take a look at checks the habits of a single API endpoint and ensures that the request-response cycle conforms to the expectation. Alternatively, integration exams verify particular flows that may be made up of two or extra endpoints to find out if the completely different elements concerned in a person circulation work as anticipated.
At this level, your workspace ought to present the gathering within the left panel:
Extra nice articles from LogRocket:
Organising requests
Subsequent, we’ll have to create requests that may maintain our exams. A request will characterize an API endpoint. On the Supply-API Checks assortment, click on on the menu button that seems on the fitting.
Choose Add request and identify the request that’s created Search Deliveries. Create three extra requests named Choose Supply, Affirm Pickup, and Full Supply.
Now, we have to write the exams for every request. Postman has a built-in testing software that permits you to write exams utilizing the JavaScript syntax. Checks are executed instantly after a request is run, and you may entry the response returned from the request within the take a look at script.
Within the Supply-API Checks assortment, choose the Search Deliveries request and choose the Checks tab. Paste the next code block into the editor:
const responseJson = pm.response.json()

pm.take a look at("response standing", perform() {
    pm.response.to.have.standing(200)
})

pm.take a look at("information incorporates outcomes", perform() {
    pm.anticipate(responseJson).to.haveOwnProperty("information")
    pm.anticipate(responseJson.information).to.be.an("array")
    pm.anticipate(responseJson.information[0]).to.haveOwnProperty("standing")
})

pm.collectionVariables.set("SELECTED_DELIVERY_ID", responseJson.information[0].id)
Within the code above, we get the response in JSON format by calling pm.response.json(). Notice that pm is a worldwide object accessible in all request scripts. We then outlined two take a look at instances utilizing pm.take a look at.
If you happen to’re aware of testing in JavaScript, then the syntax right here needs to be easy. Postman helps syntax from the Chai assertion library, so you possibly can write exams in the identical means you already do in JavaScript.
Within the take a look at instances, we’re checking for the right standing code, the kind of information returned, and a few further required fields. These are easy exams, however the aim is to grasp the idea of testing in Postman.
Notice that within the final line of the code block, we’re setting a group variable referred to as SELECTED_DELIVERY_ID. Assortment variables are an intuitive approach to share information throughout requests.
Subsequent, we wish to write exams for the opposite requests. Paste the next code blocks into the corresponding requests:
// Choose Supply
const responseJson = pm.response.json()

pm.take a look at("response standing", perform() {
    pm.response.to.have.standing(200)
})

pm.take a look at("information incorporates end result", perform() {
    pm.anticipate(responseJson).to.haveOwnProperty("information")
    pm.anticipate(responseJson.information).to.be.an("object")
    pm.anticipate(responseJson.information).to.haveOwnProperty("standing")
    pm.anticipate(responseJson.information.standing).to.eql("QUEUED")
})


// Affirm Pickup
const responseJson = pm.response.json()

pm.take a look at("response standing", perform() {
    pm.response.to.have.standing(200)
})

pm.take a look at("information incorporates end result", perform() {
    pm.anticipate(responseJson).to.haveOwnProperty("information")
    pm.anticipate(responseJson.information).to.be.an("object")
    pm.anticipate(responseJson.information).to.haveOwnProperty("standing")
    pm.anticipate(responseJson.information.standing).to.eql("PICKED_UP")
})


// Full Supply
const responseJson = pm.response.json()

pm.take a look at("response standing", perform() {
    pm.response.to.have.standing(200)
})

pm.take a look at("information incorporates end result", perform() {
    pm.anticipate(responseJson).to.haveOwnProperty("information")
    pm.anticipate(responseJson.information).to.be.an("object")
    pm.anticipate(responseJson.information).to.haveOwnProperty("standing")
    pm.anticipate(responseJson.information.standing).to.eql("COMPLETED")
})
The take a look at instances for different requests are equivalent apart from the assertion on the standing discipline. Now that we have now exams for our requests, let’s run them. We’ll have to create a backend server that may deal with the API requests. You possibly can implement the backend server in any language or framework so long as it’s REST compliant, however on this article, we’ll construct a easy Node.js server utilizing Koa.
Constructing the API server
In your terminal, create a folder and initialize a Node.js mission with both Yarn or npm:
$ mkdir delivery-api
$ cd delivery-api
$ yarn init -y
Now, create a file referred to as app.js and set up the required dependencies:
$ contact app.js
$ yarn add koa @koa/router
In your bundle.json file, add the next script:
//...
  "scripts": {
    "begin": "node app.js"
  },
//...
Koa is a light-weight HTTP middleware framework for Node.js that’s just like Specific. Let’s initialize a Koa server and outline the route handlers that correspond to the requests we arrange in Postman. In your app.js file, paste the code block beneath:
const Koa = require("koa");
const Router = require("@koa/router");
const app = new Koa();
const router = new Router();

app.use(router.routes());

const deliveries = [
   {
      id: "1",
      pickupAddress: "1000 4th Ave, Seattle, WA, 98104",
      pickupPhoneNumber: "+14148928000",
      dropoffAddress: "1201 3rd Ave, Seattle, WA, 98101",
      dropoffPhoneNumber: "+14148928000",
      instructions: "",
      status: "CREATED",
   },
   {
      id: "2",
      pickupAddress: "1000 4th Ave, Seattle, WA, 98104",
      pickupPhoneNumber: "+14148915000",
      dropoffAddress: "1201 3rd Ave, Seattle, WA, 98101",
      dropoffPhoneNumber: "+14148915000",
      instructions: "",
      status: "CREATED",
   },
];

router.get("/deliveries", (ctx) => {
   ctx.physique = {
      standing: "00",
      message: "successs",
      information: deliveries,
   };
});

router.get("/deliveries/:id/choose", (ctx) => {
   const id = ctx.params["id"];
   const supply = deliveries.discover((obj) => obj.id === id);
   if (!supply) {
      ctx.physique = {
         standing: "01",
         message: "not discovered",
         information: null,
      };
   }
   ctx.physique = {
      standing: "00",
      message: "successs",
      information: { ...supply, standing: "QUEUED" },
   };
});

router.get("/deliveries/:id/confirm-pickup", (ctx) => {
   const id = ctx.params["id"];
   const supply = deliveries.discover((obj) => obj.id === id);
   if (!supply) {
      ctx.physique = {
         standing: "01",
         message: "not discovered",
         information: null,
      };
   }
   ctx.physique = {
      standing: "00",
      message: "successs",
      information: { ...supply, standing: "PICKED_UP" },
   };
});

router.get("/deliveries/:id/full", (ctx) => {
   const id = ctx.params["id"];
   const supply = deliveries.discover((obj) => obj.id === id);
   if (!supply) {
      ctx.physique = {
         standing: "01",
         message: "not discovered",
         information: null,
      };
   }
   ctx.physique = {
      standing: "00",
      message: "successs",
      information: { ...supply, standing: "COMPLETED" },
   };
});

app.hear(8000);
There’s so much occurring right here, so let’s break it down. First, we initialize a brand new Koa app and a brand new Router object. Utilizing the router occasion, we outline 4 routes with paths that match the requests we created in Postman. Lastly, we begin the server by calling app.hear().
In abstract, this easy API server is attempting to simulate the method of delivering an order for a meals supply app. Now, begin the server by working yarn begin in your terminal.
Operating guide exams on Postman
Now, we have now all the pieces set as much as run the exams. If you happen to’re utilizing Postman on the internet, you gained’t be capable of hook up with localhost. Nonetheless, there are two methods to get round this. You possibly can both obtain the Postman desktop app or use ngrok as a tunnel to reveal your localhost port to the web.
If you happen to determine to make use of ngrok, all that you must do is set up it and begin a tunnel pointing to your server. Open one other terminal occasion, then run the next command and replica the URL displayed:
$ ngrok http 8000
The URL needs to be just like https://3d43-154-130-109-210.ngrok.io. Navigate to Postman, both on the internet or desktop, choose the Supply-API Checks assortment, and open the variables tab.
Add a variable with the API_BASE_URL key and set the worth to http://localhost:8000 or the ngrok URL when you’re not utilizing Postman desktop. Be sure you click on Persist All when including a brand new variable to make sure that exterior companies can entry it:
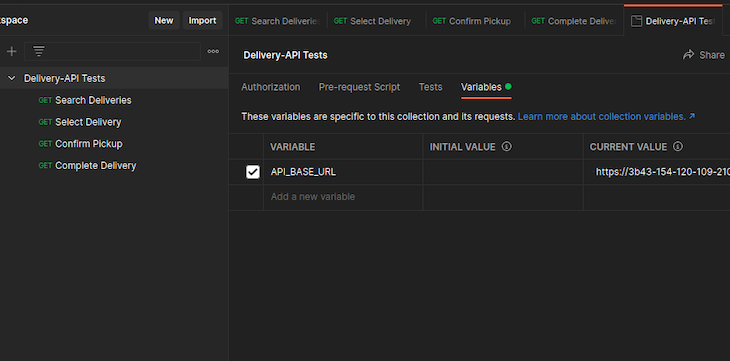
Now, we will use the gathering variable for every request. Replace the URL discipline for every request to the next values:
Search Deliveries:{{API_BASE_URL}}/deliveries?web page=1&rely=20Choose Supply:{{API_BASE_URL}}/deliveries/:id/chooseAffirm Pickup:{{API_BASE_URL}}/deliveries/:id/confirm-pickupFull Supply:{{API_BASE_URL}}/deliveries/:id/full
We are able to run our exams manually utilizing one in all two strategies. The primary is to run the requests individually, permitting the take a look at script for every request to be executed. Alternately, we will run the gathering suddenly utilizing the gathering runner. We’ll use the gathering runner within the subsequent part, however you possibly can briefly run every request manually by clicking the Ship button.
Once you run a request, you’ll see the response within the backside panel, however you can too see the take a look at outcomes by clicking on the Take a look at Outcomes tab within the backside panel:
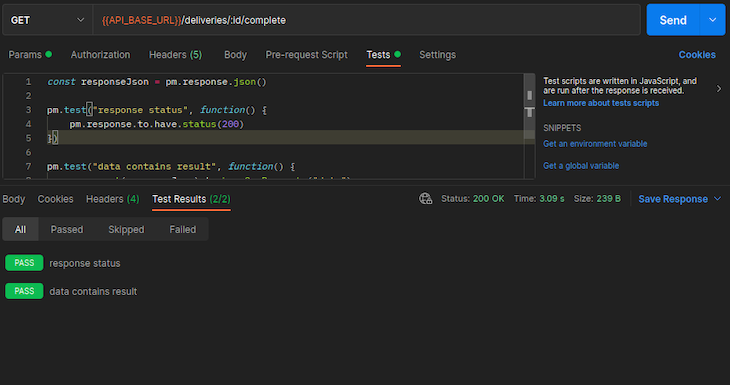
That’s all that you must do to run a take a look at in Postman. Nonetheless, it feels unintuitive to go to your Postman workspace and run exams everytime you make modifications to your codebase. This method doesn’t align with the event workflow, so let’s enhance upon it.
Automating your API exams
On this part, we’ll make the testing course of extra intuitive and fewer time consuming by automating the workflow. The optimized improvement workflow entails making native modifications and pushing new options to supply management, the place they’re picked up by the CI/CD pipeline, triggering some construct or deployment duties.
Postman offers a command line software referred to as Newman that permits you to run collections from the CLI. It additionally provides seamless integration with CI/CD environments, which means we will arrange our exams to run throughout a deployment step. This drastically simplifies the testing course of, stopping us from continually having to run exams within the workspace.
Integrating Newman with GitHub Actions
We are able to arrange Newman in lots of steady integration companies. On this article, we’ll use GitHub Actions. Let’s begin by defining a workflow for Newman. In your delivery-api mission, run the next instructions:
$ mkdir .github
$ mkdir .github/workflows
$ contact .github/workflows/postman-tests.yml
Add the next workflow definition to the postman-tests.yml file:
# postman-tests.yml
identify: Newman Run
on:
  push:
    branches:
      - essential
  # varieties: [closed]
jobs:
  newman:
    identify: Postman-tests
    runs-on: ubuntu-latest
    steps:
      - identify: Checkout
        makes use of: actions/[email protected]
      - identify: Set up Node
        makes use of: actions/[email protected]
        with:
          node-version: 14
      - identify: Set up Newman & Reporter
        run: |
          npm set up -g newman
          npm set up -g newman-reporter-htmlextra
      # Make listing for take a look at ends in workspace
      - identify: Make Listing
        run: mkdir -p newman-results
      # Run newman cli
      - identify: Run Newman
        env:
          POSTMAN_API_URL: 'https://api.getpostman.com'
          POSTMAN_API_KEY: ${{ secrets and techniques.POSTMAN_API_KEY }}
          POSTMAN_COLLECTION_UID: ${{ secrets and techniques.POSTMAN_COLLECTION_UID }}
        run: |
          newman run "${{env.POSTMAN_API_URL}}/collections/${{env.POSTMAN_COLLECTION_UID}}?apikey=${{env.POSTMAN_API_KEY}}"
          -r htmlextra,cli --reporter-htmlextra-export newman-results/htmlreport.html
      # Add take a look at outcomes to workspace
      - identify: Add Outcomes
        makes use of: actions/[email protected]
        with:
          identify: Postman_Test_Reports
          path: newman-results
The code above is a straightforward workflow that runs after we push to the repository, particularly on the default essential department. We outline a job for the Postman exams with a collection of steps.
First, we run the checkout motion, then we set up Node.js utilizing a pre-defined motion actions/[email protected]. Subsequent, we set up Newman and newman-reporter-htmlextra. The reporter is a plugin for Newman that generates a abstract of the exams in HTML format. We then run the Newman CLI software with some arguments, together with the Postman API URL for our assortment.
Notice that we‘ve outlined some surroundings variables. The POSTMAN_API_KEY and POSTMAN_COLLECTION_UID are being pulled from GitHub Motion secrets and techniques. Earlier than setting these secrets and techniques, we’ll have to create a repository. Lastly, after working Newman, we use the pre-defined motion actions/[email protected] to add the HTML file generated by the reporter to a location we will later entry.
Bringing all of it collectively
Lastly, we have to push the mission to GitHub and see the workflow run. Navigate to your GitHub account, create a brand new repository referred to as delivery-api, and replica the distant URL. Subsequent, we’ll initialize Git within the mission, add the distant URL, commit our modifications, and push the modifications:
$ git init -b essential
$ git distant add origin <your-remote-url>
$ git add .
$ git commit "<message>"
$ git push -u origin essential
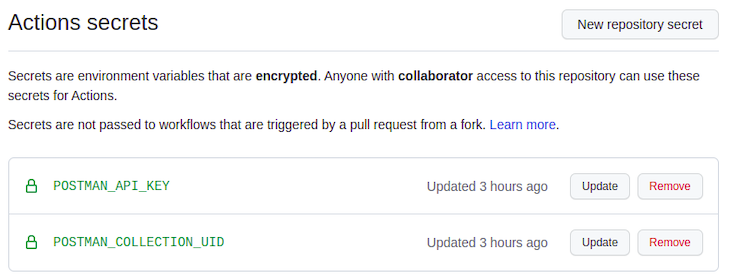
If you happen to open the Actions tab in your GitHub repository, it is best to both see the workflow working or having failed. It’s because we haven’t added the key keys.
To resolve this, we have to generate an API key on Postman and in addition fetch the gathering UID. Navigate to your Postman workspace; on the prime menu bar, click on in your profile and choose Settings. Choose API Keys from the facet navigation, then generate an API key and replica the worth.
Subsequent, make a GET request to the URL https://api.getpostman.com/collections and set a header with the important thing x-api-key and a worth equal to the API key you generated. Your response ought to include a listing of your collections:
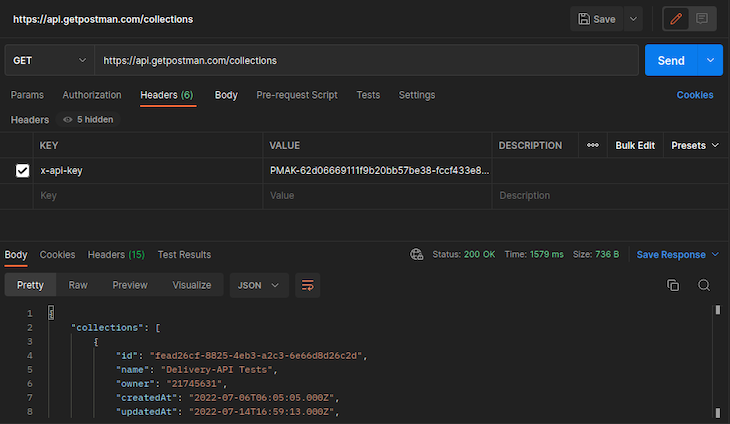
Go to your GitHub repository and add the POSTMAN_API_KEY and POSTMAN_COLLECTION_UID within the GitHub Motion secrets and techniques. The POSTMAN_COLLECTION_UID is the uid discipline in your Supply-API Checks assortment object.
Now, go to your Actions tab once more and attempt to rerun the failed jobs. If all the pieces labored advantageous, it is best to see a file within the Artifacts panel, which is the generated report from the workflow. You possibly can obtain and open the HTML file in your browser.

And that’s it! We’ve efficiently automated our API exams. Each time we make modifications and push to the upstream department, it’ll set off the workflow, working our exams. Ideally, we wish to run this workflow after a deployment has been made, however to maintain it easy, we outlined simply the Postman exams’ workflow.
Limitations of Postman for API testing
Postman is a superb software for API testing, nevertheless it comes with its personal limitations. Like all the pieces else in software program, you’ll wish to take into account your distinctive mission’s wants to find out the fitting software for the job. The very first thing to contemplate is the scope and complexity of your exams. If that you must write exams that depend upon some exterior service, you may not be capable of simply automate that.
One other limitation is flexibility. Since you’re writing exams in a unique surroundings from the place your utility logic lives, it’s tough to share and reuse items of code. This may be particularly irritating while you wish to take a look at an API endpoint in opposition to a number of completely different request parameters. Postman stays a fantastic software for testing, and it’s as much as you as a developer to make knowledgeable selections about utilizing it for testing.
Conclusion
On this article, we reviewed why testing the APIs in your utility is essential. We explored testing our APIs utilizing Postman, together with organising Newman and GitHub Actions. Lastly, we reviewed a few of Postman’s limitations for testing. Total Postman is a superb software for constructing, testing, documenting, and mocking APIs. I hope you loved this tutorial, and completely happy coding!
Are you including new JS libraries to enhance efficiency or construct new options? What in the event that they’re doing the other?
There’s little question that frontends are getting extra complicated. As you add new JavaScript libraries and different dependencies to your app, you’ll want extra visibility to make sure your customers don’t run into unknown points.
LogRocket is a frontend utility monitoring answer that permits you to replay JavaScript errors as in the event that they occurred in your personal browser so you possibly can react to bugs extra successfully.

LogRocket works completely with any app, no matter framework, and has plugins to log further context from Redux, Vuex, and @ngrx/retailer. As an alternative of guessing why issues occur, you possibly can mixture and report on what state your utility was in when a difficulty occurred. LogRocket additionally displays your app’s efficiency, reporting metrics like shopper CPU load, shopper reminiscence utilization, and extra.
Construct confidently — Begin monitoring at no cost.
