
NestJS is an online framework constructed completely in TypeScript. Most skilled builders will acknowledge one thing acquainted in NestJS; it’s a robust, object-oriented programming mannequin, and its syntax may be very much like one other framework, Angular.
NestJS code usually forces you to create an optimum design sample. Builders transitioning to Node.js and TypeScript from a Java or ASP.NET background will rapidly respect how NestJS is structured. Ideas like dependency injection, encapsulation, courses, and sophistication annotations or decorators are all accessible in NestJS.
In NestJS, making a customized module to reuse is kind of easy and is, above all, inspired. Encapsulating a module into small, reusable chunks will assist to extend the event velocity of a NestJS software. And, when you determine to launch these modules into the wild as open supply packages, you’ll get some brownie factors.
On this article, we’ll discover modules in NestJS, creating our personal fundamental, configurable module. To observe alongside, you possibly can entry the complete code on GitHub. Let’s get began!
What’s a NestJS module?
A module is a set of code encapsulated to be injected right into a NestJS software. You need to use modules to create customized companies that are supposed to carry out particular duties. For instance, TypeORM is a TypeScript-based ORM. The NestJS staff created a module that may inject an open database connection, permitting for database instructions and queries from the injected module.
NestJS modules are the spine of the framework’s sturdy dependency injection mechanism. Dependency injection is an software growth sample that goals to decouple the dependencies between two courses or modules.
As an alternative of getting strictly outlined dependencies for every class, you need to use an interface to specify a form of contract of how your dependency ought to behave whereas having no literal definition of the way it ought to run. Lastly, a decoupled structure permits for versatile purposes and creates a plug-and-play conduct for every module within the software.
NestJS module state administration
By default, NestJS modules are singletons, that means you solely have to provoke a module as soon as. Whereas creating singletons for each module can appear extreme from an engineering viewpoint, NestJS initializes singletons on a element degree.
Module scopes in NestJS
In NestJS, there are three injection scopes of modules:
- Request-level modules
- Element-level modules or transient modules
- Shared application-level modules
By default, most NestJS modules are application-level modules, also called globally shared modules. However, not each module is usually a world module. A few of them want to stay transient or request-level modules.
For instance, when you want an application-level, read-only module, your finest guess is to make use of globally shared modules. Knowledge saved inside the module received’t change usually, so it may be deferred as an application-level singleton to preserve reminiscence and create a globally accessible class. Modules with the @International decorator take away redundancy in each code and element ranges because you don’t have to reinitialize the module.
To higher perceive state preservation on a modular degree, you probably have a relentless inside a module with both a transient or request scope, will probably be an immutable variable till the module destroys it on rubbish assortment. Nonetheless, when utilizing a world module spanning the complete software, will probably be destroyed solely on the finish of an software’s lifetime.
Stopping knowledge racing situations when utilizing singletons
One other factor to be cautious about when utilizing singletons is the information race drawback. Node.js is just not immune to knowledge racing situations, and neither is NestJS.
Knowledge race situations happen when two separate processes attempt to replace the identical block of knowledge concurrently. As a result of the objects are accessible globally, simultaneous knowledge execution might end in misplaced knowledge factors on execution.
Greatest observe for avoiding knowledge race situations includes creating a world read-only module and being extra deliberate on every module’s injection scopes. International modules are probably the most prone to knowledge race situations, and utilizing world modules to speak or handle states between parts will end in an anti-pattern.
However, why can’t the identical be mentioned of transient component-level modules? On the element degree, the encapsulation limitations solely lengthen to the element’s wants. Every transient module supplier can have a devoted occasion. The separation of issues on the element degree is normally extra granular, making it extra predictable than in large-scale purposes. The identical might be mentioned for the request-level singletons, albeit on a smaller scale.
NestJS modules injection scopes
In abstract, there are three injection scopes of modules in NestJS:
- Request-level modules
- Element-level modules: Transient
- Shared application-level modules: International
Every has its advantages and downsides, with knowledge racing being the most typical drawback for world modules. Most world modules ought to be read-only, and NestJS will solely set the unique state as soon as throughout initialization.
Element-level modules have extra nuances. Extra particularly, you need to use them for state administration on a smaller scale due to their predictability. The granular encapsulation that singletons present on a element degree makes it an ideal alternative for component-level state administration.
Take into account that the information race situation is barely restricted to the state of every unbiased module. Modifying knowledge in exterior purposes like databases shouldn’t be an issue since databases have their very own knowledge race answer.
Dynamic modules in NestJS
Default NestJS modules are static and are unconfigurable. Configurable mannequin builders are basically dynamic module factories that may churn out totally different modules primarily based on the variables handed on initialization.
Extra nice articles from LogRocket:
Earlier than you get began with a configurable module, that you must perceive the fundamentals of dynamic modules. Their use instances sometimes revolve round creating non-static modules that may obtain parameters from exterior APIs to alter how the module behaves, particularly, how every module processes knowledge.
For instance, let’s think about that you simply create a module for querying knowledge from databases, however you don’t need to hardcode it for particular database suppliers. How do you clear up the issue?
First, that you must create a module that has a configuration operate. The configuration operate can have a database supplier interface as a parameter, which has all of the important features an software wants to attach and question a database. Since you use an interface as a parameter, you possibly can inject totally different database suppliers so long as the supplier extends the interface.
The underlying enterprise logic will nonetheless be the identical, however the database suppliers will change in line with the one you equipped on initialization. Subsequently, your module will not be static and can as an alternative be dynamic. That is basically why all configurable modules are dynamic modules below the hood.
Architecting a fundamental configurable NestJS module
For instance, we’ll create a customized NestJS module that reads knowledge from the .env file utilizing the course of.env API within the dotenv package deal. The module will operate as a configurable proxy that you need to use inside your initiatives:
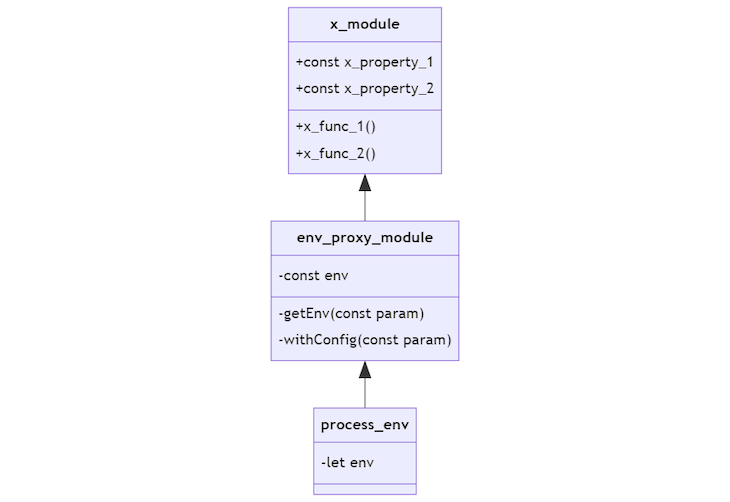
The structure of the proxy module will appear redundant as a result of you possibly can entry the course of.env variable straight with out dependency injection. However, for the sake of simplicity, you’ll use this structure to completely grasp how NestJS modules work.
Your proxy module will retrieve the course of.env on initialization and retailer it in its env property. A NestJS module is a singleton by default, so that you solely have to initialize it as soon as. You possibly can execute the getEnv operate to retrieve your env variables. It can operate as a getter to the dynamic env property.
You possibly can add a operate on initialization to just accept parameters and create a dynamic module, making it configurable. On this case, the withConfig operate would be the configurable init operate.
Easy methods to create a fundamental configurable NestJS module
Set up the @nest/cli globally with the command beneath:
npm i -g @nest/cli
Then, generate a brand new NestJS app:
nest new configurable-module-builder-examples
You possibly can select your most popular package deal supervisor, however on this tutorial, we’ll primarily use Yarn. You possibly can see the code you generated up to now by going to the step-1 department.
The brand new NestJS undertaking has all of the modules on one degree; that you must refactor it earlier than you possibly can proceed. Copy the module, controller, and repair right into a folder referred to as api-modules and rename all of the file and variable names from App to Api.
Create a brand new AppModule file and inject the ApiModule within the imports as follows:
import { Module } from '@nestjs/frequent';
import { ApiModule } from './api-module/api.module';
@Module({
  imports: [ApiModule],
})
export class AppModule {}
If you happen to’ve didn’t observe alongside, test the step-2 department within the repository. Now, you can begin creating the course of.env proxy module. You want the dotenv package deal to entry .env information, so set up the dependency by operating the command beneath:
yarn add dotenv
Create a brand new folder referred to as src/env-proxy-module and create two information, beginning with env-proxy.module.ts:
import { International, Module } from '@nestjs/frequent';
import { EnvProxyService } from './env-proxy.service';
@International()
@Module({
  suppliers: [EnvProxyService],
  exports: [EnvProxyService],
})
export class EnvProxyModule {}
Discover that the @International decorator is used to routinely inject the module’s exports to any baby of the injected element. You don’t must repeatedly import the EnvProxyModule on each module. As an alternative, you solely want so as to add it as an import in the primary AppModule:
import { EnvProxyModule } from './env-proxy-module/env-proxy.module';
@Module({
  imports: [ApiModule, EnvProxyModule],
})
export class AppModule {}
Then, create the service file, env-proxy.service.ts:
import { Injectable } from '@nestjs/frequent';
require('dotenv').config(); // eslint-disable-line
@Injectable()
export class EnvProxyService {
  public readonly env: NodeJS.ProcessEnv;
  constructor() {
    this.env = course of.env;
  }
}
To check the EnvProxyModule, you possibly can create an .env file with a DATA parameter inside:
DATA=Hey World
Strive the module out by returning the surroundings variable on a GET request:
import { EnvProxyService } from '../env-proxy-module/env-proxy.service';
@Injectable()
export class ApiService {
  constructor(non-public readonly envProxy: EnvProxyService) {}
  getHello(): string {
    return this.envProxy.env.DATA;
  }
}
Now, run the event server:
yarn begin:dev
Open your browser and go to localhost:3000. You must get a “Hey, World!” textual content in return. You possibly can see the complete code for this step within the step-3 department.
We’ve created a easy module, nevertheless it’s not configurable but. You need to use the ConfigurationModuleBuilder to take action. The ConfigurableModuleBuilder is a brand new function supplied in NestJS v9, and its function is to scale back the quantity of boilerplate code that you must write to create a configurable dynamic module.
Inside src/env-proxy-module, create a brand new file referred to as env-proxy.definition.ts:
import { ConfigurableModuleBuilder } from '@nestjs/frequent';
export interface EnvProxyModuleOptions {
  exclude: string[];
}
export const { ConfigurableModuleClass, MODULE_OPTIONS_TOKEN } =
  new ConfigurableModuleBuilder<EnvProxyModuleOptions>({
    moduleName: 'EnvProxy',
  })
    .construct();
The EnvProxyModuleOptions interface represents the thing you go by means of the config file on initialization. On this case, you’ll go an array of the surroundings variables you need to exclude from the module.
Make the EnvProxyModule lengthen the ConfigurableModuleBuilder as follows:
@International()
@Module({
  suppliers: [EnvProxyService],
  exports: [EnvProxyService],
})
export class EnvProxyModule extends ConfigurableModuleClass {}
Proceed to the EnvProxyService class and implement the next code:
@Injectable()
export class EnvProxyService {
  public readonly env: NodeJS.ProcessEnv;
  constructor(@Inject(MODULE_OPTIONS_TOKEN) non-public choices: EnvProxyModuleOptions) {
    this.env = course of.env;
    choices.exclude.forEach(val => {
      delete this.env[val];
    });
  }
}
We retrieve the EnvProxyModuleOptions object from the constructor and the @Inject decorator. Then, we add the primary enterprise logic for excluding surroundings variables to the EnvProxyService constructor. To try it out, you possibly can create a second surroundings variable referred to as DATA2:
DATA=Hey World
DATA2=Hey World2
On the AppModule imports, add a register operate and insert a EnvProxyModuleOptions:
imports: [ApiModule, EnvProxyModule.register({
  exclude: [
    "DATA"
  ]
})],
The module will exclude the DATA variable to test whether or not or not the exclusion is working. Edit the ApiService as follows:
getHello(): string {
  return this.envProxy.env.DATA ?? this.envProxy.env.DATA2;
}
Once you go to localhost:3000, you’ll get Hey World2.
And with that, you’ve created your first configurable module utilizing the configurable module builder! You possibly can test the ultimate codebase right here.
In case your configuration is extra refined than the earlier instance, you possibly can depend on the manufacturing facility sample as an alternative:
import { EnvProxyModule } from './env-proxy-module/env-proxy.module';
@Module({
  imports: [ApiModule, EnvProxyModule.registerAsync({
    useFactory: async () => {
      return {
        exclude: [
          "DATA"
        ]
      }
    }
  })],
})
export class AppModule {}
useFactory means that you can name asynchronous code that can assist you configure your builder. You’ll find the ultimate asynchronous instance on GitHub.
Abstract
NestJS is an object-oriented net framework inbuilt TypeScript. NestJS makes use of robust object-oriented rules below the hood and affords many features, together with dependency injection, courses, class annotations through decorators, and powerful encapsulation.
State administration in NestJS varies on the modular degree. Most modules’ encapsulation is proscribed to the element degree, whereas few have world shared states on the applying degree. All NestJS modules use singletons below the hood. If not made correctly, having shared modules that you need to use globally could cause knowledge race situations.
Most shared modules ought to be read-only, however there are some instances the place shared modules are sensible, logging and connecting to a message queue. In any other case, you’ll solely want modules on the element degree.
Dynamic modules are non-static configurable modules. Basically, all configurable modules are dynamic. A configurable module makes use of the manufacturing facility sample to create totally different modules in line with the parameters given throughout initialization.
Writing customized NestJS modules is kind of easy. You possibly can entry the code samples on GitHub, and you need to use the totally different branches to navigate every stage of the undertaking. I hope you loved this text, and depart a remark you probably have any questions. Completely satisfied coding!
LogRocket proactively surfaces and diagnoses an important points in your apps and web sites

Hundreds of engineering and product groups use LogRocket to scale back the time it takes to grasp the basis reason behind technical and value points. With LogRocket, you’ll spend much less time on back-and-forth conversations with clients and take away the countless troubleshooting course of. LogRocket means that you can spend extra time constructing new issues and fewer time fixing bugs.
Be proactive – attempt LogRocket right this moment.
