
On this tutorial, you may discover ways to design a wine bottle label. This practice wine label is minimalist and based mostly on solely two fonts, a sans serif and a serif model show font.
The wine label design is straightforward and stylish. Print this label with your individual textual content or use it for a mockup. On this tutorial, you may additionally discover superior choices for those who’re working out of time. I included an inventory of wine bottle label design templates and a fast how-to on a beer label generator.


In case you’re brief on time, Envato Components is a good platform providing high-quality property and limitless downloads. For a small month-to-month price, you may have entry to the perfect wine label designs, T-shirt label designs, fonts, and far more. Make sure you test them out!
What You may Be taught Whereas Designing a Wine Label
On this wine label design tutorial you may discover ways to:
- correctly arrange an InDesign file
- use grids
- use and organize completely different fonts
What You may Have to Design a Wine Label
For this wine label design tutorial, you may want the Adobe InDesign software program or related and the next property:
Set up the fonts in your system, and also you’re prepared to start out this tutorial on methods to design a wine label!
1. Easy methods to Set Up an InDesign File for a Wine Label Design
Step 1
Open Adobe InDesign and create a New Doc. Within the popup window, set the Width to 100 mm and the Top to 150 mm. Set the Margins to 5 mm, and set the Bleeds to 5 mm.
Click on Create.


Step 2
Go to Structure > Create Guides.
Set the Rows to 5 and the Columns to 3. Set each Gutters to 0 mm. Beneath Choices, set the Match Guides to choice to Web page.
Click on OK.


Step 3
Go to the Layers panel. Create a New Layer by clicking on the drop-down menu and selecting New Layer.


Step 4
Rename Layer 1 to Model Title.
Rename Layer 2 to Particulars. We’ll begin working with the Particulars layer, so make certain it is chosen.


2. Easy methods to Design a Wine Label
Step 1
Let’s begin designing a wine label. Choose the Line Software from the instruments panel. Create a vertical line that extends to the bleed traces. Set the X worth to 17 mm.


Step 2
Open the Stroke panel by going to Window > Stroke. Set the Weight to 0.5 pt. Set the Stroke Coloration to Black on the choices bar.


Step 3
To design a wine label, we have to add some particulars.
Open the Character panel by going to Window > Sort > Character. Create a textual content field utilizing the Textual content Software (T). Add the quantity of wine within the bottle—on this case, it is “750 ML”. Set the Font to Regas and the Dimension to 20 pt.


Step 4
Choose the Rotate Software (R) and rotate the textual content field 90°. Place it within the bottom-left nook of the wine bottle label design, to the left of the stroke we created earlier than.


Step 5
Duplicate the textual content field by urgent Possibility and dragging it. Edit the textual content field and add the alcohol quantity: “13% vol”. Place it on the backside of the third information.


Step 6
Duplicate the textual content field by urgent Possibility and dragging the textual content field. Edit the textual content field, and add the fermentation yr: “2020”. Place it flush to the highest margin.


Step 7
Create a brand new textual content field with the Textual content Software (T). Add the winery identify—on this case “VENUS VINEYARD SINCE 1973”.
Utilizing the Character panel, set the Font to Marison Sans and the Dimension to 6 pt. Change the Monitoring to 200. Place the textual content field underneath the highest margin and to the fitting of the road.


Step 8
Create a brand new textual content field. Add the kind of wine—on this case “PINOT GRIGIO”.
Utilizing the Character panel, set the Font to Regas and the Dimension to 30 pt. Change the Main to 30. Place the textual content field underneath the winery identify.


Step 9
Create a brand new textual content field. It is a limited-edition wine, so we’ll add: “LOT OF 1500 BOTTLES” and “LIMITED EDITION”. To create cohesiveness, use the identical typesetting as for the highest textual content.
Utilizing the Character panel, set the Font to Marison Sans and the Dimension to 6 pt. Change the Monitoring to 200. Place this textual content field close to the underside margin.


Step 10
Choose the quantity “1500” and alter the Font to Marison Brieny and the Dimension to 22 pt.


Step 11
Create a brand new textual content field so as to add a tagline: “ENJOY IN GOOD COMPANY”.
Utilizing the Character panel, set the Font to Marison Sans and the Dimension to 9 pt. Change the Monitoring to 200. Place the textual content field underneath the “restricted version” textual content field.


Step 12
Create a brand new textual content field, and add “PRODUCT OF ITALY”.
Utilizing the Character panel, set the Font to Marison Sans and the Dimension to 6 pt. Change the Monitoring to 200.


Step 13
Create a textual content field and add the abbreviations for the area of Sicily and the nation of Italy: “SIC” and “IT”.
Utilizing the Character panel, set the Font to Marison Sans and the Dimension to 7 pt. Change the Monitoring to 200.


Step 14
Utilizing the Ellipse Software (L), create a circle. Go to the Choices bar and set the Width and Top to 12 mm. Set the Stroke to 0.5 pt and the Stroke Coloration to Black.


Step 15
Choose the circle and the textual content field we created within the earlier step. Utilizing the Align panel, align each objects to their Horizontal Heart and Vertical Heart.


Step 16
Choose each objects and press Command-G to Group.
Choose the Rotate Software (R) from the Instruments bar. Rotate the grouped object barely to the fitting.


Step 17
Within the Layers panel, choose the Model Title layer.
Create a textual content field with the Textual content Software (T). Add the identify of the model: “TERRA”. Utilizing the Character panel, set the Font to Regas and the Dimension to 164 pt. Set the Coloration to #e15c59.


Step 18
Whereas deciding on the model textual content field, choose the Rotate Software (T) from the toolbar. Rotate the textual content field 90° to the fitting. Place the textual content flush to the right-side margin.


3. Easy methods to Export a Customized Wine Label
Step 1
In case you want to export the wine label design for print, go to File > Export. Within the Export popup window, set the Format to Adobe PDF Print. Click on Save.


Step 2
Within the Export Adobe PDF pop-up window, set the Adobe PDF Preset to Excessive High quality Print.
Choose the Marks and Bleeds possibility from the left aspect menu. Examine the Crop Marks possibility underneath Marks. Examine the Use Doc Bleed Settings possibility.
Click on Export.


Step 3
If you wish to export the wine label design for a mockup, go to File > Export. Set the Format to JPEG and click on Save.


Step 4
Within the Export JPEG pop-up window, set the High quality to Excessive and the Decision to 72 dpi. Click on Export.


Your Customized Wine Label Design Is Prepared!
Congratulations! You’ve got accomplished this tutorial on methods to design a wine label in InDesign. After I exported my file, I used this wine bottle mockup from Envato Components to indicate how my customized wine label would look on a bottle. If you wish to make a wine bottle mockup or a wine label however you do not really feel too assured utilizing specialised software program, we have an answer for you arising subsequent!


Placeit Beer Label Maker
Do you wish to make a wine bottle mockup or a wine bottle label design, however you do not wish to use design software program? You should use Placeit’s wine label generator.


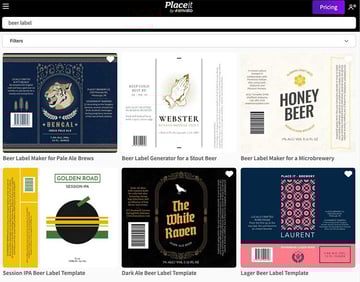
In case you want a tremendous wine label generator with tons of designs, Placeit is a good possibility. This reasonably priced on-line design generator has high-quality label designs, mockups, and far more. You possibly can edit the designs proper out of your browser, without having for any software program, and you may obtain the leads to only a few seconds. This is how straightforward it’s to make use of:
Step 1
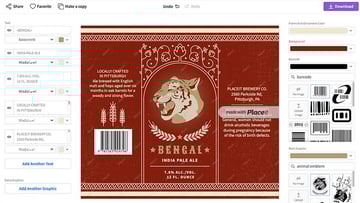
Select your design. Whenever you click on on it, it ought to open in a brand new window/tab.
You may discover that there are many choices to customise the label. One of many right-side choices is Coloration. You possibly can select a unique decoration colour, background, and even bar colour.


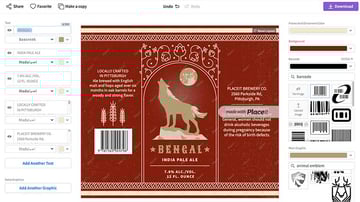
Step 2
Decrease within the choices, you may change the animal emblem.


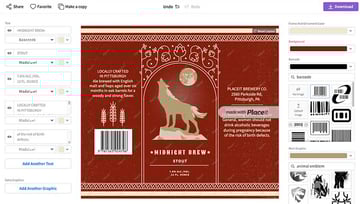
Step 3
Final, on the left aspect, there are alternatives to set the typography. Right here you may change the contents and likewise the font.


That is It!
On this tutorial, I confirmed you methods to design a wine bottle label. The design is fashionable and experimental. I additionally confirmed you some superior wine bottle label design templates that may make it easier to once you’re brief on time.
In case you’re on the lookout for a wine label generator, make sure you take a look at Placeit. And final however not least, to current your trendy wine label designs, make sure you use a terrific mockup. Which wine bottle label design was your favourite?
Wine Label Design at Envato Components
In case you’re on the lookout for the perfect property proper now, make sure you take a look at Envato Components. Discover something from wonderful wine bottle mockups to wine label designs, beer label designs, and far more. For a small month-to-month price, you will have entry to high-quality property and limitless downloads. Make sure you test them out!
Classic Wine Label Design (AI)


Designing a wine label can get difficult if you wish to obtain a classic look. You do not have to fret about that with this classic wine label design. The attractive illustration is already carried out, so all it’s good to do is customise the textual content and also you’re all set.
Classic Wine Label Design (AI)


This wine bottle label design is intricate and stylish. The gold particulars make the bottle seem like one thing from the Artwork Deco period. The content material that it’s good to add is simply textual content, so there is no want for an intricate emblem.
Classic Wine Set Labels Design (AI)


In case you’re on the lookout for a customized wine label, this can be a nice possibility. Whereas it is a shortcut, this wine bottle label design is exclusive and delightful. The pack comes with a back and front label design that means that you can add much more data for purchasers.
Classic Wine Label Design (AI)


This delicate wine label design is romantic. The complicated traces and adornments make it excellent for marriage ceremony favours. The symmetrical design is traditional and really consultant of a high-quality reserve.
Classic Wine Label Design (AI)


This wine bottle label design comes with three components: the principle label on the entrance, the supporting label, and a again label. It is a nice wine label design pack for those who’re on the lookout for one thing very traditional and classy.
In case you favored this tutorial, you may like:
