Chances are you’ll get the Did not create a proxy gadget for the USB gadget error whenever you attempt to plug in an exterior USB gadget like a tough drive in VirtualBox in your Home windows 11 or Home windows 10 laptop. This submit offers probably the most relevant options to the difficulty for affected PC customers.

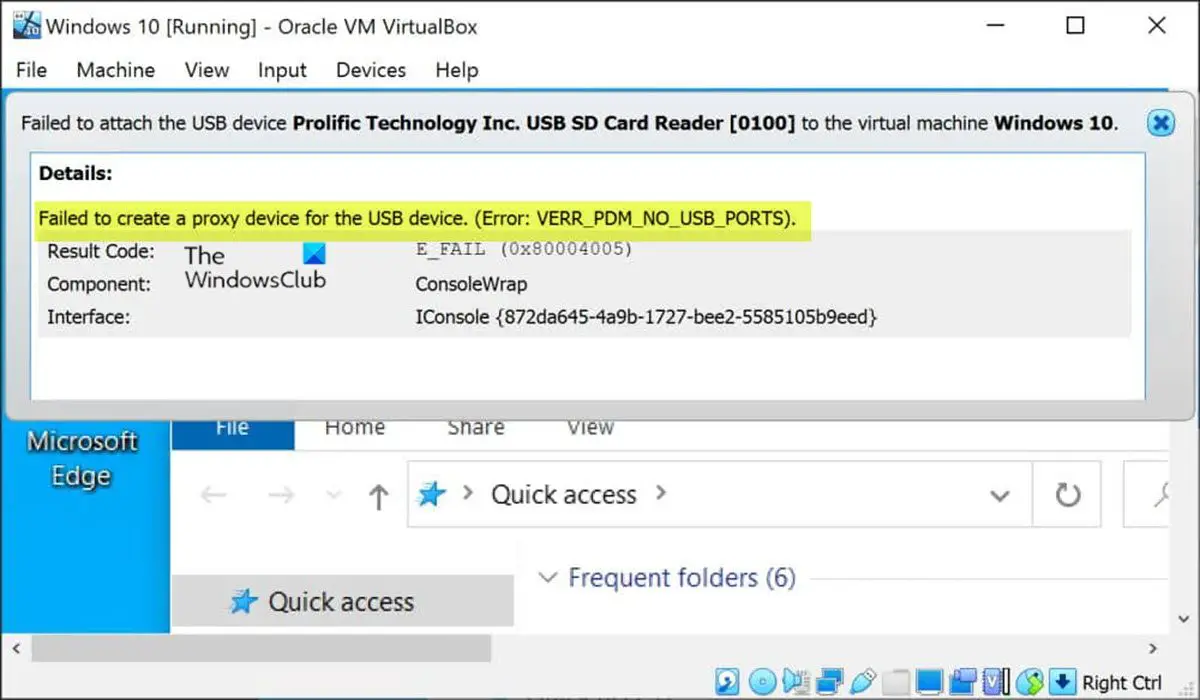
Did not create a proxy gadget for the USB gadget. (Error: VERR_PDM_NO_USB_PORTS).
Did not create a proxy gadget for the USB gadget — VirtualBox error
In the event you get the Did not create a proxy gadget for the USB gadget error whenever you attempt to join an exterior USB {hardware} when operating a digital machine in VirtualBox in your Home windows 11/10 PC, you possibly can strive our beneficial options introduced beneath in no specific order and see in case your drawback is resolved in your gadget.
- Preliminary guidelines
- Set up VirtualBox Visitor Additions
- Set up VirtualBox Extension Pack
- Allow USB 3.0 Controller
- Manually set up USB driver for VirtualBox
- Modify Home windows Registry
Let’s check out the outline of the method concerned regarding every of the listed options.
1] Preliminary guidelines
Earlier than you proceed with the options beneath, to see in the event you can resolve the difficulty, you possibly can first eject the USB gadget from the host machine, after which re-attach the gadget. To do that in your host laptop, click on on the arrow signal in your taskbar, right-click the USB ejector icon and choose the USB gadget that you just need to take away out of your system. As soon as eliminated, now you can reconnect or remount the ejected USB gadget. If this didn’t work, you possibly can unplug the USB gadget, then restart the PC to rule out any risk of a glitch or one-time bug on the system. After the host machine restarts, you can begin the digital machine and plug within the USB gadget. Now, it’s best to see the USB gadget has appeared in your system.
2] Set up VirtualBox Visitor Additions
Visitor Additions in VirtualBox encompass functions and gadget drivers that assist to boost the efficiency of the working system. After you could have efficiently put in Home windows in a VirtualBox VM, it’s beneficial to put in the Visitor Additions package deal for higher usability and efficiency.
To set up VirtualBox Visitor Additions, do the next:
- Launch VirtualBox.
- Proper-click the digital machine, and choose the Begin submenu.
- Subsequent, select the Regular Begin possibility.
- Register to your Home windows 11/10 account.
- Click on the Gadgets menu.
- Choose the Insert Visitor Additions CD picture possibility.
- Subsequent, open File Explorer within the digital machine.
- On the left navigation pane, click on on This PC.
- Below the Gadgets and drives part, double-click to open the VirtualBox Visitor Additions disc.
- Subsequent, double-click the VBoxWindowsAdditions.exe file to launch the installer.
- Click on the Subsequent button.
- Click on the Subsequent button once more.
- Click on the Set up button.
- Choose the Reboot now possibility.
- Click on the End button.
As soon as the set up is completed, join your USB gadget and see if the Did not create a proxy gadget for the USB gadget error reoccurs. If that’s the case, strive the following answer.
Learn: The way to velocity up a VirtualBox Digital Machine and make it run quicker
3] Set up VirtualBox Extension Pack

The VirtualBox Extension Pack helps enormously in enhancing the features of the working system, and it additionally extends the performance of the app. The package deal provides the next performance: Help for USB 2.0 and USB 3.0 units. To get the Oracle model, you have to obtain the Extension Pack for all supported platforms.
To put in VirtualBox Extension Pack, do the next:
- Launch VirtualBox.
- Click on File > Preferences.
- Click on the Extension tab.
- Click on the + button.
- Navigate to the place you saved the Extension Pack.
- Choose the Extension Pack.
- Click on Open.
- When prompted, click on the Set up button.
- Scroll via the EULA after which click on I Agree.
If this isn’t the case for you as a result of you have already got the package deal put in, however the situation in spotlight isn’t resolved, you possibly can strive the following answer.
4] Allow USB 3.0 Controller

The problem you’re presently going through may very well be resulting from you making an attempt to make use of a USB 3.0 gadget with a visitor that doesn’t assist USB 3.0, otherwise you haven’t enabled the USB 3.0 Controller possibility within the VM settings.
To allow the USB 3.0 Controller possibility, do the next:
- Open the VirtualBox in your laptop.
- Proper-click on the digital machine and choose the Settings possibility.
- Subsequent, click on on Ports > USB tab.
- Examine the Allow USB Controller possibility.
- Now, choose the radio button for the USB 3.0 (xHCI) Controller possibility.
- Subsequent, click on on the Add button and choose the USB gadget unable to attach.
- Click on on OK and choose Exit.
As soon as all of the steps are carried out, join the USB gadget and see if the error has been resolved. In any other case, strive the following answer.
Learn: USB 3.0 Exterior Onerous Drive not acknowledged in Home windows
5] Manually set up USB driver for VirtualBox

If there is a matter with the digital USB driver, you’re more likely to encounter the difficulty in focus. On this case, you have to manually set up the USB driver in your Home windows 11/10 host machine. To carry out this process, do the next:
- Press the Home windows key + E to open File Explorer in your laptop.
- Navigate to the listing path beneath:
C:Program FilesOracleVirtualBoxdriversUSB
- On the location, open the gadget folder.
- Proper-click on the VBoxUSB.inf file and choose the Set up possibility.
- Open the filter folder.
- Proper-click on the VBoxUSBMon.inf and choose the Set up possibility.
When you full the set up process, restart the VirtualBox software and verify if the difficulty is resolved. If not, strive the following answer.
Learn: The way to repair VirtualBox USB not detected in Home windows laptop
6] Modify Home windows Registry
This answer requires you to edit or modify the registry by deleting the UpperFilters key. UpperFilters and LowerFilters are add-ons added by third-party software program throughout set up. It helps put in applications talk together with your gadget (system) drivers. Generally, these filters could cause Gadget Supervisor errors.
First, you have to discover the Class GUID for the USB gadget as follows:

- Press the Home windows key + R to open Run.
- Within the Run dialog field, sort devmgmt.msc and hit Enter to open the Gadget Supervisor.
- In Gadget Supervisor, broaden the gadget class for which you need to view the Class GUID.
- Proper-click on the gadget driver and select Properties.
- Open the Particulars tab.
- Click on the drop-down menu and select Class GUID.
The Class GUID will present up underneath the Worth part and appears like this {ca3e7ab9-b4c3-4ae6-8251-579ef933890f}. Now, with the Class GUID, you possibly can proceed to delete the registry Filter keys for the USB gadget. Since this can be a registry operation, it is strongly recommended that you just again up the registry or create a system restore level as essential precautionary measures. As soon as carried out, you possibly can proceed as follows:
HKEY_LOCAL_MACHINESYSTEMCurrentControlSetControlClassDeviceDriverGUID
- On the location, on the precise pane, right-click on the UpperFilters worth and select Delete.
- Click on Sure to verify the motion.
- Subsequent, delete the LowerFilters worth if it exists for a similar GUID class subkey.
- Exit Registry Editor when carried out.
- Restart your PC.
On boot, launch the VirtualBox app and fireplace up your VM, then reconnect the USB gadget. The problem ought to be resolved now. You could have to reinstall the USB gadget driver or any software program that’s required by the gadget.
I hope this submit helps you!
Associated submit: VirtualBox Failed to connect the USB gadget to the digital machine
How do I get VirtualBox to acknowledge my USB?
Open settings in VirtualBox, browse to the USB tab, and click on the Add button on the very proper of the window. Choose the USB gadget that you just want to use from the record. As soon as carried out, click on OK to avoid wasting adjustments and exit. Now return into your VM window, and from the Host choices, choose Gadget > Usb Gadgets then choose your USB gadget.
Why is VirtualBox not detecting USB?
If VirtualBox is just not detecting USB in your Home windows 11/10 PC, do the next:
- Open the VirtualBox in your laptop.
- Proper-click on the digital machine and choose the Settings possibility.
- Change to the USB tab.
- Tick the Allow USB Controller checkbox.
- Click on the plus icon on the precise aspect.
- Choose the USB gadget that was not detected.
- Click on the OK button. The USB ought to seem as out there.
What’s a USB filter in VirtualBox?
USB filters in VirtualBox can help you mechanically mount USB units in VMs operating in VirtualBox. To arrange a VirtualBox USB filter, right-click on the VM and go to USB. Allow the USB controller and click on on the “+” signal on the precise aspect of the window. This can present a listing of presently out there USB units.
How do I switch recordsdata from USB to VirtualBox?
Insert the USB gadget you want to use. Launch VirtualBox and click on File > Preferences, then Extensions and click on +. Browse to the downloaded Extension Pack, click on Open, then when prompted, Set up and observe the prompts to finish the method.
Learn: The way to switch Recordsdata to Home windows Sandbox
How do I switch recordsdata from a PC to digital machine?
To switch a file from the host/bodily machine to the digital machine, merely drag the recordsdata to the digital machine window (the place the visitor OS is displayed). Alternatively, you possibly can right-click the file on the bodily laptop and choose Copy, then right-click within the visitor OS and choose Paste.
