
One of the crucial fascinating MongoDB World 2022 bulletins is the discharge of Vercel-MongoDB integration. What we’re seeing right here is the gradual simplification and standardization of integrating massive infrastructure parts. You’ll be able to capitalize on quite a lot of energy in your information retailer and host with a minimal of architectural fuss.
Much less wrangling with structure means extra time working in your core objectives. Let’s check out the brand new streamlined integration.
Utilizing MongoDB and Vercel collectively was already pretty simple. Nonetheless, the brand new official integration provides an ordained strategy that’s commonplace and brings with it a number of niceties. Let’s construct on this mission I used to demo Vercel-MongoDB integration beforehand to see how issues work.
The hinge between your Vercel and MongoDB Atlas infrastructure comes right down to the MONGODB_URI environmental variable. The official integration handles defining this and sharing it for you, together with the required permissions.
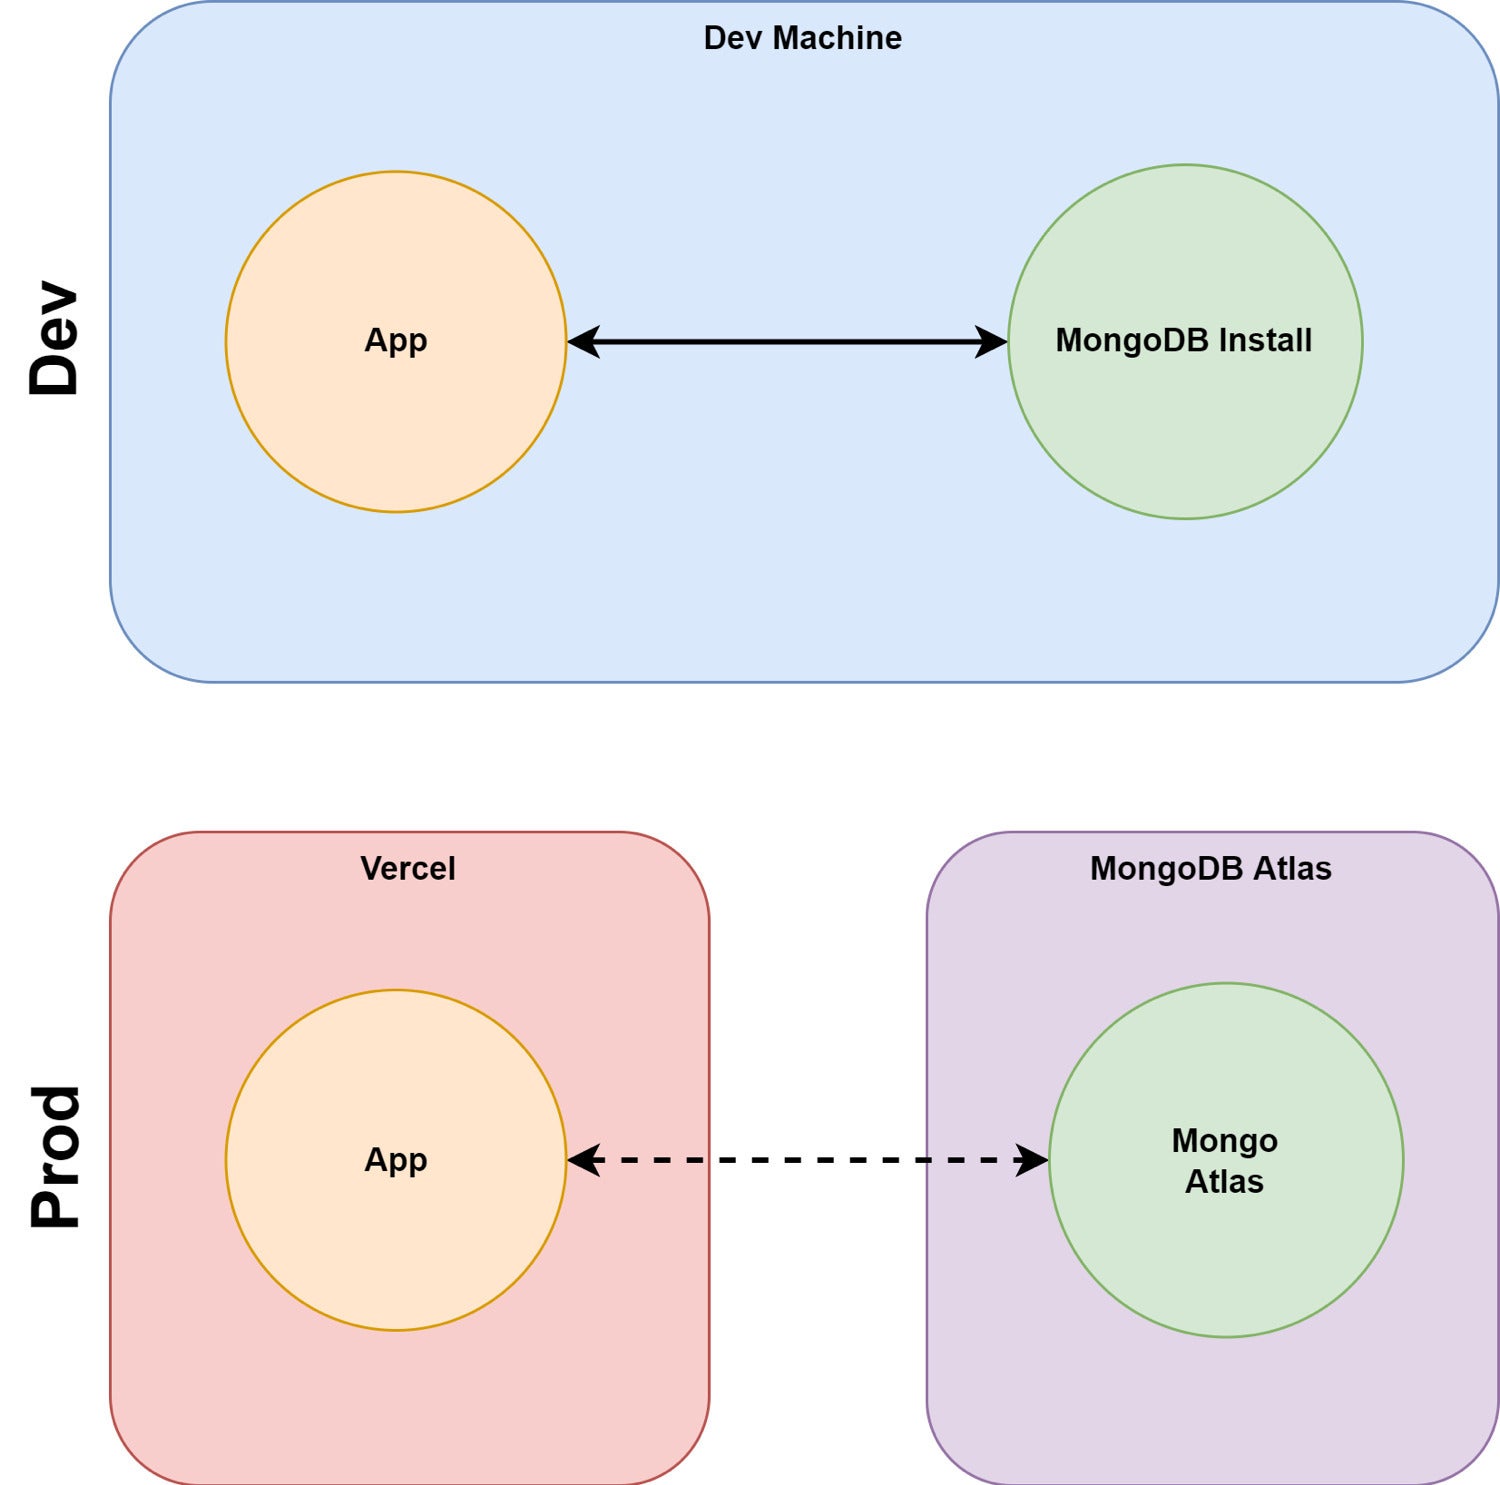
For our demo right here, what we need to obtain is a SvelteKit-based app that we develop with domestically, with a neighborhood MongoDB information retailer. Then we need to deploy this app to Vercel and have it routinely use a MongoDB Atlas cluster as its information retailer. It is a quite common setup. By the way, a lot of this works the identical for React/Subsequent or Vue/Nuxt. The essential setup is seen in Determine 1.
Determine 1. Dev and prod architectures for Vercel-MongoDB app
 IDG
IDGThe SvelteKit demo app
Our demo app is a SvelteKit app that permits for making a easy doc, an apothegm, with a textual content and an creator discipline, and shows the listing of apothegms within the database. For the textual content of our paperwork, we’ll use some pithy apothegms.
SvelteKit is a full-stack framework, so we’ll use the load technique in our view to hit the again finish and cargo any present apothegms, as in Itemizing 1.
Itemizing 1. SvelteKit’s load() technique
 export async operate load({ params, fetch, session, stuff }) {
    const res = await fetch('/apothegm', {
      technique: "GET",
      headers: { 'content-type': 'utility/json' }
    });
    return {
      props: {
        apothegms: await res.json()
      }
    };
  }
You’ll discover extra data on SvelteKit’s load technique right here, however the principle concept is that we’re hitting the back-end API earlier than the web page is bootstrapped and inserting the resultant JSON into the props.apothegms discipline. That discipline can also be uncovered on an everyday script factor, in order that the web page has entry to it, with the road export let apothegms;.
On the again finish, the /apothegm get technique seems to be like Itemizing 2.
Itemizing 2. Retrieving apothegms from the again finish
import clientPromise from '../lib/mongo';export async operate get ({request}) {
const dbConnection = await clientPromise;
const db = dbConnection.db("apothegm");
const assortment = db.assortment("apothegm");
let apos = await assortment.discover({}).toArray();return {
standing: 200,
headers: { 'content-type': 'utility/json' },
physique: { apos }
};
}
Itemizing 2 returns a physique filled with apothegms retrieved from the info retailer, i.e., from the apothegm database and the apothegm assortment. This technique largely depends on the clientPromise object imported from lib/mongo. Let’s have a look at the related bits of that module in Itemizing 3.
Itemizing 3. The MongoDB helper /lib/mongo.js
import 'dotenv/config';
import { MongoClient } from 'mongodb';const uri = course of.env["MONGODB_URI"];
const choices = {
useUnifiedTopology: true,
useNewUrlParser: true,
}let shopper;
let clientPromise;if (!uri) {
throw new Error('Please set Mongo URI')
}if (course of.env['NODE_ENV'] === 'improvement') {
if (!world._mongoClientPromise) {
shopper = new MongoClient(uri, choices)
world._mongoClientPromise = shopper.join()
}
clientPromise = world._mongoClientPromise
} else {shopper = new MongoClient(uri, choices)
clientPromise = shopper.join()
}export default clientPromise
Itemizing 3 does its work by making a connection to a MongoDB occasion by way of the MONGODB_URI environmental variable. This variable is pulled from the setting with the course of.env["MONGODB_URI"] name.
Word the primary line of this file is a name to import 'dotenv/config'. This import causes the dotenv library to bootstrap itself. The aim of dotenv is to load setting variables for the app from config recordsdata (in an OS-agnostic approach). Extra data on that right here.
For our app, we need to set that variable to a neighborhood URI throughout improvement, and set it to a distant MongoDB Atlas URL throughout manufacturing. We are able to try this by offering a .env file that dotenv will discover throughout native improvement however not in prod. To perform this, we don’t examine the file into model management—we add it to .gitignore. The related bits from each recordsdata are proven in Itemizing 4.
Itemizing 4. Provides to .env and .gitignore
// .env
MONGODB_URI="mongodb://localhost:27017
// .gitignore
.env
.env.*
This implies throughout improvement, our app will hit the native MongoDB set up. At this level, you’ll be able to launch the app with npm run dev and every thing ought to operate.
The Vercel-MongoDB manufacturing setup
Now that dev is up and working we’ll flip our consideration to establishing prod, or what we’re calling prod. In a real-world state of affairs, you’ll implement testing and staging steps after which promote from staging to manufacturing.
In any occasion, you’ll want accounts in each Vercel and MongoDB Atlas. Each providers supply free pastime stage accounts which are fast and simple to arrange: MongoDB enroll, Vercel enroll.
Import the mission into Vercel
After getting your accounts, you’ll be able to log into Vercel, create a brand new mission, and import the code for the mission. Right here’s that GitHub mission once more: https://github.com/MTyson/sveltekit-vercel-mongo.
As soon as the import is finished, Vercel will routinely construct and deploy the mission. (Sigh of aid: No further infrastructure work.) The construct will succeed however the mission will show an error whenever you view it. That’s as a result of there is no such thing as a information retailer accessible.
Create a MongoDB Atlas cluster
Now you need to create a cluster in MongoDB Atlas to function a house in your manufacturing information. In your MongoDB console, it’s simple to create a free cluster (directions right here). You’ll additionally create a database person alongside the best way.
Again to Vercel so as to add integration
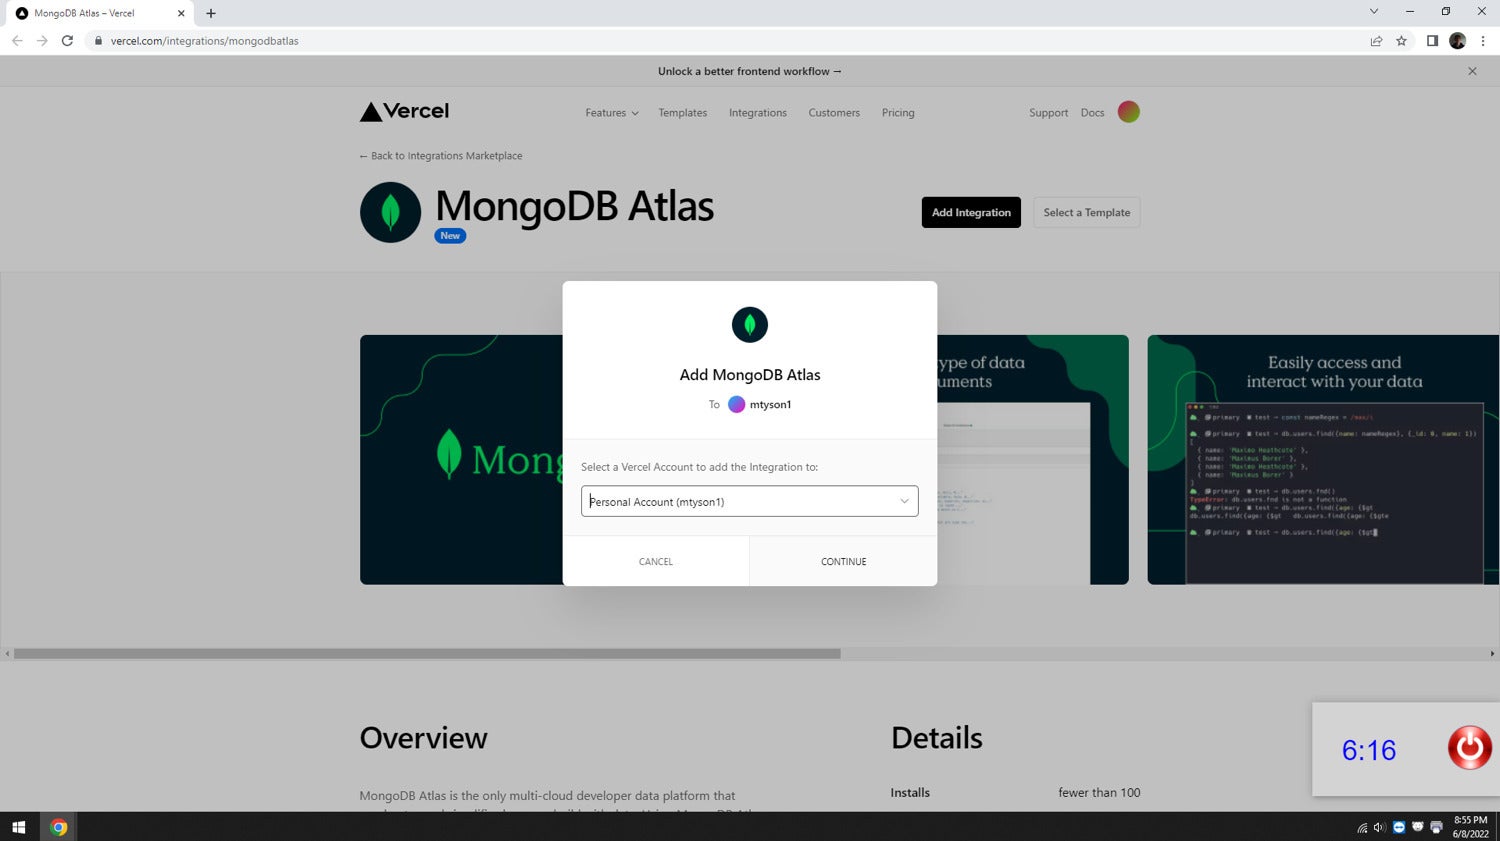
After getting a cluster accessible to be used, the subsequent step is so as to add MongoDB integration to your Vercel person account. (In an enterprise setting, you’ll be able to add this to your Vercel workforce.) Navigate to https://vercel.com/integrations/mongodbatlas and click on the “Add Integration” button on the prime. You’ll be offered with a modal containing a drop-down menu, and the account you need to use ought to seem there, as in Display 1 under.
Display 1. Add MongoDB Atlas integration to Vercel
 IDG
IDGSubsequent you might be given the selection so as to add the mixing to all initiatives or to a particular one. For the sake of this demo, let’s choose “Add to All” and hit proceed.
Briefly again in MongoDB Atlas
Including the mixing will launch a MongoDB signup web page in one other window. When you don’t have already got a MongoDB account, you’ll be able to set one up. In any other case, log in to your present account.
Subsequent, a dialog will ask what MongoDB Atlas group so as to add the mixing to. Simply use the default you arrange in your person.
Lastly, hit the Acknowledge button on the ultimate display to just accept that it’s important to manually uninstall the mixing if you’d like it eliminated, as proven in Display 2.
Display 2. Acknowledge group entry in MongoDB Atlas
 IDG
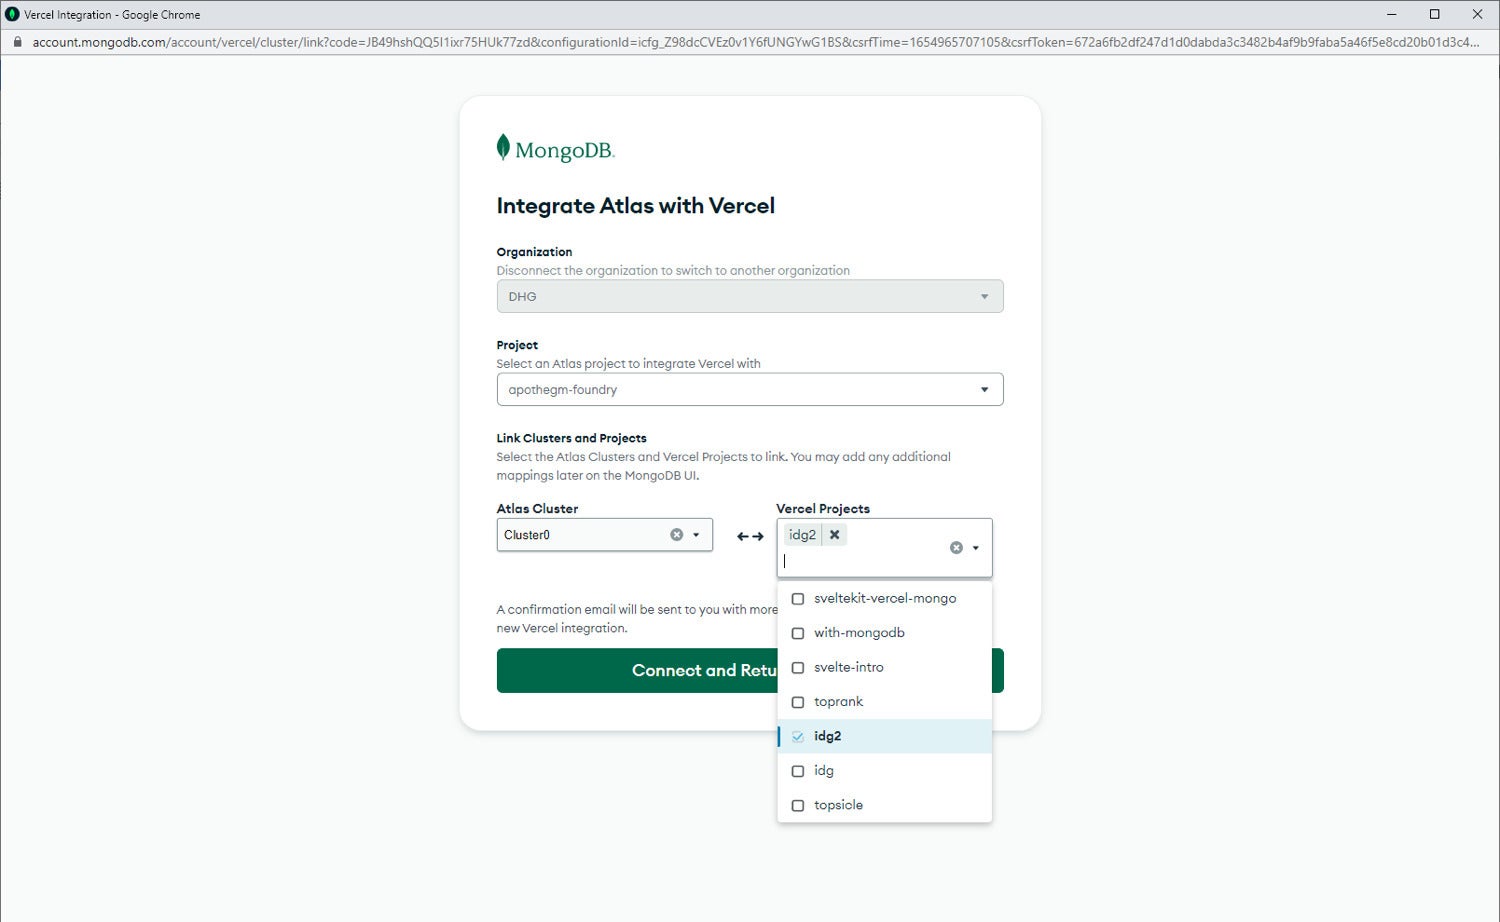
IDGNow you’ll see the MongoDB Atlas mission you chose and the clusters inside it. You’ll affiliate a cluster within the left-hand drop field to a number of Vercel initiatives within the right-hand multiselect. In our case, we need to add the Vercel mission we created earlier to the right-hand choice. You possibly can see this in Display 3.
Display 3. Affiliate Vercel mission to MongoDB Atlas cluster
 IDG
IDGThe following step is creating the bridge between the MongoDB Atlas cluster and the Vercel mission. Ensure you choose the proper mission on the Vercel facet!
As soon as that is in place, the Vercel mission will routinely have entry to the setting variable (MONGODB_URL) we have to join with ease to the info retailer.
Again to Vercel to check
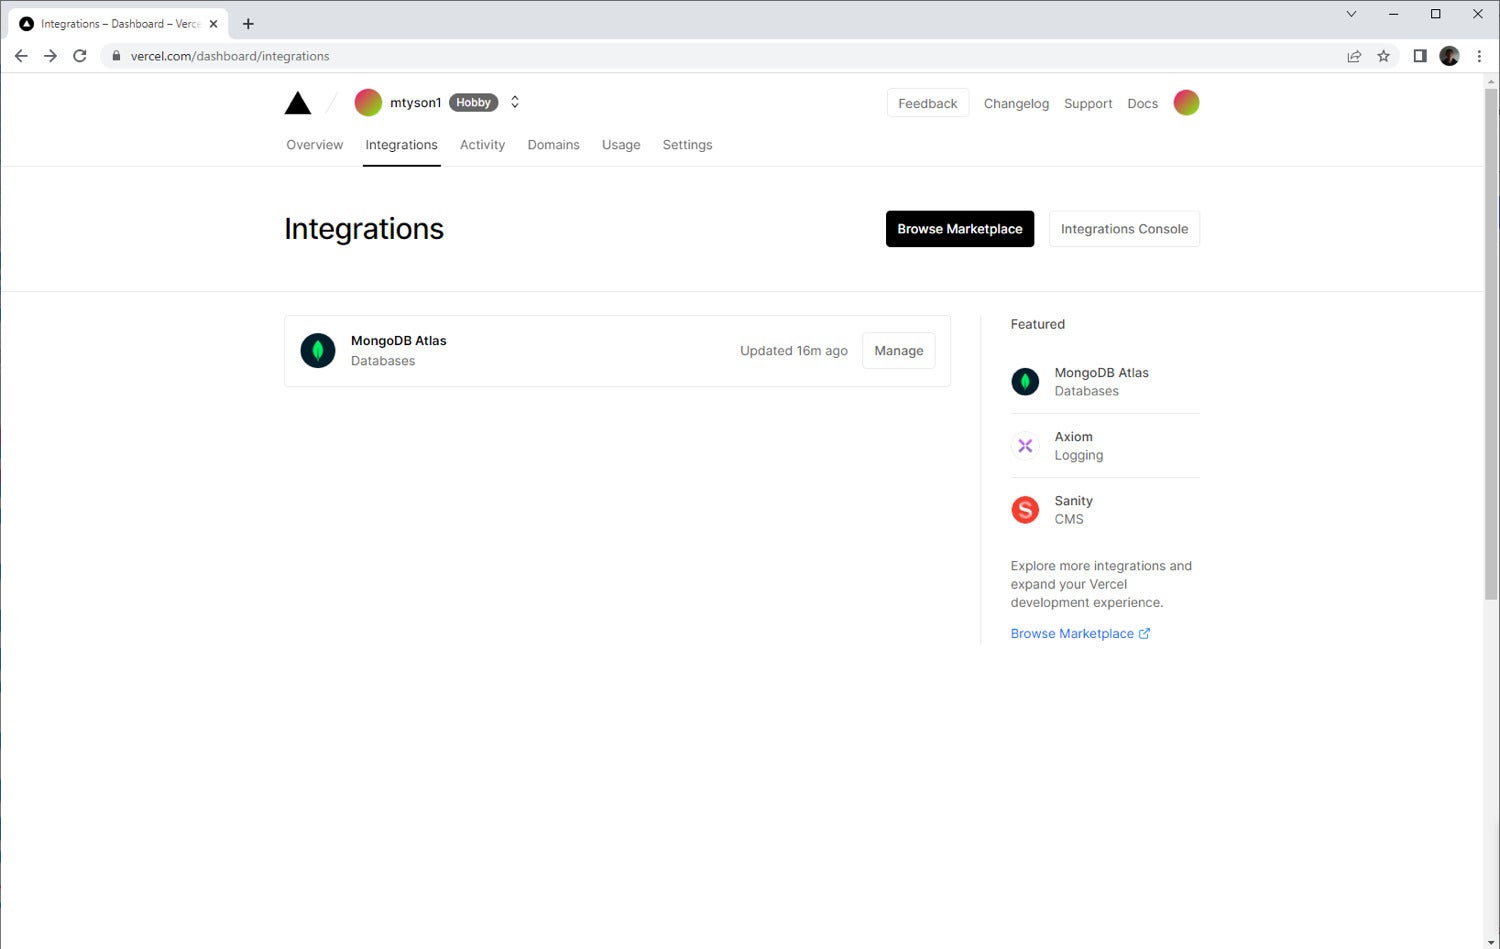
Again in Vercel, you’ll see the MongoDB Atlas integrations within the Integrations tab, as in Display 4.
Display 4. MongoDB Atlas integration in Vercel
 IDG
IDGFrom right here you may make modifications to the Vercel facet of the mixing (together with uninstalling it if you want, by choosing Handle -> Uninstall).
Subsequent we confirm that the Vercel mission has taken on the brand new environmental variable that refers back to the MongoDB Atlas set up. Open the Vercel mission, and click on Settings. In Settings, click on “Atmosphere Variables” within the left-hand menu. It is best to then see a MONGODB_URI variable listed there, as in Display 5.
Display 5. Atmosphere variables in Vercel mission
 IDG
IDGWhen you click on the attention icon throughout the variable, you’ll be able to see the worth, which ought to level to your MongoDB Atlas cluster. This verifies that the setting variable is obtainable to the app when deployed.
Now in the event you click on on the mission to view it, you’ll see it working with information pushed by the Atlas cluster, as in Display 6.
Display 6. Working in prod with Vercel-MongoDB Atlas integration
 IDG
IDGThe underside line is that the Vercel-MongoDB integration offers us a easy option to join our utility as deployed in Vercel to our information retailer as working in MongoDB Atlas. The same strategy might be used for associating apps to information in several environments, from check, to staging, to manufacturing.
Total, the mixing permits for a extra standardized strategy to leveraging world “scale to zero” infrastructure with a minimal of fuss.
Copyright © 2022 IDG Communications, Inc.
