
In laptop science, “masking” refers to utilizing one digital aspect (a masks) to change or extract information from a second digital aspect. Programmers use masking in varied laptop science functions: bit masking is used when growing software program methods/APIs, enter masking is utilized in frontend growth, and computer-graphics-based masking is used when growing GUI apps.
In cellular apps, we frequently use visible alerts to enhance the app’s high quality and user-friendliness, together with these sorts of mask-based static graphics and animations. For instance, trendy cellular apps embrace vector shapes or textual content that comprise picture textures or gradient layers. Some cellular apps reveal the primary app display with an animated vector masks (i.e., Twitter’s iOS app) to create a uniquely welcoming consumer expertise.
The react-native-masked-view library enables you to create masked views so as to add compelling visuals to your React Native apps. On this tutorial, I’ll clarify how one can use the react-native-masked-view library with some sensible examples that you should use in your React Native apps.
Soar forward:
Studying library options helps to confirm the feasibility of implementing your design concepts. So, let’s research some library options earlier than utilizing the library. This library comes with the next highlighted options:
Cross-platform help
Older React Native variations provided the official, inbuilt MaskedViewIOS framework part for implementing masked views on iOS. However in v0.59, the React Native staff moved the MaskedViewIOS part to a separate group package deal referred to as react-native-masked-view for higher manageability; now, react-native-masked-view helps each Android and iOS platforms.
Factor-type-independent masking
This library doesn’t restrict app builders by providing solely image-based masking; you should use any legitimate React aspect for the masking course of. It’s potential to create text-based, image-based, or any React element-based masks with this library.
Animations help
The React Native framework gives an inbuilt animation API for builders to animate platform-specific native UI components. You possibly can combine the inbuilt animation API and this masking library to create compelling dynamic visuals in your React Native apps. Creating a novel opener animation with a vector form masks is really easy!
Now that we all know the first options that the masking library gives, let’s begin utilizing the library to develop into extra acquainted with it.
First, we have to set up the library in a React Native venture. You need to use the upcoming examples in an current venture or a brand new venture. In the event you plan to create a brand new one, use the next command:
npx react-native init MaskedViewDemo
cd MaskedViewDemo
Now, set up the library as follows:
npm set up @react-native-masked-view/masked-view
# --- or ---
yarn add @react-native-masked-view/masked-view
Run the venture to guarantee that the masking package deal set up was profitable:
npx react-native run-android
# --- or ---
npx react-native run-ios
Making a textual content masks with a background texture
We will create a easy masks aspect with a Textual content part and an Picture part to get began. Right here, we have to use the Textual content part because the masks aspect and use Picture for the masks’s texture. In different phrases, we have to fill a textual content aspect with a background texture.
First, obtain the medium-sized picture file from the Unsplash web site into your app listing and rename it as texture.jpg. Subsequent, add the next code to your App.js file:
import React from 'react';
import {
  SafeAreaView,
  StyleSheet,
  Textual content,
  View,
  Picture
} from 'react-native';
import MaskedView from '@react-native-masked-view/masked-view';
import backgroundTexture from './texture.jpg';

perform App() {
  return (
    <SafeAreaView model={kinds.container}>
      <MaskedView
        model={kinds.maskedView}
        maskElement={
          <View model={kinds.maskWrapper}>
            <Textual content model={kinds.masks}>Textual content Masks</Textual content>
          </View>
        }>
        <Picture
          supply={backgroundTexture}
          model={kinds.picture}
        />
      </MaskedView>
    </SafeAreaView>
  );
}

const kinds = StyleSheet.create({
  container: {
    flex: 1,
    backgroundColor: '#444'
  },
  maskedView: {
    flex: 1,
    flexDirection: 'row',
    top: '100%'
  },
  maskWrapper: {
    backgroundColor: 'clear',
    flex: 1,
    justifyContent: 'heart',
    alignItems: 'heart',
  },
  masks: {
    fontSize: 60,
    colour: 'black',
    fontWeight: 'daring',
  },
  picture: {
    flex: 1,
    top: '100%',
    backgroundColor: '#324376'
  },
});

export default App;
Above, we created a textual content masks and added a Textual content part inside the maskElement prop. For positioning functions, we wrapped the Textual content part with a clear View. The Picture part will get rendered behind the textual content masks, so we are going to see the picture content material solely inside the masks space:
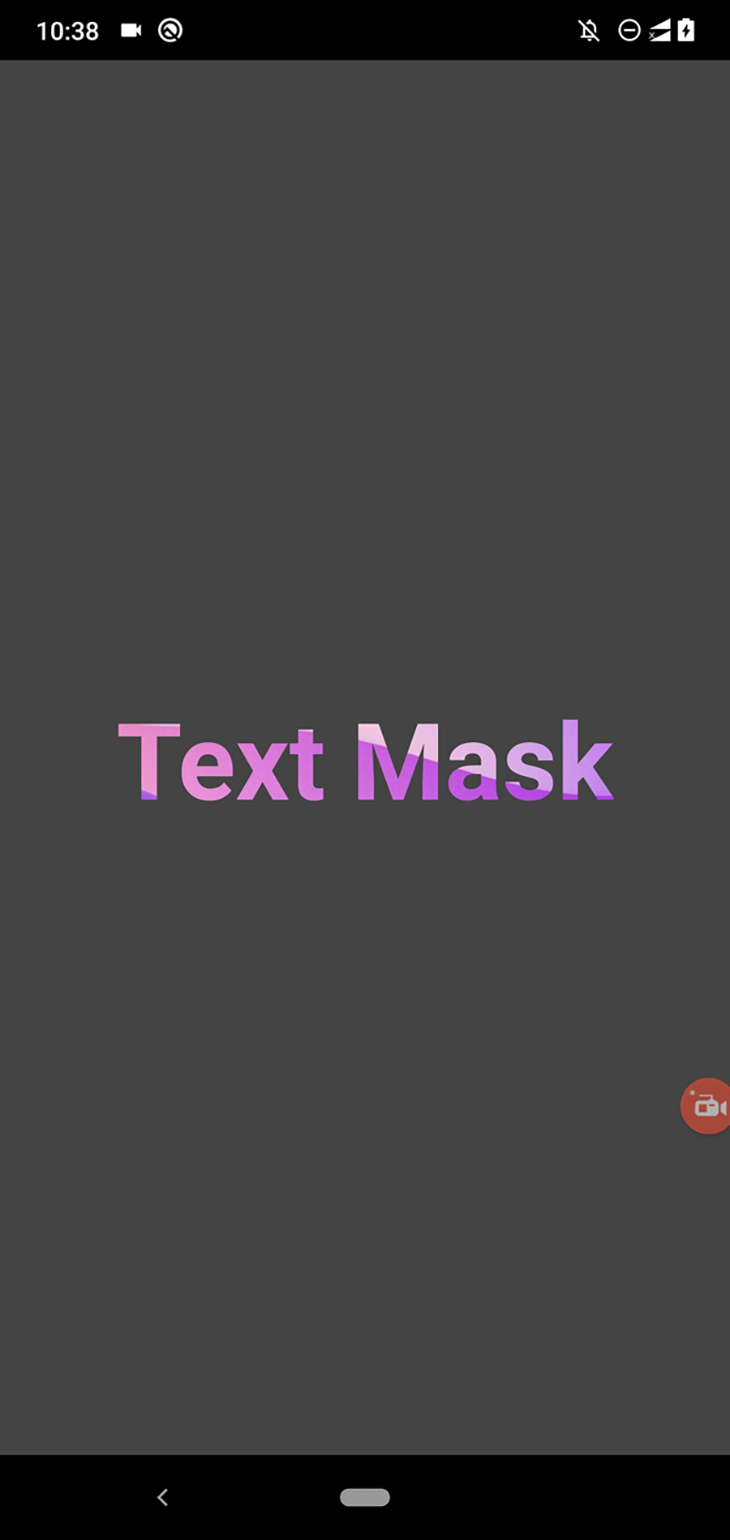
The MaskedView part reveals background elements based mostly on the maskElement‘s alpha channel, so we are able to use partial transparency so as to add curiosity to our kinds. For instance, we are able to partially present the background picture across the textual content aspect as follows:
maskWrapper: {
  backgroundColor: 'rgba(0, 0, 0, 0.3)',
  flex: 1,
  justifyContent: 'heart',
  alignItems: 'heart',
},
The above styling definition units an opacity worth for the masks aspect by way of the rgba styling syntax. Now, you will note the next consequence:

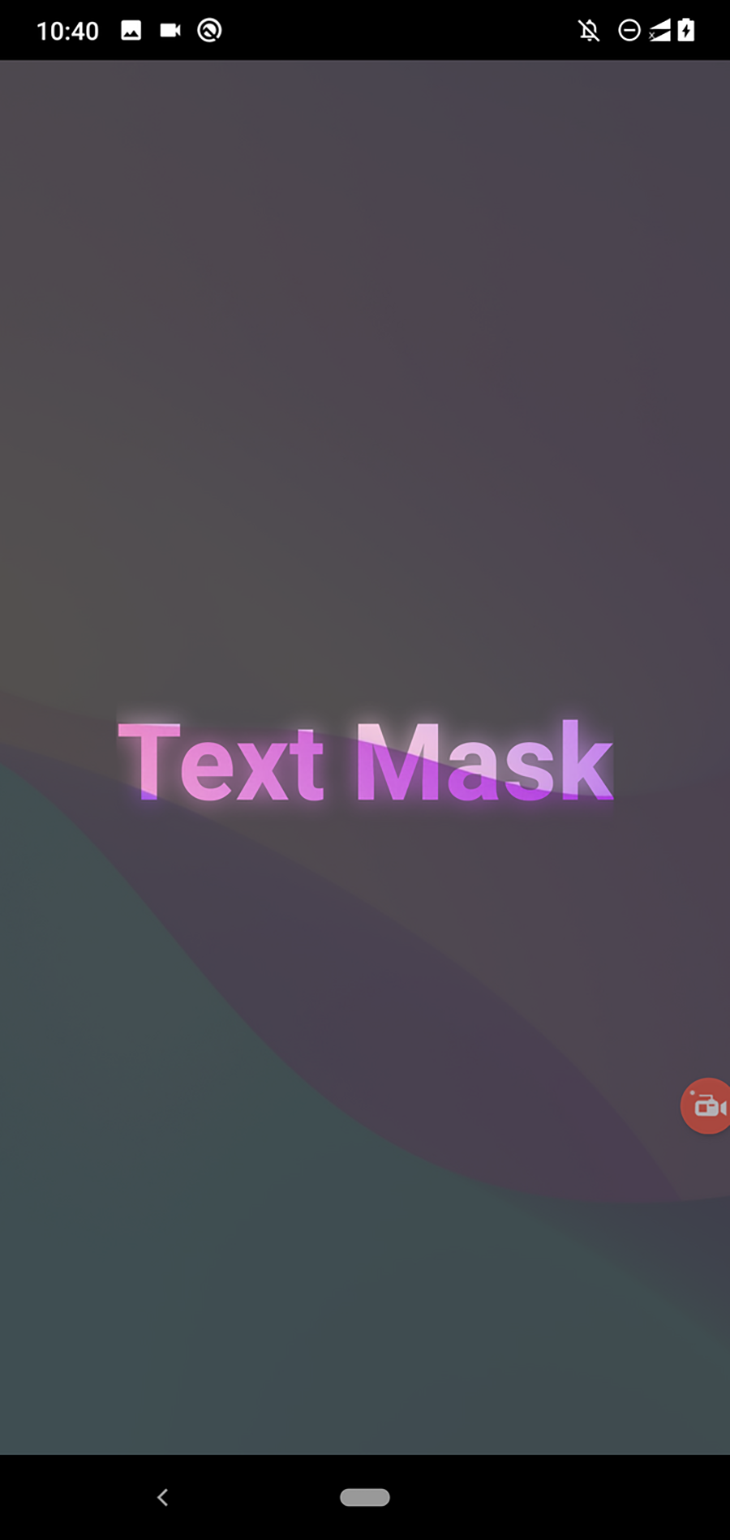
We will additionally change the textual content shadow to use a blur impact across the textual content aspect:
maskWrapper: {
  backgroundColor: 'rgba(0, 0, 0, 0.08)',
  flex: 1,
  justifyContent: 'heart',
  alignItems: 'heart',
},
masks: {
  fontSize: 60,
  colour: 'black',
  fontWeight: 'daring',
  textShadowRadius: 30,
  textShadowColor: 'rgba(0, 0, 0, 0.8)'
},
After you employ the above code in your app, you will note a blur impact across the textual content aspect. Utilizing a excessive alpha worth for the shadow reveals the background picture extra, blurring the textual content aspect for the reason that masking course of makes use of the non-transparent areas to activate the masks. Take a look at the next preview:
Creating vector form masks
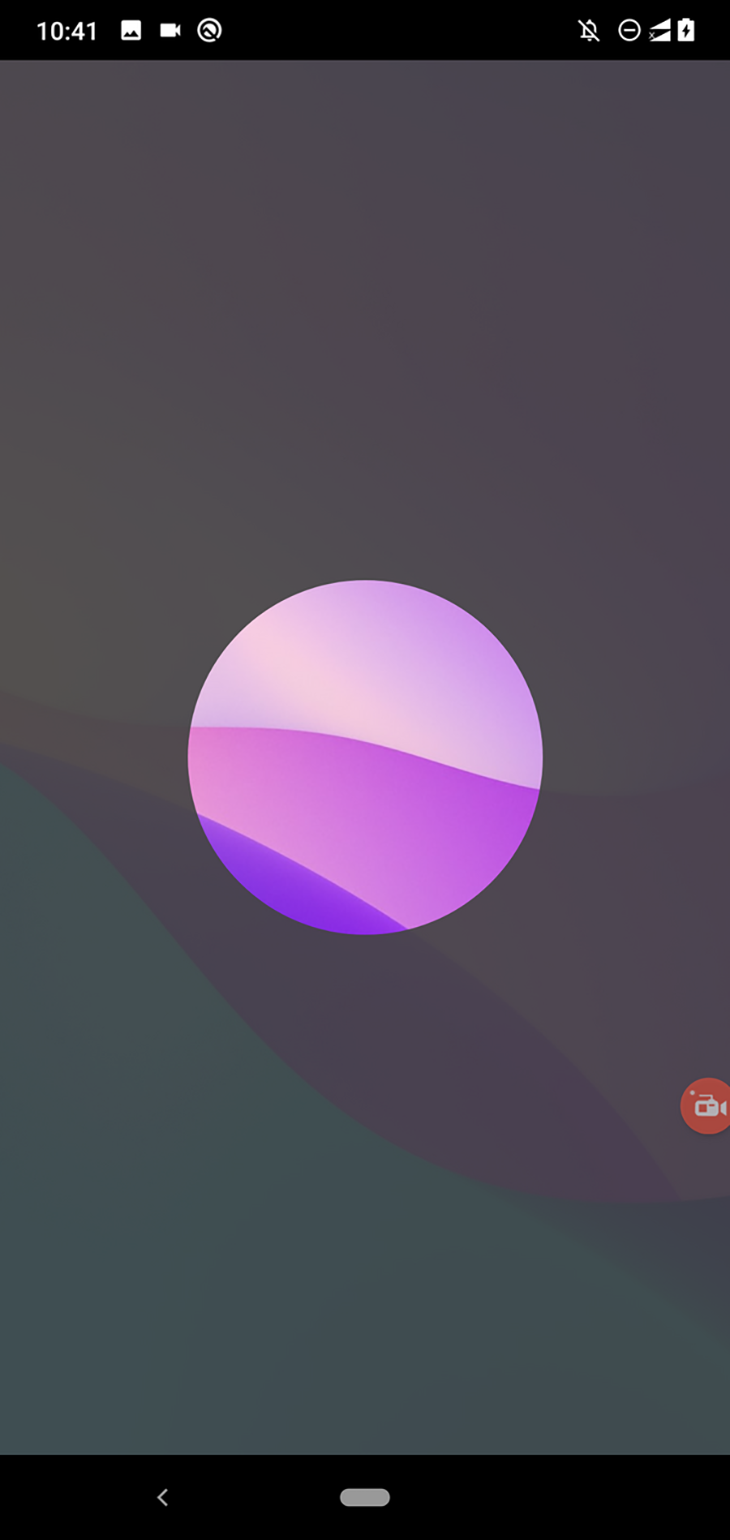
Earlier, we used a textual content masks with a background picture. Now, we’ll use a vector form as a masks. We will get began with form masks through the use of a View part. As you already know, we are able to create a circle form with a View part by adjusting its border radius.
Change the Textual content part with a View part as follows:
maskElement={
  <View model={kinds.maskWrapper}>
    <View model={kinds.masks}></View>
  </View>
}>
Subsequent, change the styling definition for the internal masks aspect:
masks: {
  width: 200,
  top: 200,
  backgroundColor: '#000',
  borderRadius: 100
},
Notice that we nonetheless use maskWrapper for positioning functions. The above styling snippet units the border radius for the internal View, whereas the outer View makes use of a low alpha worth to disclose the background picture barely, as proven within the following preview:
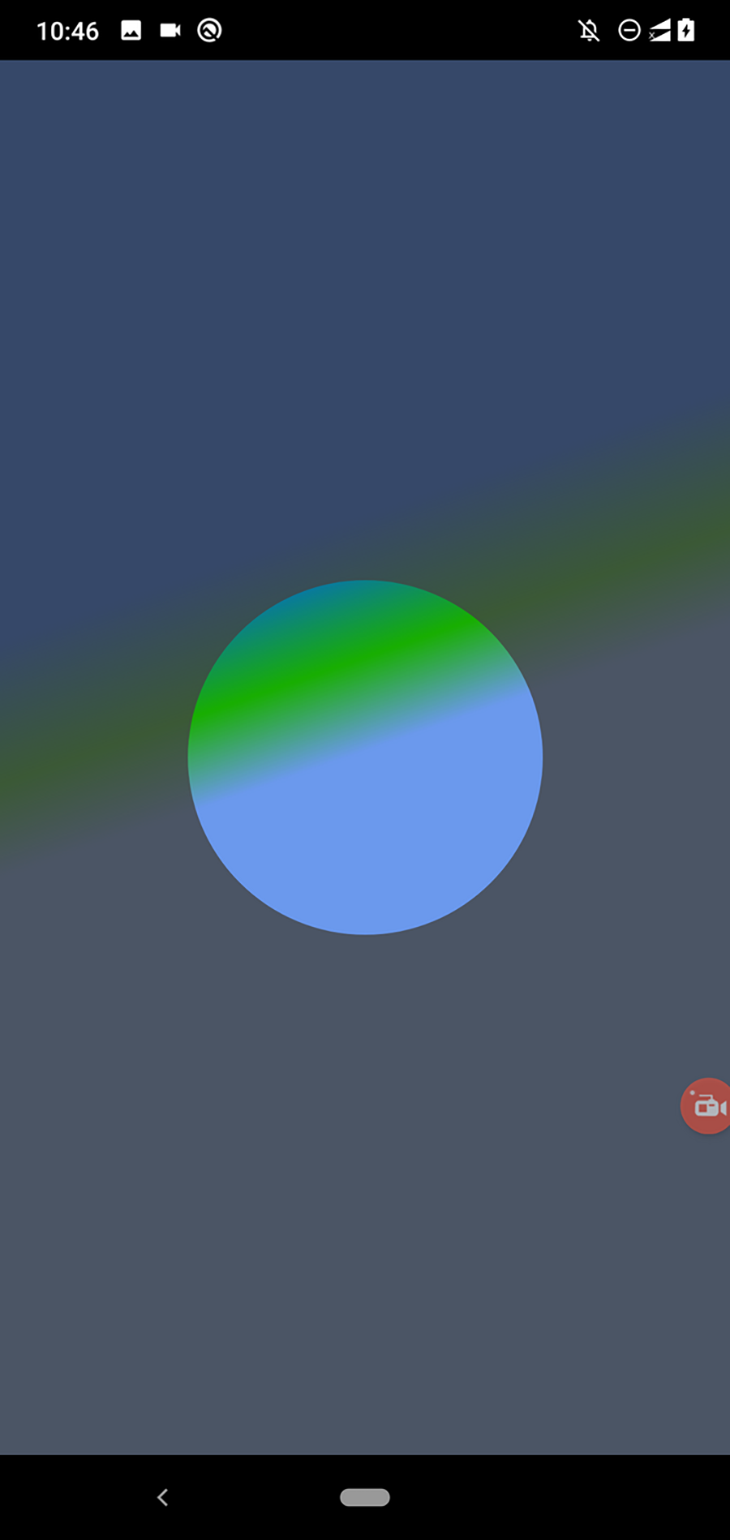
In earlier examples, we used a picture background with the masks, however the masking library helps utilizing any React aspect behind the masks aspect. For instance, you should use the well-known LinearGradient part behind the masks aspect as follows:
import React from 'react';
import {
  SafeAreaView,
  StyleSheet,
  Textual content,
  View,
  Picture
} from 'react-native';
import MaskedView from '@react-native-masked-view/masked-view';
import LinearGradient from 'react-native-linear-gradient';

perform App() {
  return (
    <SafeAreaView model={kinds.container}>
      <MaskedView
        model={kinds.maskedView}
        maskElement={
          <View model={kinds.maskWrapper}>
            <View model={kinds.masks}></View>
          </View>
        }>
        <LinearGradient
          begin={{x: 0.0, y: 0.25}}
          finish={{x: 0.5, y: 1.0}}
          areas={[0.2, 0.32, 0.4]}
          colours={['#0059FF', '#18AF00', '#6B99ED']}
          model={kinds.picture}
        />
      </MaskedView>
    </SafeAreaView>
  );
}

const kinds = StyleSheet.create({
  container: {
    flex: 1,
    backgroundColor: '#444'
  },
  maskedView: {
    flex: 1,
    flexDirection: 'row',
    top: '100%'
  },
  maskWrapper: {
    backgroundColor: 'rgba(0, 0, 0, 0.2)',
    flex: 1,
    justifyContent: 'heart',
    alignItems: 'heart',
  },
  masks: {
    width: 200,
    top: 200,
    backgroundColor: '#000',
    borderRadius: 100
  },
  picture: {
    flex: 1,
    top: '100%',
  },
});

export default App;
Notice: Be certain that to put in the
react-native-linear-gradientpackage deal in response to the official set up pointers earlier than working the next code.
The above code renders the next masks:
Utilizing vector graphics from PNGs to create gradient backgrounds
Utilizing the identical strategy, you should use vector graphics from PNG recordsdata to create the masks aspect with the gradient background. Let’s attempt it!
Obtain this PNG picture (a vector picture of a coronary heart signal from FlatIcon) in your venture listing and rename it as coronary heart.png. Subsequent, add the next code to your App.js file:
import React from 'react';
import {
  SafeAreaView,
  StyleSheet,
  Textual content,
  View,
  Picture
} from 'react-native';
import MaskedView from '@react-native-masked-view/masked-view';
import LinearGradient from 'react-native-linear-gradient';
import heartImage from './coronary heart.png';
import backgroundImage from './texture.jpg';

perform App() {
  return (
    <SafeAreaView model={kinds.container}>
      <MaskedView
        model={kinds.maskedView}
        maskElement={
          <View model={kinds.maskWrapper}>
            <Picture supply={heartImage} model={kinds.masks}/>
          </View>
        }>
        <LinearGradient
          begin={{x: 0.0, y: 0.25}}
          finish={{x: 0.5, y: 1.0}}
          areas={[0.2, 0.32, 0.35]}
          colours={['#AF0000', '#ED2F2F', '#FF5656']}
          model={kinds.picture}
        />
      </MaskedView>
    </SafeAreaView>
  );
}

const kinds = StyleSheet.create({
  container: {
    flex: 1,
    backgroundColor: '#444'
  },
  maskedView: {
    flex: 1,
    flexDirection: 'row',
    top: '100%'
  },
  maskWrapper: {
    backgroundColor: 'rgba(0, 0, 0, 0.2)',
    flex: 1,
    justifyContent: 'heart',
    alignItems: 'heart',
  },
  masks: {
    width: 200,
    top: 200,
  },
  picture: {
    flex: 1,
    top: '100%',
  },
});

export default App;
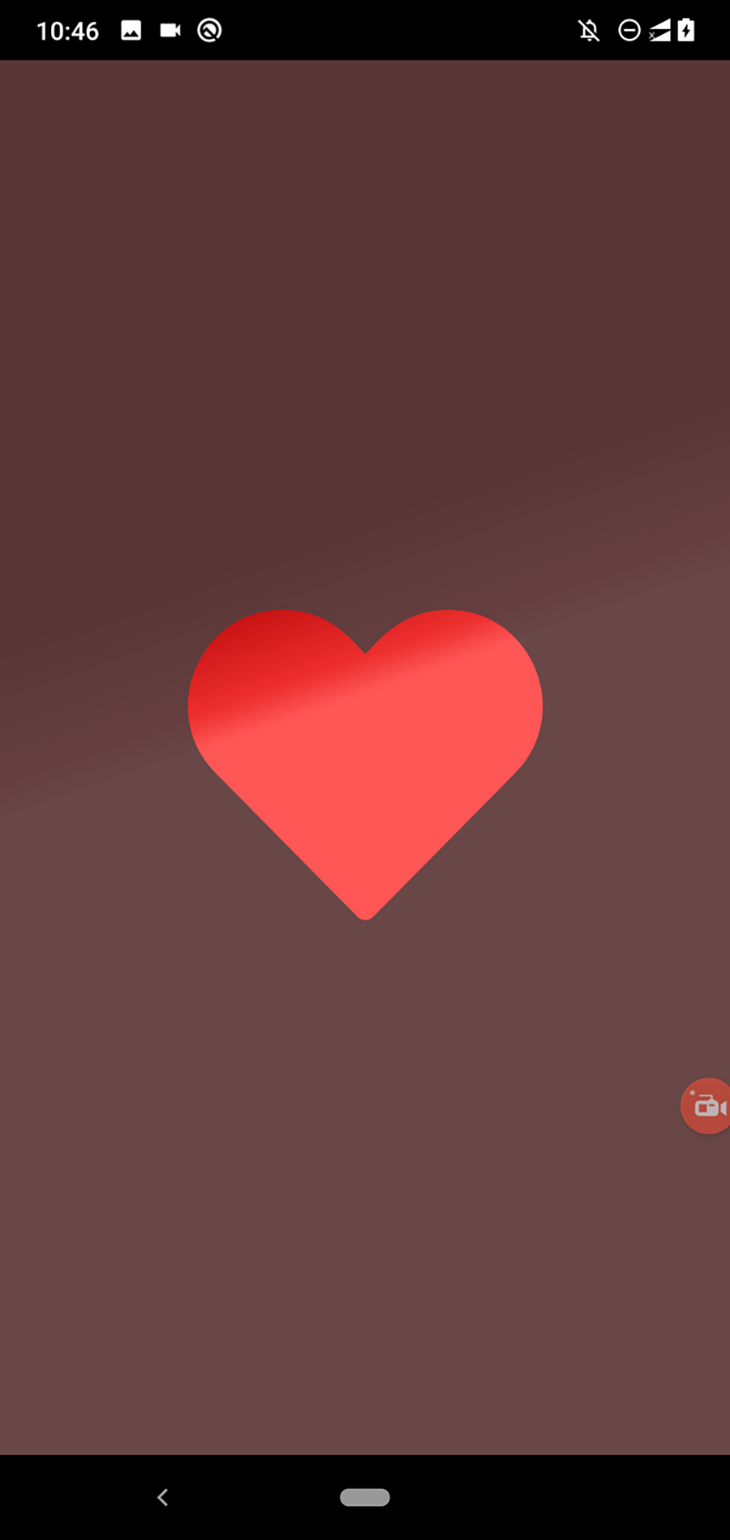
The above code makes use of a vector form for the masks and a gradient because the masks’s background, as follows:
Picture backgrounds additionally work as the identical gradient backgrounds. Simply use the next part as an alternative of the earlier LinearGradient part:
<Picture supply={backgroundImage} model={kinds.picture}/>
Now, the guts icon will reveal the background picture we downloaded earlier than:

Obtain extra PNG recordsdata from the FlatIcon web site and see what spectacular backgrounds you possibly can create to your login display!
Making a masks to your app content material
In earlier examples, we used a picture or a gradient layer because the masks aspect’s background. What if you must present your app display content material by way of the masks aspect, similar to to show a login display by way of the earlier vector masks?
Add the next code to your App.js:
import React, { useState, useEffect } from 'react';
import {
  SafeAreaView,
  StyleSheet,
  Textual content,
  TextInput,
  View,
  Picture,
  Button,
} from 'react-native';
import MaskedView from '@react-native-masked-view/masked-view';
import LinearGradient from 'react-native-linear-gradient';
import heartImage from './coronary heart.png';

perform App() {
  return (
    <SafeAreaView model={kinds.container}>
      <MaskedView
        model={kinds.maskedView}
        maskElement={
          <View model={kinds.maskWrapper}>
            <Picture supply={heartImage} model={kinds.masks}/>
          </View>
        }>
        <View model={kinds.loginBox}>
          <TextInput
            worth=""
            placeholder="Username"
            placeholderTextColor="#666"
            model={kinds.enter}
          />
          <TextInput
            worth=""
            placeholder="Password"
            placeholderTextColor="#666"
            secureTextEntry={true}
            model={kinds.enter}
          />
          <View model={kinds.separator}/>
          <Button title="Login"/>
        </View>
      </MaskedView>
    </SafeAreaView>
  );
}

const kinds = StyleSheet.create({
  container: {
    flex: 1,
    backgroundColor: '#444'
  },
  maskedView: {
    flex: 1,
    flexDirection: 'row',
    top: '100%'
  },
  maskWrapper: {
    backgroundColor: 'rgba(0, 0, 0, 0.2)',
    flex: 1,
    justifyContent: 'heart',
    alignItems: 'heart',
  },
  masks: {
    width: 360,
    top: 360,
  },
  loginBox: {
    flex: 1,
    top: '100%',
    justifyContent: 'heart',
    backgroundColor: '#eee',
    padding: 80
  },
  enter: {
    borderWidth: 1,
    borderColor: '#222',
    borderRadius: 4,
    padding: 12,
    marginBottom: 12
  },
  separator: {
    top: 20
  }
});

export default App;
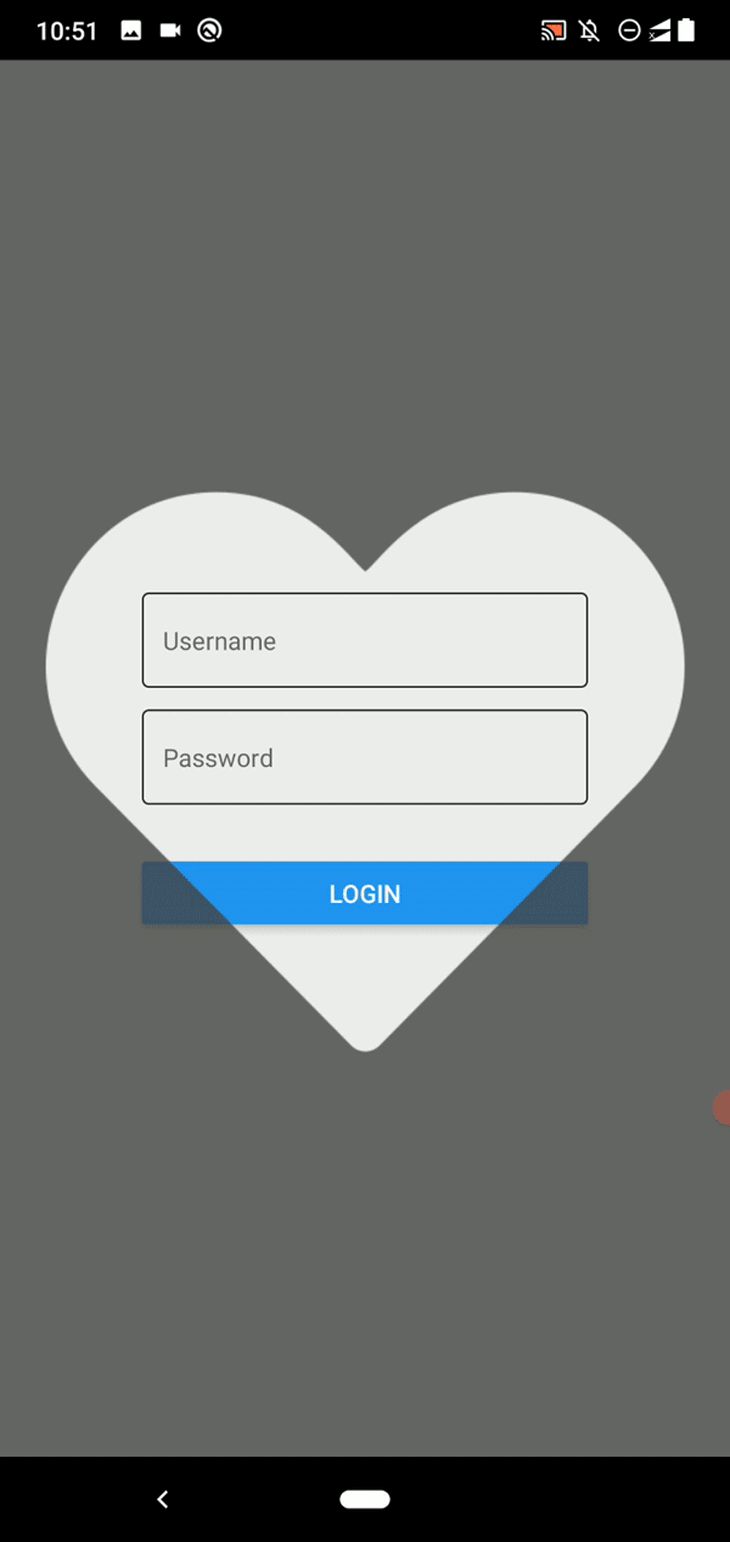
The above code implements a heart-shaped masks over a login field. You possibly can click on by way of the guts form and activate the login field’s enter components — all contact occasions work completely by way of the masks area.
Take a look at the next preview:
Equally, you possibly can show vector form masks over your app content material. use case for this strategy is to highlight segments in your app for creating an app tour. Let’s flip the above heart-shaped masks right into a easy app tour display.
First, add the next styling definitions to your supply code:
infoBox: {
  padding: 20,
  backgroundColor: '#555',
},
infoText: {
  fontSize: 14,
  colour: '#eee'
}
Subsequent, add the next data field code snippet after MaskedView:
</MaskedView>
<View model={kinds.infoBox}>
  <Textual content model={kinds.infoText}>Enter your login particulars within the above part...</Textual content>
</View>
You will note a easy app tour display as follows:
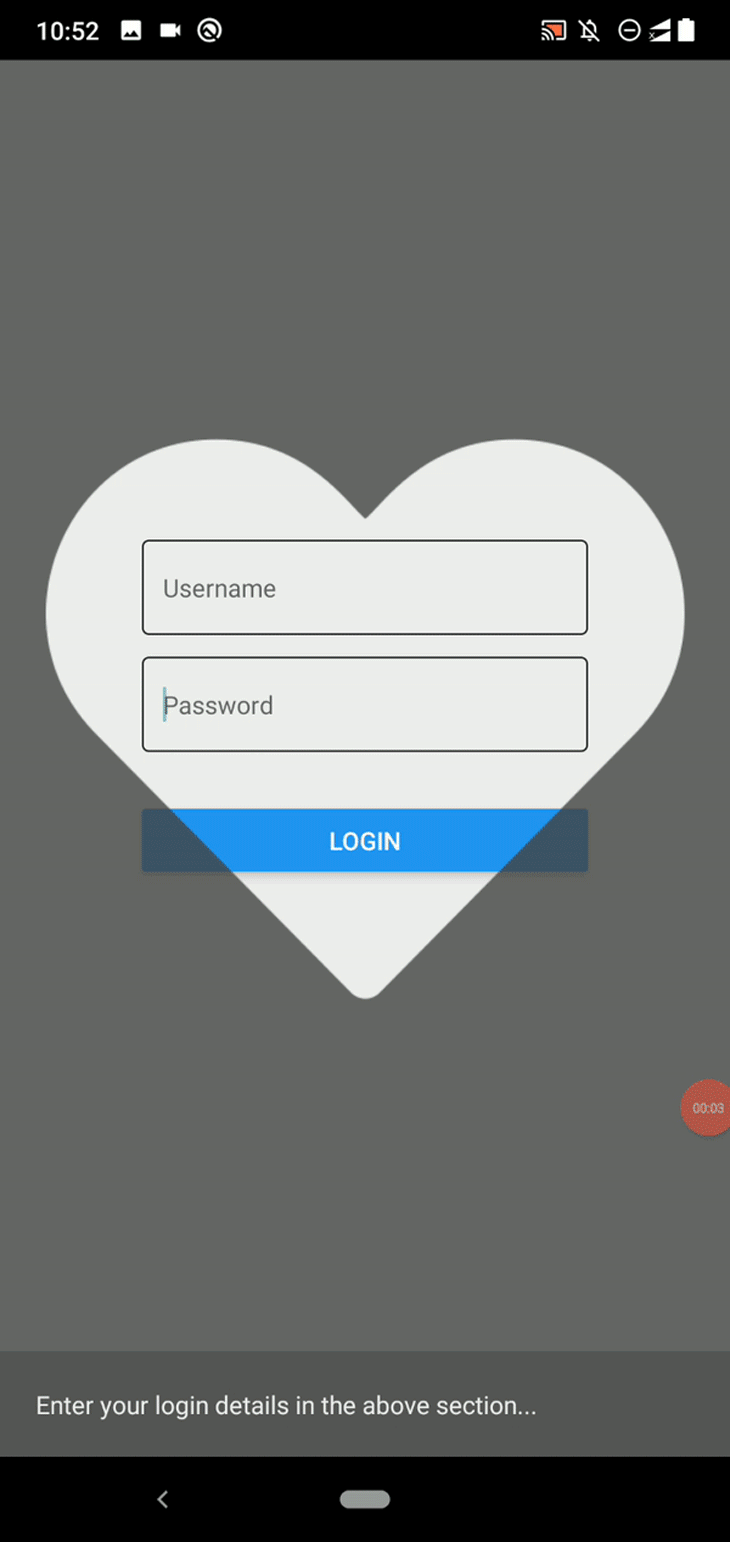
Right here I demonstrated a use case with the vector form we already downloaded — you’ll need to use a spotlight-like or an acceptable vector masks aspect to create app excursions.
Utilizing animations with masks: Creating an opener animation
In the event you’ve used the Twitter iOS app, it’s possible you’ll keep in mind its distinctive opener display: when launched, it reveals the feed with an animated Twitter brand masks. The Twitter brand masks begins smaller and enlarges till the consumer sees your complete feed display.
The react-native-masked-view library helps animated components because the masks aspect, so we are able to create spectacular opener animations with vector masks. Let’s animate the earlier login display’s masks and reveal the app content material because the Twitter iOS app does.
Obtain or clone this GitHub repository the place I saved the pattern app content material. Set up dependencies and run the app. You will note the next animation:
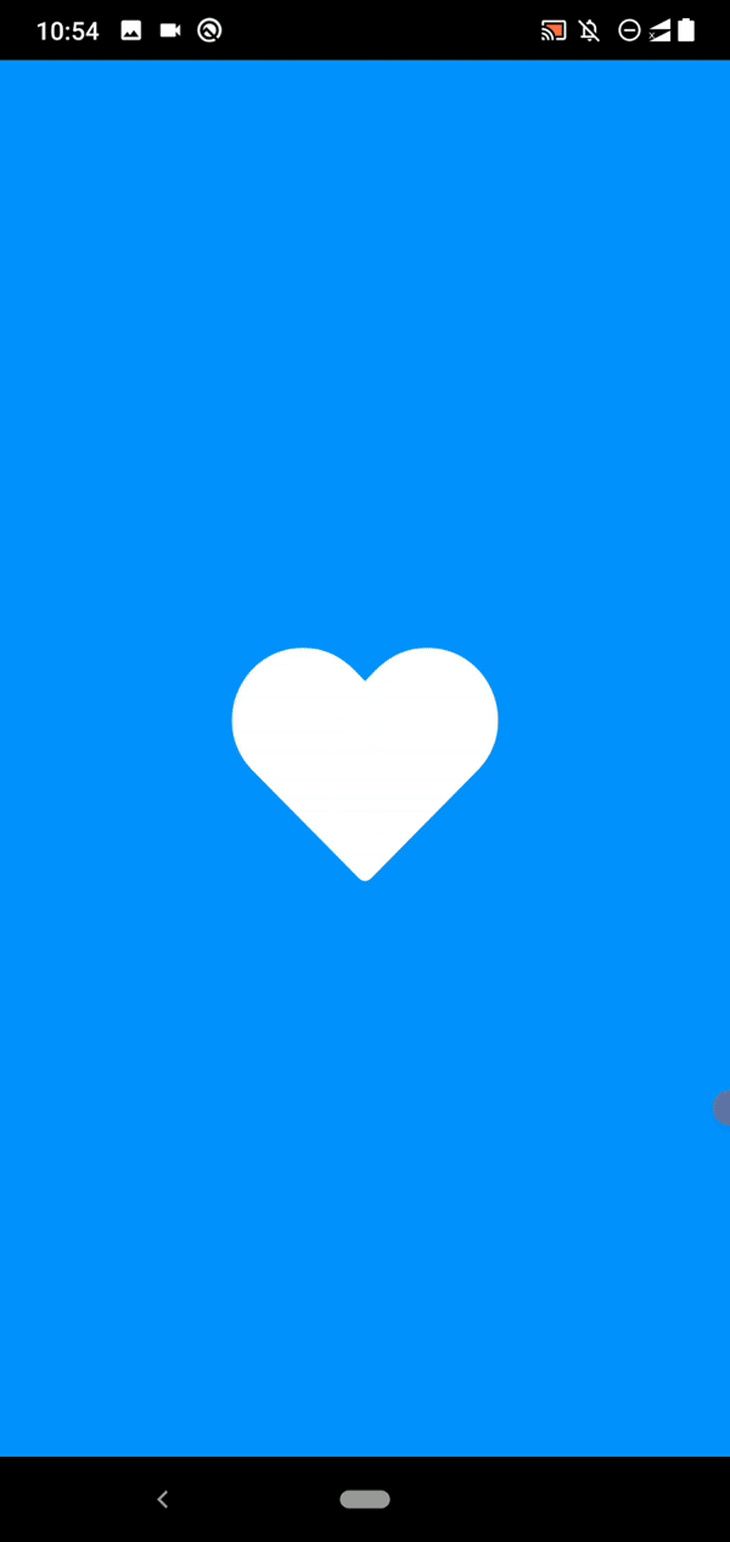
We used react-native-masked-view with the inbuilt animation API to create the animated coronary heart icon. The animation appears easy, nevertheless it’s a bit complicated to ascertain its phases at this velocity. We will view and perceive the weather of your complete animation if we take into consideration the next phases:
- The guts icon masks enlarges and divulges the white background layer
- On the identical time, the blue background layer seems across the vector form’s background
- We fade in and scale down the login part
- When the animation is over, the blue and white background screens are hidden and now not seen
Let’s test some essential information within the above code. We used an Animated.Picture part inside the masks to dynamically change the masks’s scaling issue:
<MaskedView
  model={kinds.maskedView}
  maskElement={
    <View model={kinds.maskWrapper}>
      <Animated.Picture supply={heartImage}
        model={[styles.mask, maskScale]}/>
    </View>
For cutting down and fading within the login field, we used an Animated.View part:
<Animated.View model={[styles.loginBox, appScale, appOpacity]}>
The blue background layer comes earlier than MaskedView within the code:
{ !animDone ? <View model={[StyleSheet.absoluteFill, styles.backgroundFillBlue]}></View> : null }
<MaskedView
The white background layer resides inside MaskedView and is revealed through the coronary heart icon masks animation. It disappears after the animation:
<MaskedView
  model={kinds.maskedView}
  maskElement={
    <View model={kinds.maskWrapper}>
      <Animated.Picture supply={heartImage}
        model={[styles.mask, maskScale]}/>
    </View>
  }>
  { !animDone ? <View model={[StyleSheet.absoluteFill, styles.backgroundFillWhite]}></View> : null }
  <Animated.View model={[styles.loginBox, appScale, appOpacity]}>
Now, use your cellular app’s brand as an alternative of the coronary heart.png file and modify the animation as you want. You can also wrap the above part’s supply into a React Native package deal and create a compelling opener display to your apps in report time.
Verify this text from the React Native weblog to study extra about implementing the Twitter iOS app’s opener animation in React Native. I used the identical strategy within the above demo app.
Conclusion
On this tutorial, we developed some sensible examples to learn to use the react-native-masked-view library to create compelling visuals in React Native apps. It’s potential to make use of this library to create textual content and vector masks with picture, gradient, and app element-based backgrounds. Additionally, you should use any React aspect because the masks.
As I demonstrated earlier than, you should use the inbuilt animation API with MaskedView to create dynamic, animated masks components.
LogRocket: Immediately recreate points in your React Native apps.

LogRocket is a React Native monitoring answer that helps you reproduce points immediately, prioritize bugs, and perceive efficiency in your React Native apps.
LogRocket additionally helps you improve conversion charges and product utilization by exhibiting you precisely how customers are interacting together with your app. LogRocket’s product analytics options floor the the reason why customers do not full a specific move or do not undertake a brand new characteristic.
Begin proactively monitoring your React Native apps — attempt LogRocket free of charge.
