
A bit of bit greater than three years in the past, I revealed the thought of forming micro-frontends through some type of discovery mechanism in a put up for LogRocket, Taming the frontend monolith. The invention mechanism, referred to as a feed service, was on the coronary heart of an answer to which I used to be contributing.
That answer was Piral, which we formally revealed at O’Reilly’s Software program Structure convention half a 12 months later.
In the present day, Piral is among the most-used and well-known options within the micro-frontend area. That alone would justify one other weblog put up — however then, we even have the elevated reputation of micro-frontends, in addition to the demand for scalability basically.
With out additional ado, let’s take a look at what micro-frontends are, why unfastened coupling is so necessary for them, and the way Piral solves this (and different points) to realize nice scalability. We’ll cowl this within the following sections:
What are micro-frontends?
Lately, micro-frontends have develop into more and more well-liked. One motive for that is the elevated demand for bigger internet purposes. In the present day, highly effective portals such because the AWS and Azure portals, together with wealthy consumer experiences like Netflix or DAZN, will not be the exception however the norm. How can such giant purposes be constructed? How can they be scaled?
One reply to these questions might be utilizing micro-frontends. A micro-frontend is the technical illustration of a enterprise subdomain. The essential concept is to develop a chunk of the UI in isolation. This piece doesn’t have to be represented on the display in a single space; it might probably truly include a number of fragments, i.e., a menu merchandise and the web page that the menu merchandise hyperlinks to. The one constraint is that the piece ought to be associated to a enterprise subdomain.
A micro-frontend consists of various parts, however these will not be the classical UI parts like dropdowns or wealthy textual content discipline containers. As a substitute, these parts are domain-specific parts and comprise some enterprise logic, reminiscent of what API requests have to be made.
Even a easy factor like a menu merchandise is a site part on this context as a result of it can already know the hyperlink to the web page is from the identical enterprise area. As soon as the part has some area logic, it’s a area part — and may subsequently be a part of a micro-frontend.
To implement micro-frontends, a complete set of approaches and practices exist. They are often introduced collectively at construct time, on the server aspect, and on the shopper aspect.
On this article we’ll take a look at composition on the shopper aspect, however the identical story could possibly be written for the server. So how do micro-frontends truly scale?
Extra nice articles from LogRocket:
Scalability issues with different micro-frontend frameworks
Many micro-frontend frameworks face scalability points in real-world contexts. Taking a look at different articles, the know-how appears sound at first; as an example, for those who learn Creating micro-frontends apps with single-spa or Constructing Svelte micro-frontends with Podium, they introduce the know-how and use case properly. One other instance might be seen in Construct progressive micro-frontends with Fronts.
The issue is that these frameworks normally attempt to break up the UI visually. Nevertheless, in actuality, you’ll by no means break up your frontend into components like “navigation”, “header”, “content material”, and “footer”. Why is that?
An actual software consists of various components that come, as defined within the earlier part, from completely different subdomains that come collectively to type the complete software area. Whereas these sub-domains might be absolutely separated properly on paper, they normally seem to the tip consumer throughout the similar structure components.
Consider one thing like an online store. In case you have one subdomain for the product particulars and one other subdomain dealing with earlier orders, then you definately wouldn’t need to solely see meaningless IDs of merchandise in your order historical past as a consumer. As a substitute, you’d anticipate that at the least the product identify and a few particulars are proven within the order historical past. So, these subdomains interleave visually in direction of the tip consumer.
Likewise, virtually virtually each subdomain has one thing to contribute to shared UI structure components, reminiscent of a navigation, header, or footer. Due to this fact, having micro-frontends that solely take care of a navigation space doesn’t make a lot sense in apply as a result of this micro-frontend will obtain a number of requests from different groups — and develop into a bottleneck. Doing that may lead to a hidden monolith.
Now, any person might argue that not having the navigation in a micro-frontend would lead to the identical demand on adjustments, however this time on the app shell proprietor. This is able to be even worse.
So what’s the answer then? Clearly, we have to decouple this stuff. So as an alternative of utilizing one thing like:
import MyMenuItem1 from 'my-micro-frontend1';
import MyMenuItem1 from 'my-micro-frontend2';
import MyMenuItemN from 'my-micro-frontendN';

const MyMenu = () => (
    <>
        <MyMenuItem1 />
        <MyMenuItem2 />
        <MyMenuItemN />
    </>
);
We have to register every of the mandatory components, such because the navigation objects from the micro-frontends themselves. This manner, we might find yourself with a construction reminiscent of:
const MyMenu = () => {
    const objects = useRegisteredMenuItems();

    return (
        <>
            {objects.map(({ id, Element }) => <Element key={id} />)}
        </>
    );
};
To keep away from needing to know the names and places of a micro-frontend, a type of discovery is required. That is only a JSON doc that may be retrieved from a recognized location, reminiscent of a backend service.
Now that we all know what we have to scale, it’s time to start out implementing. Fortunately, there’s a framework that provides us already a head begin on this: Piral.
How does Piral differ?
Piral is a framework for creating ultra-scalable internet apps utilizing micro-frontends. Amongst many issues, it options:
- An built-in micro-frontends discovery mechanism
- An in depth developer expertise that’s end-to-end with the whole lot you’d want
- Loosely coupled parts with cross-framework help
This manner, particular person groups can give attention to their particular area issues, as an alternative of requiring alignment and joint releases. A Piral software consists of three components:
- The app shell. This may be so simple as an HTML file containing a reference to the micro-frontend discovery service, referred to as a feed
- The feed of micro-frontends (could possibly be additionally a static JSON, however normally you’d need one thing extra highly effective)
- The completely different modules (micro-frontends), known as pilets
The entire setup might be sketched as follows:

The module builders can use the command line utility piral-cli to scaffold (i.e., create with some template) and publish new pilets, debug and replace current modules, or carry out some linting and validations. The true customers don’t see the answer as completely different items — they really devour the app shell along with the pilets in a single software. Technically, these pilets are fetched from a feed service.
Very often, the dev expertise for micro-frontends isn’t supreme. Both a number of issues have to be checked out and began, or the entire course of boils all the way down to a develop-submit-try-fail-restart cycle. Piral is completely different right here — it tries to be offline-first. Micro-frontends are developed immediately in a particular version of the app shell referred to as an emulator.
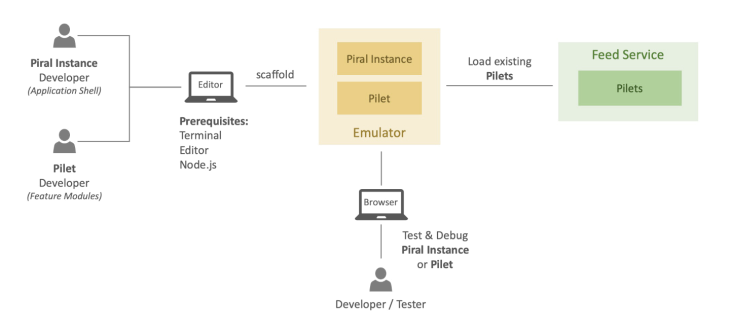
The emulator is simply an npm package deal that may be put in in any npm mission. When the piral-cli is used for debugging, it can truly use the content material from the emulator because the web page to show. The pilet will then be served through an inner API as an alternative of going to a distant feed service or one thing comparable.
However, it might nonetheless make sense to load current micro-frontends throughout growth. In such circumstances, pilets from an current feed can nonetheless be built-in.
Let’s see how this all works in apply.
Creating your app shell with Piral
There are a number of methods to create an app shell with Piral:
- Migrating an current mission
- Including packages to a brand new mission manually
- Utilizing the
piral-clito create a brand new mission
On this put up, we’ll do the latter.
On the command line, we run:
npm init piral-instance --bundler esbuild --target my-app-shell --defaults
This may create a brand new app shell within the my-app-shell listing. The mission will use npm, TypeScript, and the esbuild tooling as our bundler (although we might have truly chosen any type of bundler, reminiscent of webpack, Parcel, or Vite, and many others.). Selecting esbuild ought to be ample in lots of circumstances and offers the advantage of the quickest set up time.
Now, we will begin debugging the mission. Go into the brand new listing (e.g., cd my-app-shell) and begin the debugging session:
npm begin
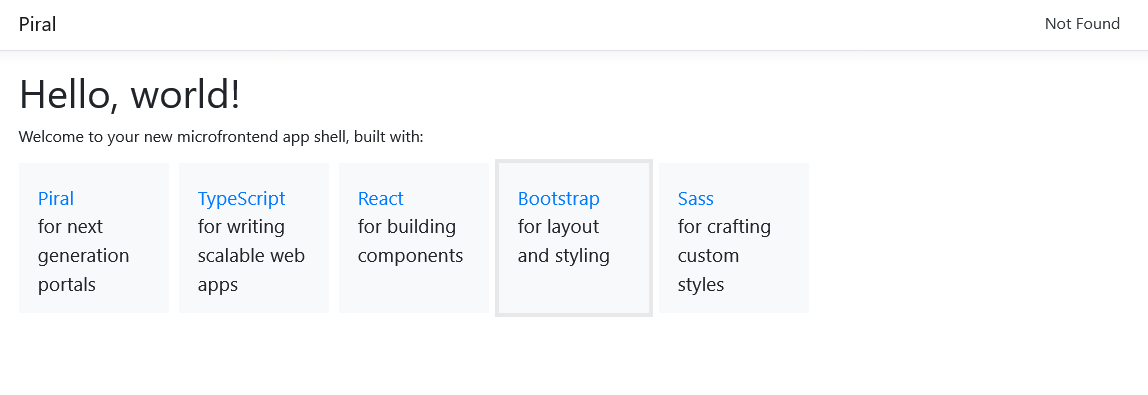
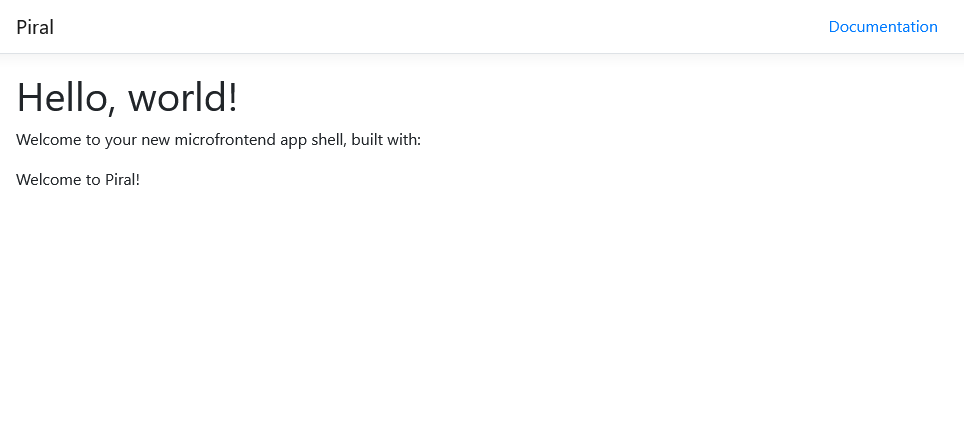
Going to http://localhost:1234 ought to present you the usual template:
Altering the template
We will now change the template in all attainable facets. As an illustration, we might change the supplied structure to not have any mounted content material tiles; simply edit the src/structure.tsx file and take away the defaultTiles and the defaultMenuItems. Make sure that not solely to take away their initialization, but additionally the references to them.
To get extra detailed, we will change the DashboardContainer from:
DashboardContainer: ({ kids }) => (
  <div>
    <h1>Hey, world!</h1>
    <p>Welcome to your new microfrontend app shell, constructed with:</p>
    <div className="tiles">
      {defaultTiles}
      {kids}
    </div>
  </div>
),
to:
DashboardContainer: ({ kids }) => (
  <div>
    <h1>Hey, world!</h1>
    <p>Welcome to your new microfrontend app shell, constructed with:</p>
    <div className="tiles">
      {kids}
    </div>
  </div>
),
All of the parts that may be seen right here serve completely different functions. Whereas lots of them come from elective plugins, some — such because the ErrorInfo or Structure — are already outlined through the core library driving Piral.
Within the case above, we outline the dashboard container for the dashboard plugin from Piral. The dashboard plugin offers us a dashboard, which — by default — is positioned on the homepage (/) of our web page. We will change the whole lot right here, together with what it seems like and the place it ought to be positioned (and, after all, if we need to have a dashboard in any respect).
Dashboards are nice for portal purposes as a result of they collect a number of info on one display. For micro-frontends, a dashboard can be good — particularly as a showcase. On this web page, probably most, if not all, of the micro-frontends need to present one thing.
After eradicating the default tiles from the dashboard container, the online app ought to now look a bit extra empty:
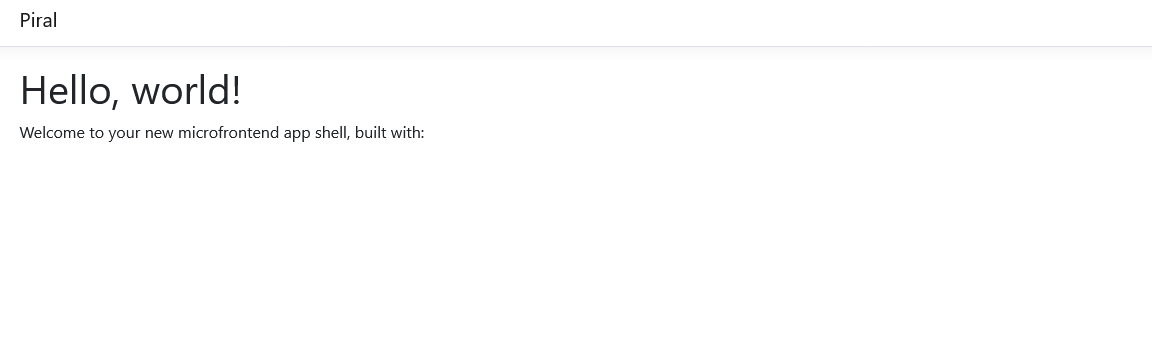
The principle motive for the vacancy of our internet app is that we don’t combine any micro-frontends that render parts someplace. At this level, the scaffolding mechanism wired our new app shell to a particular feed that’s owned by Piral itself: the empty feed.
The empty feed is a feed that, because the identify suggests, will all the time stay empty. We will change the app shell’s code to go another feed as an alternative.
Altering feeds to show completely different pilets
For this, it’s worthwhile to open the src/index.tsx file. There, you’ll see the variable with the URL for the feed for use:
const feedUrl="https://feed.piral.cloud/api/v1/pilet/pattern";
Going to the pattern feed, which is utilized in one other app shell, we will truly see how the shell might look if correctly populated by micro-frontends. The dashboard ought to now appear to be:

The truth that we will already show pilets from one other feed in our new app shell is definitely fairly cool. This means upfront that the pilets are actually unbiased and don’t have any robust relation with their shell.
Nevertheless, remember the fact that such a clean integration might not all the time be attainable. Pilets can all the time be developed in a manner that will be moderately simple to combine in different Piral situations. Likewise, growing a pilet in a manner that guidelines out completely different app shells is feasible, too.
Creating the app emulator
Earlier than we will develop some micro-frontends for this app shell, we have to create its emulator. Cease the debug course of and run the next command:
npm run construct
This may run piral construct on the present mission. The result’s that there are two sub-directories in dist:
dist/launchdist/emulator
Whereas the previous can be utilized to really deploy our internet app someplace, the latter incorporates a .tgz file that may be uploaded to a registry like this:
npm publish dist/emulator/my-app-shell-1.0.0.tgz
You would possibly want npm credentials to publish the package deal, however even for those who’re already logged into npm it’s possible you’ll not need to publish it and as an alternative hold it non-public, or publish on a distinct registry.
For testing the publishing course of with a customized registry, you should use Verdaccio. In a brand new shell, begin:
npx verdaccio
This may set up and run a neighborhood model of Verdaccio. You need to see one thing like the next printed on the display:
warn --- http deal with - http://localhost:4873/ - verdaccio/5.13.1
Go to this deal with and see the directions. They need to appear to be:
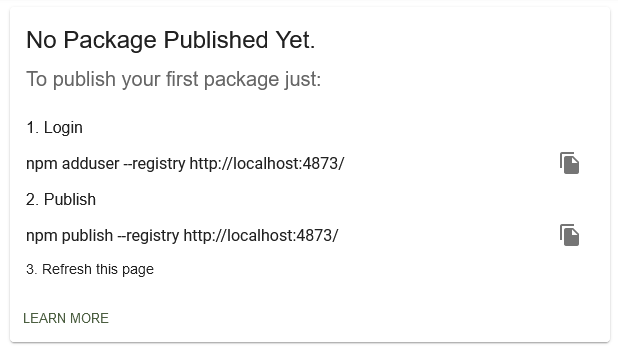
Run the login command (npm adduser --registry http://localhost:4873/) and fill out the information. For Username and Password, you may simply use check. Something might be taken; the E-mail might be so simple as [email protected].
Publishing to the customized registry now works through:
npm publish dist/emulator/my-app-shell-1.0.0.tgz --registry http://localhost:4873/
As soon as accomplished, we will create micro-frontends for this shell!
Rolling out micro-frontends
As we did for the app shell, we will use the piral-cli to scaffold us a mission. The command for this now makes use of pilet as an alternative of piral-instance. We run:
npm init pilet --source my-app-shell --registry http://localhost:4873/ --bundler esbuild --target my-pilet --defaults
This may create a brand new listing known as my-pilet that incorporates the code for a brand new micro-frontend. The tooling is ready to esbuild (like earlier than, we use esbuild as a result of it installs in a short time, however you possibly can additionally go for one thing completely different like webpack).
The necessary half above is to specify the --source, which signifies the emulator to make use of for growth. Now that the whole lot is in place, we will cd my-pilet and run:
npm begin
Like beforehand, the event server is hosted at http://localhost:1234. Going there ends in a web page as proven beneath:
Virtually as empty as if we’d used the empty feed. Nevertheless, on this case, the template for the brand new pilet already registers a tile and a menu merchandise. Let’s see how we will change this.
Altering pilets
Open the src/index.tsx file and take a look on the code:
import * as React from 'react';
import kind { PiletApi } from 'my-app-shell';

export operate setup(api: PiletApi) {
  api.showNotification('Hey from Piral!', {
    autoClose: 2000,
  });
  api.registerMenu(() =>
    <a href="https://docs.piral.io" goal="_blank">Documentation</a>
  );
  api.registerTile(() => <div>Welcome to Piral!</div>, {
    initialColumns: 2,
    initialRows: 1,
  });
}
Merely talking, a pilet is only a JavaScript library; the necessary half is what this library exports.
A pilet exports a setup operate (and, optionally, a teardown operate, to be exact). This operate is used as soon as the micro-frontend is linked, and receives a single argument, api, which is outlined and created by the app shell.
The app shell’s API (sometimes called Pilet API) is the place the place pilets can register their components throughout the software. Let’s add a web page and alter the tile a bit.
We begin with the tile. We may give it some class like teaser to really have a little bit of background. Moreover, we need to add a little bit of metadata for the dashboard container. We will use the initialColumns and initialRows properties to speak the specified measurement.
app.registerTile(() => <div className="teaser">Hey LogRocket!</div>, {
  initialColumns: 2,
  initialRows: 2,
})
As soon as saved, the tile could have a little bit of a distinct look. Let’s take away the showNotification that’s not wanted and introduce a brand new web page:
api.registerPage('/foo', () =>
  <p>That is my web page</p>
);
To hyperlink to this web page, we will change the registered menu merchandise. To carry out the SPA navigation, we will use a well-recognized React device, react-router-dom:
api.registerMenu(() =>
  <Hyperlink to="/foo">Foo</Hyperlink>
);
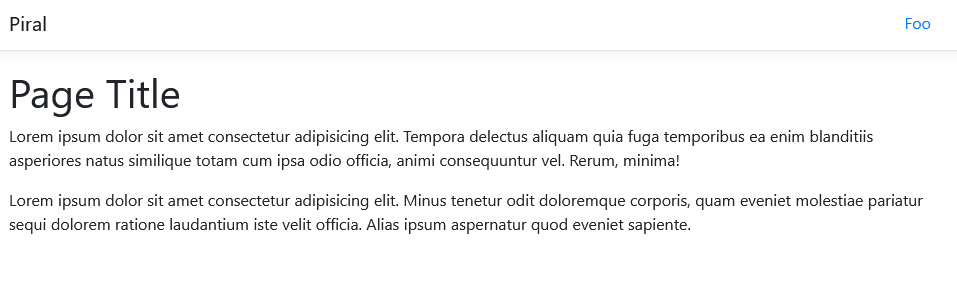
Nice! Nevertheless, fragments just like the web page will not be all the time required and will solely be loaded when they need to be rendered. This type of lazy loading might be achieved by inserting the code in a devoted file, i.e., Web page.tsx, and altering the registration to be:
const Web page = React.lazy(() => import('./Web page'));
api.registerPage('/foo', Web page);
The content material of Web page.tsx might be as simple as:
import * as React from 'react';

export default () => {
  return (
    <>
      <h1>Web page Title</h1>
      <p>Lorem ipsum dolor sit ...</p>
      <p>Lorem ipsum dolor sit ...</p>
    </>
  );
};
With the web page registered, now you can click on on “Foo” within the navigation bar and see the web page:
Constructing and publishing our pilet
Now that our pilet is written, we will truly construct and publish it. At this level, we now have not created our personal feed or revealed the app shell wherever, so the final half is definitely a bit theoretical.
To construct the pilet, you may run:
npm run construct
As soon as created, you may pack the pilet utilizing npx pilet pack. This might be fairly much like working npm pack. The result’s one other .tgz file — this time not an emulator, however the precise pilet. The tarball is what might be uploaded to a devoted service, reminiscent of a feed service, providing the feed to be consumed by the app shell.
Examples for each non-commercial and industrial choices for this may be discovered at piral.cloud.
Earlier than we shut out the tutorial, let’s take a look at how we will combine one frequent performance — on this case, performing HTTP requests with SWR.
Integrating SWR to carry out HTTP requests
There are a number of methods of integrating frequent considerations like SWR. When you add swr (or different libraries sitting on prime of it) to the app shell and configure it there, you have got three choices:
- Exposing it as a shared library
- Exposing it through the Pilet API
- Not exposing it (although, in our instance with SWR, that doesn’t work as a result of we want a reference to the Hook)
- Leaving the choice to make use of
swrto pilets: they’ll shareswras a distributed dependency (i.e., solely loading it when no different pilets have loaded it but)
The simplest and most dependable methodology for integrating SWT can be to make use of the primary possibility. For this, we return to the app shell.
Within the app shell’s listing run:
npm set up swr
Now, let’s modify the package deal.json. Maintain just about the whole lot, however modify the externals array of the pilets part like so:
{
  "identify": "my-app-shell",
  "model": "1.1.0",
  // ...
  "pilets": {
    "externals": ["swr"],
    // ...
  },
  // ...
}
Discover that I additionally modified the model quantity. As we are going to make an replace to our emulator, we have to have a brand new model. This may instruct Piral to really share the swr dependency with all of the pilets.
To really check this, let’s write npm run construct and publish once more.
npm run construct
npm publish dist/emulator/my-app-shell-1.1.0.tgz --registry http://localhost:4873/
With the up to date shell accessible, let’s go into the pilet’s listing and improve the app shell:
npx pilet improve
The package deal.json file for the pilet ought to have modified. It ought to now comprise a reference to my-app-shell in model 1.1.0 as an alternative of 1.0.0. As well as, you must see swr listed in devDependencies and peerDependencies.
Let’s modify the web page to make use of swr:
import * as React from 'react';
import LogRocket from 'swr';

// observe: fetcher might have additionally been globally configured within the app shell
// nonetheless, basically the pilet's do not learn about this and they also might need to
// reconfigure or redefine it like right here
const fetcher = (useful resource, init) => fetch(useful resource, init).then(res => res.json());

export default () => {
  const { knowledge, error } = useSWR('https://jsonplaceholder.typicode.com/customers/1', fetcher);

  if (error) {
    return <div>didn't load</div>;
  }

  if (!knowledge) {
    return <div>loading...</div>;
  }

  return (
    <>
      Hey {knowledge.identify}!
    </>
  );
};
And now we’re accomplished! Not solely is SWR efficiently arrange in our app, we will additionally use it in all micro-frontends. This each saves the bandwidth to load SWR and the inner cache of SWR, giving all micro-frontends a pleasant efficiency profit.
Abstract
On this put up, you’ve seen how simple it’s to get began with Piral. Piral affords you the choice to distribute your internet app into completely different repositories, even throughout completely different groups.
We solely explored the very primary setup on this put up, however there may be much more that you are able to do with Piral. One of the best ways to discover Piral is to undergo the official documentation.
The rationale why Piral scales higher than most different options is that Piral encourages unfastened coupling. This manner, you should have a tough time fusing two issues collectively, which helps you keep away from function overlap and hidden monoliths.
No matter you intend to do, make sure that to already take into consideration what dependencies to share and which of them to go away as much as the pilet. We’ve seen an instance the place offering swr as a shared dependency was truly arrange in seconds. Blissful coding!
Are you including new JS libraries to enhance efficiency or construct new options? What in the event that they’re doing the alternative?
There’s little doubt that frontends are getting extra advanced. As you add new JavaScript libraries and different dependencies to your app, you’ll want extra visibility to make sure your customers don’t run into unknown points.
LogRocket is a frontend software monitoring answer that permits you to replay JavaScript errors as in the event that they occurred in your individual browser so you may react to bugs extra successfully.

LogRocket works completely with any app, no matter framework, and has plugins to log further context from Redux, Vuex, and @ngrx/retailer. As a substitute of guessing why issues occur, you may combination and report on what state your software was in when a difficulty occurred. LogRocket additionally displays your app’s efficiency, reporting metrics like shopper CPU load, shopper reminiscence utilization, and extra.
Construct confidently — Begin monitoring without cost.
