
Relating to frontend growth, the clearer the UI, the higher. That is very true for cell growth’s smaller display sizing.
Borders enable us to spotlight data and CTAs in a cell app. Having a border by itself, nonetheless, will not be sufficient. So as to make the borders extra enticing and cohesive with the remainder of the interface, it’s possible you’ll end up in want of some superior border styling.
On this submit, we’ll cowl create an interesting gradient border for lists and buttons.
Establishing a pattern to-do listing
For the reason that focus of this submit is creating and making use of gradient borders, I gained’t go into depth on truly create the to-do listing we’ll use for instance. Nevertheless, I adopted this tutorial on creating an inventory and listing objects to your reference. The complete supply code for this weblog submit could be discovered on GitHub.
Beneath is what our to-do listing appears like earlier than we assemble and apply any gradients:
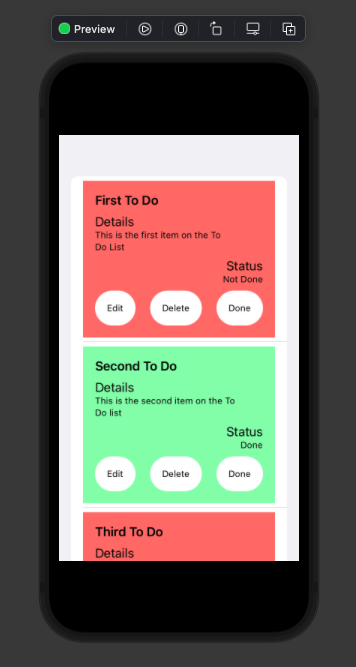
As you may see, every listing merchandise accommodates a title, particulars, standing, and buttons. Particularly, the buttons execute an motion related to the corresponding textual content. We are going to refer to those collectively as actions.
The background shade is decided by the standing of the to-do listing merchandise. The listing is crimson if the merchandise isn’t full and inexperienced whether it is. Easy, proper?
Utilizing Swift to use gradients borders to an inventory
Whereas the background shade can assist us differentiate between completely different listing objects, it’s a bit boring. I personally don’t like how the actions and listing objects themselves mix with the background.
A border can’t solely spotlight and differentiate UI components, however may also present extra depth and persona. That is the place our gradient borders can turn out to be useful!
First, let’s declare our gradient borders. We will retailer these gradients in a file referred to as MyGradients.swift.
We’ll be developing overlays to layer borders over our views. An overlay means that you can layer a secondary View over a offered View. To make use of them, you may merely create a separate View and tack it onto one other one, like so:
SomeView().overlay(
SomeOtherView()
)
Should you wished to do extra with the overlay than simply rendering a secondary View by itself, equivalent to adjusting the alignment, you may write your overlay like this:
SomeView().overlay(
    alignment: .topLeading
){
    SomeOtherView()
}
For our particular case, our gradients might be handed as overlays with out specified alignment to the Views used for our to-do listing objects and actions.
The very first thing we’ll do in our MyGradients.swift is import SwiftUI and create a gradient to make use of for our borders. You may see this under:
import SwiftUI

var myGradient = Gradient(
    colours: [
        Color(.systemTeal),
        Color(.systemPurple)
    ]
)
Right here, we’re making use of the Gradient class offered by SwiftUI. This class accepts an inventory of Colour cases as arguments. You may add as many colours as you need, however we’ll cease at two for now.
The subsequent factor we’ll need to create is our CardGradient. This would be the gradient border that we use for our to-do listing objects.
We do that by making a struct that conforms to the View protocol. Within the physique, we’ll prolong the View protocol once more and use the Rectangle construction. We are going to use this form as a result of our to-do objects render it by default.
This course of is printed under:
struct CardGradient: View{
    var physique: some View {
        Rectangle()
            .stroke(
                LinearGradient(
                    gradient: myGradient,
                    startPoint: .main,
                    endPoint: .trailing
                ),
                lineWidth: 5
            )
    }
}
The stroke(...) that you simply see tacked on to our Rectangle occasion returns a brand new form that primarily acts because the offered one. On this case, a Rectangle is the expanse of our to-do listing merchandise with a stroked path (i.e., a border) whose line width is outlined by the lineWidth worth. We’ll embrace our gradient utilizing LinearGradient within the content material of the stroked path.
I want to observe that we’re utilizing LinearGradient versus RadialGradient as a result of the distinction is extra noticeable. With RadialGradient, the gradient radiates from the middle outward. That is higher for bigger, strong shapes, versus lengthy, skinny stroke paths.
LinearGradient wants three arguments: a gradient (the colour gradient utilized to the trail); a startPoint; and an endPoint. We’ll present myGradient in gradient.
For startPoint, we are going to use .main to point that the beginning must be the primary shade within the listing. endPoint is solely the reverse of startPoint. We use .trailing to point that the gradient ought to mix towards the final shade within the listing.
Through the use of .main and .trailing, we inform the linear gradient to be horizontal as an alternative of vertical. For a vertical gradient, you can use .prime and .backside.
Now, let’s see our new gradient border in motion! To do that, we have to go to CardView. We will tack on the gradient as an overlay to our View’s VStack within the physique, as demonstrated under.
var physique: some View {
        VStack(alignment: .main) {
            Textual content(todo.title)
                .font(.headline)
            Spacer();
            Textual content("Particulars");
            Textual content("(todo.content material)")
                .padding(.trailing, 20)
                .font(.caption);
            Spacer();
            Textual content("Standing")
                .body(minWidth: 0, maxWidth: .infinity, alignment: .trailing);
            Textual content(todo.isDone == true ? "Completed" : "Not Completed")
                .font(.caption)
                .body(minWidth: 0, maxWidth: .infinity, alignment: .trailing);
            Spacer();
            ActionsView()
        }
        .body(minWidth: 0, maxWidth: .infinity, minHeight: 0, maxHeight: .infinity, alignment: .topLeading)
        .padding()
        .background(todo.isDone == true
                    ? Colour(crimson: 0.5804, inexperienced: 0.9961, blue: 0.6784)
                    : Colour(crimson: 1, inexperienced: 0.4471, blue: 0.4353)
        )
        .overlay(
            CardGradient()
        )
    }
We additionally carried out .overlay() to our CardGradient in the previous few strains of code to use the gradient.
Now, let’s see how this appears within the UI.
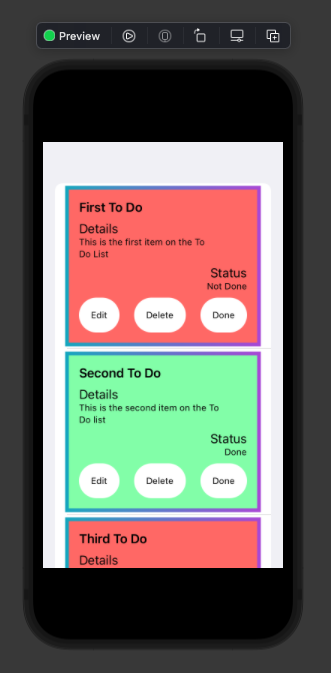
Good! Now we now have a cool gradient border utilized to our to-do listing objects.
Making use of gradient borders to buttons utilizing Swift
Since we’ve discovered make a gradient border for our listing objects, we will merely reapply this course of to our buttons with just a few tweaks. Let’s return to MyGradients.swift to create our second gradient border: ButtonGradient.
So as to create this gradient, we will reuse plenty of the code in CardGradient. Nevertheless, we have to account for the form of the actions. If we use Rectangle, our overlay will bleed out of the buttons’ bounds and the borders will adhere extra to a sq. form. These might be fairly inconsistent with our actions buttons.
To repair this, we might be utilizing Capsule as an alternative of Rectangle:
struct ButtonGradient: View{
    var physique: some View {
        Capsule()
            .stroke(
                LinearGradient(
                    gradient: myGradient,
                    startPoint: .main,
                    endPoint: .trailing
                ),
                lineWidth: 5
            )
    }
}
As you may see, the code is just about the identical except for the preliminary form for our View. We will see how that is utilized to our buttons in our Actions.swift file.
So as to apply customized kinds to every Button, we make use of a property referred to as ButtonStyle. This property accepts a struct that conforms to ButtonStyle and accommodates varied properties that have an effect on the styling of our Button.
struct MyButtonStyle: ButtonStyle {


    func makeBody(configuration: Configuration) -> some View {
        HStack {
          configuration.label.foregroundColor(.black)
        }
        .padding()
        .scaleEffect(configuration.isPressed ? 0.95 : 1)
        .background(Capsule().foregroundColor(Colour.white))
    }
}
That is the preliminary styling for our actions. It may be utilized to every motion button like so:
Button(motion: edit) {
                Textual content("Edit")
                    .font(.caption)
            }
            .buttonStyle(MyButtonStyle())
Now, as a way to apply our ButtonGradient to our motion buttons, we will tack on overlay the identical means we did for our CardView:
struct MyButtonStyle: ButtonStyle {


    func makeBody(configuration: Configuration) -> some View {
        HStack {
          configuration.label.foregroundColor(.black)
        }
        .padding()
        .scaleEffect(configuration.isPressed ? 0.95 : 1)
        .background(Capsule().foregroundColor(Colour.white))
        .overlay(
           ButtonGradient()
        )
    }
}
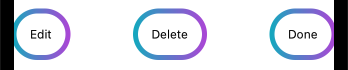
Let’s see how this appears. Beneath are our actions earlier than we utilized the overlay:

And listed below are our actions after making use of the overlay:
Now, let’s see all of it collectively:
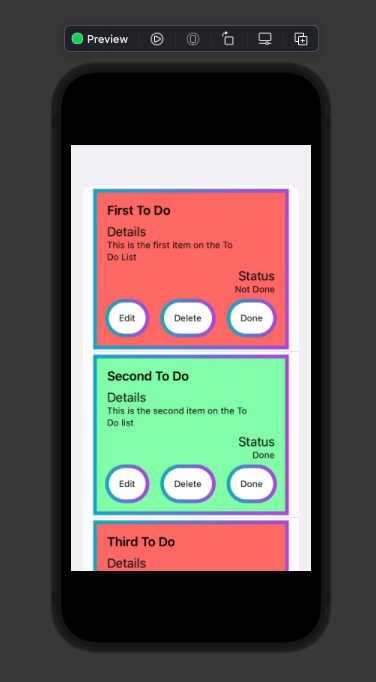
There you’ve got it! A gradient border for our to-do listing objects and our actions with each gradient borders adhering to their respective aspect shapes. Improbable!
Conclusion
Gradient borders for lists and buttons are a good way to distinguish your UI options and create a horny interface.
If you wish to take this additional, be at liberty to experiment with extra colours, gradient varieties and gradient instructions!
In case you need to reference it, all the code accompanying this submit could be discovered on GitHub.
LogRocket: Full visibility into your internet apps

LogRocket is a frontend software monitoring answer that allows you to replay issues as in the event that they occurred in your personal browser. As a substitute of guessing why errors occur, or asking customers for screenshots and log dumps, LogRocket enables you to replay the session to shortly perceive what went flawed. It really works completely with any app, no matter framework, and has plugins to log extra context from Redux, Vuex, and @ngrx/retailer.
Along with logging Redux actions and state, LogRocket data console logs, JavaScript errors, stacktraces, community requests/responses with headers + our bodies, browser metadata, and customized logs. It additionally devices the DOM to report the HTML and CSS on the web page, recreating pixel-perfect movies of even probably the most advanced single-page apps.
