
Cell app builders use numerous GUI parts of their apps, like buttons, lists, enter packing containers, and textual content areas inside app screens. Generally, we’d like advanced GUI parts, similar to calendars, timetables, agenda views, and so forth.
The React Native framework presents inbuilt elements for including major GUI parts, however for designing advanced GUI elements, we’ll should both construct them from scratch with inbuilt core parts or reuse pre-implemented elements from third-party libraries.
The react-native-calendars library presents pre-implemented, customizable elements for including calendars to your React Native apps. You should use these calendar elements for creating personalized shareable calendars to show date-based knowledge and seize date values from the person.
On this tutorial, I’ll clarify how one can create personalized shareable calendars with react-native-calendars, and allow you to learn about a number of different packages for creating customizable calendars.
Bounce forward:
Highlighted options of react-native-calendars
This calendar library presents the next highlighted options for including customizable high-quality calendar elements:
A number of elements on your wants
The library presents numerous elements for creating calendars, agenda views, and timelines. Listed below are the favored ones for creating calendars:
Calendar: Renders a calendar part with inbuilt month navigation helpCalendarList: A contemporary, fashionable part that renders a semi-infinite, scrollable calendar recordAgenda: A fancy calendar part helps builders implement timetables, appointment tables, and date schedulers
Cross-platform help and constant feel and look
Cross-platform help is certainly an important reality to contemplate whereas choosing React Native libraries. This package deal formally helps Android and iOS platforms and presents a constant feel and look with major React Native elements (Textual content, TouchableOpacity, and so forth.) that look virtually the identical on each working techniques.
In depth customizations and options
Every library part exposes a number of props to customise the actual part’s habits and options. For instance, this package deal permits you to customise the calendar part’s fonts and colours by offering a theme object. Additionally, you possibly can mark particular person dates and date ranges with inbuilt customizable indicators and customized shapes.
It’s attainable to realize superior styling customizations by overriding stylesheet definitions. So, in case you use your personal theme on your app, utilizing the present theme colours is simple. This package deal additionally permits you to connect callbacks for numerous occasions, so constructing a personalized, fashionable date picker is possible.
react-native-calendars tutorial
Now, we already know an summary of the calendars package deal. Let’s begin utilizing it virtually in a React Native app to change into extra acquainted by testing its options. You should use the upcoming code examples instantly in an present app or create a brand new experimental app to proceed with the tutorial.
If you want to get began with a brand new challenge, create one with the next command:
npx react-native init CalendarsExample
cd CalendarsExample
Subsequent, run the app to ensure that the whole lot works advantageous:
npx react-native run-android
# --- or ---
npx react-native run-ios
Enter the next command and set up react-native-calendars:
npm set up react-native-calendars
# --- or ---
yarn set up react-native-calendars
Let’s begin with the Calendar part and be taught its customizations and options in depth!
Making a fundamental calendar
The Calendar part permits you to render a conventional calendar factor that helps month navigation. There aren’t any necessary props right here — use the part with no props in App.js to create a calendar with the default setup:
import React from 'react';
import {
  SafeAreaView,
  ScrollView,
  StyleSheet,
  View,
} from 'react-native';
import { Calendar } from 'react-native-calendars';

perform App() {
  return (
    <SafeAreaView model={types.container}>
      <Calendar />
    </SafeAreaView>
  );
};

const types = StyleSheet.create({
  container: {
    flex: 1,
    justifyContent: 'heart'
  },
});

export default App;
The above code will render a calendar part with default options and types, as proven within the following preview:
Be aware: Deciding on a date received’t render a highlighted background model as everybody expects as an inbuilt characteristic — we’ll have to write down some code for it. I’ll clarify how one can spotlight the chosen date within the Marking particular person days part.
Attaching contact occasion callbacks
The calendar part is interactive, so customers can carry out actions by urgent the month navigation arrows and day parts.
This library exposes a number of props to connect callbacks for these essential person actions. Take a look at the next pattern callback implementations:
<Calendar
  onDayPress={(day) => console.log('onDayPress', day) }
  onDayLongPress={(day) => console.log('onDayLongPress', day) }
  onMonthChange={(date) => console.log('onMonthChange', date) }
  onPressArrowLeft={(goToPreviousMonth) => {
    console.log('onPressArrowLeft'); goToPreviousMonth();
  }}
  onPressArrowRight={(goToNextMonth) => {
    console.log('onPressArrowRight'); goToNextMonth();
  }}
/>
Handlers are executed on the next inputs:
onDayPress: When the person faucets a selected day factoronDayLongPress: When the person lengthy presses a day factoronMonthChange: When the calendar month adjustmentsonPressArrowLeft: When the person clicks the left-side month navigation arrowonPressArrowRight: When the person clicks the right-side month navigation arrow
Run the above code snippet, examine the code, modify it, and change into aware of all our callbacks. For instance, you may get the user-pressed date as follows:
onDayPress={(day) => console.log('Chosen date: ', day.dateString) }
Experiment with all the opposite callbacks by attaching perform implementations.
Setting preliminary, min, and max dates
In some eventualities, utilizing a default calendar with callback implementations just isn’t sufficient to fulfill app specs. Generally, we have to set the initially chosen month and minimal/most finish date. The Calendar part presents props to set preliminary, min, and max dates.
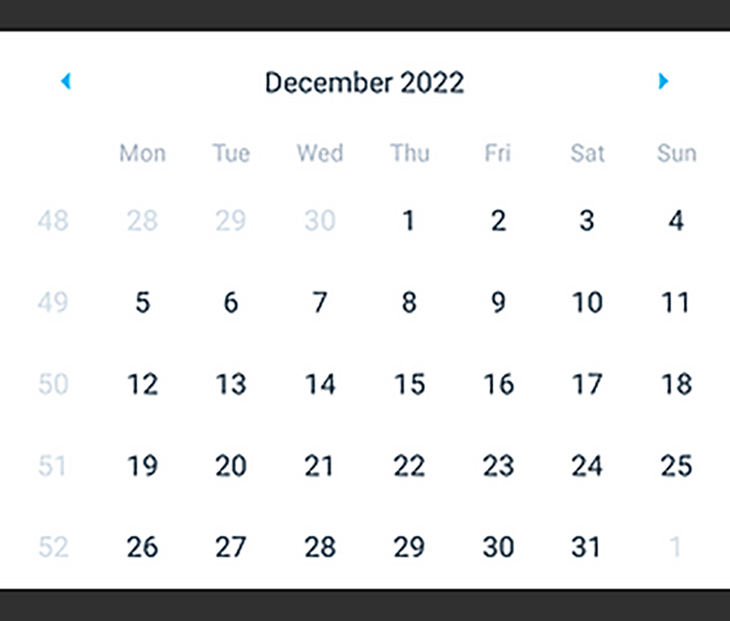
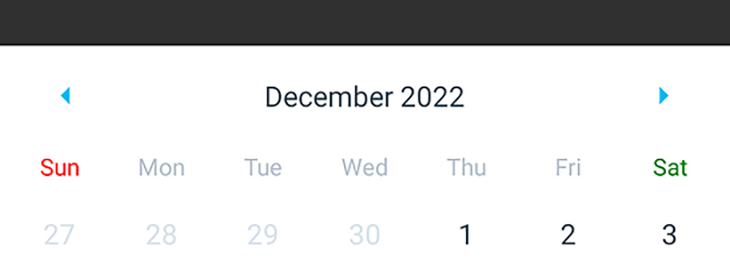
Assume that it is advisable to make a calendar part that originally exhibits December 2022 and allows you to press solely a day between the first of December 2022 and the thirtieth of January 2023. The next code snippet satisfies this specification:
<Calendar
  initialDate="2022-12-01"
  minDate="2022-12-01"
  maxDate="2023-01-30"
  disableAllTouchEventsForDisabledDays={true}
/>
Right here, the disableAllTouchEventsForDisabledDays boolean prop helps us disable the contact suggestions for disabled date parts. Run the app code snippet and examine the consequence with the above specification:
Making the calendar part reusable
If it is advisable to use the above calendar in a number of locations, making a reusable part is undoubtedly a superb follow:
import React from 'react';
import {
  SafeAreaView,
  ScrollView,
  StyleSheet,
  View,
} from 'react-native';
import { Calendar } from 'react-native-calendars';

perform CustomCalendar(props) {
  return (
    <Calendar
      initialDate="2022-12-01"
      minDate="2022-12-01"
      maxDate="2023-01-30"
      disableAllTouchEventsForDisabledDays={true}
      {...props}
    />
  );
}

perform App() {
  return (
    <SafeAreaView model={types.container}>
      <CustomCalendar onDayPress={(day) => console.log(`Date pressed: ${day.dateString}`)} />
    </SafeAreaView>
  );
};

const types = StyleSheet.create({
  container: {
    flex: 1,
    justifyContent: 'heart',
  },
});

export default App;
The above CustomCalendar part makes use of customized preliminary, min, and max dates. It additionally accepts Calendar props for additional customizations. We’ll focus on how one can develop a reusable date picker part in an upcoming part — then, you possibly can be taught extra about creating shareable calendars.
Supported calendar UI customizations
The calendar part consists of View, TouchableOpacity, and Textual content-like inbuilt framework elements, in contrast to the platform-specific, native date picker part in Android and iOS. So, it presents quite a few props for in depth UI customization.
For instance, you possibly can disable the left and proper arrows with the disableLeftArrow and disableRightArrow boolean props within the earlier CustomCalendar implementation:
perform CustomCalendar(props) {
  return (
    <Calendar
      initialDate="2022-12-01"
      minDate="2022-12-01"
      maxDate="2022-12-31"
      disableAllTouchEventsForDisabledDays={true}
      disableArrowLeft={true}
      disableArrowRight={true}
      {...props}
    />
  );
}
Now, you’ll solely see December 2022, since month-by-month navigation just isn’t attainable:
Hiding each arrows can be attainable with the hideArrows boolean prop:
perform CustomCalendar(props) {
  return (
    <Calendar
      initialDate="2022-12-01"
      minDate="2022-12-01"
      maxDate="2022-12-31"
      disableAllTouchEventsForDisabledDays={true}
      hideArrows={true}
      {...props}
    />
  );
}
By default, week rows begin with Sunday. You can begin each week row with Monday and present week numbers on the calendar with the next props:
firstDay={1}
showWeekNumbers={true}
Take a look at the next preview:
Utilizing a customized month format can be attainable with the dateFormat prop. For instance, the next setup will render Dec/2020 -like month strings:
monthFormat="MMM/yyyy"
Browse the official documentation and determine all supported calendar props that assist customizing the calendar UI.
Marking particular person days
Take a look at a bodily paper calendar in your desk or wall. You will notice that a number of day packing containers are marked with background colours or symbols to point particular days or nationwide holidays. How can we mark day parts within the Calendar part much like the bodily one?
The Calendar part permits you to mark dates by way of the markedDates prop. Let’s learn to mark particular person days first! Use the next code for CustomCalendar:
perform CustomCalendar(props) {
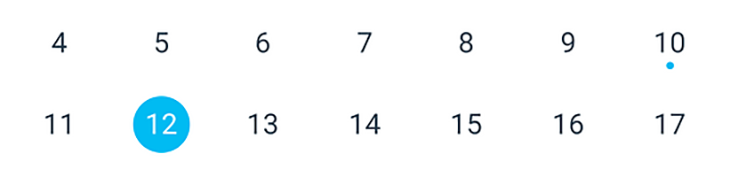
const marked = {
'2022-12-10': { marked: true },
'2022-12-12': { chosen: true }
};
return (
<Calendar
initialDate="2022-12-01"
minDate="2022-12-01"
maxDate="2022-12-31"
disableAllTouchEventsForDisabledDays={true}
markedDates={marked}
{...props}
/>
);
}
If the marked boolean prop is ready to true, the part will render a dot on a selected day; if the chosen boolean prop is ready to true, the part will render a crammed circle across the specific day factor. Take a look at the next preview:
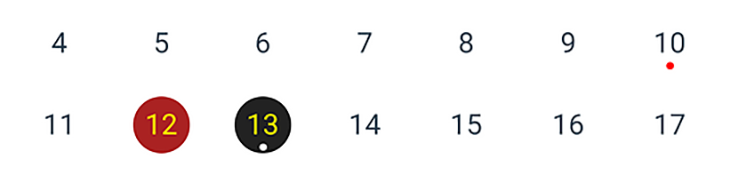
It’s attainable to customise the above indicators and shapes as follows:
const marked = {
    '2022-12-10': { marked: true, dotColor: 'crimson' },
    '2022-12-12': { chosen: true, selectedColor: '#aa2222', selectedTextColor: 'yellow' },
    '2022-12-13': {
      marked: true,
      chosen: true,
      selectedColor: '#222222',
      selectedTextColor: 'yellow',
      dotColor: 'white'
    }
  };
As soon as you utilize the above definition for marked, you will note the next consequence:
The markedDates prop helps us to mark the at present pressed day factor with a easy implementation. We are able to retailer the present date within the part state and replace the markedDates object accordingly, as proven within the following code:
import React, { useState, useMemo } from 'react';
import {
  SafeAreaView,
  ScrollView,
  StyleSheet,
  View,
} from 'react-native';
import { Calendar } from 'react-native-calendars';

perform CustomCalendar(props) {
  const initDate="2022-12-01";
  const [selected, setSelected] = useState(initDate);
  const marked = useMemo(() => ({
    [selected]: {
      chosen: true,
      selectedColor: '#222222',
      selectedTextColor: 'yellow',
    }
  }), [selected]);
  return (
    <Calendar
      initialDate={initDate}
      markedDates={marked}
      onDayPress={(day) => {
        setSelected(day.dateString);
        props.onDaySelect && props.onDaySelect(day);
      }}
      {...props}
    />
  );
}

perform App() {
  return (
    <SafeAreaView model={types.container}>
      <CustomCalendar onDaySelect={(day) => console.log(`Date chosen: ${day.dateString}`)}/>
    </SafeAreaView>
  );
};

const types = StyleSheet.create({
  container: {
    flex: 1,
    justifyContent: 'heart',
  },
});

export default App;
Right here, we used the useMemo Hook to memoize the marked object and recompute it provided that chosen is modified (for efficiency optimization). See how the above code implements selectable day parts:
The marked boolean factor renders a circle form with a number of pre-included types, however this library is versatile sufficient to supply the customStyles prop for constructing a developer-defined form model. The next code snippet renders a inexperienced rectangle once you press a day factor:
perform CustomCalendar(props) {
  const initDate="2022-12-01";
  const [selected, setSelected] = useState(initDate);
  const marked = useMemo(() => ({
    [selected]: {
      customStyles: {
        container: {
          backgroundColor: 'inexperienced',
          borderRadius: 0,
        },
        textual content: {
          shade: 'white',
        }
      }
    }
  }), [selected]);
  return (
    <Calendar
      initialDate="2022-12-01"
      markingType="customized"
      markedDates={marked}
      onDayPress={(day) => {
        setSelected(day.dateString);
        props.onDaySelect && props.onDaySelect(day);
      }}
      {...props}
    />
  );
}
Right here, we used markingType="customized" to activate the customized markers characteristic. The multi-dot marking sort lets us add a number of dot indicators into day parts, as if to point occasions on a selected day, as proven within the following code:
import React from 'react';
import {
  SafeAreaView,
  ScrollView,
  StyleSheet,
  View,
} from 'react-native';
import { Calendar } from 'react-native-calendars';

perform App() {
  const operating = {key: 'operating', shade: 'blue'};
  const biking = {key: 'biking', shade: 'inexperienced'};
  const strolling = {key: 'strolling', shade: 'orange'};
  const marked = {
    '2022-12-01': {
      dots: [running, walking]
    },
    '2022-12-02': {
      dots: [running, walking, cycling]
    }
  };
  return (
    <SafeAreaView model={types.container}>
      <Calendar
        initialDate="2022-12-01"
        markingType="multi-dot"
        markedDates={marked}
      />
    </SafeAreaView>
  );
};

const types = StyleSheet.create({
  container: {
    flex: 1,
    justifyContent: 'heart',
  },
});

export default App;
The above code generates a calendar part with a number of dot indicators in day parts:

Marking date ranges
We are able to write some code and implement a date-range marking model ourselves with customStyles, however this library boosts builders’ productiveness by providing an inbuilt date-range marking characteristic.
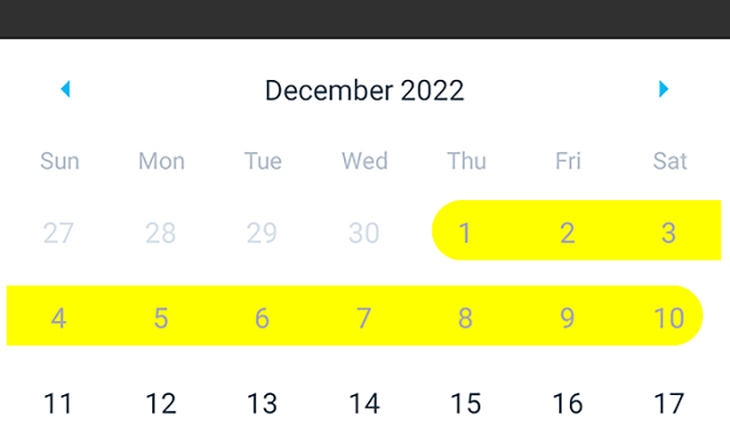
For instance, you possibly can mark the primary ten days of December 2022 with the inbuilt range-marking characteristic as follows:
perform App() {
  const getMarked = () => {
    let marked = {};
    for(let i = 1; i <= 10; i++) {
      let day = i.toString().padStart(2, '0');
      marked[`2022-12-${day}`] = {
        startingDay: i == 1,
        endingDay: i == 10,
        shade: 'yellow',
        textColor: '#aaa',
        disabled: true,
      };
    }
    return marked;
  };

  return (
    <SafeAreaView model={types.container}>
      <Calendar
        initialDate="2022-12-01"
        markingType="interval"
        markedDates={getMarked()}
      />
    </SafeAreaView>
  );
};
Right here, we use the getMarked perform to generate a ten-day-long interval. The interval begin/finish edge styling will change in line with the startingDay and endingDay booleans. When you run the above code snippet, it’s best to see the next consequence:
It’s attainable to construct a date vary selector part with this era marking characteristic. You possibly can see a pattern implementation from my GitHub repository.
This library presents an inbuilt multi-period-marking characteristic, too. Take a look at the next code:
perform App() {
  const getMarked = () => {
    let marked = {};
    for(let i = 1; i <= 10; i++) {
      let day = i.toString().padStart(2, '0');
      let durations = [
        {
          startingDay: i == 1,
          endingDay: i == 10,
          color: 'teal',
        },
        (i >= 2 && i <= 6) && {
          startingDay: i == 2,
          endingDay: i == 6,
          color: 'orange',
        }
      ];
      marked[`2022-12-${day}`] = {
        durations
      };
    }
    return marked;
  };
  return (
    <SafeAreaView model={types.container}>
      <Calendar
        initialDate="2022-12-01"
        markingType="multi-period"
        markedDates={getMarked()}
      />
    </SafeAreaView>
  );
};
The above App part implementation renders two date interval traces between the first and the tenth of December 2022:
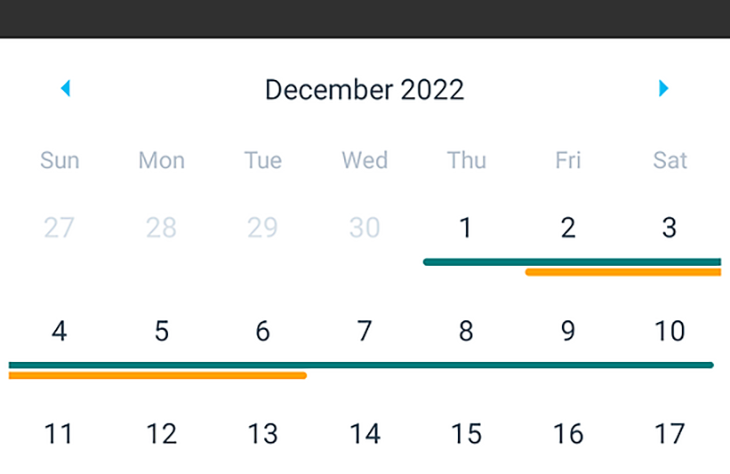
Wish to show a fast abstract of some bookings in a calendar? Strive the multi-period marking sort.
Customizing the calendar theme
Now, we already know how one can do fundamental UI customizations; we modified the primary weekday, disabled/hid the month navigation arrows, modified the month format, and so forth. What if we have to change the day factor, header, weekday identify colours, and fonts?
As talked about within the highlighted options part, this library permits you to change the appear and feel by passing a customized theme object. When you really feel that utilizing a customized theme object is limiting, you possibly can instantly override stylesheet definitions of the calendar part. Furthermore, you possibly can customise the calendar part’s container types.
First, take a look at the next instance code and learn to customise the calendar’s feel and look by way of the theme prop, and the calendar container’s types with the model prop:
<Calendar
  initialDate="2022-12-01"
  model={{
    borderRadius: 5,
    margin: 12,
    elevation: 5,
    borderWidth: 4,
    borderColor: 'rgba(100, 100, 100, 0.2)'
  }}
  theme={{
    calendarBackground: '#222',
    dayTextColor: '#fff',
    textDisabledColor: '#444',
    monthTextColor: '#888'
  }}
/>
The above code snippet applies a darkish shade scheme to the calendar by way of the theme prop and a few styling enhancements for the calendar container by way of the model prop. Take a look at the next preview:
The theme prop presents a technique to customise textual content types and colours. However, we generally have to do superior customizations utilizing extra styling definitions. For such eventualities, it’s attainable to override stylesheet definitions. For instance, you possibly can override the calendar header model as follows:
theme={{
  'stylesheet.calendar.header': {
    headerContainer: {
      flexDirection: 'row',
      backgroundColor: '#eee',
      borderRadius: 12
    },
  }
}}
Take a look at your model.ts information by looking the supply and determine all model definitions you can override by way of theme. Test the top of a selected model.ts file to seek out the stylesheet identifier (i.e., model.calendar.header).
We are able to use stylesheet-overriding within the theme prop to use completely different types for weekend day headers. For instance, we are able to use inexperienced for Saturday headers and crimson for Sunday headers with the next theme object:
theme={{
  'stylesheet.calendar.header': {
    dayTextAtIndex0: {
      shade: 'crimson'
    },
    dayTextAtIndex6: {
      shade: 'inexperienced'
    }
  }
}}
Right here is the preview for the above setup:
Utilizing two completely different colours for weekend day numbers can be a superb UI/UX enchancment. However, the library doesn’t help customizing listed day factor styling as we used for customizing day headers by way of the theme prop. So, we have now to model weekend day numbers with markedDates till the maintainers and contributors work on this pull request’s thought.
Creating scrollable calendar lists
Trendy cell apps typically use extra swipe occasions than conventional faucets. For instance, each well-liked social media app usually masses extra posts when the person swipes up — not when the person faucets a load-more-posts button. The Calendar part is designed to navigate with arrows and see one month at a time, however you need to use the CalendarList part to create a contemporary infinite scroller-like calendar part.
Run the next code:
import React from 'react';
import {
  SafeAreaView,
  ScrollView,
  StyleSheet,
  View,
} from 'react-native';
import { CalendarList } from 'react-native-calendars';

perform App() {
  return (
    <SafeAreaView model={types.container}>
      <CalendarList/>
    </SafeAreaView>
  );
};

const types = StyleSheet.create({
  container: {
    flex: 1,
    justifyContent: 'heart',
  },
});

export default App;
Now, you possibly can see a scrollable calendar:
CalendarList to create a scrollable calendarNonetheless, the Calendar part is minimal, conventional, and generic, so take into account choosing CalendarList provided that the display screen is calendar-oriented (i.e., displaying inside a Modal) and customers have to see a number of months at a time. The CalendarList part accepts all Calendar props and some extra props.
Utilizing the Agenda part for superior use circumstances
In some eventualities, we have to implement agenda views in our React Native apps. The Calendar and CalendarList elements help including multi-period markers by way of the markedDates prop, however the calendar part doesn’t have sufficient area so as to add a title and outline for every marker line. So, implementing an agenda view with Calendar or CalendarList part just isn’t a superb determination.
Extra nice articles from LogRocket:
The Agenda part permits you to create agenda views by displaying information for every day in a second view that will get opened after tapping a day factor.
Run the next code to show a pattern agenda view:
import React from 'react';
import {
  SafeAreaView,
  ScrollView,
  StyleSheet,
  Textual content,
  TouchableOpacity,
} from 'react-native';
import { Agenda } from 'react-native-calendars';

perform App() {
  return (
    <SafeAreaView model={types.container}>
      <Agenda
        chosen="2022-12-01"
        objects={{
          '2022-12-01': [{name: 'Cycling'}, {name: 'Walking'}, {name: 'Running'}],
          '2022-12-02': [{name: 'Writing'}]
        }}
        renderItem={(merchandise, isFirst) => (
          <TouchableOpacity model={types.merchandise}>
            <Textual content model={types.itemText}>{merchandise.identify}</Textual content>
          </TouchableOpacity>
        )}
      />
    </SafeAreaView>
  );
};

const types = StyleSheet.create({
  container: {
    flex: 1,
    justifyContent: 'heart'
  },
  merchandise: {
    backgroundColor: 'white',
    flex: 1,
    borderRadius: 5,
    padding: 10,
    marginRight: 10,
    marginTop: 17,
  },
  itemText: {
    shade: '#888',
    fontSize: 16,
  }
});

export default App;
Right here, we used the Agenda part by offering day objects by way of the objects prop. You should use the renderItem callback to design a GUI for every day merchandise. Test different callbacks and supported props from the official documentation on this GitHub repository.
When you run the above code, you will note a minimal agenda view as follows:

Agenda part preview in AndroidWe hardcoded a number of day objects for demonstration functions, however you too can use a distant internet server to fetch knowledge on your agenda view in manufacturing apps.
The right way to place calendar elements
There are two key methods to render any GUI factor in cell apps: rendering on an app display screen floor or rendering in a popup. I demonstrated all of the above calendar part customizations instantly on an app display screen. When you use a calendar part as a person enter factor, displaying it in a popup saves the present app display screen’s area and improves total usability.
Take a look at the next code:
import React, { useState } from 'react';
import {
  SafeAreaView,
  ScrollView,
  StyleSheet,
  View,
  Modal,
  Button,
} from 'react-native';
import { Calendar } from 'react-native-calendars';

perform DatePicker({seen, onDateSelected}) {
  return (
    <Modal seen={seen} clear={true} animationType="fade">
      <View model={types.overlay}>
        <Calendar onDayPress={onDateSelected}/>
      </View>
    </Modal>
  );
}

perform App() {
  const [modalVisible, setModalVisible] = useState(false);
  return (
    <SafeAreaView model={types.container}>
      <Button title="Present Modal" onPress={() => setModalVisible(true)}/>
      <DatePicker
        seen={modalVisible}
        onDateSelected={() => setModalVisible(false)}/>
    </SafeAreaView>
  );
};

const types = StyleSheet.create({
  container: {
    flex: 1,
    justifyContent: 'heart'
  },
  overlay: {
    flex: 1,
    justifyContent: 'heart',
    padding: 40,
    backgroundColor: 'rgba(100, 100, 100, 0.6)',
  },
});

export default App;
Right here, we created the reusable DatePicker part and confirmed a calendar part inside a Modal. When you faucet the button, the modal will seem with an overlay and a calendar part, as proven within the following preview:
react-native-calendars elements
On this tutorial, we mentioned three well-liked elements that react-native-calendars presents:
CalendarCalendarListAgenda
We primarily targeted on the Calendar part as a result of it permits you to create customizable and shareable calendar elements in your React Native apps, however the library presents every week calendar by way of WeekCalendar, a timeline implementation by way of Timeline, and so forth.
Take a look at all formally supported elements from the official documentation. There are some undocumented elements, however you possibly can test them from the supply.
react-native-calendars alternate options
Like another well-liked React Native package deal, react-native-calendars additionally has different packages, however these alternate options will not be so aggressive with the react-native-calendars package deal.
The explanations for this embrace:
- Most different packages deal with creating date pickers — not calendar views
- Some packages will not be actively maintained and are deprecated (i.e.,
react-native-calendar) - Some packages are new and are nonetheless changing into well-liked inside the React Native group
Nonetheless, it’s value realizing about alternate options as a result of they could change into well-liked sooner or later and should provide distinctive options on your necessities. So, take a look at the next different libraries:
Conclusion
We studied how one can create shareable, personalized calendars with the react-native-calendars library. Code reusability boosts everybody’s productiveness and improves software program high quality, so at all times attempt to outline a shareable calendar part in case you repeat the identical calendar props with the identical values in a number of locations.
Additionally, at all times care about your apps’ UI/UX elements by utilizing an identical shade theme for the calendar part and different UI parts. This library presents the Calendar part as the primary part, however test CalendarList, Agenda, and others, earlier than choosing one on your requirement.
