Parallax scrolling can enhance the searching expertise of a web site by making it extra dynamic and immersive. Within the easiest of phrases, parallax scrolling is a three-dimensional impact for including extra depth to a webpage. There’s some nuance to this that we’ll make clear later.
On this article, we’ll talk about causes to think about using parallax scrolling. We’ll show methods to implement the parallax scrolling impact with CSS, and we’ll share some advantages of utilizing CSS to create a parallax impact as a substitute of JavaScript. All through this tutorial, we’ll share a number of CSS parallax impact examples and use instances.
A well-known, well-executed instance of parallax scrolling is the Firewatch laptop recreation web site. The hero part comprises a rural scene of a hiker peering throughout a valley to a hill station. The parallax impact makes the scene fall away to disclose the content material under because the consumer scrolls down:

Seems to be like magic, proper?

Let’s go backstage and see how the magic occurs! 

Leap forward:
Parallax scrolling is a pc graphics approach wherein background photographs transfer previous the digicam extra slowly than foreground photographs, creating an phantasm of depth in a 2D scene. The approach grew out of the multiplane digicam approach utilized in conventional animation within the Thirties:
Instance of two.5D scrolling that simulates the looks of a 3D scene. Produced by Wikipedia consumer Janke. Public area, by way of Wikipedia.
The above instance is sometimes called 2.5D (two-and-a-half dimensional) or pseudo-3D perspective as a result of it simulates the looks of a three-dimensional scene.
Parallax scrolling was popularized in 2D laptop graphics and was included in video video games beginning within the early Eighties. Many individuals credit score the arcade recreation Moon Patrol as being the primary use of the impact in side-scrolling video games. Parallax scrolling made it into many in style platform video games all through the 80s and 90s, akin to Sonic the Hedgehog.
The sport The Whispered World applied the parallax impact by way of the compositing of layers. Beneath is an isometric view of the sport’s layers, with every distinguished by a coloured body:
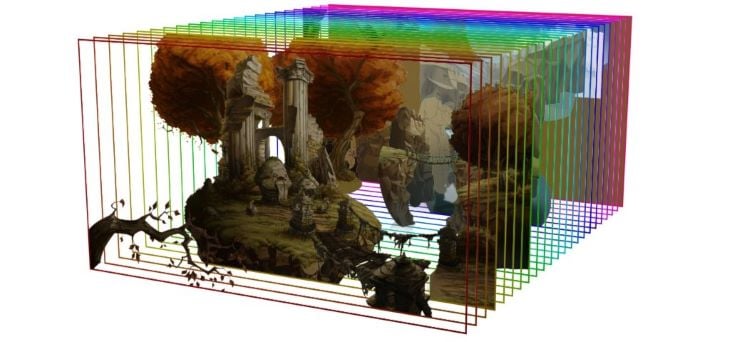
When seen from the entrance, the layers type an entire scene:

This method was integrated into net design however didn’t turn out to be in style till the 2011 introduction of HTML5 and CSS 3. As CSS has matured, it has turn out to be simpler to drag off the impact with out JavaScript and hacks.
One unlucky consequence is that many deal with the parallax impact as a blanket time period; it has turn out to be synonymous with “gratuitous scrolling results”. However actually, the parallax impact doesn’t require any animation or scroll-triggered occasions. It’s purely based mostly on components shifting at totally different speeds to offer a notion of depth.
In net design, that is achieved by grouping components into “layers”, and controlling how briskly every layer strikes. The weather are laid out vertically in a typical webpage, and the motion is a results of the consumer scrolling by way of the web page.
It’s essential to think about why you’d need to use the parallax scrolling impact earlier than you drop it into a web site! Listed below are a few causes.
Improved consumer engagement
Parallax graphics can seize a consumer’s consideration and enhance engagement. This could cut back the share of customers who both hit the again button or shut the tab after trying out only one web page of your web site. An improved (or diminished) bounce price will be helpful if the success of your website depends upon customers viewing multiple web page!
Serves as a storytelling assist
Good design speaks to the consumer. Parallax graphics may also help take customers on an immersive journey. You need to use parallax scrolling to provide a one-page web site the place guests can learn a complete story about your product or model with out navigating to a number of pages. Take a look at Matterday made by Netlify for an amazing instance; this website tells a compelling story about how Netlify can save time and presents solutions for a way that additional time may very well be used!
Methods to implement the parallax impact in CSS
Broadly talking, there are two strategies for implementing a parallax impact with CSS. Let’s discover and evaluate each strategies.
Technique 1: Fixing the place of the background
Fixing the place of the background was the earliest technique for making a parallax impact with CSS. You’ll be able to consider it as a 2.5D parallax implementation.
The key to this technique is to make use of a background picture for a bit and repair its place, usually with background-attachment:fastened. When the consumer scrolls by way of a selected part, the background doesn’t scroll by, however the different components do. Nevertheless, as soon as the consumer scrolls past that part, there’s a totally different background. By having components shifting at totally different speeds, we create a parallax impact!
One factor to bear in mind with this technique is that cell browser help for background-attachment:fastened nonetheless seems to be problematic! We’ll talk about workarounds for this later on this article.
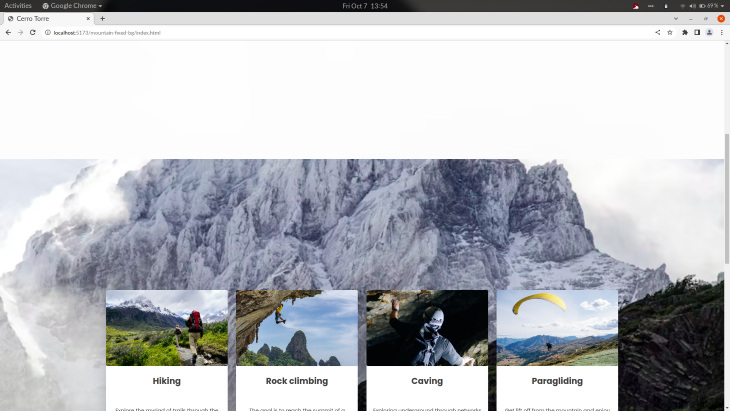
Let’s discover a selected instance to get a greater understanding of how this technique works. Right here’s a full-page instance showcasing the actions obtainable at Cerro Torre mountain in Argentina:
Laying out the design
Relating to parallax examples, many builders appear to favor these with mountain scenes. I feel it’s because it appears form of cool whenever you see one thing rise above a mountain, however don’t let this restrict your software of the approach!
Beneath is an outline of the webpage’s design. We create a form of banded design wherein we interleave a parallax part with a non-parallax part (I name this a “buffer” part):
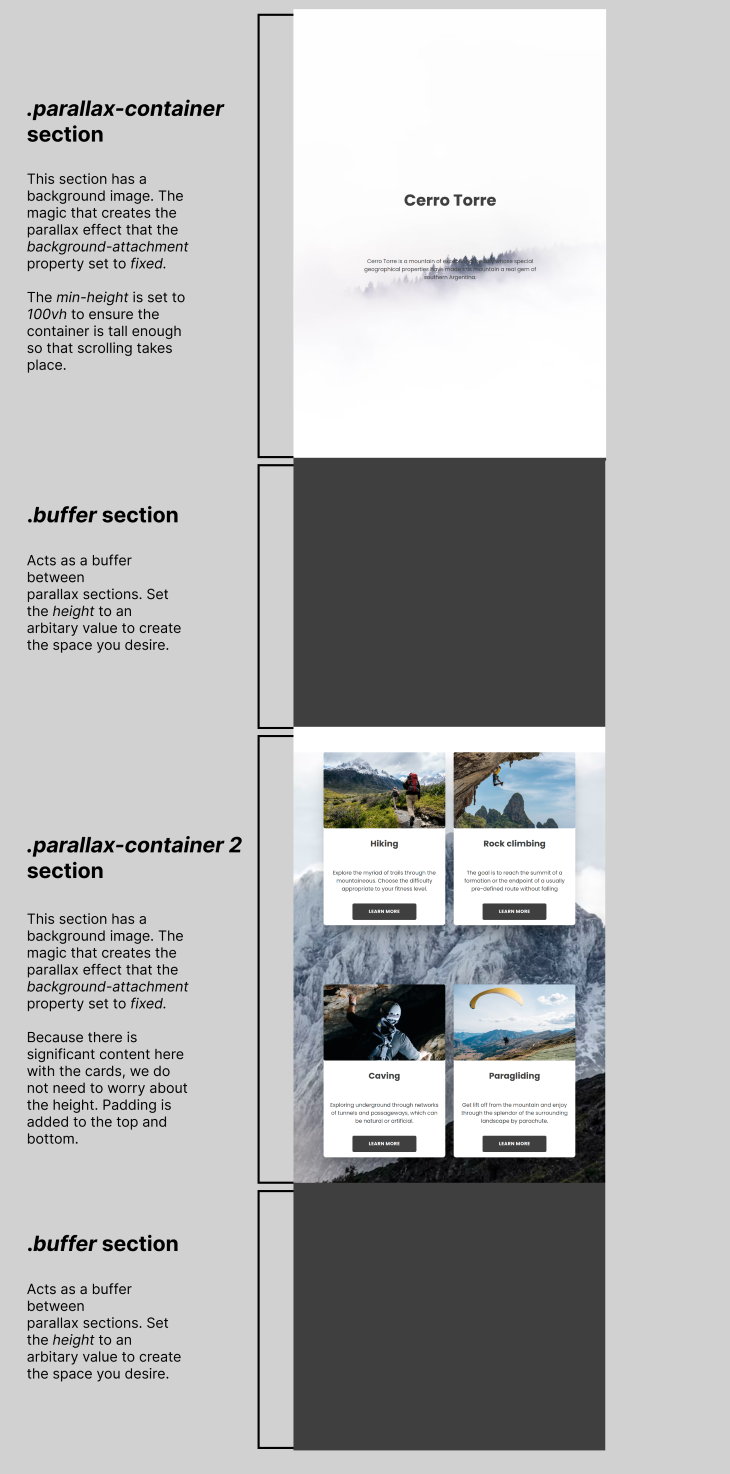
The “buffer” part will not be required for the parallax impact to work, nonetheless, it may well function a margin between parallax sections. Additionally, it may well present extra management of the start line of the background of the next parallax part.
For instance, on a 1920px display screen, if we scroll down many of the first parallax part, we see the center of the mountainous background within the second parallax part:
With out the primary “buffer” part, under is what we’ll see on the similar place on the web page. You’ll discover that the preliminary view of the mountainous background of the second parallax part is greater:
Finally, the “buffer” part is a design choice; it’s not an implementation requirement.
Right here’s the CodePen for the above instance:
See the Pen
Fastened background parallax scroll by rob2 (@robatronbobby)
on CodePen.
The important thing to creating the parallax container is to set the background-image property with a picture of your selecting after which set the background-attachment property to fastened. The fastened worth fixes the place of the background picture relative to the viewport.
Scaling the design
It’s non-obligatory, however usually fascinating, to make use of background-size: cowl; to scale the picture to the smallest attainable dimension to fill the container whereas preserving its side ratio. Within the under code, I additionally middle the place of the background picture utilizing background-position: middle:
.parallax-container {
  /*  that is the place the magic occurs:  */
  background-image: url("https://photographs.unsplash.com/photo-1519120944692-1a8d8cfc107f?ixlib=rb-1.2.1&ixid=MnwxMjA3fDB8MHxwaG90by1wYWdlfHx8fGVufDB8fHx8&auto=format&match=crop&w=872&q=80");
  background-attachment: fastened;
  background-position: middle;
  background-size: cowl;

  /* dimensions are essential, guarantee it's tall sufficient to scroll */
  min-height: 100vh;

  /* you're free to put out the container objects with flexbox or no matter means you would like */
  show: flex;
  flex-direction: column;
  align-items: middle;
  justify-content: middle;
}
Additionally, you have to be conscious of the parallax container dimensions. The container ought to be tall sufficient to require important scrolling! A easy solution to assure that is to set min-height: 100vh on the parallax container, in order that it is going to be no less than as tall as the peak of the display screen, whatever the components it comprises.
Dealing with cell browser compatibility points
It’s a disgrace that there are nonetheless lingering points with background-attachment: fastened on cell browsers. If you wish to higher perceive these points, learn this documentation.
Happily, we’ve got some choices to beat any cell browser incompatibility.
For instance, we are able to take the nuclear strategy and ditch parallax fully on cell units (smaller screens) utilizing a media question. The CSS could be one thing like this:
 /* Flip off parallax scrolling for all tablets and telephones. Improve/lower the pixels if wanted */
@media solely display screen and (max-device-width: 1366px) {
  .parallax-container {
    background-attachment: scroll;
  }
}
Murtuzaali Surti wrote a couple of fastened background hack and confirmed how bugs manifest in cell browsers when background-attachment: fastened is used. In a nutshell, Murtuzaali suggests creating a component with a background picture utilizing place: fastened, inserting the content material right into a separate ingredient, after which positioning it completely on high of (stacked above) the background ingredient.
Equally, we may use a pseudo-element for the fastened background picture, and it ought to work the identical. I haven’t tried this myself, so I can’t personally vouch for this technique!
Professionals and cons of fixing the place of the background
There are each benefits and downsides to implementing parallax scrolling by fixing the place of the background.
Professionals:
- Comparatively straightforward to know
- Simple to implement
Cons:
- Cellular browser help remains to be problematic, however workarounds can be found
- Solely able to having two layers
- Can’t management the velocity of layers
Technique 2: Utilizing 3D translations
In CSS, we are able to place components in three dimensions. We are able to place components alongside the z-axis to extend or lower the perceivable distance between the consumer and the ingredient:
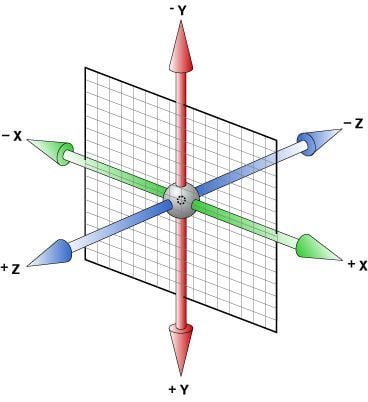
Since 3D translations mimic actuality, there are comparable bodily results to once we transfer issues in our digital world. One thing that’s additional away (i.e., unfavourable translation on the z-axis), will transfer slower. Conversely, one thing that’s nearer (i.e., constructive translation on the z-axis) will transfer sooner. We are able to form of hijack the z-axis to manage the scroll velocity of issues!
Extra nice articles from LogRocket:
One other bodily impact is scale. If we transfer one thing additional away, it’s going to seem smaller. Whether it is nearer, it’s going to seem larger. If you wish to counter this adjustment, you’ll have to scale it up or down your self.
To realize the parallax impact, we’ll make use of three CSS properties: place, perspective, and remodel to put out and group our components into layers. Then we’ll use the translateZ() and scale() transformation features to manage the scrolling velocity and sizes of layers relative to the perspective set on the mother or father ingredient.
Earlier than we go additional, remember the fact that this can be a tough matter as a result of it goes towards the grain of what’s typical. So, let’s make a small guidelines of subjects you ought to be comfy with to actually grasp this technique:
- CSS transformations: The remodel properties are core to CSS; the 3D side is especially essential to know
- z-index: Stacking components by way of the
placeandremodelproperties can result in conditions wherein layers should not stacked as you would possibly anticipate. This is actually becauseremodelcreates a brand new stacking context. It’s possible you’ll have to intervene and handle thez-indexof the layers relying in your design. I can suggest Ahmad Shadeed’s article on the subject if you wish to stage up your understanding - Overflow: When working in 3D with overlapping components, you have to be conscious of overflow. If you don’t perceive overflow effectively, right here’s a useful resource chances are you’ll discover useful
Keith Clark wrote the seminal tutorial on the 3D translation technique in 2014. This tutorial is a good exposition of the strategy, though it’s a bit mild on life like examples that would make the strategy simpler to understand.
Somewhat than repeating the identical data right here, I’ll stroll by way of a parallax scrolling instance, and share among the finer factors not lined in that article. I like to recommend you learn Keith’s article; you’ll be able to disregard any dialogue about browser bugs as these are not a difficulty.
Parallax scrolling demo
Let’s create a primary parallax scrolling instance with three layers which have some textual content in addition to totally different background colours.
Right here’s the HTML:
<div class="parallax">
  <!--layer 1 would be the backside layer, layer 3 would be the high layer-->
  <div class="parallax-layer layer1">LAYER 1</div>
  <div class="parallax-layer layer2">LAYER 2</div>
  <div class="parallax-layer layer3">LAYER 3</div>
</div>
Right here’s the bottom CSS that we are able to reuse:
/* if you don't take away the margin, you will notice a vertical scrollbar on the .parallax div */
physique {
  margin: 0;
}

/* parallax "viewport" */
.parallax {
  peak: 100vh;

  overflow-x: hidden;
  overflow-y: auto;

  perspective: 1px;
}

.parallax-layer {
  place: absolute;
  high: 0;
  proper: 0;
  backside: 0;
  left: 0;
}

.layer1 {
  remodel: translateZ(0);
}

.layer2 {
  remodel: translateZ(-1px);
}

.layer3 {
  remodel: translateZ(-2px);
}
There are some issues to notice about this CSS code.
First, the parallax class is the place the magic occurs. Defining the peak and perspective type properties of a component creates a set origin 3D viewport.
The perspective property defines how far-off the thing is from the consumer. I’ve chosen a price of 1px for the perspective property for the parallax class, which suggests we’re very, very near the div. You’ll be able to improve this worth in order for you a extra pronounced parallax impact.
The velocity of the impact is managed by the mix of the values supplied for perspective and translateZ(). Reducing the worth for translateZ() will push the ingredient additional away and that ingredient will scroll slower. The additional the worth is from zero, the extra pronounced the parallax impact i.e. translateZ(-5px) will scroll slower than translateZ(-1px).
Past the bottom CSS, it is best to at all times think about the peak of the layers. If a layer doesn’t have a lot content material, it could be too small to create appropriately tall scrolling context. Some folks prefer to set a default dimension in .parallax-layer. That’s as much as you!
We are able to change the place of the layers to satisfy our design utilizing the properties: high, proper, left, and backside. Alternatively, we are able to additionally use translate3d() to maneuver a component alongside the x-axis and y-axis.
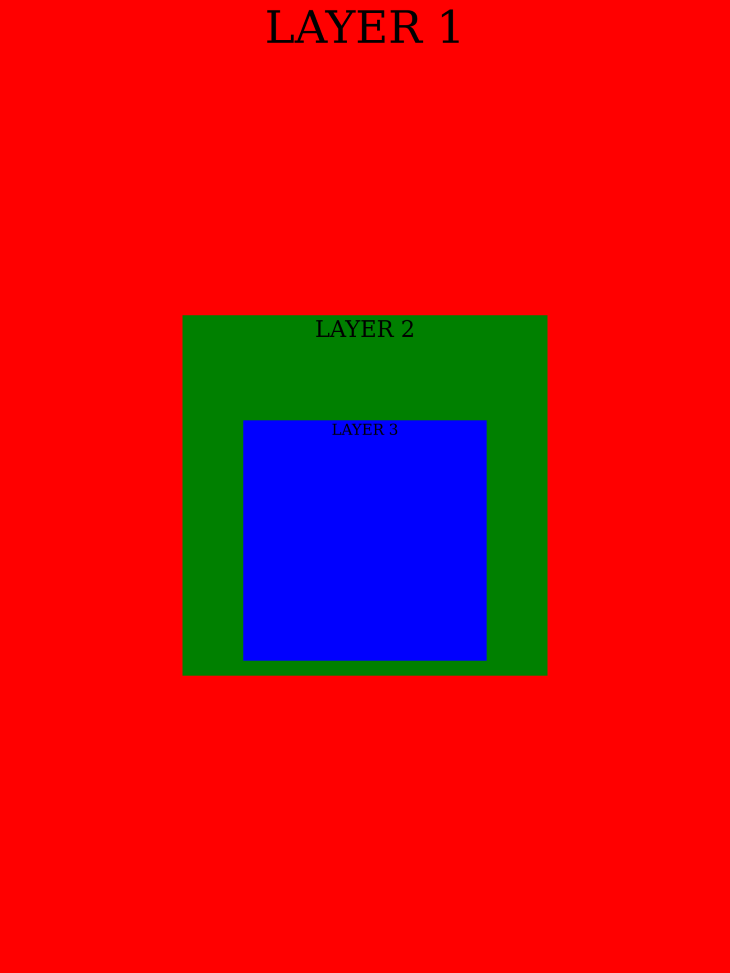
Now, let’s dimension, place, and add a background coloration to every of the layers to show this all matches collectively.
Right here’s an approximate determine of what we’re doing on the z-axis:

Subsequent, we’ll make layer 2 and layer 3 half the peak of layer 1, in order that we are able to see every layer distinctly.
Then, we’ll place layer 2 decrease on the y-axis with high, so it begins under layer 1. Subsequent, we’ll do the identical with layer 3, in order that it begins under layer 2:
.parallax-layer.layer1 {
  width: 100%;
  peak: 100rem;

  background-color: purple;
}

.parallax-layer.layer2 {
  high: 10rem;

  width: 100%;
  peak: 50rem;

  background-color: inexperienced;
}

.parallax-layer.layer3 {
  high: 20rem;

  width: 100%;
  peak: 50rem;

  background-color: blue;
}

div{
  font-size: 50px;
  text-align: middle;
}
Right here’s the CodePen:
See the Pen
Fundamental parallax scrolling instance by rob2 (@robatronbobby)
on CodePen.
That is the way it appears full display screen; it’s form of like a Russian nesting doll:
Do you discover the looks surprising in any means? 
Do you discover that despite the fact that layer 2 and layer 3 have the identical peak, layer 3 seems to be shorter than layer 2?
That is as a result of 3D transformation as we mentioned earlier. Layer 3 is additional away, so it seems smaller! You need to use the scale() operate if you wish to make them seem equal in dimension.
Questioning why layer 1 is the underside layer?
In HTML, the layer 1 div comes earlier than the layer 3 div. These divs are positioned completely, that means that layer 3 ought to be the layer high because it comes final within the DOM. Effectively, a remodel creates a brand new stacking context. This promotes every div to sit down above what comes earlier than it! So the order of the layers is the reverse of the order within the DOM. 
The takeaway is to do not forget that the primary ingredient within the “parallax” container or part will turn out to be the underside layer.
Additionally, it could be surprising that our “parallax” div can have a visual scrollbar you probably have a margin on the physique (as is the default), as proven under. It’s because the layers are taller than the container, so that they overflow:

And that’s how the items match collectively!
If you wish to create a design with separate parallax sections, you’ll be able to seek the advice of this part of Keith’s article.
If this all feels a bit overwhelming, don’t fear! When you discover the core mechanics as we’ve got, you’ll be able to fill within the lacking items in your comprehension by exploring some good examples. Let’s collect some!
Good examples utilizing 3D translations
If you want a guided walkthrough on methods to create a parallax hero part, watch this video tutorial. Right here’s a CodePen for the instance mentioned:
See the Pen
CSS by rob2 (@robatronbobby)
on CodePen.
If you want to duplicate the Firewatch web site, right here’s a CodePen with a reasonably good CSS recreation (the code is written by lemmin):
See the Pen
CSS Solely Parallax Instance: Firewatch Launch Website by rob2 (@robatronbobby)
on CodePen.
If you want to see a model that makes use of the unique Firewatch paintings, Sam Beckham did a brief weblog publish on this matter. Right here’s a CodePen of this instance:
See the Pen
Firewatch Parallax in CSS by Sam Beckham (@samdbeckham)
on CodePen.
A next-level exposition of the approach is Lynn’s Fisher work on the Matterday micro web site. It is vitally enjoyable and distinctive. I feel the sticky mini “window” for every background to cross beneath different content material is basically novel.
Lynn wrote an wonderful weblog publish on how she created this impact. I want to choose by way of it in additional element to unlock the entire methods she used! The code is obtainable on GitHub.
Professionals and cons of utilizing 3D translations
Professionals:
- Can use a number of layers
- Can management the velocity of layers
- Cross-browser help is superb
Cons:
- Extra obscure than technique 1
- Implementation will be tough
In case you’re searching for some inspiration for the place to make use of parallax scrolling, there are a number of assets. Adobe wrote an article 10 Finest Parallax Web site Design Examples that has some wonderful designs. Dribble is one other good useful resource. You’ll be able to search Dribble to seek out designs from artistic people.
Why use CSS as a substitute of JavaScript?
In case you can pull one thing off in CSS moderately than JavaScript, you’ll typically get a extra performant consequence. As an trade, at one level it appeared that some people needed to do every part with JavaScript, however I feel there may be extra enlightenment round this matter now.
Sketch wrote about parallax on their design weblog and spoke about how they applied a delicate parallax scrolling impact on the homepage of their web site. They selected to make use of a JS framework referred to as Stimulus:
And it was easy from a growth standpoint, too — as Richárd explains. “We use an excellent tiny JS framework referred to as Stimulus. It lets us create small JavaScript elements which are managed by HTML knowledge attributes,” he continues. With just some additional HTML knowledge parameters, the group may management horizontal and vertical velocity based mostly on the velocity of scrolling. “So bigger objects and components can transfer slower and the smaller ones can transfer sooner within the digital house,” Richárd concludes.
I feel it is very important perceive that no framework or JavaScript is required! If this weblog publish was my first introduction to the parallax impact, I may very well be led to imagine that I ought to implement it with a JavaScript framework too.
Improvement groups might go for JavaScript as a result of they’re already utilizing a framework and may obtain the identical consequence with just a bit additional JavaScript. I don’t need to admonish anybody for doing that, it could be justifiable. Nevertheless, it may be straightforward to make a behavior of transport increasingly more JavaScript as you add impartial options over time.
Additionally, do not forget that it’s not a mutually unique alternative, you should use principally CSS with some JavaScript. The keyframers did an attention-grabbing instance of this in a coding stream. Right here’s the accompanying CodePen:
See the Pen
Movable Mountains  | @keyframers 1.12.0 by Shaw (@shshaw)
on CodePen.
It is very important have a balanced strategy like this. You shouldn’t really feel polarized and really feel it’s a CSS vs. JavaScript factor.
There’s a time when you will have to succeed in for JavaScript. If you’d like an animated scroll expertise, that is the place JavaScript might be referred to as for. GreenSock is the perfect JavaScript library for net animation.
Conclusion
A well-crafted parallax scrolling web site may also help you stand out from the gang and create a long-lasting impression in your guests. However, I’d advise warning when utilizing parallax scrolling. You need to take care with the design and implementation to make sure that scrolling will not be compromised and that the consumer expertise is sweet on units of all sizes!
I hope this text demystified the parallax scrolling approach for you and supplied insights on methods to implement it with CSS. Don’t overlook to have enjoyable with it; create one thing superior!
Is your frontend hogging your customers’ CPU?
As net frontends get more and more complicated, resource-greedy options demand increasingly more from the browser. In case you’re keen on monitoring and monitoring client-side CPU utilization, reminiscence utilization, and extra for your whole customers in manufacturing, attempt LogRocket. https://logrocket.com/signup/
LogRocket is sort of a DVR for net and cell apps, recording every part that occurs in your net app or website. As an alternative of guessing why issues occur, you’ll be able to mixture and report on key frontend efficiency metrics, replay consumer periods together with software state, log community requests, and robotically floor all errors.
Modernize the way you debug net and cell apps — Begin monitoring without spending a dime.
