
# Create A Breakout Recreation With Flame and Forge2D – Half 2
This text is an element two of a three-part sequence that walks you thru the creation of a Flutter Breakout sport with Flame and Forge2D.
The companion articles to this tutorial are:
Partly certainly one of this sequence, you created a Breakout sport and discovered learn how to use Forge2D to make a ball and enviornment, in addition to made the ball bounce off the world’s partitions.

You’re properly on the way in which to constructing your very personal Breakout sport.

By the top of this text, you’ll add a brick wall to smash and a paddle to manage the bounce. You’ll additionally discover ways to:
- Create a customized Flame part.
- Add consumer enter to manage a physique in Forge2D.
- Create a
Jointto carry our bodies collectively and limit their motion. - Add inflexible physique collision detection.
Getting Began
You can begin together with your mission from half one or the starter mission that’s accessible from the Obtain Supplies button on the high or backside of the tutorial.
Construct and run. Your mission ought to have a Forge2D ball bouncing inside an enviornment. That is the place to begin for this a part of the tutorial sequence.
Creating the Brick Wall
You could have a ball, and now you’re going to create a brick wall for it to destroy. There are a number of steps forward, the primary being to outline the brick physique.
Making a Brick
Creating the brick physique will probably be similar to the opposite inflexible physique elements you’ve constructed, and also you’ll begin by defining a Brick extending from BodyComponent.
Create a brick.dart file within the elements folder and add the next traces of code to this file:
import 'package deal:flutter/materials.dart';
import 'package deal:flame_forge2d/flame_forge2d.dart';
import '../forge2d_game_world.dart';

// 1
class Brick extends BodyComponent<Forge2dGameWorld> {
 remaining Measurement measurement;
 remaining Vector2 place;

 // 2
 Brick({
  required this.measurement,
  required this.place,
 });

 // 3
 @override
 Physique createBody() {
  remaining bodyDef = BodyDef()
   ..kind = BodyType.static
   ..place = place
   ..angularDamping = 1.0
   ..linearDamping = 1.0;

  remaining brickBody = world.createBody(bodyDef);

  // 4
  remaining form = PolygonShape()
   ..setAsBox(
    measurement.width / 2.0,
    measurement.top / 2.0,
    Vector2(0.0, 0.0),
    0.0,
   );

  // 5
  brickBody.createFixture(
   FixtureDef(form)
    ..density = 100.0
    ..friction = 0.0
    ..restitution = 0.1,
  );

  return brickBody;
 }
}
This code could also be acquainted to you — in case it’s not, see under.
- Declare a
Brickpart. - Outline the
Brickpart, which you’ll use a number of instances to create the wall. Themeasurementandplaceconstructor parameters set the distinctive values for particular person bricks. - Arrange the brick our bodies to be static, however static doesn’t imply motionless. Take into consideration a field in your storage — it doesn’t transfer by itself. Nevertheless it strikes whenever you push it, kick it, or brush it apart. Your bricks will behave equally when the ball collides with them. Then you definitely set
angularDampingandlinearDampingto 100% to stop any motion. Do not forget that we symbolize these values with a floating level quantity between 0.0 and 1.0 - Make the form of the brick to be a polygon field form.
- Outline and create the fixture for the physique.
Making a Customized Flame Element
Now that you’ve the Brick physique part, you may construct a wall — one brick at a time. How painful!
On this part, you’ll create a Flame part so you may deal with your entire wall as a single part.
Create a file named brick_wall.dart within the elements folder then add the next code to it:
import 'package deal:flutter/materials.dart';
import 'package deal:flame/elements.dart';
import '../forge2d_game_world.dart';
import 'brick.dart';

// 1
class BrickWall extends Element with HasGameRef<Forge2dGameWorld> {
 remaining Vector2 place;
 remaining Measurement? measurement;
 remaining int rows;
 remaining int columns;
 remaining double hole;

 // 2
 BrickWall({
  Vector2? place,
  this.measurement,
  int? rows,
  int? columns,
  double? hole,
 }) : place = place ?? Vector2.zero(),
    rows = rows ?? 1,
    columns = columns ?? 1,
    hole = hole ?? 0.1;

 // 3
 @override
 Future<void> onLoad() async {
  await _buildWall();
 }

 Future<void> _buildWall() async {
 }
}
The brick wall is a set of Brick elements the place every brick is a BodyComponent. With Flame, you must create a customized part so to deal with your entire wall as a single part with the next logic:
- Declare
BrickWallas a subclass ofElementwith a mixture ofHasGameRef. TheHasGameRefis just like the glue that binds the part to yourForge2dGameWorld. - Outline a
BrickWallconstructor to permit for setting theplace, generalmeasurement, the variety of brickrowsandcolumns, and the dimensions of theholebetween bricks. - Create a the Flame sport loop because the
BrickWallis a Flame part. The loop will nameonLoadin the course of the load cycle.
Creating the Brick Wall
Now you’re going to really construct a brick wall.
In brick_wall.dart, add the next code to _buildWall:
  // 1
  remaining wallSize = measurement ??
    Measurement(
     gameRef.measurement.x,
     gameRef.measurement.y * 0.25,
    );

  // 2
  remaining brickSize = Measurement(
   ((wallSize.width - hole * 2.0) - (columns - 1) * hole) / columns,
   (wallSize.top - (rows - 1) * hole) / rows,
  );

  // 3
  var brickPosition = Vector2(
   brickSize.width / 2.0 + hole,
   brickSize.top / 2.0 + place.y,
  );

  // 4
  for (var i = 0; i < rows; i++) {
   for (var j = 0; j < columns; j++) {
    await add(Brick(
     measurement: brickSize,
     place: brickPosition,
    ));
    brickPosition += Vector2(brickSize.width + hole, 0.0);
   }
   brickPosition += Vector2(
    (brickSize.width / 2.0 + hole) - brickPosition.x,
    brickSize.top + hole,
   );
  }
The development of the brick wall is fairly simple. First, you calculate the brick measurement and wall place. Then you definitely construct the wall one row at a time.
Here is some extra element:
- If the caller does not specify the dimensions of the brick wall, this units the world to fill to the complete width of the sport space and 25% of the peak.
- Calculate the brick measurement from the given wall dimensions.
- Set the place of the primary brick.
- Create a wall of bricks by including every brick to the sport world.
You are now prepared so as to add the wall to your sport!
Open the file forge2d_game_world.dart, add an import for brick_wall.dart:
import 'elements/brick_wall.dart';
Create an occasion of BrickWall in _initializeGame simply after the Area:
  remaining brickWallPosition = Vector2(0.0, measurement.y * 0.075);

  remaining brickWall = BrickWall(
   place: brickWallPosition,
   rows: 8,
   columns: 6,
  );
  await add(brickWall);
BrickWall makes use of the place parameter to find the primary brick within the wall.
Then, BrickWall builds the wall row by row from high to backside, and Vector2(0.0, measurement.y * 0.075) locations the wall towards the left edge whereas leaving 7.5% of the sport space above.
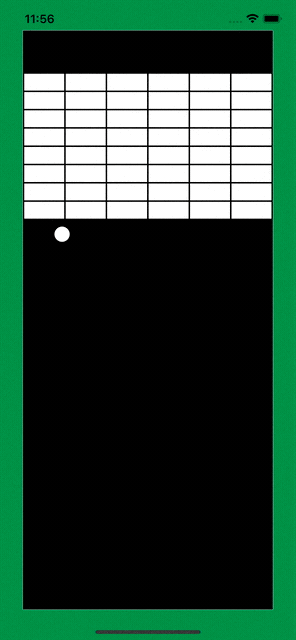
Construct and run your mission. You will now see a brick wall on the high of the sport enviornment. One other main Breakout sport part is now in place.
Creating the Paddle
The ultimate component of the Breakout sport to make is the user-controlled paddle. Just like the ball and bricks, the paddle can also be a inflexible physique and your first step is to declare the Paddle physique part.
Create a paddle.dart file within the elements folder and add the next traces of code to this file:
import 'package deal:flame/extensions.dart';
import 'package deal:flame_forge2d/flame_forge2d.dart';
import '../forge2d_game_world.dart';

class Paddle extends BodyComponent<Forge2dGameWorld> {
 remaining Measurement measurement;
 remaining Vector2 place;

 Paddle({
  required this.measurement,
  required this.place,
 });

 @override
 Physique createBody() {
  remaining bodyDef = BodyDef()
   ..kind = BodyType.dynamic
   ..place = place
   ..fixedRotation = true
   ..angularDamping = 1.0
   ..linearDamping = 10.0;

  remaining paddleBody = world.createBody(bodyDef);

  remaining form = PolygonShape()
   ..setAsBox(
    measurement.width / 2.0,
    measurement.top / 2.0,
    Vector2(0.0, 0.0),
    0.0,
   );

  paddleBody.createFixture(FixtureDef(form)
   ..density = 100.0
   ..friction = 0.0
   ..restitution = 1.0);

  return paddleBody;
 }
}
The Paddle code ought to be very acquainted at this level. There’s nothing new right here — it is simply one other inflexible physique in your Forge2D world.
Now you may add the paddle to your sport.
Open the file forge2d_game_world.dart then add an import for paddle.dart in addition to for the dimensions part:
import 'package deal:flame/extensions.dart';
import 'elements/paddle.dart';
Then, create an occasion of Paddle in _initializeGame simply after the BrickWall:
  const paddleSize = Measurement(4.0, 0.8);
  remaining paddlePosition = Vector2(
   measurement.x / 2.0,
   measurement.y * 0.85,
  );

  remaining paddle = Paddle(
   measurement: paddleSize,
   place: paddlePosition,
  );
  await add(paddle);
You’ve got set the paddle to 4 meters extensive by 80 centimeters excessive, an inexpensive measurement for the sport space. The place is relative to the middle of the paddle physique. This paddlePosition facilities the paddle on the x-axis and down 85% from the highest of the sport space.
Construct and run your mission. You now have all the weather for a Breakout sport: a ball, a brick wall and a paddle. Woohoo!

Giving Consumer Management of the Paddle
You could have your paddle, however your breakout sport gained’t be a lot enjoyable till it responds to consumer enter. That’s what you’ll construct subsequent.
Flame helps a number of enter types, together with gesture enter. The Flame Draggable mixin is the right function for implementing consumer management of the paddle.
Setting Up Draggable Mixin
Open forge2d_game_world.dart and add the next import:
import 'package deal:flame/sport.dart';
You’re together with the mixin HasDraggables in your Forge2DGame to tell the sport world that it’ll have draggable elements.
Insert this:
class Forge2dGameWorld extends Forge2DGame with HasDraggables {
You’ve simply added the HasDraggables mixin to your Forge2dGameWorld class.
Open the paddle.dart file and add:
class Paddle extends BodyComponent<Forge2dGameWorld> with Draggable {
You’ve simply added the Draggable mixin to the Paddle class.
Then embody the next imports to get the Draggable mixin:
import 'package deal:flame/elements.dart';
import 'package deal:flame/enter.dart';
And now override the mixin routine onDragUpdate, like so:
 @override
 bool onDragUpdate(DragUpdateInfo information) {
  physique.setTransform(information.eventPosition.sport, 0.0);

  // Do not proceed passing the occasion.
  return false;
 }
Flame sends your draggable part’s knowledge in regards to the drag occasion so you should utilize it to replace the paddle’s place. For now, you’re utilizing setTransform to replace the placement and rotation of the paddle physique.
Construct and run!
To pull the paddle, you should be inside the form space of the paddle.

The paddle acknowledges consumer enter however nonetheless does not behave the way you’d anticipate. On this sport format, it ought to be horizontally constrained throughout the sport space.
within the subsequent part, you’ll use a MouseJoint to constrain the paddle’s motion.
Constraining Physique Motion with Joints
Utilizing setTransform to outline the placement of a physique within the Forge2d world works, but it surely’s not the most effective methodology to maneuver the paddle.
Why?
As a result of utilizing setTransform is like being beamed from level A to level B. If factors A and B are far aside, it appears to be like unnatural—except you reside within the Star Trek universe.
It’s extra pure for a physique to maneuver by way of a sequence of areas, beginning a degree A and ending at level B. You’ll accomplish this impact with a MouseJoint.
However a MouseJoint alone is not sufficient to implement the proper Breakout paddle habits — it should even be constrained to solely transfer aspect to aspect.
A PrismaticJoint restricts the motion of a physique alongside an axis.
You will use these two joints collectively on the paddle physique to create the specified habits!
Word: Joints join our bodies in Forge2D. Joints are a posh matter deserving a extra strong dialogue, however doing so would derail you from ending this Breakout sport tutorial. There is a hyperlink on the finish if you would like to study extra.
Making a Mouse Joint
A MouseJoint is used to make a physique observe to a world level.
Joints join our bodies. The paddle is one physique, however what would be the second physique?
The sector physique fills the display space and can make a great anchor physique for the MouseJoint. The sector would be the “floor” for the MouseJoint joint.
In different phrases, you may create a MouseJoint and have it observe to a world level offered by DragUpdateInfo.
Open paddle.dart and add a brand new floor parameter to the Paddle class:
 remaining Measurement measurement;
 remaining BodyComponent floor;
 remaining Vector2 place;

 Paddle({
  required this.measurement,
  required this.floor,
  required this.place,
 });
Subsequent, add these variables:
 MouseJoint? _mouseJoint;
 Vector2 dragStartPosition = Vector2.zero();
 Vector2 dragAccumlativePosition = Vector2.zero();
These will maintain the mouse joint, the drag begin place and the accumulative drag offset.
Now, you are going to change the onDragUpdate routine and add new routines for dealing with the beginning, finish and cancel drag occasions.
 // 1
 @override
 bool onDragStart(DragStartInfo information) {
  if (_mouseJoint != null) {
   return true;
  }
  dragStartPosition = information.eventPosition.sport;
  _setupDragControls();

  // Do not proceed passing the occasion.
  return false;
 }

 // 2
 @override
 bool onDragUpdate(DragUpdateInfo information) {
  dragAccumlativePosition += information.delta.sport;
  if ((dragAccumlativePosition - dragStartPosition).size > 0.1) {
   _mouseJoint?.setTarget(dragAccumlativePosition);
   dragStartPosition = dragAccumlativePosition;
  }

  // Do not proceed passing the occasion.
  return false;
 }

 // 3
 @override
 bool onDragEnd(DragEndInfo information) {
  _resetDragControls();

  // Do not proceed passing the occasion.
  return false;
 }

 // 4
 @override
 bool onDragCancel() {
  _resetDragControls();

  // Do not proceed passing the occasion.
  return false;
 }

 // 5
 void _setupDragControls() {
  remaining mouseJointDef = MouseJointDef()
   ..bodyA = floor.physique
   ..bodyB = physique
   ..frequencyHz = 5.0
   ..dampingRatio = 0.9
   ..collideConnected = false
   ..maxForce = 2000.0 * physique.mass;

  _mouseJoint = MouseJoint(mouseJointDef);
  world.createJoint(_mouseJoint!);
 }

 // 6
 // Clear the drag place accumulator and take away the mouse joint.
 void _resetDragControls() {
  dragAccumlativePosition = Vector2.zero();
  if (_mouseJoint != null) {
   world.destroyJoint(_mouseJoint!);
   _mouseJoint = null;
  }
 }
This code appears to be like prolonged, but it surely’s fairly simple. Right here’s a step-by-step rationalization:
-
onDragStartchecks to make sure there is not already aMouseJointin use. If not, it will get the drag begin place and units up the drag controls. Word {that a} mouse joint is energetic solely throughout a drag occasion. -
onDragUpdatewill get the present drag offset place after which checks the accumulative drag place towards the paddle’s present place. The paddle place is up to date solely when the brand new place is much sufficient away to justify transferring. Word that you simply eliminatedphysique.setTransformfromonDragUpdateand changed it with this new code. -
onDragEndresets the drag controls. -
onDragCanceladditionally resets the drag controls. -
MouseJointDefidentifies the 2 our bodies related by the joint and their relationship,frequencyHzis the response pace,dampingRatiois how rapidly the physique will cease transferring, andcollideConnectedflags whether or not or not the 2 our bodies can collide with one another. Word that that is just like making a physique or fixture. - Take away the mouse joint and reset the mouse joint variables.
Open the file forge2d_game_world.dart and replace the Paddle occasion, like so:
  remaining paddle = Paddle(
   measurement: paddleSize,
   floor: enviornment,
   place: paddlePosition,
  );
  await add(paddle);
Now your Paddle contains the brand new floor parameter — keep in mind, a joint wants two our bodies. The Area is now the second physique tied to the paddle.
Construct and run.
Drag the paddle. You will discover that the paddle follows the drag enter. The habits is refined however essential. Your finger doesn’t set the paddle’s place; your enter asks Forge2D to maneuver the paddle to a brand new location.

Making a Prismatic Joint
Now you are going to restrict the paddle’s motion to the horizontal aircraft with PrismaticJoint.
The MouseJoint is related to the drag occasion, and it’s created and destroyed when the consumer drags the paddle. You want one thing extra sturdy than that.
The PrismaticJoint is legitimate for the lifetime of the paddle physique and will be created simply as soon as after the paddle physique is mounted. That sounds extra viable, no?
Open paddle.dart and add the next onMount methodology to the Paddle class:
 @override
 void onMount() {
  tremendous.onMount();

  // 1
  remaining worldAxis = Vector2(1.0, 0.0);

  // 2
  remaining travelExtent = (gameRef.measurement.x / 2) - (measurement.width / 2.0);

  // 3
  remaining jointDef = PrismaticJointDef()
   ..enableLimit = true
   ..lowerTranslation = -travelExtent
   ..upperTranslation = travelExtent
   ..collideConnected = true;

  // 4
  jointDef.initialize(physique, floor.physique, physique.worldCenter, worldAxis);
  remaining joint = PrismaticJoint(jointDef);
  world.createJoint(joint);
 }
Step by way of the code:
- Set the
worldAxisto limit the paddle’s motion to the x-axis. - Set the extent that the paddle can transfer. The paddle motion is relative to the origin of the paddle, which is at its heart. Set
travelExtentto a distance of half the width of the sport space minus half the width of the paddle to maintain the motion throughout the enviornment. - Create the prismatic joint definition with the motion limits.
- Create the joint then add it to the sport world.
Construct and run. The paddle motion is now restricted to transferring back and forth.

Cool! Your sport is starting to seem like the Breakout sport. Now you must add some logic so you may destroy these bricks.
Including Collision Detection
To destroy a brick, it’s essential to know when the ball collides with a brick. Your Forge2D collision detection code should uniquely establish the inflexible our bodies which have are available contact.
To find out the our bodies concerned in a given collision, you must add userData to the physique definition to establish the our bodies uniquely.
Open ball.dart then set the userData property to reference this occasion of the ball, like this:
  remaining bodyDef = BodyDef()
   ..userData = this
   ..kind = BodyType.dynamic
   ..place = place;
Now, open brick.dart and add an identical userData property for the bricks:
  remaining bodyDef = BodyDef()
   ..userData = this
   ..kind = BodyType.static
   ..place = place
   ..angularDamping = 1.0
   ..linearDamping = 1.0;
Your new this reference makes it so every brick within the wall is uniquely recognized from different bricks. When a ball collides with a brick, Forge2D will use this knowledge to establish the inflexible our bodies.
When a collision between the ball and a brick occurs, the brick is liable for recording the collision. Then, when the sport loop updates, the brick wall checks for destroyed bricks and removes them from the Forge2D world.
In brick.dart, add the mixin ContactCallbacks to the Brick class.
class Brick extends BodyComponent<Forge2dGameWorld> with ContactCallbacks {
This mixin supplies entry to the contact strategies.
Now, add the under:
 var destroy = false;

 @override
 void beginContact(Object different, Contact contact) {
  if (different is Ball) {
   destroy = true;
  }
 }
You simply added a flag to point if this brick collided with the ball —beginContact units the flag and is likely one of the ContactCallbacks Forge2D supplies to warn you to collisions between our bodies.
Add the under to brick.dart:
import 'ball.dart';
Your code wants this to import the Ball class.
The ball might collide with a number of bricks in a sport loop cycle. The brick wall part is a superb place to verify the standing of and take away destroyed bricks.
Open brick_wall.dart then add the next replace methodology:
 @override
 void replace(double dt) {
  // Test for bricks within the wall which have been flagged for elimination.
  // Word: it is a damaging course of so iterate over a duplicate of
  // the weather and never the precise checklist of youngsters and fixtures.
  //
  for (remaining baby in [...children]) {
   if (baby is Brick && baby.destroy) {
    for (remaining fixture in [...child.body.fixtures]) {
     baby.physique.destroyFixture(fixture);
    }
    gameRef.world.destroyBody(baby.physique);
    take away(baby);
   }
  }

  tremendous.replace(dt);
 }
The above code helps us confirm which of our bridges have been marked for elimination, then destroys their fixtures and our bodies. Do not forget that, when eradicating our bodies from Forge2D, it’s essential to first take away the physique’s fixtures then you may take away the physique.
Construct and run and see in case you can smash some bricks now.

One other spherical of congratulations is so as!
You’ve got created a ball, paddle and wall of bricks. The consumer can management the paddle to bounce the ball into the bricks and destroy them.
The place to Go From Right here?
You possibly can obtain the finished mission recordsdata by clicking the Obtain Supplies button on the high or backside of the tutorial.
Throughout half two of this sequence, you discovered learn how to:
- Create a customized Flame
Elementfor the brick wall. - Add
Draggableconsumer enter controls to Forge2D inflexible our bodies. - Transfer our bodies in Forge2D utilizing
setTransformandMouseJoint. - Constrain the motion of a inflexible physique utilizing a
PrismaticJoint. - Detect collisions between inflexible our bodies utilizing
ContactCallbacks.
Whenever you’re able to deep dive into Forge2D joints, go to this text: Box2D C++ tutorials – Joints – overview.
The third and remaining a part of the Create A Breakout Recreation With Flame and Forge2D tutorial sequence will present you learn how to full your Breakout sport.
Proper now, you’ve gotten all of the mechanics wanted for a Breakout sport, however it’s a lawless land. It is lacking guidelines and logic to implement them.
Your sport additionally lacks visible attraction — all the things is black and white.
By the top of half three, these points will probably be addressed and you will have a phenomenal, addictive sport to play whenever you’re bored: Create A Breakout Recreation With Flame and Forge2D – Half 3
We hope you loved this tutorial, and if in case you have any questions or feedback, please be part of the discussion board dialogue under!
