The significance of analyzing information at any scale can’t be overemphasized. Almost each a part of our day-to-day lives is information pushed, and as builders, one of many first concerns when constructing any moderately sized software is what database to make use of and find out how to construction your information.
However, it doesn’t cease at simply storing information, you’ll additionally must make sense of this information by extracting and presenting it in a format that any non-technical particular person can perceive. For instance, an ecommerce enterprise generates giant quantities of information each day, that means we’d must preserve monitor of issues like product stock, month-to-month income, monetary statements, and extra. Presently, there are lots of providers that present these kinds of options, however one of many best methods to shortly extract and current information is to generate a spreadsheet or a CSV file.
On this article, we’ll discover find out how to create spreadsheets in Go by constructing a easy expense report and exporting it in CSV format utilizing the Excelize library. You will discover the whole code for this tutorial on the GitHub repo. Let’s get began!
Producing an expense report
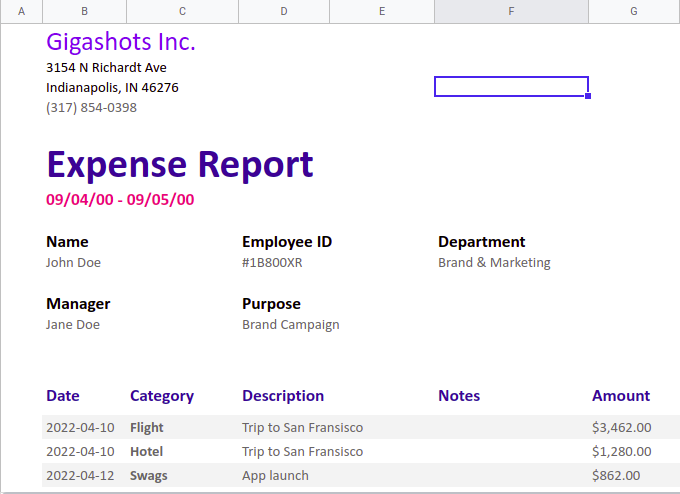
An expense report is an itemized checklist displaying an organization’s expenditure over a time frame in as a lot element as doable. We’ll construct a report that’s much like what we’ve within the picture under:
Making a worksheet
To get began, be sure to have Go ≥v1.15 put in and create a brand new challenge folder. Within the challenge listing, create a foremost.go file and initialize Go modules with the next code:
$ mkdir <project-name>
$ cd <project-name>
$ contact foremost.go
$ go mod init github.com/<your-username>/<project-name>
The foremost.go file is the entry level of our Go software, and we use the generated go.mod file for dependency administration. Subsequent, set up the Excelize library by working the command under:
$ go get github.com/xuri/excelize/v2
Excelize is a Go library with no dependencies that gives primitives for studying and writing to XLSX recordsdata and different supported spreadsheet file codecs. In your foremost.go file, import Excelize, create a brand new file, create a brand new worksheet, and set the lively sheet to the worksheet you simply created:
bundle foremost
import "github.com/xuri/excelize/v2"
const (
   SheetName = "Expense Report"
)
func foremost() {
   var err error
   f := excelize.NewFile()
   index := f.NewSheet("Sheet1")
   f.SetActiveSheet(index)
   f.SetSheetName("Sheet1", SheetName)
}
Including information and creating types
With our worksheet created, we will begin constructing the report. First, we’ll set some dimensions to suit the construction we wish, as proven within the picture under. Add the next code block to your foremost perform:
//foremost.go
//...
   err = f.SetColWidth(SheetName, "A", "A", 6)
   err = f.SetColWidth(SheetName, "H", "H", 6)
   err = f.SetColWidth(SheetName, "B", "B", 12)
   err = f.SetColWidth(SheetName, "C", "C", 16)
   err = f.SetColWidth(SheetName, "D", "D", 13)
   err = f.SetColWidth(SheetName, "E", "E", 15)
   err = f.SetColWidth(SheetName, "F", "F", 22)
   err = f.SetColWidth(SheetName, "G", "G", 13)
We simply want columns A to G for the report, so we’re utilizing the SetColWidth to regulate the width of the columns to suit our necessities. You’ll discover that we’ve outlined an error variable to the highest of the foremost perform, and we’re merely assigning any error returned from these capabilities to it. Ideally, it is best to deal with every error correctly because it’s idiomatic in Go, but it surely’s superb to maintain the code minimal.
The primary part of the report accommodates static info, so we’ll have it hard-coded. Add the next code block to your foremost perform:
//foremost.go
//...
   err = f.SetRowHeight(SheetName, 1, 12)
   err = f.MergeCell(SheetName, "A1", "H1")

   err = f.SetRowHeight(SheetName, 2, 25)
   err = f.MergeCell(SheetName, "B2", "D2")

   model, err := f.NewStyle(&excelize.Model{Font: &excelize.Font{Dimension: 20, Colour: "6d64e8"}})
   err = f.SetCellStyle(SheetName, "B2", "D2", model)
   err = f.SetSheetRow(SheetName, "B2", &[]interface{}{"Gigashots Inc."})
   err = f.MergeCell(SheetName, "B3", "D3")
   err = f.SetSheetRow(SheetName, "B3", &[]interface{}{"3154 N Richardt Ave"})

   err = f.MergeCell(SheetName, "B4", "D4")
   err = f.SetSheetRow(SheetName, "B4", &[]interface{}{"Indianapolis, IN 46276"})

   model, err = f.NewStyle(&excelize.Model{Font: &excelize.Font{Colour: "666666"}})
   err = f.MergeCell(SheetName, "B5", "D5")
   err = f.SetCellStyle(SheetName, "B5", "D5", model)
   err = f.SetSheetRow(SheetName, "B5", &[]interface{}{"(317) 854-0398"})

   model, err = f.NewStyle(&excelize.Model{Font: &excelize.Font{Dimension: 32, Colour: "2B4492", Daring: true}})
   err = f.MergeCell(SheetName, "B7", "G7")
   err = f.SetCellStyle(SheetName, "B7", "G7", model)
   err = f.SetSheetRow(SheetName, "B7", &[]interface{}{"Expense Report"})

   model, err = f.NewStyle(&excelize.Model{Font: &excelize.Font{Dimension: 13, Colour: "E25184", Daring: true}})
   err = f.MergeCell(SheetName, "B8", "C8")
   err = f.SetCellStyle(SheetName, "B8", "C8", model)
   err = f.SetSheetRow(SheetName, "B8", &[]interface{}{"09/04/00 - 09/05/00"})

   model, err = f.NewStyle(&excelize.Model{Font: &excelize.Font{Dimension: 13, Daring: true}})
   err = f.SetCellStyle(SheetName, "B10", "G10", model)
   err = f.SetSheetRow(SheetName, "B10", &[]interface{}{"Title", "", "Worker ID", "", "Division"})
   err = f.MergeCell(SheetName, "B10", "C10")
   err = f.MergeCell(SheetName, "D10", "E10")
   err = f.MergeCell(SheetName, "F10", "G10")

   model, err = f.NewStyle(&excelize.Model{Font: &excelize.Font{Colour: "666666"}})
   err = f.SetCellStyle(SheetName, "B11", "G11", model)
   err = f.SetSheetRow(SheetName, "B11", &[]interface{}{"John Doe", "", "#1B800XR", "", "Model & Advertising"})
   err = f.MergeCell(SheetName, "B11", "C11")
   err = f.MergeCell(SheetName, "D11", "E11")
   err = f.MergeCell(SheetName, "F11", "G11")

   model, err = f.NewStyle(&excelize.Model{Font: &excelize.Font{Dimension: 13, Daring: true}})
   err = f.SetCellStyle(SheetName, "B13", "G13", model)
   err = f.SetSheetRow(SheetName, "B13", &[]interface{}{"Supervisor", "", "Goal"})
   err = f.MergeCell(SheetName, "B13", "C13")
   err = f.MergeCell(SheetName, "D13", "E13")

   model, err = f.NewStyle(&excelize.Model{Font: &excelize.Font{Colour: "666666"}})
   err = f.SetCellStyle(SheetName, "B14", "G14", model)
   err = f.SetSheetRow(SheetName, "B14", &[]interface{}{"Jane Doe", "", "Model Marketing campaign"})
   err = f.MergeCell(SheetName, "B14", "C14")
   err = f.MergeCell(SheetName, "D14", "E14")
There’s lots occurring on this block of code, so let’s break it down.
As said earlier, Excelize offers a set of primitive capabilities to govern the spreadsheet. Every performance you want simply requires calling a technique on the file object, which accepts some parameters. On this case, we’re utilizing 5 foremost strategies:
SetRowHeightMergeCellNewStyleSetCellStyleSetSheetRow
SetRowHeight adjusts the peak of a given row, and MergeCell combines a number of cells in a row into one single cell. To compose types, we will use the excelize.Model struct, which offers the properties you could outline customized types. The NewStyle technique merely takes within the Model object and returns an index representing the model.
After defining your customized model, we will use SetCellStyle to use the model to a single cell or a spread of cells. We use SetSheetRow so as to add information to a cell or a spread of cells in a single row. It accepts a slice of interface, which is a container for any primitive information sort. The slice is positional, and every component shall be positioned within the corresponding cell ranging from the axis supplied. Subsequently, we used an empty string in some instances the place a number of cells have been merged.
The second a part of the report is a desk containing dynamic information that may be of any size, that means we will’t simply outline the content material of every row like we did earlier than. The info represented within the desk follows an outlined construction, so we will simply loop by means of the incoming information and create every row dynamically.
Let’s outline some arbitrary information that may characterize an inventory of bills. On the high of your foremost.go file, outdoors of the foremost perform, add the next variable:
Extra nice articles from LogRocket:
//foremost.go
//...
var (
   expenseData = [][]interface{}{
      {"2022-04-10", "Flight", "Journey to San Fransisco", "", "", "$3,462.00"},
      {"2022-04-10", "Resort", "Journey to San Fransisco", "", "", "$1,280.00"},
      {"2022-04-12", "Swags", "App launch", "", "", "$862.00"},
      {"2022-03-15", "Advertising", "App launch", "", "", "$7,520.00"},
      {"2022-04-11", "Occasion corridor", "App launch", "", "", "$2,080.00"},
   }
)
//...
Now, add the next block of code to your foremost perform:
//foremost.go
//...
   model, err = f.NewStyle(&excelize.Model{
      Font:      &excelize.Font{Dimension: 13, Daring: true, Colour: "2B4492"},
      Alignment: &excelize.Alignment{Vertical: "heart"},
   })
   err = f.SetCellStyle(SheetName, "B17", "G17", model)
   err = f.SetSheetRow(SheetName, "B17", &[]interface{}{"Date", "Class", "Description", "", "Notes", "Quantity"})
   err = f.MergeCell(SheetName, "D17", "E17")
   err = f.SetRowHeight(SheetName, 17, 32)

   startRow := 18
   for i := startRow; i < (len(expenseData) + startRow); i++ {
      var fill string
      if ipercent2 == 0 {
         fill = "F3F3F3"
      } else {
         fill = "FFFFFF"
      }

      model, err = f.NewStyle(&excelize.Model{
         Fill:      excelize.Fill{Kind: "sample", Sample: 1, Colour: []string{fill}},
         Font:      &excelize.Font{Colour: "666666"},
         Alignment: &excelize.Alignment{Vertical: "heart"},
      })
      err = f.SetCellStyle(SheetName, fmt.Sprintf("Bpercentd", i), fmt.Sprintf("Gpercentd", i), model)
      err = f.SetSheetRow(SheetName, fmt.Sprintf("Bpercentd", i), &expenseData[i-18])
      err = f.SetCellRichText(SheetName, fmt.Sprintf("Cpercentd", i), []excelize.RichTextRun{
         {Textual content: expenseData[i-18][1].(string), Font: &excelize.Font{Daring: true}},
      })

      err = f.MergeCell(SheetName, fmt.Sprintf("Dpercentd", i), fmt.Sprintf("Epercentd", i))
      err = f.SetRowHeight(SheetName, i, 18)
   }
We’re nonetheless utilizing the identical strategies to compose the types and add information. Nevertheless, we’re looping by means of the expenseData checklist and including every merchandise to the present row. We began the loop at 18, which is the present row within the spreadsheet. To make the rows of the desk extra distinct and readable, we add a delicate background coloration to each different row by checking if it’s even or odd utilizing a modulo operation.
Saving the worksheet
In just some strains of code, you’ve been in a position to create an expense report utilizing easy Go capabilities. There are various methods which you could show the report, however on this article, you’ll save the file to your disk and add it to Google sheets. Add the next code block on the finish of the foremost perform:
//foremost.go
//...
   err = f.SaveAs("expense-report.xlsx")
   if err != nil {
      log.Deadly(err)
   }
The code above will save the file within the present listing with an XLSX extension. Now, open up a brand new spreadsheet in Google Sheets and import the file. You need to see the expense report similar to within the pattern picture above.
Exporting to CSV
To date, we’ve explored working with XLSX recordsdata, nonetheless, there are different codecs appropriate for presenting this type of information. A CSV file is a textual content file with rows of information delimited by commas that’s largely used for importing and exporting information.
Take into account a case the place we need to retailer the desk in our expense report in some self-hosted database. We will extract this desk in CSV format and import it within the database with just some steps.
First, create a perform outdoors of your foremost perform known as generateCSV and add the code block under:
//foremost.go
//...
sort Axis struct {
   row int
   col string
}

func generateCSV(f *excelize.File, begin, finish Axis) error {
   var information [][]string

   for i := begin.row; i <= finish.row; i++ {
      row := []string{}
      for j := []rune(begin.col)[0]; j <= []rune(finish.col)[0]; j++ {
         worth, err := f.GetCellValue(SheetName, fmt.Sprintf("%spercentd", string(j), i), excelize.Choices{})
         if err != nil {
            return err
         }
         row = append(row, worth)
      }
      information = append(information, row)
   }

   file, err := os.Create("bills.csv")
   if err != nil {
      return err
   }
   defer f.Shut()

   author := csv.NewWriter(file)
   return author.WriteAll(information)
}
The generateCSV perform accepts an excelize.File sort, a begin axis, and an finish axis. The axis is only a mixture of the row and column that makes a cell. We loop by means of every row, and for every row, we loop by means of every column inside the bounds of the beginning and finish axis.
We then use the f.GetCellValue to extract the present worth of every cell. As a result of the columns are represented as alphabet strings, we convert them to runes to get the underlying unicode decimal. Lastly, we save the extracted information to a .csv file utilizing the CSV bundle from the usual library.
We will name this perform after saving the worksheet and passing the file deal with. In your foremost perform, add the next code block:
//foremost.go
///...
   err = f.SaveAs("expense-report.xlsx")
   err = generateCSV(f, Axis{17, "B"}, Axis{22, "G"})

   if err != nil {
      log.Deadly(err)
   }
We offer the file we created earlier for the worksheet and the axis representing the vary of the desk. For those who run the foremost.go file now, it is best to see an XLSX file and a CSV file generated:
$ go run foremost.go
Conclusion
There are various use instances for presenting information in a spreadsheet-compatible format, together with evaluation, transformation, and validation. On this article, we discovered find out how to work with spreadsheets utilizing Go and the Excelize bundle by producing an expense report.
When you think about the opposite options that Excelize gives out of the field, we’ve solely scratched the floor. You possibly can add pictures, create charts, sparklines, shapes, pivot tables, and extra. I hope you discovered one thing new, and depart a remark when you have any questions. Pleased coding!
LogRocket proactively surfaces and diagnoses a very powerful points in your apps and web sites

1000’s of engineering and product groups use LogRocket to cut back the time it takes to grasp the basis explanation for technical and usefulness points. With LogRocket, you’ll spend much less time on back-and-forth conversations with clients and take away the infinite troubleshooting course of. LogRocket lets you spend extra time constructing new issues and fewer time fixing bugs.
Be proactive – strive LogRocket at this time.
