
I promise probably the most thrilling a part of this text received’t be that you just’re studying about the best way to construct a weblog in a weblog submit.  What’s going to make this learn genuinely intriguing is that you’ll construct your new weblog in Alinea, a brand new CMS written in TypeScript.
Should you’re an enormous fan of content material administration programs and typed languages, and also you’re prepared to find the very new and intriguing Alinea, I counsel you get your favourite beverage, roll your sleeves up and observe me on a journey of discovering this new CMS.
Through the years, I’ve performed with an extended checklist of content material administration programs. As somebody who has been running a blog for 18 years, CMSs had been at all times near my coronary heart. From WordPress, Joomla, CouchCMS, and even Gatsby, I’ve tried a number of options on the market, and I’ve come to the identical conclusion each time: you could use the proper instrument for the proper job.
With that in thoughts, let’s uncover Alinea and study what it’s finest fitted to and who would use it most.
On the time of writing, Alinea is in beta, which is thrilling since you get to experiment with one thing new and glossy, and brag about it on the subsequent coder meetup. Nonetheless, my expertise with it could be one thing apart from a carbon copy of your expertise. Beta software program at all times comes with further unpredictability and later modifications that will not be mirrored on this article.
Soar forward:
Establishing the brand new Alinea app with React
For some hardware-software context, I’m creating this Alinea weblog on an Apple Silicon MacBook Air M2 with 16 GB of RAM and 512 GB SSD. It’s on macOS v12.6, working Node.js v16.16. There are not any Docker photographs, no digital machine, nothing particular, and a really easy setup — which brings me to my first level.
When constructing a brand new Alinea weblog, you’ll ideally begin with a bunch utility. Right here, we are going to use a easy React app with Subsequent.js as a result of it’s very well-supported by Alinea and is higher for search engine optimisation. There’s no simpler approach to get one going than merely working everybody’s favourite React command:
npx [email protected] --typescript
To remain true to Alinea’s mission of delivering a typed answer, I believe our host app ought to be in TypeScript. The main target of this train received’t be TypeScript, and we’ll maintain that half primary. It’s additionally value noting that Alinea runs simply advantageous as a JavaScript undertaking. To allow that, rename your alinea.config.tsx file to alinea.config.js. For these new to TypeScript, I’d advocate doing that and trying out our information to utilizing TypeScript in React.
As soon as your React app is up and working, you’re set to get going with Alinea in your undertaking’s listing by putting in it with npm set up alinea.
Let’s initialize it and spin it up within the browser by typing the next into the command line: npx alinea init after which npx alinea serve. And that’s it. Finish of article. Take pleasure in your new CMS. 
OK, OK, I’m joking, in fact, however you need to respect how laughingly easy it was to get our new CMS up and working.  Clean crusing up to now, so let’s make our new CMS do some work for us!
Creating the weblog pages and kinds
There are a number of methods to go about creating blogs; a method or one other, you’ll doubtless find yourself creating pages and weblog posts. In case your weblog helps multi-tenancy — a number of authors — you’d even have an creator kind. For brevity, we’ll concentrate on pages and weblog posts.
Alinea operates based mostly on a configuration file. This may be one file or damaged up into a number of smaller configuration information. I believe the latter is a greater strategy as a result of it makes issues simpler to know and handle.
So, with out additional ado, let’s create the principle config file and every related file for our homepage, weblog web page, and weblog submit.
If you ran npx alinea init, amongst others, it created alinea.config.tsx. Let’s exchange the contents of that with one thing much more manageable, like so:
import {IcRoundInsertDriveFile} from '@alinea/ui/icons/IcRoundInsertDriveFile'
import {IcRoundPermMedia} from '@alinea/ui/icons/IcRoundPermMedia'
import {alinea, BrowserPreview, MediaSchema} from 'alinea'
import {BlogCollection, BlogPost, HomePage} from './schema'

const schema = alinea.schema({
  ...MediaSchema,
  HomePage,
  BlogCollection,
  BlogPost
})

export const config = alinea.createConfig({
  schema,
  dashboard: {
    staticFile: './public/admin.html',
    dashboardUrl: '/admin.html',
    handlerUrl: '/api/cms'
  },
  workspaces: {
    primary: alinea.workspace('Weblog', {
      supply: './content material',
      mediaDir: './public/property',
      roots: {
        pages: alinea.root('Weblog', {
          icon: IcRoundInsertDriveFile,
          comprises: ['HomePage', 'BlogCollection']
        }),
        property: alinea.root('Property', {
          icon: IcRoundPermMedia,
          comprises: ['MediaLibrary']
        })
      },
      preview({entry, previewToken}) {
        const location =
          course of.env.NODE_ENV === 'growth' ? 'http://localhost:3000' : ''
        if (['Author', 'BlogCollection'].contains(entry.kind)) return null
        return (
          <BrowserPreview
            url={`${location}/api/preview?${previewToken}`}
            prettyUrl={entry.url}
          />
        )
      }
    })
  }
})
So, let’s see what we have now right here. Firstly, we do some Alinea-specific imports and the schema information, which we have now not created but. The remainder of the file is establishing the schema and creating the configuration for the CMS. This, amongst others, additionally makes use of the schema. To make extra sense of this, let’s additionally arrange the weblog web page, the homepage, and the weblog submit, so we are able to floor them within the CMS.
In your root folder, create one other listing referred to as schema. Inside, let’s create the next 4 information:
index.tshomePage.tsblogCollection.tsblogPost.ts
Within the index.ts file, export the opposite three schema information like so:
export * from './blogCollection'
export * from './blogPost'
export * from './homePage'
Within the homePage.ts file, arrange the fields and information kind we need to have accessible within the CMS:
import {Entry} from '@alinea/core'
import alinea from 'alinea'

export const HomePage = alinea.kind('Homepage', {
  title: alinea.textual content('Title', {width: 0.5}),
  path: alinea.path('Path', {hidden: true}),
  intro: alinea.object('Intro', {
    fields: alinea.kind('Intro fields', {
      title: alinea.textual content('Intro title'),
      byline: alinea.richText('Byline')
    })
  }),
  heroPost: alinea.entry('Hero submit', {
    situation: Entry.kind.is('BlogPost')
  })
})
Very equally, within the blogCollection.ts file, we’ll arrange the kind and information as effectively. That is primarily a container for all of the weblog posts that you just’ll be creating later:
import alinea from 'alinea'


export const BlogCollection = alinea
  .kind('Weblog posts', {
    title: alinea.textual content('Title', {width: 0.5}),
    path: alinea.path('Path', {width: 0.5})
  })
  .configure({
    isContainer: true,
    comprises: ['BlogPost']
  })
And eventually, let’s have a look at the blogPost.ts itself, which defines what we are able to have as information in every submit:
import {Entry} from '@alinea/core'
import alinea from 'alinea'

export const BlogPost = alinea.kind(
  'Weblog submit',
  alinea.tabs(
    alinea.tab('Content material', {
      title: alinea.textual content('Title', {width: 0.5}),
      path: alinea.path('Path', {width: 0.5}),
      date: alinea.date('Publish date'),
      coverImage: alinea.picture('Cowl picture', {width: 0.5}),
      creator: alinea.entry('Creator', {
        width: 0.5,
        situation: Entry.kind.is('Creator')
      }),
      excerpt: alinea.richText('Excerpt'),
      content material: alinea.richText('Content material')
    }),
    alinea.tab('Metadata', {
      ogImage: alinea.picture('OG Picture')
    })
  )
)
That’s about it concerning setup and configuration for a light-weight weblog CMS. You may, in fact, construct on this primary configuration. To do this, consult with the official documentation. For now, let’s join the CMS to our frontend, the React app we created within the first steps.
Getting information to the frontend
Now, one would hope that establishing our schemas and the generated information within the .alinea folder can be sufficient to easily pull the information from the pages and posts within the CMS. Sadly, that’s not fairly sufficient. There are a number of methods to go about this, however I’ll present you the cleanest and probably easiest approach to get the information. Additionally, it’s the prompt technique in Alinea’s demo initiatives. So, let’s create just a little “API” to drag all that information.
First, create an api listing in your root folder, and inside add a file referred to as api.ts that ought to seem like this:
import {initPages} from '@alinea/content material/pages'
import {PreviewData} from 'subsequent'

export perform createApi(previewToken?: PreviewData) {
  const pages = initPages(previewToken as string)
  return {
    async getHomePage() {
      return pages.whereType('HomePage').certain()
    },
    async getPostSlugs() {
      return pages.whereType('BlogPost').choose(web page => web page.path)
    },
    async getPostBySlug(slug: string) {
      return pages.whereType('BlogPost').first(web page => web page.path.is(slug))
    },
    async getAllPosts() {
      return pages.whereType('BlogPost').choose(web page => ({
        title: web page.title,
        date: web page.date,
        path: web page.path,
        creator: web page.creator,
        coverImage: web page.coverImage,
        excerpt: web page.excerpt
      }))
    }
  }
}
All we’re actually doing right here is making our lives simpler later within the view code. As you add extra pages and content material sorts, you’ll be able to simply prolong this file with further endpoints to hook into. Neat!
Displaying the information within the views
That is in all probability probably the most concerned a part of the method, however it additionally gives you with probably the most freedom. At this level, you’re going to simply pull information through the “API” we created within the earlier step and present it on the display.
That mentioned, there’s extra to it than only a easy view file. We’ll want no less than a few pages and a few supporting elements, so in your root listing, create two extra folders: pages and elements.
Creating the pages on your Alinea weblog
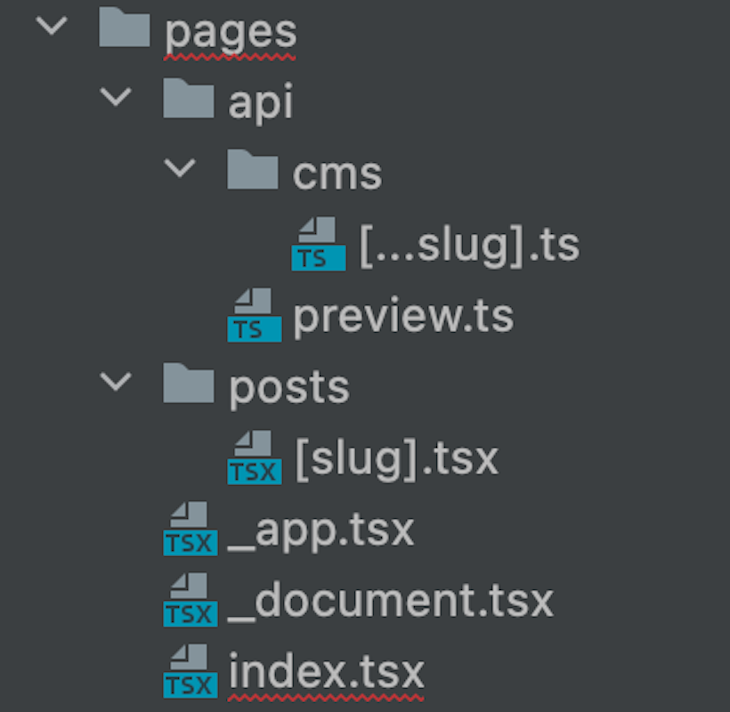
Contained in the pages folder, we’ll additionally create two extra directories: api and posts. Within the api folder, we’ll have a cms folder inside, which we’ll create a [slug].ts file, whereas in api, we’ll have one file referred to as preview.ts.
Then, within the posts folder, we’ll solely have one file, and we’ll identify it [slug].tsx. Lastly, inside pages, we’ll create three information: index.tsx, _document.tsx, and _app.tsx.
I do know, that’s quite a lot of folders and information and could also be troublesome to observe. So, right here’s a screenshot of what your folder and file construction ought to seem like:
What goes into every file is far more about React and Subsequent.js than Alinea, so I received’t go into a lot element. You’ll, nonetheless, see that there are some extra elements you’ll be able to convey into your views offered by the CMS, equivalent to RichText and TextDoc. Let’s have a look at our pages.
pages/index.tsx
There’s nothing particular occurring right here. There are a few headings and subheadings, and a hero submit for our primary web page, which is populated by the props coming from Alinea:
import {Web page} from '@alinea/content material'
import Head from 'subsequent/head'
import Hero from '../elements/hero'
import Format from '../elements/format'
import MoreBlogposts from '../elements/moreBlogposts'
import {createApi} from '../api/api'
import {RichText} from '@alinea/ui'
import {TextDoc} from 'alinea'

kind Props = {
  dwelling: Web page.Residence
  allPosts: Web page.BlogPost[]
  title: string
  byline: TextDoc
}

export default perform Index({title, byline, dwelling, allPosts}: Props) {
  const heroPost = allPosts[0]
  const morePosts = allPosts.slice(1)
  return (
    <>
      <Format>
        <Head>
          <title>{dwelling.title}</title>
        </Head>
        <div>
            <h1>
              {title}
            </h1>
            <h4>
              <RichText
                  doc={byline}
                  a={
                    <a/>
                  }
              />
            </h4>
          {heroPost && (
            <Hero
              title={heroPost.title}
              coverImage={heroPost.coverImage?.src}
              date={heroPost.date}
              slug={heroPost.path}
              excerpt={heroPost.excerpt}
            />
          )}
          {morePosts.size > 0 && <MoreBlogposts posts={morePosts} />}
        </div>
      </Format>
    </>
  )
}

export const getStaticProps = async context => {
  const api = createApi(context.previewData)
  const dwelling = await api.getHomePage()
  const allPosts = await api.getAllPosts()
  return {
    props: {dwelling, allPosts}
  }
}
pages/_document.tsx
The basis for all the opposite elements in Subsequent.js is as bog-standard because it will get. There’s nothing Alinea-specific right here to fret about. Nonetheless, make it possible for the language is about within the HTML tag as a result of it’s good for accessibility:
import {Head, Html, Fundamental, NextScript} from 'subsequent/doc'

export default perform Doc() {
  return (
    <Html lang="en">
      <Head />
      <physique>
        <Fundamental />
        <NextScript />
      </physique>
    </Html>
  )
}
pages/_app.tsx
That is only a root part, so just like the others, nothing particular is occurring. Apart from useNextPreview which allows preview within the CMS, its boilerplate Subsequent.js code:
import {useNextPreview} from '@alinea/preview/subsequent'
import {AppProps} from 'subsequent/app'

export default perform MyApp({Element, pageProps}: AppProps) {
  useNextPreview()
  return <Element {...pageProps} />
}
pages/api/cms/[...slug].ts
For this explicit file, I believe I want to offer some further context; in any other case, it seems too cryptic. The nodeHandler utility principally exports the backend deal with as a Node.js http handler, then the generated backend file will hook up with the backend. The CMS API routes are dealt with at /api/cms/[...slug] and eventually, we disable the bodyParser injected by Subsequent.js and let the handler take care of it:
import {nodeHandler} from '@alinea/backend/router/NodeHandler'
import {backend} from '@alinea/content material/backend'
export default nodeHandler(backend.deal with)
export const config = {api: {bodyParser: false}}
pages/api/preview.ts
Right here, the previewToken will get parsed from the /api/preview?token URL, which we ask Alinea to parse and validate. This can lead to entry to the URL of the entry we’re previewing. This token will get saved within the Subsequent.js context so we are able to later use it within the Subsequent route to question drafts.
Subsequent.js depends on a short lived cookie to attain and stick with this. Lastly, the redirect to the web page we really need to view does this:
import {backend} from '@alinea/content material/backend'
import kind {NextApiRequest, NextApiResponse} from 'subsequent'

export default async perform handler(
  req: NextApiRequest,
  res: NextApiResponse
) {
  const previewToken = req.url!.break up('?').pop()
    const {url} = await backend.parsePreviewToken(previewToken)

  res.setPreviewData(previewToken)

  res.redirect(url)
}
pages/posts/[slug].tsx
Once more, comparatively easy stuff. To render our particular person weblog submit, we guarantee it has a title that’s additionally seen within the browser tab. Right here, add a header picture and the physique of the submit, with props from Alinea:
import {Web page} from '@alinea/content material'
import {GetStaticPropsContext} from 'subsequent'
import ErrorPage from 'subsequent/error'
import Head from 'subsequent/head'
import {useRouter} from 'subsequent/router'
import Format from '../../elements/format'
import PostBody from '../../elements/postBody'
import PostHeader from '../../elements/postHeader'
import PostTitle from '../../elements/postTitle'
import {createApi} from '../../api/api'

kind Props = {
  submit: Web page.BlogPost
  morePosts: Web page.BlogPost[]
  preview?: boolean
}

export default perform Submit({submit, morePosts, preview}: Props) {
  const router = useRouter()
  if (!router.isFallback && !submit?.path) {
    return <ErrorPage statusCode={404} />
  }
  const title = `${submit.title} | Subsequent.js Weblog Instance with Alinea`
  return (
    <Format preview={preview}>
        <h1>Attila's Weblog</h1>
        {router.isFallback ? (
          <PostTitle>Loading...</PostTitle>
        ) : (
          <>
            <article>
              <Head>
                <title>{title}</title>
                <meta property="og:picture" content material={submit.ogImage?.src} />
              </Head>
              <PostHeader
                title={submit.title}
                coverImage={submit.coverImage?.src}
                date={submit.date}
              />
              <PostBody content material={submit.content material} />
            </article>
          </>
        )}
    </Format>
  )
}

kind Params = {
  slug: string
}

export async perform getStaticProps({
  params,
  previewData
}: GetStaticPropsContext<Params>) {
  const api = createApi(previewData)
  const submit = await api.getPostBySlug(params.slug)
  return {
    props: {submit}
  }
}

export async perform getStaticPaths(context) {
  const api = createApi(context.previewData)
  const slugs = await api.getPostSlugs()
  return {
    paths: slugs.map(slug => {
      return {
        params: {slug}
      }
    }),
    fallback: false
  }
}
You may see that we lastly made use of the API we created beforehand and the question content material from Alinea. We additionally imported many elements, which we don’t but have, so let’s sort out that within the closing step.
Constructing the elements on your Alinea weblog
Your elements could be as easy or complicated as you’d like them to be. For brevity’s sake, I attempted preserving them easy sufficient and left the browser to deal with the types for now. On the finish of the day, that is now totally React territory, so no matter you fancy doing by way of elements and styling is completely permitted. Alinea has no actual say in what you’ll be able to or can not do on the frontend.
With that mentioned, let’s create a couple of elements in our elements listing. That is simply bog-standard React and Subsequent, so I can’t clarify the small print across the view code until there’s something Alinea-specific. Your elements information ought to be:
hero.tsxformat.tsxmoreBlogposts.tsxpostBody.tsxpostHeader.tsxpostPreview.tsxpostTitle.tsx
To keep away from confusion, right here’s a screenshot of what it ought to seem like:

elements/hero.tsx
That is the hero submit part exhibiting on the principle web page, and as you’d anticipate, we simply want an picture, hyperlink, title, and physique. On this case, the excerpt is coming from Alinea whereas additionally counting on Alinea’s RichText part:
import {RichText} from '@alinea/ui'
import {TextDoc} from 'alinea'
import Hyperlink from 'subsequent/hyperlink'

kind Props = {
  title: string
  coverImage: string
  date: string
  excerpt: TextDoc
  slug: string
}

const Hero = ({title, coverImage, date, excerpt, slug}: Props) => {
  return (
    <part>
      <img src={`/property/${coverImage}`} alt="some textual content description"/>
      <h3>
        <Hyperlink as={`/posts/${slug}`} href="https://weblog.logrocket.com/posts/[slug]">
          {title}
        </Hyperlink>
      </h3>
      <p>{date}</p>
          <RichText
            doc={excerpt}
            p={<p/>}
          />
    </part>
  )
}

export default Hero
elements/format.tsx
That is as primary as a wrapper for a format can get in React. It naturally helps baby elements:
kind Props = {
  preview?: boolean
  kids: React.ReactNode
}

const Format = ({ kids }: Props) => {
  return (
    <>
        <primary>{kids}</primary>
    </>
  )
}

export default Format
elements/moreBlogposts.tsx
This part has one position and one position solely — to map over all posts and present the excerpts within the web page through the PostPreview part:
import {BlogPost} from '../schema'
import PostPreview from './postPreview'

kind Props = {
  posts: BlogPost[]
}

const MoreBlogposts = ({posts}: Props) => {
  return (
    <part>
      <h2>
        Extra Blogposts
      </h2>
      <div>
        {posts.map(submit => (
          <PostPreview
            key={submit.path}
            title={submit.title}
            coverImage={submit.coverImage?.src}
            date={submit.date}
            slug={submit.path}
            excerpt={submit.excerpt}
          />
        ))}
      </div>
    </part>
  )
}

export default MoreBlogposts
elements/postBody.tsx
The part identify is fairly self-explanatory. It’s the place we construct our weblog submit’s physique. The TextDoc is the content material itself, which then will get handed into Alinea’s RichText part as a prop:
import {RichText} from '@alinea/ui'
import {TextDoc} from 'alinea'

kind Props = {
  content material: TextDoc
}

const PostBody = ({content material}: Props) => {
  return (
    <div>
        <RichText doc={content material} />
    </div>
  )
}

export default PostBody
I hope it’s all beginning to make sense now since we’ve constructed a little bit of a sample right here. Similar to how we constructed the physique, we’ll individually construct the header for the weblog submit. Word, you don’t should do these as particular person elements, however it’s React, in spite of everything, so when you’ll be able to break issues down, you in all probability ought to:
kind Props = {
  title: string
  coverImage: string
  date: string
}

const PostHeader = ({title, coverImage, date}: Props) => {
  return (
    <>
        <h2>{title}</h2>
        <img alt="description of the picture" src={`/property${coverImage}`}/>
        <p>{date}</p>
    </>
  )
}

export default PostHeader
elements/postPreview.tsx
Right here, we have now extra picture, hyperlink, date, and excerpts that we’ve labored with earlier than. Nonetheless, this time, for the preview view. Oh, and sure, including alt textual content to pictures is one thing I extremely advocate for accessibility functions:
import {RichText} from '@alinea/ui'
import {TextDoc} from 'alinea'
import Hyperlink from 'subsequent/hyperlink'

kind Props = {
  title: string
  coverImage: string
  date: string
  excerpt: TextDoc
  slug: string
}

const PostPreview = ({
  title,
  coverImage,
  date,
  excerpt,
  slug
}: Props) => {
  return (
    <div>
        <img src={`/property/${coverImage}`} alt="some textual content description"/>
      <h3>
        <Hyperlink as={`/posts/${slug}`} href="https://weblog.logrocket.com/posts/[slug]">
          {title}
        </Hyperlink>
      </h3>
        <p>{date}</p>
      <RichText
        doc={excerpt}
        p={<p/>}
      />
    </div>
  )
}

export default PostPreview
elements/postTitle.tsx
Lastly, have a title part to go together with our physique. It’s a easy heading stage one React part that takes kids:
import { ReactNode } from 'react'

kind Props = {
  kids?: ReactNode
}

const PostTitle = ({ kids }: Props) => {
  return (
    <h1>
      {kids}
    </h1>
  )
}

export default PostTitle
The one two dependencies which are Alinea associated are the recurring RichText and TextDoc. The documentation for each of them could be discovered on the Alinea Docs web page. For this demonstration, I additionally borrowed some types from one among Alinea’s instance initiatives. Nonetheless, you’re greater than welcome so as to add your personal or clone all the undertaking and exchange it along with your content material, information sorts, and editable areas. That’s the ability of open supply proper there!  Anyhow, my closing consequence seems one thing like this:
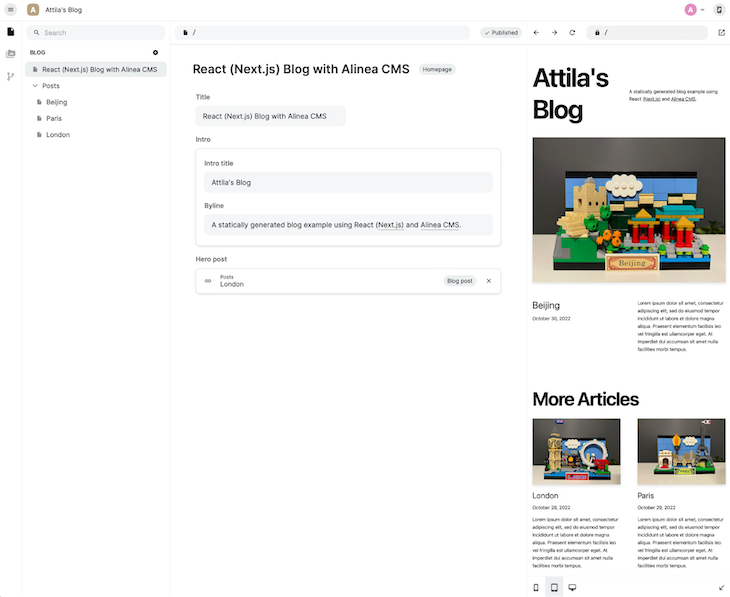
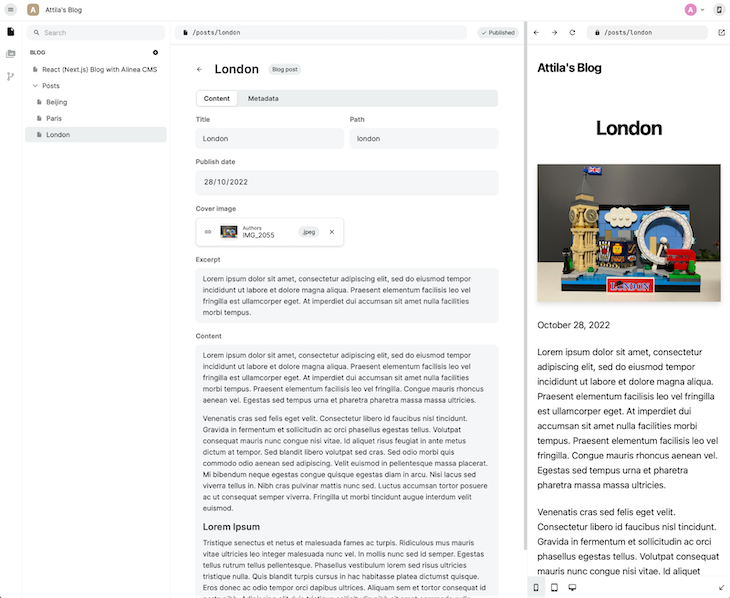
Word: The styling of the CMS itself comes by default with Alinea; no further work is critical
Ultimate ideas
Whereas this isn’t meant to be a overview of Alinea, I believe there are a few issues value taking away from constructing a weblog with the brand new CMS. First, as with each beta software program, the kinks are but to be ironed out, so throughout the growth course of, I’ve had occasions when it felt just a little brittle.
Second, the documentation isn’t fairly as much as what I’d anticipate. I needed to transfer quite a bit between the docs and instance initiatives to make sense of what was occurring and the way the varied items match collectively. Constructing a weblog with Alinea is on no account an easy expertise. Whereas it’s a promising growth, it has but to mature to develop into a substitute for every thing else.
Having mentioned all that, even in its beta state, one can construct a functioning and fairly handsome, deployable Alinea weblog, all with React and TypeScript. I counsel beginning with one of many instance initiatives, as it would prevent quite a lot of complications in these early phases.
It’s simple that Alinea’s strategy to producing an embedded SQLite database by the schemas, that are then pushed as a part of the supply code, leading to blazing-fast question occasions, is an edge over another conventional CMSs on the market. Add to that the moment previews, and you’ve got a probably successful mixture of options, ease of use, and velocity.
LogRocket: Full visibility into your manufacturing React apps
Debugging React functions could be troublesome, particularly when customers expertise points which are laborious to breed. Should you’re curious about monitoring and monitoring Redux state, routinely surfacing JavaScript errors, and monitoring sluggish community requests and part load time,
strive LogRocket.


LogRocket
combines session replay, product analytics, and error monitoring – empowering software program groups to create the best internet and cellular product expertise. What does that imply for you?
As a substitute of guessing why errors occur, or asking customers for screenshots and log dumps, LogRocket permits you to replay issues as in the event that they occurred in your personal browser to rapidly perceive what went fallacious.
No extra noisy alerting. Sensible error monitoring permits you to triage and categorize points, then learns from this. Get notified of impactful person points, not false positives. Much less alerts, far more helpful sign.
The LogRocket Redux middleware bundle provides an additional layer of visibility into your person classes. LogRocket logs all actions and state out of your Redux shops.
Modernize the way you debug your React apps —
begin monitoring without cost.
