
Desk of contents:
What are internet parts?
Internet parts are customized, reusable, and strongly-encapsulated HTML parts which might be library-agnostic and can be utilized in any JavaScript undertaking.
One instance of a preferred internet element is the <video> tag. Whereas video would possibly look like a single HTML ingredient, beneath, it consists of a number of HTML components and customized logic that defines its conduct.
Why use internet parts?
So, why use internet parts? At a excessive stage, the 2 essential benefits of internet parts are encapsulation and an absence of exterior dependencies.
Internet parts remedy the encapsulation drawback by permitting you to restrict the influence of your CSS and JavaScript code to the scope of your element.
After all, well-liked JavaScript frameworks like React and Angular assist you obtain related encapsulation results. So then, what makes internet parts particular? That query brings us to the second benefit: internet parts are library-agnostic, and you’ll create them utilizing solely inbuilt JavaScript APIs.
The library-agnostic nature of internet parts is very helpful when designing a UI element library. In contrast to different libraries constructed for particular frameworks, you should utilize internet parts to construct a library that isn’t coupled to a single know-how stack. Meaning anyone can use it, whatever the JavaScript framework they use for his or her undertaking.
Internet element specs
Usually, you’ll use three specs/applied sciences when creating internet parts:
- Customized components: An API to create HTML components to encapsulate your customized HTML, JavaScript, and CSS code
- Shadow DOM: An API to connect a hidden DOM to a component that doesn’t conflict with CSS or JavaScript code in different components of your utility
- Templates: An API for reusing a markup construction. Utilizing the
<template>tag, you may outline a markup construction that’s not instantly rendered upon web page load however is supposed to be duplicated utilizing JavaScript
To be taught extra about these specs and the way internet parts examine to JavaScript frameworks like React, try this LogRocket weblog publish.
Limitations of internet parts
Similar to any know-how, internet parts have limitations. Let’s cowl them briefly.
Internet parts require browsers to permit operating JavaScript in your internet app, even when your internet element is only presentational and doesn’t include any interactive JavaScript code.
Usually, you would want to jot down your internet parts in an crucial trend, quite than a declarative one. That leads to a considerably clunky authoring expertise, particularly when implementing extra superior strategies, like progressive enhancement. We’ll cowl this in additional element in a later part.
How WebC helps
As you’ve most likely guessed, WebC helps with a few of the pains when working with internet parts.
WebC is a serializer that generates markup for internet parts. It’s framework-agnostic and supplies varied helpful compilation instruments that make writing internet parts simpler.
As I discussed, internet parts usually require JavaScript to be obtainable, even for the online parts that don’t have any JavaScript in them. However with WebC, this isn’t the case. You’ll be able to create HTML-only internet parts that can render even when the browser has JavaScript disabled. That’s as a result of WebC takes your internet element code and compiles it to a easy HTML output.
WebC supplies a greater authoring expertise when writing internet parts. With WebC, you may create single-file internet parts which might be straightforward to jot down and keep. They consolidate your HTML, CSS, and JavaScript code and simplify the method utilizing options like templates and Shadow DOM.
And that’s simply scratching the floor: WebC has extra options and customizations that make writing internet parts a extra nice expertise. Take a look at their docs for a extra detailed overview of all of the options and choices.
Constructing customized internet parts with WebC in a vanilla JavaScript undertaking
Let’s see WebC in motion! For this tutorial, we’ll construct a customized element with a button and a field that rotates whenever you click on the button. This can be a fairly contrived instance, however it’ll nonetheless assist us illustrate the advantages of utilizing WebC.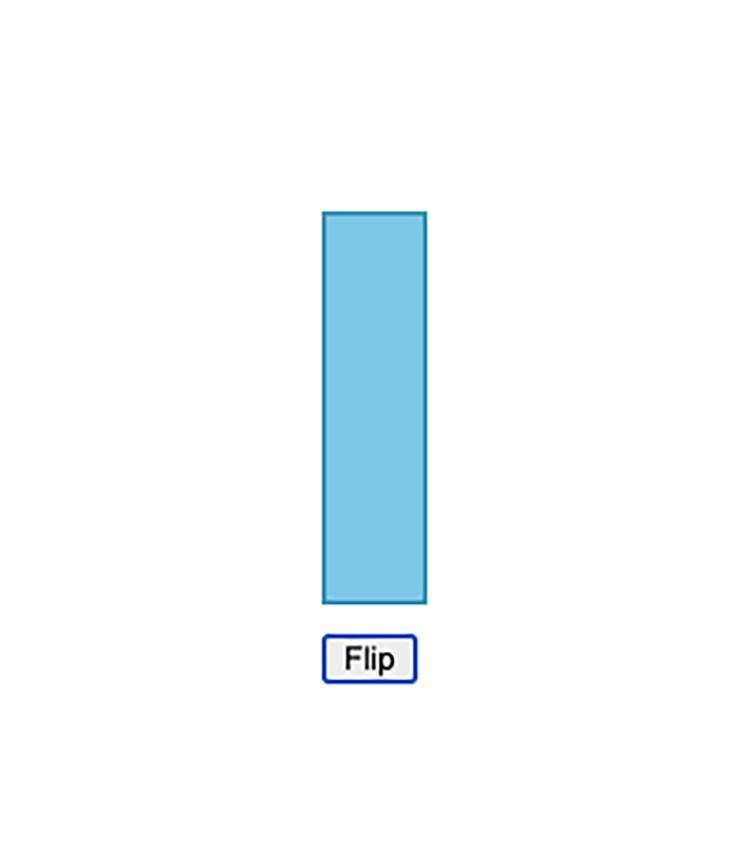
To observe alongside, first, you will have to arrange a JavaScript undertaking. I’ll use Vite to spin up a brand new undertaking rapidly.
Additionally, you will want Node.js put in; we’ll use it to run our WebC compilation script that can generate static information which Vite will serve.
When you’ve arrange your undertaking, run yarn add @11ty/webc to put in WebC. Subsequent, let’s add our essential.js script that can register the WebC web page and write its content material to index.html on the root of our undertaking:
import { WebC } from "@11ty/webc";
import fs from "fs";
let web page = new WebC();
web page.defineComponents("parts/**.webc");
web page.setInputPath("web page.webc");
let { html, css, js, parts } = await web page.compile();
fs.writeFile("./index.html", html, (err) => {
  if (err) {
    console.log({ err });
  }
});
So, right here’s what’s occurring above:
- First, we instantiate a WebC web page object. It’s the web page that can include our customized internet element
- Utilizing
web page.setInputPath("web page.webc");, we outline the content material supply for our web page. WebC pages and parts often have a.webcfile extension - Utilizing
web page.defineComponents("parts/**.webc");, we outline the folder the place we’ll maintain our internet parts - We name
web page.compile()to mixture and compile the web page’s content material right into a static HTML output - Lastly, we write the output HTML to the
index.htmlfile
Earlier than we go any additional, let’s briefly cowl the distinction between pages and parts. In WebC, pages are information that begin with <!doctype or <html and are sometimes used to show the entire web page.
Parts are some other WebC information which might be used to show reusable UI items or fragments.
Now, let’s create our web page.webc file and check out operating our script. The file will include a fundamental HTML web page setup:
<!-- HTML-->
<!DOCTYPE html>
<html lang="en">
  <head>
    <meta charset="UTF-8">
    <meta http-equiv="X-UA-Suitable" content material="IE=edge">
    <meta title="viewport" content material="width=device-width, initial-scale=1.0">
    <title>WebC tutorial</title>
  </head>
  <physique>
    <my-component></my-component>
  </physique>
  <model>
    physique {
      padding: 20%;
    }
  </model>
</html>
You might need observed that this seems similar to our commonplace HTML, and that’s as a result of it’s! With WebC, you utilize common HTML, JavaScript, and CSS, aside from a number of circumstances the place you’d want so as to add some WebC syntax.
Now let’s attempt operating our script. You’ll be able to run it merely utilizing the node essential.js command. For a greater developer expertise although, I like to recommend utilizing nodemon. It should decide up any adjustments you make to your script and routinely re-run the file.
Right here’s the nodemon command I’m utilizing for this tutorial:
nodemon essential.js -e js,webc,html
Subsequent, let’s add our internet element by creating the parts folder and putting the my-component.webc file there. Let’s add the next content material:
<!-- HTML-->
<div id="rectangle"></div>
<button id="flipper">Flip</button>
<model webc:scoped>
  #rectangle {
    background-color: skyblue;
    width: 40px;
    peak: 160px;
    border: 2px #4ba3c6 stable;
  }

  button {
    margin-top: 12px;
    width: 40px;
  }
</model>
Once more, we’re utilizing easy HTML and CSS to arrange and magnificence the button and the div for our field.
Utilizing the webc:scoped attribute in model tags
One notable half from the instance above is the webc:scoped attribute in our model tag. This tag permits you to encapsulate your CSS code inside your element.
Whenever you add this attribute to a model tag, WebC will routinely generate and assign a singular hashed string class to your element ingredient through the compilation. It then prefixes that hash string in entrance of the entire CSS selectors you declare inside your element.
Extra nice articles from LogRocket:
Standard styling libraries like emotion and styled-components use an identical hash-generating mechanism to include styling inside customized parts.
Including JavaScript performance to our internet element
To date, we’ve outlined how our internet element seems, nevertheless it doesn’t do a lot. Let’s add some JavaScript code for interactions.
In the identical internet element, proper beneath the model tag, add a script tag with the next JavaScript code:
<!-- HTML-->
<script>
  let deg = 0;
  doc.getElementById("flipper").onclick = () => {
    const rectangle = doc.getElementById("rectangle");
    const nextDeg = deg === 0 ? 90 : 0;
    rectangle.model.remodel = `rotate(${nextDeg}deg)`
    deg = nextDeg;
  }
</script>
Right here we’re merely including an onclick listener to our button that rotates the rectangle by updating the remodel model attribute. Discover that we didn’t need to outline our internet element globally utilizing customElements.outline; we merely added the JavaScript code to energy our button.
And that’s all there’s to it. Now we’ve a functioning, albeit easy internet element. If you happen to had been to flip off JavaScript to your native server utilizing an extension, our internet element would nonetheless be displayed, though the button received’t do something.
Progressive enhancement with WebC
One other highly effective function of WebC is simplifying the method of including progressive enhancements to your app.
Progressive enhancement is a sample that enables the customers to entry the fundamental content material and performance of an internet site first. Afterward, if the consumer’s browser options and web connection permits, usersl obtain UI enhancements and extra interactive options.
Let’s add a easy progressive enhancement therapy to our element by disabling the button till JavaScript is on the market.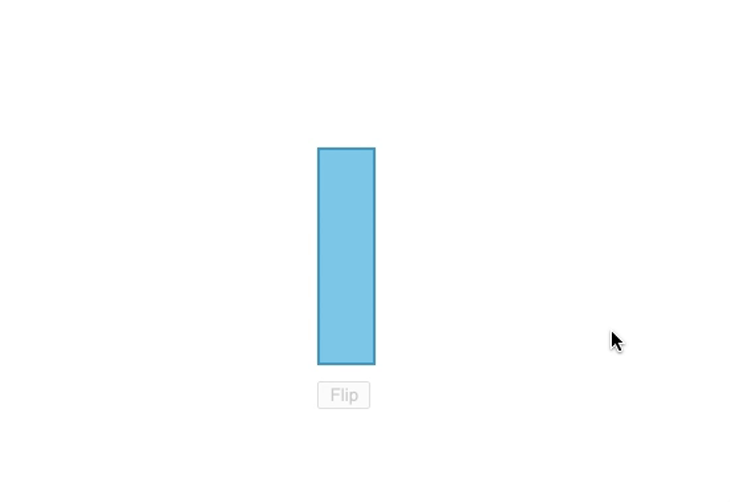
First, we have to replace the code in our script tag:
<!-- HTML-->
<script>
  let deg = 0;
  class MyComponent extends HTMLElement {
    connectedCallback() {
      doc.getElementById("flipper").onclick = () => {
        const rectangle = doc.getElementById("rectangle");
        const nextDeg = deg === 0 ? 90 : 0;
        rectangle.model.remodel = `rotate(${nextDeg}deg)`
        deg = nextDeg;
      }
    }
  }
  window.customElements.outline("my-component", MyComponent)
</script>
Right here, we used the usual sample for outlining an online element utilizing window.customElements.outline so as to have the ability to anticipate JavaScript to change into obtainable.
Now let’s add the CSS therapy to our button:
<!-- HTML-->
<model webc:scoped>
  #rectangle {
    background-color: skyblue;
    width: 40px;
    peak: 160px;
    border: 2px #4ba3c6 stable;
  }

  button {
    margin-top: 12px;
    width: 40px;
  }

  :host:not(:outlined)>button {
    opacity: 0.2;
    cursor: not-allowed;
  }
</model>
As you may see, we’re utilizing the :host:not(:outlined) selector. This selector comes from the Shadow DOM API and permits you to outline particular styling to your internet parts whereas they’re loading.
WebC does put its personal spin on it, although: when your code is compiled, it’ll substitute the :host half with the generated hash string class.
Now, should you had been to show off JavaScript to your native server, you will notice that the button is greyed out, and it’s extra apparent that the button doesn’t do something.
You could possibly use the identical sample to offer your internet web page any progressive enhancement therapy you need.
Conclusion
That’s it for this publish. We went over internet parts, their use circumstances, and the way they examine in opposition to JavaScript frameworks.
As well as, we mentioned how WebC alleviates a few of the drawbacks of internet parts and helps us reap their full advantages.
LogRocket: Debug JavaScript errors extra simply by understanding the context
Debugging code is all the time a tedious job. However the extra you perceive your errors the simpler it’s to repair them.
LogRocket permits you to perceive these errors in new and distinctive methods. Our frontend monitoring answer tracks consumer engagement together with your JavaScript frontends to provide the capacity to search out out precisely what the consumer did that led to an error.

LogRocket information console logs, web page load instances, stacktraces, gradual community requests/responses with headers + our bodies, browser metadata, and customized logs. Understanding the influence of your JavaScript code won’t ever be simpler!
