The command line has 1000’s of instruments, comparable to awk, sed, grep, and discover obtainable at your disposal that reduce improvement time and automate tedious duties. Making a command line device in Node.js isn’t very sophisticated, because of a strong library like Commander.js.
Pairing Node.js with TypeScript helps you catch bugs early throughout the improvement course of so as to ship CLIs which can be extra dependable and have fewer bugs.
On this tutorial, we are going to speak in regards to the CLI is and the way to use Commander.js with TypeScript to construct one. We are going to then make the CLI globally accessible in order that customers can entry it anyplace of their system.
Bounce forward:
Conditions
To observe this tutorial, you’ll need:
Why Commander.js?
A command-line interface, also known as a CLI, is a program that enables customers to kind directions and work together with a script that processes the enter and produces an output. Node.js has a whole lot of packages that means that you can construct CLIs, like args, minimist, and oclif.
Commander.js offers a whole lot of options that mean you can succinctly construct command-line interfaces. Moreover, the Node.js group offers libraries comparable to Chalk and Figlet that complement Commander.js CLIs to make them look visually interesting.
We are going to use Commander.js due to the next options:
- Help for sub-commands
- Help for varied command-line choices, comparable to required, variadic, or non-compulsory
- Customized occasion listeners
- Automated assist
Understanding the command-line interface
Earlier than we dive into constructing CLIs, let’s have a look at how an present CLI works.
If you’re following this tutorial, you in all probability have Node.js put in in your machine. Node.js offers a CLI that you would be able to entry by typing node within the terminal:
node
Typing the command means that you can entry the Node.js learn–eval–print loop (REPL) the place you may enter and execute JavaScript code.
You possibly can modify the Node.js CLI to do one thing else with using command-line flags, or choices. Exit the REPL with CTRL+D, then examine the Node.js model with the -v choice:
node -v
// v18.11.0
As you may see within the output, passing the -v choice modified the habits of the node CLI to indicate the Node.js model. You may as well the long-form choices:
node --version
// v18.11.0
Different Node.js CLI choices require an argument to be handed together with the choice. For instance, the -e choice, which is a brief type of --eval, accepts an argument of a string that comprises JavaScript code. Node executes the code and logs the end result within the terminal:
node -e "console.log(4 * 2)"
// 8
The -e choice returns an error if no argument is handed:
node -e
// node: -e requires an argument
Now that we’ve got an concept of how a CLI works. Let’s have a look at the Commander.js terminology for the Node CLI choices we’ve got seen far:
- Boolean choice: These choices don’t require arguments.
-vis an instance of a boolean choice; different acquainted examples arels -lorsudo -i - Required choice: These choices require arguments. For instance,
node -e "console.log(4 * 2)"throws an error if an argument isn’t handed - Choice-argument: These are the arguments handed to an choice. Within the
node -e "console.log(4 * 2)"command,"console.log(4 * 2)"is an option-argument; one other instance isgit standing -m "commit message", the place the"commit message"is an option-argument for the-mchoice
Now that you’ve an concept of what a CLI is, we are going to create a listing and configure it to make use of TypeScript and Commander.js.
Getting began and configuring TypeScript
On this part, we are going to create a listing for the undertaking, initialize it as an npm package deal, set up all the mandatory dependencies, and configure TypeScript.
To start, create the listing for the undertaking:
mkdir directory_manager
Grow to be the listing:
cd directory_manager
Initialize the listing as an npm undertaking:
npm init -y
This creates a package deal.json file, which comprises vital details about your undertaking and monitor dependencies.
Subsequent, run the next command:
npm set up commander figlet
Commander.js is our library for constructing a CLI, and Figlet can be used for turning CLI textual content into ASCII artwork.
Subsequent, obtain the TypeScript and ts-node packages:
npm set up @sorts/node typescript --save-dev
Now, create a tsconfig.json file in your textual content editor and add the next configuration settings for TypeScript:
{
  "compilerOptions": {
    "rootDir": "src",
    "outDir": "dist",
    "strict": true,
    "goal": "es6",
    "module": "commonjs",
    "sourceMap": true,
    "esModuleInterop": true,
    "moduleResolution": "node"
  }
}
Let’s go over among the choices:
rootDir: A listing that can include the TypeScript recordsdata(.tsrecordsdata) for the CLI, which we’ll preserve within thesrclistingoutDir: A listing that can include TypeScript-compiled JavaScript supply code. We are going to use thedistlistingstrict: This disables non-compulsory typing and ensures that each one the TypeScript code you write has sortsgoal: The model of ECMAScript to which TypeScript ought to compile JavaScript
For a complete have a look at all of the choices, go to the TypeScript documentation.
Subsequent, within the package deal.json file, create a construct script that you’ll use to compile TypeScript:
{
  ...
  "scripts": {
    // add the next line
    "construct": "npx tsc",
    "check": "echo "Error: no check specified" && exit 1"
  },
  ...
}
To compile TypeScript, you’ll run the construct script with npm run construct, which can run the npx tsc command that compiles TypeScript to JavaScript.
We’ve now configured TypeScript and added a script for compiling TypeScript. We are going to begin constructing a CLI subsequent.
Making a CLI with TypeScript
On this part, we are going to start constructing a CLI utilizing TypeScript and Commander.js. It would look as follows:
The CLI can be used to handle a listing and it’ll have a -l choice that can checklist listing contents in a desk format. For every merchandise, it is going to show its identify, measurement, and date of creation. It would even have a -m for creating directories and a -t choice for creating empty recordsdata.
Now that you’ve an concept of what we can be constructing, we are going to break the CLI into smaller chunks and begin constructing every half.
Creating the identify of the CLI
On this part, we are going to create the identify of the CLI and use the Figlet package deal to show it into ASCII artwork textual content.
It would appear to be this when completed:

In your undertaking listing, create the src listing and navigate into it:
mkdir src && cd src
This listing will include the TypeScript recordsdata. You would possibly recall, we specified this listing within the rootDir choice after we configured TypeScript with the tsconfig.js file earlier within the tutorial.
Subsequent, create an index.ts file and add the next contents:
const figlet = require("figlet");

console.log(figlet.textSync("Dir Supervisor"));
Within the first line, we import the Figlet module. Subsequent, we invoke the figlet.textSync() technique with the string Dir Supervisor because the argument to show the textual content into ASCII Artwork. Lastly, we log the textual content within the console.
To confirm that the adjustments work, save your file. Compile the TypeScript file to JavaScript with the next command:
npm run construct
When TypeScript finishes compiling, you will note output like this:
// output
> [email protected] construct
> npx tsc
If profitable, you received’t see any errors right here.
You may additionally recall, we added an outDir choice and set it to the dist listing within the tsconfig.json file. After compiling TypeScript, the listing can be created mechanically within the root listing.
Extra nice articles from LogRocket:
Grow to be the dist listing:
cd ../dist
Listing the listing contents:
ls

// output
index.js  index.js.map
You will note that the index.js file has been created. You possibly can run the file with Node.js as follows:
node index.js
Upon operating the command, you will note the CLI identify in ASCII artwork:

Now, return to the foundation listing:
cd ..
Going ahead, we received’t log into the dist listing to run the file. We are going to do it whereas within the root listing as node dist/index.js.
Now that you would be able to create the identify of the CLI in ASCII textual content, we are going to create the CLI choices.
Creating the CLI choices utilizing Commander.js
On this part, we are going to use Commander.js to create an outline for the CLI and its choices.
We are going to create the next choices:

The -V choice will invoke the Commander.js model() technique, and the -h can be supplied by default. We at the moment are left to outline three choices:
-l/--ls: Modifies the CLI to checklist listing contents in a desk. It would additionally settle for an non-compulsory listing path argument-m/--mkdir: Used to create a listing. It would require an option-argument, which is the identify of the listing to be created-t/--touch: Modifies the CLI to create an empty file. It would require an option-argument, which is the identify of the file
Now that we all know the choices we’ll be creating, we are going to outline them utilizing Commander.js.
Defining choices utilizing Commander.js
In your textual content editor, open the index.ts file and add the next code to import and initialize Commander.js:
const { Command } = require("commander"); // add this line
const figlet = require("figlet");

//add the next line
const program = new Command();

console.log(figlet.textSync("Dir Supervisor"));
Within the first line, we import the Commander.js module and extract the Command class. We then set the program variable to an occasion of the Command class. The category offers us a number of strategies that can be utilized to set the model, description, and CLI choices.
Subsequent, outline the CLI choices in your index.ts file:
...

program
  .model("1.0.0")
  .description("An instance CLI for managing a listing")
  .choice("-l, --ls  [value]", "Listing listing contents")
  .choice("-m, --mkdir <worth>", "Create a listing")
  .choice("-t, --touch <worth>", "Create a file")
  .parse(course of.argv);

const choices = program.opts();
Within the previous code, we use the program variable containing the Commander occasion to invoke the model() technique. The strategy takes a string containing the model of the CLI and Commander creates the -V choice for you.
Subsequent, we chain the description() technique name with the textual content that describes the CLI program. Following this, you chain a name to the choice() technique of Commander package deal, which takes two arguments: an choice and an outline. The primary argument is a string that specifies the -l choice and the lengthy identify --ls. We then wrap worth in [] in order that the choice can settle for an non-compulsory argument. The second argument is the assistance textual content that can be proven when customers use the -h flag.
After that, we chain one other choice() technique name to outline the -m / --mkdir choice. The <> within the <worth> signifies that it requires an argument. Following this, we chain one other choice() to outline the -t choice and the lengthy identify --touch, which additionally requires an argument.
We then chain the parse() technique name, which processes the arguments within the course of.argv, which is an array containing the arguments the consumer handed. The primary argument is node, the second argument is this system filename, and the remaining are further arguments.
Lastly, we set the choices variable to the program.opts() name, which returns an object. The thing has CLI choices as properties, whose values are the arguments the consumer handed.
At this level, the index.ts file will appear to be the next:
const { Command } = require("commander");
const figlet = require("figlet");

const program = new Command();

console.log(figlet.textSync("Dir Supervisor"));

program
  .model("1.0.0")
  .description("An instance CLI for managing a listing")
  .choice("-l, --ls  [value]", "Listing listing contents")
  .choice("-m, --mkdir <worth>", "Create a listing")
  .choice("-t, --touch <worth>", "Create a file")
  .parse(course of.argv);

const choices = program.opts();
When you find yourself completed making adjustments, save the file, then compile TypeScript:
npm run construct
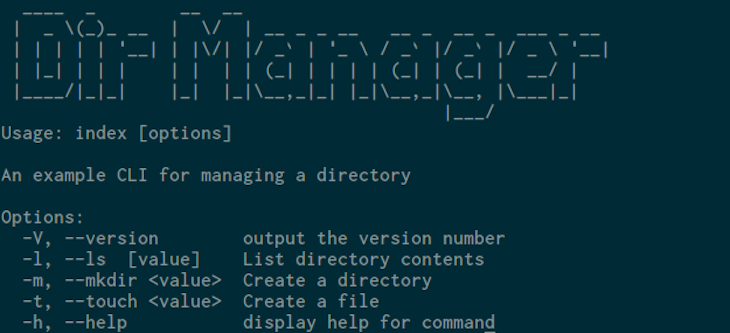
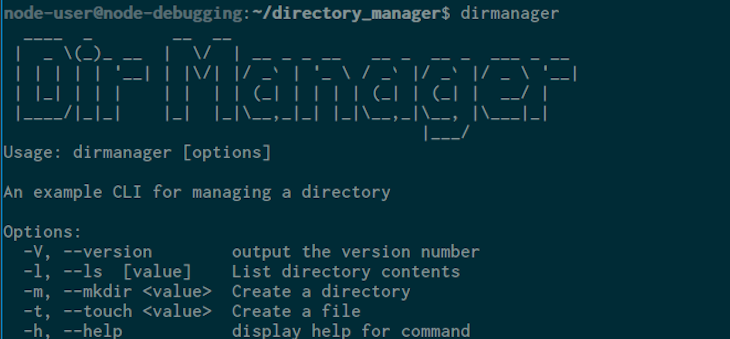
Run the index.js with the -h choice to see the CLI assist web page:
node dist/index.js -h
Upon operating the command, the web page will appear to be this:

Let’s additionally attempt the -V choice:
node dist/index.js -V
// 1.0.0
Up to now, the -h and the -V choice work with none points. Should you attempt the opposite choices we outlined, you’ll solely see the CLI identify.
node dist/index.js -l

That is taking place as a result of we’ve got not outlined the actions for the opposite choices.
Creating actions for the CLI
Up to now, we’ve got outlined choices for the CLI however they don’t have any actions related to them. On this part, we are going to create actions for the choices in order that when a consumer makes use of the choices, the CLI will carry out the related job.
We are going to start with the -l choice. We would like the CLI to indicate listing contents in a desk with the next fields:
- Filename
- Measurement(KB)
created_at
A consumer can even present an non-compulsory listing path:
node dist/index.js -l /residence/username/Paperwork
If the consumer doesn’t cross any option-argument, the CLI will solely present contents within the location of the index.js file we’re executing:
node dist/index.js -l
In your index.ts file, import the fs and path modules:
const { Command } = require("commander");
// import fs and path modules
const fs = require("fs");
const path = require("path");
const figlet = require("figlet");
Outline a listDirContents() operate with an exception handler on the finish of the file:
const { Command } = require("commander");
...
const choices = program.opts();

//outline the next operate
async operate listDirContents(filepath: string) {
  attempt {

  } catch (error) {
    console.error("Error occurred whereas studying the listing!", error);
  }
}
The listDirContents() asynchronous operate takes a filepath parameter, which has a TypeScript kind declaration of string. The sort ensures that the operate solely accepts strings as arguments, and the async key phrase you prefix makes the operate asynchronous. This may permit us to make use of the await key phrase contained in the operate, which we’ll do quickly.
Inside the operate, we outline the attempt block, which is empty for now. It would include the performance that lists the listing contents and format the end result right into a desk. After that, we outline the catch block that can log a message within the console if the code contained within the attempt block has an exception.
Let’s add the code that lists the listing contents within the listDirContents() operate:
async operate listDirContents(filepath: string) {
  attempt {
    // add the next
    const recordsdata = await fs.guarantees.readdir(filepath);
    const detailedFilesPromises = recordsdata.map(async (file: string) => {
      let fileDetails = await fs.guarantees.lstat(path.resolve(filepath, file));
      const { measurement, birthtime } = fileDetails;
      return { filename: file, "measurement(KB)": measurement, created_at: birthtime };
    });
  } catch (error) {
    console.error("Error occurred whereas studying the listing!", error);
  }
}
First, we name fs.guarantees.readdir() with the worth within the filepath parameter to learn the listing contents. The operate returns a promise, so we prefix it with the await key phrase to attend for it to resolve. As soon as resolved, recordsdata is about to an array.
Second, we iterate over every factor within the recordsdata array and return a brand new array utilizing the map() technique, which takes an asynchronous callback. The callback accepts the file parameter. Within the callback, we invoke fs.guarantees.lstat() with the total path of the file to get extra particulars in regards to the file, comparable to measurement, birthtime, and information. We then extract the measurement and birthtime properties and the return an object with the filename, measurement(KB), and created_at properties into the array that the map() technique returns into the detailedFilesPromise variable.
Now, add the next code in the direction of the top of the attempt block to create a desk that shows the listing contents:
async operate listDirContents(filepath: string) {
  attempt {
    const recordsdata = await fs.guarantees.readdir(filepath);
    const detailedFilesPromises = recordsdata.map(async (file: string) => {
      let fileDetails = await fs.guarantees.lstat(path.resolve(filepath, file));
      const { measurement, birthtime } = fileDetails;
      return { filename: file, "measurement(KB)": measurement, created_at: birthtime };
    });
    // add the next
    const detailedFiles = await Promise.all(detailedFilesPromises);
    console.desk(detailedFiles);
  } catch (error) {
    console.error("Error occurred whereas studying the listing!", error);
  }
}
Now, every factor within the the detailedFilesPromise will return a promise and consider to an object as soon as resolved. To attend for all of them to resolve, we name the Promise.all() technique.
Lastly, we invoke console.desk() with the detailedFiles array to log the info within the console.
Let’s now outline an motion for the -m choice. To try this, outline the createDir() operate beneath the listDirContents() operate:
async operate listDirContents(filepath: string) {
  ...
}

// create the next operate
operate createDir(filepath: string) {
  if (!fs.existsSync(filepath)) {
    fs.mkdirSync(filepath);
    console.log("The listing has been created efficiently");
  }
}
Within the CreateDir() operate, we examine if the given listing path exists. If it doesn’t exist, we name fs.mkdirSync() to create a listing, then log a hit message.
Earlier than we invoke the operate, outline a createFile() operate for the -t flag:
async operate listDirContents(filepath: string) {
  ...
}

operate createDir(filepath: string) {
  ...
}
// create the next operate
operate createFile(filepath: string) {
  fs.openSync(filepath, "w");
  console.log("An empty file has been created");
}
Within the createFile() operate, we invoke fs.openSync() to create an empty file within the given path. We then log a affirmation message to the terminal.
Up to now, we’ve got created three capabilities however we haven’t known as them. To try this, we have to examine if the consumer has used the choice, in order that we will invoke the appropriate operate.
To examine if the consumer has used the -l or --ls choice, add the next in index.ts:
...
operate createFile(filepath: string) {
  ...
}
// examine if the choice has been used the consumer
if (choices.ls) {
  const filepath = typeof choices.ls === "string" ? choices.ls : __dirname;
  listDirContents(filepath);
}
If choices.ls is about to a price, we set the filepath variable to the trail the consumer supplied, if choice.ls is a string; in any other case, it’s set to the file path of the index.js file within the dist listing. After that, we name the listDirContents() with the filepath variable.
Let’s now invoke the createDir() and createFile() operate when the consumer makes use of the suitable choice:
if (choices.ls) {
  ...
}

// add the next code
if (choices.mkdir) {
  createDir(path.resolve(__dirname, choices.mkdir));
}
if (choices.contact) {
  createFile(path.resolve(__dirname, choices.contact));
}
If the consumer makes use of the -m flag and passes an argument, we invoke createDir() with the total path to the index.js file to create the listing.
If the consumer makes use of the -t flag and passes an argument, we invoke the createFile() operate with the total path to the index.js location.
At this level, the whole index.ts file will appear to be this:
const { Command } = require("commander");
const fs = require("fs");
const path = require("path");
const figlet = require("figlet");

const program = new Command();

console.log(figlet.textSync("Dir Supervisor"));

program
  .model("1.0.0")
  .description("An instance CLI for managing a listing")
  .choice("-l, --ls  [value]", "Listing listing contents")
  .choice("-m, --mkdir <worth>", "Create a listing")
  .choice("-t, --touch <worth>", "Create a file")
  .parse(course of.argv);

const choices = program.opts();

async operate listDirContents(filepath: string) {
  attempt {
    const recordsdata = await fs.guarantees.readdir(filepath);
    const detailedFilesPromises = recordsdata.map(async (file: string) => {
      let fileDetails = await fs.guarantees.lstat(path.resolve(filepath, file));
      const { measurement, birthtime } = fileDetails;
      return { filename: file, "measurement(KB)": measurement, created_at: birthtime };
    });
    const detailedFiles = await Promise.all(detailedFilesPromises);
    console.desk(detailedFiles);
  } catch (error) {
    console.error("Error occurred whereas studying the listing!", error);
  }
}
operate createDir(filepath: string) {
  if (!fs.existsSync(filepath)) {
    fs.mkdirSync(filepath);
    console.log("The listing has been created efficiently");
  }
}

operate createFile(filepath: string) {
  fs.openSync(filepath, "w");
  console.log("An empty file has been created");
}

if (choices.ls) {
  const filepath = typeof choices.ls === "string" ? choices.ls : __dirname;
  listDirContents(filepath);
}
if (choices.mkdir) {
  createDir(path.resolve(__dirname, choices.mkdir));
}
if (choices.contact) {
  createFile(path.resolve(__dirname, choices.contact));
}
Save your file and compile TypeScript:
npm run construct
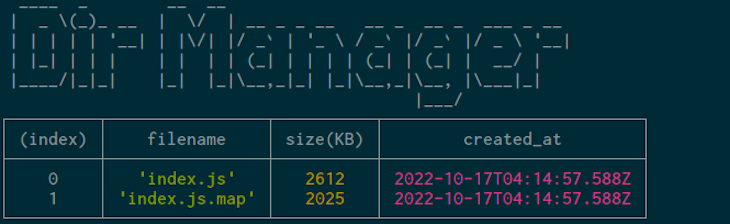
Let’s confirm that the choices work. In your terminal, enter the next to attempt the -l choice:
node dist/index.js -l
You will note the listing contents in a desk that appears much like this:
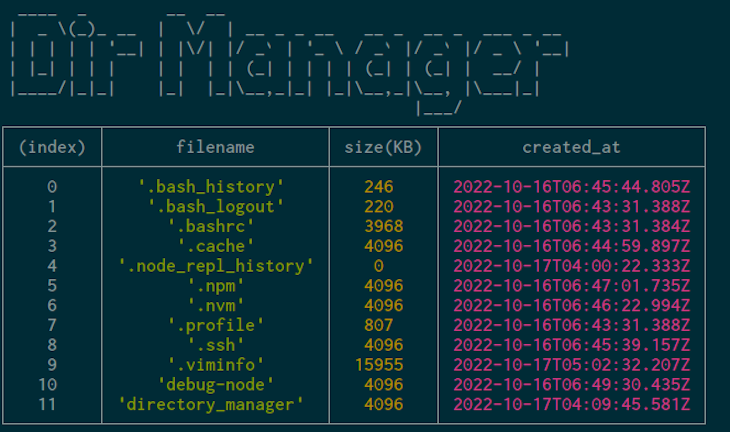
Subsequent, cross the listing path of your selecting as an argument:
node dist/index.js -l /residence/node-user/
Within the output, you will note the listing contents of your chosen path:
Utilizing the -m choice, create a brand new listing with any identify you favor:
node dist/index.js -m new_directory
// The listing has been created efficiently
Let’s additionally create an empty file utilizing the -t choice:
node dist/index.js -t empty_file.txt
// An empty file has been created
Following this, let’s examine if the listing and the empty file have been created with the next:
node dist/index.js -l
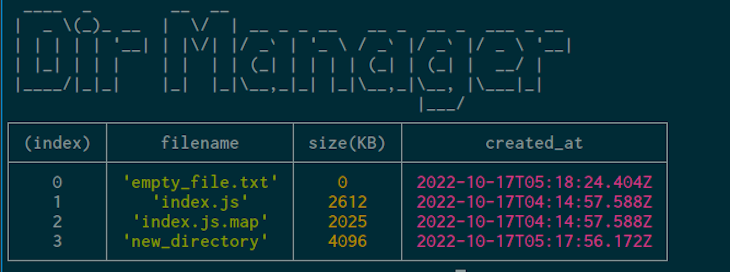
The output exhibits the new_directory and the empty_file.txt file, confirming that they had been created.
Now, for those who use the node dist/index.js command with none choice, it is going to present the CLI identify:
node dist/index.js

Displaying the assistance web page
It will be a good suggestion to indicate the assistance web page when no choices have been handed. Within the index.ts file, add the next on the finish of the file:
...
if (!course of.argv.slice(2).size) {
  program.outputHelp();
}
If the variety of arguments handed is the same as two — that’s, course of.argv has solely node and the filename because the argument — you may invoke outputHelp() to indicate the output.
As with every adjustments, compile TypeScript to JavaScript:
npm run construct
Run the next command:
node dist/index.js

Making the CLI globally accessible
At this level, our CLI is now full. You would possibly discover that utilizing the CLI is tedious. Each day, we must change the listing into the CLI undertaking listing, then invoke index.js to make use of it. It will be simpler if we might give it a reputation like dirmanager that works anyplace in our system, like so:
dirmanager -l
To do that, open the package deal.json file and add the next:
{
  ...
  "predominant": "dist/index.js",
  "bin": {
    "dirmanager": "./dist/index.js"
  },
  ...
}
Within the previous code, we replace predominant to the compiled index.js file. You then add bin with an object as its worth. Within the object, we set dirmanager to ./dist/index.js, which is the placement of the compiled script. We can be utilizing dirmanager to entry the CLI, however you should utilize any identify you want.
Subsequent, open the index.ts file and add the next line on the high of the file:
#! /usr/bin/env node

const { Command } = require("commander");
const fs = require("fs");
The road known as a shebang line, which tells the OS to run the file with the node interpreter.
Save your file and compile TypeScript as soon as extra:
npm run construct
Run the next command:
npm set up -g .
The -g choice tells npm to put in the package deal globally.
At this level, you may open a brand new terminal or use the present terminal, then enter the next command:
dirmanager
You may as well attempt the opposite choices and they’ll work effective:
dirmanager -l
We’ve now efficiently created a TypeScript CLI that works anyplace within the system.
Conclusion
On this article, we checked out what a CLI is after which used Commander.js and TypeScript to construct a CLI. We then made the CLI globally accessible anyplace within the system. Now you’re geared up with data on the way to create CLIs with TypeScript.
As a subsequent step, you may go to the Commander documentation to study extra about it. To proceed your TypeScript journey, go to the TypeScript documentation. You may as well try TypeScript tutorials on this weblog.
200’s solely  Monitor failed and gradual community requests in manufacturing
Deploying a Node-based net app or web site is the simple half. Ensuring your Node occasion continues to serve assets to your app is the place issues get harder. Should you’re curious about guaranteeing requests to the backend or third social gathering companies are profitable, attempt LogRocket.  https://logrocket.com/signup/
LogRocket is sort of a DVR for net and cell apps, recording actually every part that occurs whereas a consumer interacts together with your app. As an alternative of guessing why issues occur, you may combination and report on problematic community requests to shortly perceive the foundation trigger.
LogRocket devices your app to report baseline efficiency timings comparable to web page load time, time to first byte, gradual community requests, and likewise logs Redux, NgRx, and Vuex actions/state. Begin monitoring without cost.
