Reside streaming is an effective way to interact with audiences ranging anyplace from one individual to thousands and thousands in real-time. In contrast to video conferences the place anybody can share their display screen or converse at any time, in stay streaming, viewers have restricted permissions. Implementing stay streaming from scratch could be time-consuming, however there are providers that we are able to use so as to add this function with only a few steps, considered one of which is 100ms.
On this tutorial, we’ll find out about 100ms by constructing a stay streaming app with an interactive function the place broadcasters and viewers can talk utilizing chat.
To observe together with this tutorial, you have to be aware of React and React Hooks. You must also have Node.js put in in your system.
The complete code for this tutorial is on the market on GitHub. Let’s get began!
Introduction to 100ms
100ms is a cloud platform that enables builders so as to add video and audio conferencing to internet, Android, and iOS purposes. It supplies REST APIs, SDKs, and a dashboard that makes it easy to seize, distribute, file, and render stay interactive audio and video.
Utilizing 100ms to construct a stay app is kind of easy, involving simply two main steps. The primary is creating and configuring a template within the dashboard with roles and settings for the app and its customers.
The template configuration will probably be completely different relying on what sort of app you’re constructing, video convention, digital occasion, or stay streaming. For instance, in a stay streaming app, streamers or broadcasters can share video, audio, or their display screen, whereas a viewer can’t do any of the above. We’ll set all this up within the template.
As an alternative of making a customized template, we are able to select from the out there starter kits that have already got the suitable configurations for several types of stay apps and simply add a little bit high-quality tuning. After organising the template, we’ll use the SDK with its intuitive strategies, hooks, and selectors on the shopper aspect to combine and work with 100ms.
Earlier than getting began, you have to be aware of the 100ms ideas under:
- Room: Once we be a part of an audio or video name, the members are mentioned to be in a room
- Peer: A participant within the audio or video name. You’re the native peer, whereas others are distant friends
- Observe: There are two forms of tracks a peer can have, audio and video
Establishing 100ms
To arrange the stay streaming template, navigate to 100ms and arrange a person account within the browser. When logged in, click on Create Your First App on the dashboard and a modal will seem the place we are able to create a customized template or select one which has already been created:
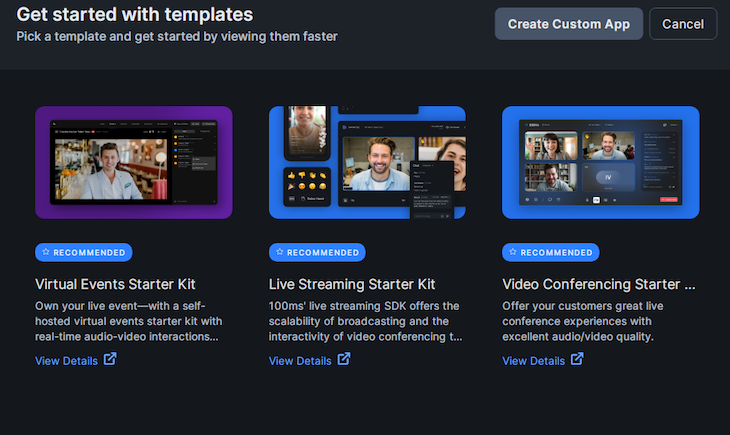
As an alternative of making a brand new template, we’ll use the stay streaming app starter equipment. Hover on the Reside Streaming Starter Equipment template and click on on the Deploy now button that seems. You’ll see the next:
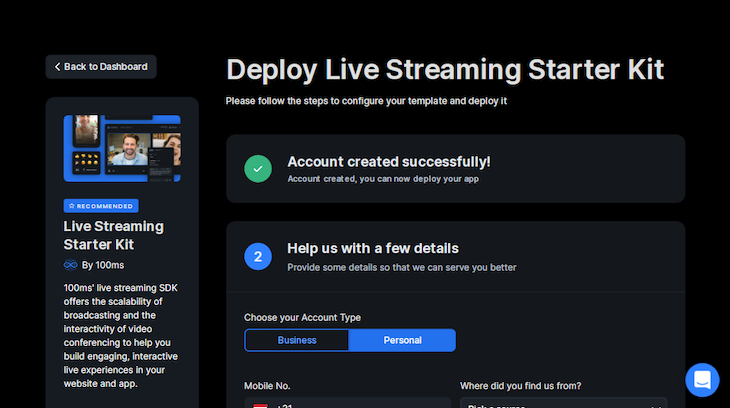
Within the Select your Account Sort space, choose Private, then click on Subsequent, and also you’ll see the next:
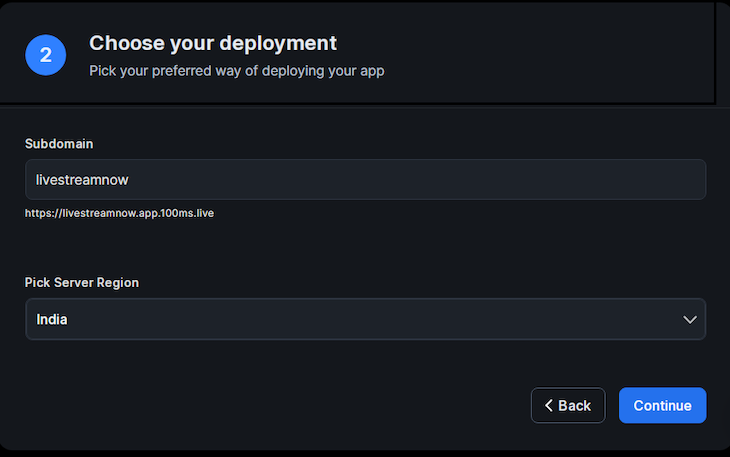
We have to enter a singular subdomain. For this, I’ll enter livestreamnow, however you should utilize some other identify. After that, click on Proceed. With this, a stay streaming starter equipment has been created, and also you’ll see it after we navigate to our dashboard:
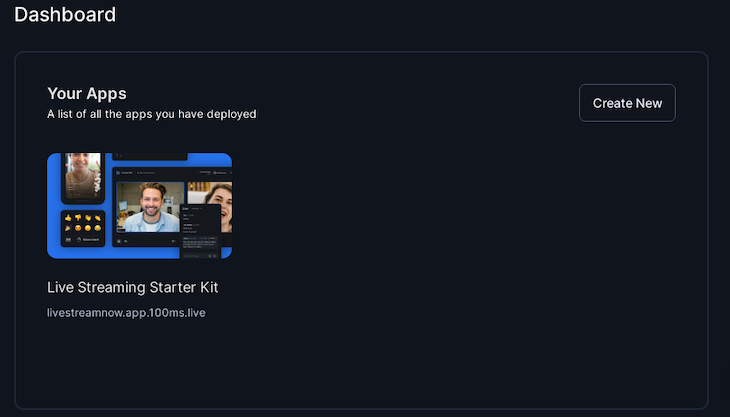
To view the configuration of the starter template, hover on it and click on on the setting icon that seems. You’ll see the next display screen:
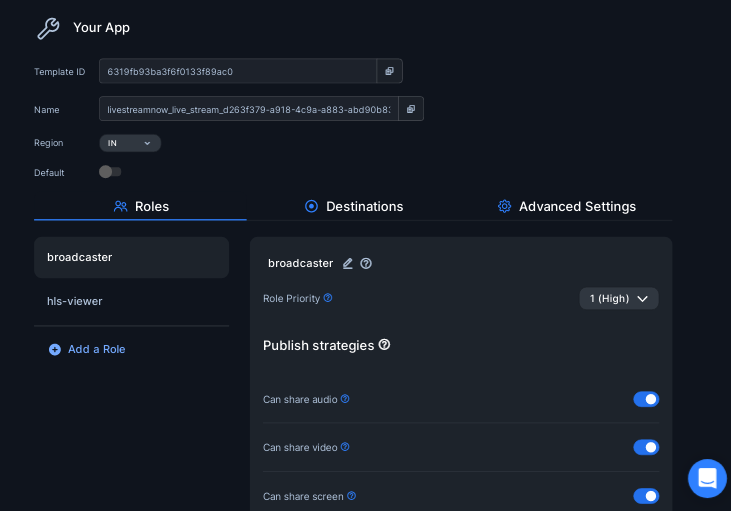
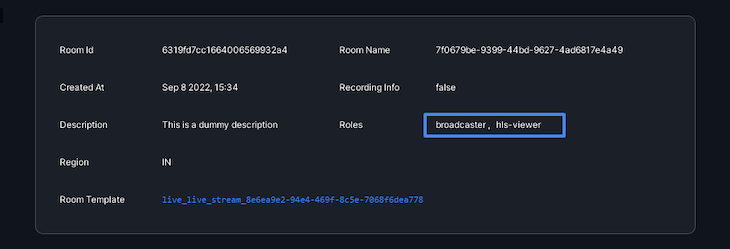
Discover that two roles appropriate for a stay streaming app have already been created, broadcaster and hls-viewer.
The broadcaster position represents a streamer that publishes their audio or video. They’ve all permissions turned on, permitting them to carry out all out there operations, like sharing audio and video, muting and unmuting any participant within the room, stopping and beginning the stay stream, and extra. We will edit the operations allowed for this position or some other position by simply toggling the change subsequent to the operation we need to disable or allow.
The hls-viewer position represents the viewers members that be a part of the stay stream and may work together utilizing messaging. None of their permissions are turned on, which is normally the case for the viewers in a stay stream.
We will create different roles by clicking on Add a Position on the fitting aspect of the display screen after which modifying the permissions to go well with our wants. Nevertheless, for the reason that required roles for our use case have already been created for us, we received’t try this.
Constructing a stay streaming app with 100ms
100ms consists of assist for HLS for stay streaming, which permits scaling to thousands and thousands of viewers, primarily because of its assist by OSes and CDNs. Nevertheless, in comparison with different protocols, stay streaming by way of HLS is slower and has a better latency.
On this part, we’ll use the 100ms SDK to construct the stay streaming app. Earlier than continuing, you have to be aware of the next:
hmsStore: Incorporates the entire state of the room at any given time, together with, for instance, participant particulars, messages, and monitor stateshmsActions: Used to carry out any motion like becoming a member of, muting, and sending a message
Establishing React
I’ve already created a starter template that we’ll use for this tutorial, so we are able to focus solely on utilizing 100ms. Clone the GitHub repo with the next instructions:
$ git clone -b starter https://github.com/Tammibriggs/LiveStreaming-100ms.git

$ cd LiveStreaming-100ms

$ npm set up
Now, after we begin the app utilizing the npm begin command, we’ll see the next web page:

On the web page above, we are able to enter a reputation and choose the position we need to use when becoming a member of the room.
At this level within the tutorial, after we click on on the Be a part of button, we received’t be taken to a special web page; we’ll work on that later. As an alternative, after clicking on the Be a part of button, the web page will appear like the next picture:
Combine 100ms into our app
To combine 100ms into our React app, first, we’ll set up the SDK, which we’ll must construct the app. We’ll set up one further dependency, HLS.js, to assist us in displaying the HLS stream for browsers that don’t assist HLS natively:
$ npm i @100mslive/[email protected] hls.js
Subsequent, to initialize the SDK, we have to wrap our complete software with the <HMSRoomProvider /> element. Within the starter app, head over to the index.js file within the src listing and modify it to appear like the next code:
// src/index.js
import React from 'react';
import ReactDOM from 'react-dom/shopper';
import './index.css';
import App from './App';
import { HMSRoomProvider } from '@100mslive/react-sdk';

const root = ReactDOM.createRoot(doc.getElementById('root'));
root.render(
  <React.StrictMode>
    <HMSRoomProvider>
      <App />
    </HMSRoomProvider>
  </React.StrictMode>
);
Now, let’s go forward and retrieve the required credentials for constructing our app, room_id and token_endpoint. To get the room_id, navigate to your 100ms dashboard. Within the sidebar, click on on Rooms, and also you’ll be taken to the next web page:
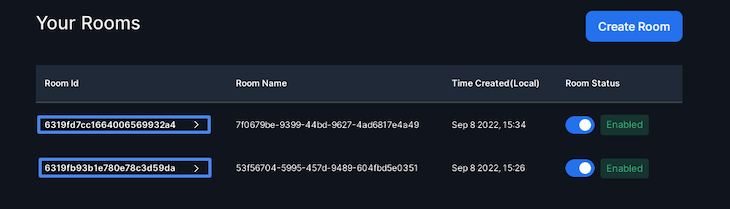
The 2 rooms above have already been created for us, which was completed when deployed the stay streaming starter equipment. To confirm that the rooms have the broadcaster and hls-viewer roles required for our app, click on on any of the IDs beneath the Room Id desk head to examine:
Now, copy one of many IDs and paste it within the acceptable variable within the .env file of the starter app.
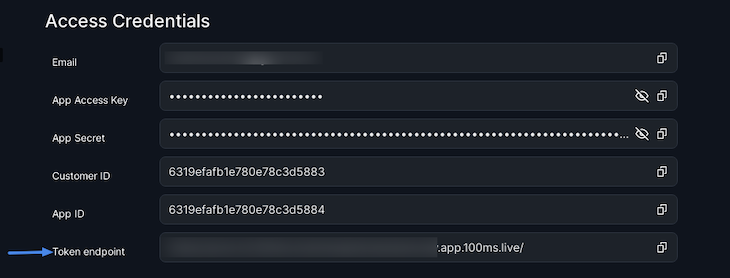
To get the token_endpoint on the sidebar, first click on on Developer. On the subsequent web page, copy the token_endpoint and paste it within the acceptable variable within the .env file:
Becoming a member of a room
Now, we’ll work on the web page under:

Earlier than we are able to start streaming by way of HLS, we first want to hitch a room utilizing the be a part of technique on hmsActions, which requires us to go a config object. The config object will need to have the next fields:
userName: The identify of the person that will probably be seen to everybody related to the roomauthToken: A client-side token that we’ll use to authenticate the person
If we have been constructing a video convention, digital assembly, or some other video name app, we may publish our video by becoming a member of the room, which might be seen by different friends or members within the room. Nevertheless, since we’ll be stay streaming by way of HLS, the method is completely different.
Head over to src/JoinRoom.js and add the next import:
// src/JoinRoom.js
import { useHMSActions } from "@100mslive/react-sdk";
Subsequent, add the next traces of code after the selectedRole state:
// src/JoinRoom.js
const hmsActions = useHMSActions()
Subsequent, let’s create the perform for producing the authToken and be a part of the room. Add the next traces of code after the hmsActions variable:
// src/JoinRoom.js
const handleSubmit = async (e) => {
  e.preventDefault()
  const response = await fetch(`${ENDPOINT}api/token`, {
    technique: "POST",
    physique: JSON.stringify({
      user_id: `${Date.now()}`,
      position: selectedRole, //broadcaster, hls-viewer
      sort: "app",
      room_id: ROOM_ID,
    }),
  })
  const { token } = await response.json()
  // Becoming a member of the room
  hmsActions.be a part of({
    userName: username,
    authToken: token,
  })
}
Within the code above, we’re sending a request to generate the authentication token utilizing the endpoint we provided in our .env file. The request takes the chosen position and room ID as parameters. After producing the token, we use it together with the username entered within the enter discipline to hitch the room utilizing the be a part of technique.
To name this perform when the shape is submitted, modify the opening type tag <type> to appear like the next code:
// src/JoinRoom.js
<type className="be a part of" onSubmit={handleSubmit}>
Proper now, after we navigate to http://localhost:3000/ in our browser, enter a username, and click on on the Be a part of button, we’ll be a part of the room. Nevertheless, there received’t be any adjustments within the UI but. To repair this, we’d like a solution to know the connection state of the room and to cover the shape after we’ve related. We will accomplish that utilizing the selectIsConnectedToRoom selector and the useHMSStore Hook.
Head over to src/App.js and add the next import:
// src/App.js
import { useHMSStore, selectIsConnectedToRoom } from '@100mslive/react-sdk';
Subsequent, add the next traces of code within the App element:
// src/App.js
const isConnected = useHMSStore(selectIsConnectedToRoom)
Subsequent, modify the return assertion within the App element to appear like the next:
// src/App.js
return (
  <div className="App wrapper">
    {isConnected
      ? <Room />
      : <JoinRoom />
    }
  </div>
);
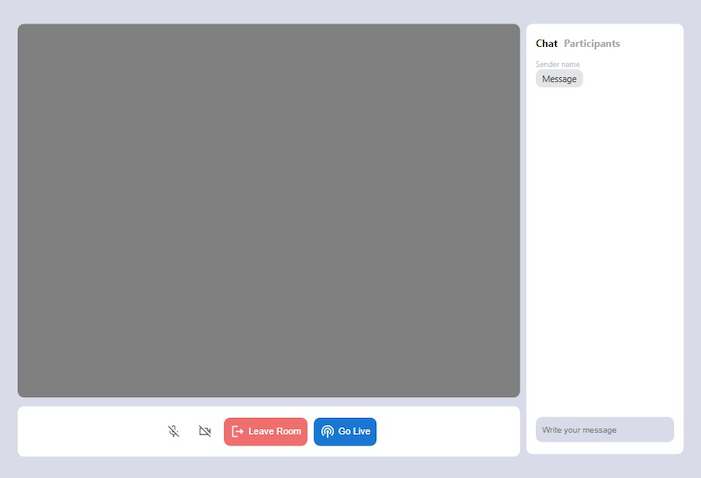
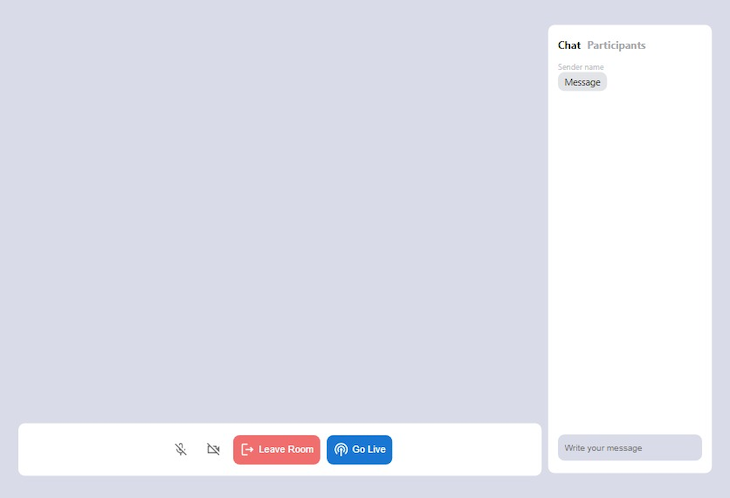
With this, after becoming a member of the room, we’ll see the next web page:
Displaying video tiles
After becoming a member of the room, our video and audio will probably be revealed, that means different friends within the room can view it. Nevertheless, since we’re stay streaming by way of HLS, different viewers shouldn’t be capable of see this. For each broadcaster that joins the room, we wish solely a video tile of their revealed video to be exhibited to different broadcasters.
For this, we’ll use the useVideo Hook, which takes in a video monitor ID and returns a videoRef to be handed to a video factor. To get the video monitor ID, we first must get the record of friends within the room. We will accomplish that utilizing the useHMSStore Hook and selectPeers selector.
Modify the Stream.js file within the src listing to appear like the next code:
// src/Stream.js
import VideoTile from "./VideoTile";
import HlsView from "./HlsView";
import { selectLocalPeer, selectPeers, useHMSStore } from "@100mslive/react-sdk";

perform Stream() {
  const friends = useHMSStore(selectPeers)
  const localPeer = useHMSStore(selectLocalPeer)

  return (
    <div className="stream">
      {localPeer.roleName === 'broadcaster' &&
        friends.filter((peer) => peer.roleName === 'broadcaster')
        .map((peer) => (
          <VideoTile key={peer.id} peer={peer} friends={friends} />
        ))
      }
    </div>
  )
}

export default Stream
Within the code above, we’re getting the record of friends within the room in addition to the native peer, which is you. We’re conditionally rendering the VideoTile element solely when the roleName discipline of localPeer equals broadcaster.
Doing so will make the video tiles seen solely to broadcasters as a result of we haven’t began streaming but. After that, utilizing the filter technique, we are able to create a brand new array containing solely friends who’re broadcasters, then mapping via it and passing every peer to the VideoTile element.
Now, head over to the src/VideoTile.js file. Let’s use useVideo to start out displaying the revealed video of broadcasters within the room. Modify the VideoTile.js file to appear like the next code:
// src/VideoTile.js
import { useVideo } from "@100mslive/react-sdk";

perform VideoTile({ peer, friends }) {
  const { videoRef } = useVideo({
    trackId: peer.videoTrack
  })

  const numberOfBroadCasters = () => {
    const broadcasters = friends.filter((peer) => {
      return peer.roleName === 'broadcaster'
    })
    return broadcasters.size
  }

  return (
    <video
      ref={videoRef}
      className={numberOfBroadCasters() >= 2 ? 'video' : ''}
      autoPlay
      muted
      playsInline
    />
  )
}

export default VideoTile
With this, after we be a part of the room as a broadcaster, we should always see our revealed video and the movies of different broadcasters within the room.
Reside stream by way of HLS and show stream to viewers
To begin streaming by way of HLS, we simply must name the startHLSStreaming in hmsActions. To cease the stream, we are able to name the stopHLSStreaming technique, and to get the HLS state, we are able to use the selectHLSState selector. It’s that easy.
Head over to src/Controls.js and add the next imports:
// src/Controls.js
import { selectHLSState, useHMSActions, useHMSStore } from '@100mslive/react-sdk'
Subsequent, add the next traces of code within the Controls element:
// src/Controls.js
const hmsActions = useHMSActions()
const hlsState = useHMSStore(selectHLSState)
Subsequent, add the next capabilities after the hlsState variable for beginning and stopping the stay stream:
// src/Controls.js
const startHLSStreaming = async () => {
  attempt {
    await hmsActions.startHLSStreaming()
  } catch (err) {
      alert(`failed to start out hls ${err}`)
  }
}

const stopHLSStreaming = async () => {
  attempt {
    await hmsActions.stopHLSStreaming()
  } catch (err) {
      alert(`didn't cease hls ${err}`)
  }
}
To name the capabilities above, change the button element beneath the {/* HLS stream button */} remark within the return assertion with the next code:
// src/Controls.js
{hlsState.working
  ? <Button
      variant="contained"
      disableElevation
      className="go away"
      onClick={stopHLSStreaming}
    >
      <StopCircleOutlined /> Cease Streaming
    </Button>
  : <Button
      variant="contained"
      disableElevation
      onClick={startHLSStreaming}
    >
      <PodcastsOutlined /> Go Reside
    </Button>
}
Now, to show the HLS stream to viewers, we’ll use HLS.js, which we put in earlier. For extra UI customizations, you may take a look at Video.js, which makes use of HLS.js internally.
When utilizing HLS.js in displaying the stream, we have to go the stream URL to its loadSource technique and likewise go a video factor to it utilizing the attachMedia technique. We will get the stream URL from the hls state, which we are able to retrieve utilizing the selectHLSState selector.
Extra nice articles from LogRocket:
Head over to src/Stream.js and add the next code earlier than the closing tag </> of the div with stream because the className:
// src/Stream.js
{localPeer.roleName === 'hls-viewer' &&
  <HlsView/>
}
Subsequent, head over to src/HlsView and modify the file to appear like the next code:
// src/HlsView
import { selectHLSState, useHMSStore } from '@100mslive/react-sdk'
import Hls from 'hls.js'
import { useEffect, useRef } from 'react'

perform HlsView() {
    const videoRef = useRef(null)
    const hlsState = useHMSStore(selectHLSState)
    const hlsUrl = hlsState.variants[0]?.url
    useEffect(() => {
        if (videoRef.present && hlsUrl) {
            const browserHasNativeHLSSupport = videoRef.present.canPlayType(
                'software/vnd.apple.mpegurl'
            );
            if (Hls.isSupported()) {
                let hls = new Hls()
                hls.loadSource(hlsUrl)
                hls.attachMedia(videoRef.present)
            }
            else if (browserHasNativeHLSSupport) {
                videoRef.present.src = hlsUrl
            }
        }
    }, [hlsUrl])
    return <video ref={videoRef} autoPlay controls></video>;
}

export default HlsView
With this, viewers will now be capable of see the stream from broadcasters.
Including room management functionalities
Let’s add performance to mute and unmute audio and video and to go away the room. Head over to src/Controls.js and add the next imports:
// src/Controls.js
import { selectIsLocalAudioEnabled, selectIsLocalVideoEnabled, selectLocalPeer } from '@100mslive/react-sdk'
Subsequent, add the next traces of code after the hlsState variable:
// src/Controls.js
const audioEnabled = useHMSStore(selectIsLocalAudioEnabled)
const videoEnabled = useHMSStore(selectIsLocalVideoEnabled)
const localPeer = useHMSStore(selectLocalPeer)
We use the selectIsLocalAudioEnabled and selectIsLocalVideoEnabled selectors to get the respective boolean states of the audio and video and decide whether or not they’re presently muted or unmuted. We’ll then toggle the present state and present the suitable icon within the UI. We additionally get localPeer utilizing the selectLocalPeer selector.
To mute and unmute audio and video, we are able to use setLocalVideoEnabled and setLocalAudioEnabled in hmsActions, which receives a boolean as parameter. Within the Controls element, add the next capabilities after the stopHLSStreaming perform:
// src/Controls.js
const toggleAudio = async () => {
  await hmsActions.setLocalAudioEnabled(!audioEnabled);
}

const toggleVideo = async () => {
  await hmsActions.setLocalVideoEnabled(!videoEnabled);
}
Now, to name the perform above, discover the next traces of code within the return assertion:
<IconButton>
  <MicOffOutlined />
</IconButton>
<IconButton>
  <VideocamOffOutlined />
</IconButton>
Modify the code above to the next code:
// src/Controls.js
<IconButton onClick={toggleAudio}>
  {audioEnabled
    ? <MicNoneOutlined />
    : <MicOffOutlined />
  }
</IconButton>
<IconButton onClick={toggleVideo}>
  {videoEnabled
    ? <VideocamOutlined />
    : <VideocamOffOutlined />
  }
</IconButton>
To depart the room, we have to name the go away() technique in hmsActions. After the toggleVideo perform, we have to add the next traces of code:
// src/Controls.js
const leaveRoom = async () => {
  if(localPeer.roleName === 'broadcaster'){
    hmsActions.go away()
    await hmsActions.stopHLSStreaming()
  }else{
    hmsActions.go away()
  }
}
Within the code above, if the roleName discipline of the localPeer equals broadcaster, together with leaving the room, we’re additionally ending the HLS stream in case it’s ongoing.
To name the perform above within the return assertion, we’ll see the next traces of code:
<Button
  variant="contained"
  disableElevation
  className="go away"
>
  <LogoutOutlined /> Go away Room
</Button>
Modify it to the next:
// src/Controls.js
<Button
  variant="contained"
  disableElevation
  className="go away"
  onClick={leaveRoom}
>
  <LogoutOutlined /> Go away Room
</Button>
With this, the mute, unmute, and go away performance ought to be working high-quality.
Nevertheless, you’ll discover that even after we be a part of the room as a viewer, all of the UI elements meant to be seen or used solely by the broadcaster will probably be seen, which shouldn’t be so. Viewers ought to solely be capable of see the go away button.
To repair this, modify the return assertion of the Controls element to appear like the next:
// src/Controls.js
return (
  <div className="controls">
    {localPeer.roleName === 'broadcaster'
      ? <>
          <IconButton onClick={toggleAudio}>
            {audioEnabled
              ? <MicNoneOutlined />
              : <MicOffOutlined />
            }
          </IconButton>
          <IconButton onClick={toggleVideo}>
            {videoEnabled
              ? <VideocamOutlined />
              : <VideocamOffOutlined />
            }
          </IconButton>
          <Button
            variant="contained"
            disableElevation
            className="go away"
            onClick={leaveRoom}
          >
            <LogoutOutlined /> Go away Room
          </Button>
          {hlsState.working
            ? <Button
                variant="contained"
                disableElevation
                className="go away"
                onClick={stopHLSStreaming}
              >
                <StopCircleOutlined /> Cease Streaming
              </Button>
            : <Button
                variant="contained"
                disableElevation
                onClick={startHLSStreaming}
              >
                <PodcastsOutlined /> Go Reside
              </Button>
          }
        </>
      : <Button
          variant="contained"
          disableElevation
          className="go away"
          onClick={leaveRoom}
        >
          <LogoutOutlined /> Go away Room
        </Button>
    }
  </div>
)
Add chat performance and show all members
There are three completely different strategies out there to ship chat messages which have completely different use instances.
sendBroadcastMessage('message'): For messages that will probably be obtained by everybody within the roomsendGroupMessage('message', ['role1']): For messages that will probably be obtained by each peer who’s a part of the passed-in rolessendDirectMessage('message', peer.id): For messages that will probably be obtained solely by the peer whose ID was handed
In our app, we’ll solely use sendBroadcastMessage(), however you may add options for the remaining if you happen to like.
Head over to src/ChatNdParticipants.js and add the next traces of code:
// src/ChatNdParticipants.js
import { selectHMSMessages, useHMSActions, useHMSStore } from "@100mslive/react-sdk"
Subsequent, add the next traces of code after the message state:
// src/ChatNdParticipants.js
const messages = useHMSStore(selectHMSMessages)
const hmsActions = useHMSActions()

const handleSubmit = (e) => {
  e.preventDefault();
  hmsActions.sendBroadcastMessage(message)
  setMessage('')
}
We’ve created a handleSubmit, which can ship the messages. We’re additionally retrieving all of the despatched messages utilizing the selectHMSMessages selector.
When the send-message type is submitted, we have to name handleSubmit and loop via the retrieved messages and show them. To name handleSubmit, modify the open tag <type> of the shape with a reputation of send-message to the code under:
// src/ChatNdParticipants.js
<type identify="send-messge" onSubmit={handleSubmit}>
Subsequent, change the Message element beneath the {/* Messages */} remark with the next:
// src/ChatNdParticipants.js
{messages.map((msg) => (
  <Message key={msg.id} message={msg} />
))}
Subsequent, modify the Message.js file within the src listing to appear like the next code:
// src/ChatNdParticipants.js
import { selectLocalPeer, useHMSStore } from '@100mslive/react-sdk'

perform Message({message}) {
  const localPeer = useHMSStore(selectLocalPeer)

  return (
    <div
      className={`message ${message.senderUserId === localPeer.customerUserId && 'myMessage'}`}
    >
      <span>{message.senderName}</span>
      <p>{message.message}</p>
    </div>
  )
}

export default Message
Now, the chat performance ought to be working. To show the members, we’ll use the selectPeers selector to get all of the friends within the room, loop over them, and show their identify and position.
Within the ChatNdParticipants.js, add the next import:
// src/ChatNdParticipants.js
import { selectPeers } from "@100mslive/react-sdk"
Subsequent, add the next line of code after the hmsActions variable:
// src/ChatNdParticipants.js
const friends = useHMSStore(selectPeers)
Now, add the next traces of code after the {/* Contributors */} remark:
// src/ChatNdParticipants.js
{friends.map((peer) => (
  <div className="rightBox__participant">
    {peer.identify}
    <p>{peer.roleName}</p>
  </div>
))}
With this, we’re completed constructing our stay streaming app.
Conclusion
On this tutorial, we discovered learn how to construct a stay streaming app utilizing 100ms. Other than the options coated on this tutorial, there are rather a lot others we are able to add, like streaming on YouTube, Twitch, Fb, and so forth utilizing RTMP streaming, displaying notifications for actions taking place within the room, and extra.
I hope you loved this tutorial, and you’ll want to go away a remark when you have any questions. Glad coding!
Full visibility into manufacturing React apps
Debugging React purposes might be troublesome, particularly when customers expertise points which can be laborious to breed. In case you’re eager about monitoring and monitoring Redux state, routinely surfacing JavaScript errors, and monitoring sluggish community requests and element load time, attempt LogRocket. 

LogRocket is sort of a DVR for internet and cellular apps, recording actually every thing that occurs in your React app. As an alternative of guessing why issues occur, you may mixture and report on what state your software was in when a problem occurred. LogRocket additionally displays your app’s efficiency, reporting with metrics like shopper CPU load, shopper reminiscence utilization, and extra.
The LogRocket Redux middleware package deal provides an additional layer of visibility into your person classes. LogRocket logs all actions and state out of your Redux shops.
Modernize the way you debug your React apps — begin monitoring at no cost.
