A login type is used on the entrance finish of a web site, internet app, or cell app to gather info wanted to confirm whether or not a person has been registered in a system’s database.
The authentication course of is straightforward. First, the person submits some credentials — sometimes an e mail and password — to the backend by means of a login type. Then, the backend software checks if the e-mail and password are within the database. From there, the backend app will both grant customers entry or require them to register.
On this tutorial, we’ll learn to construct a easy login type with Node.js. The shape would require a person to register an account. Then, we’ll use the entered info and retailer it in a MySQL database earlier than signing the person in.
Now that we have now an outline of the venture, let’s begin constructing!
Soar forward:
Conditions
You’ll want Node.js and npm put in in your native growth machine to observe this tutorial. If you happen to’re unsure when you have them put in, run the next instructions to examine their availability:
# To examine if Node is put in, run:
node -v

# To examine if Node is put in, run:
npm -v
Apart from Node.js, you’ll want a MySQL server put in and operating. You need to use the standalone MySQL installer or server distributions with MySQL built-in, reminiscent of WAMP and XAMP.
Constructing a Node.js login type
Let’s create a brand new folder for the app and navigate to the folder utilizing the command line with the cd directive:
cd path/to/your/folder
Then, run the next command to put in the dependencies required for this tutorial:
npm i specific mysql dotenv hbs bcryptjs
Let me clarify what every library is for:
- Categorical: for creating API and internet routes and establishing the app backend
- MySQL: for connecting to our native MySQL server
- dotenv: for storing environmental variables that shouldn’t be uncovered within the app supply code
- hbs: for rendering HTML on the server
- Bcryptjs: for hashing passwords
As well as, I like to recommend putting in nodemon, which mechanically restarts the server when file modifications are detected, saving you valuable time in growth. Set up it with the next command:
npm i nodemon --save
Lastly, open your app’s package deal.json file with a code editor and add the next subject contained in the scripts object:
"begin": "nodemon app.js"
Now, we’re completed with the venture setup. Subsequent, we’ll connect with our MySQL database and create a desk to retailer person login info.
Establishing a database connection in Node.js
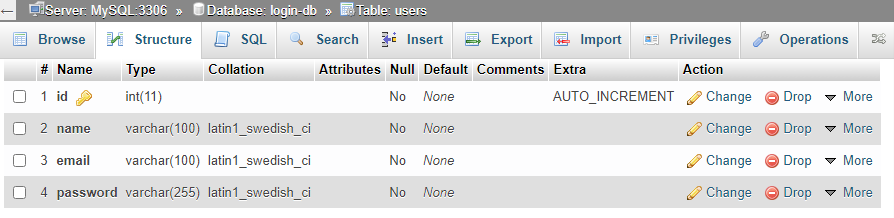
Begin by creating a brand new database in your MySQL surroundings named login-db. After that, construct a customers desk with the ID, title, e mail, and password. Set the ID to INT and AUTOINCREMENT, and the title, e mail, and password to VARCHAR.
In the long run, the database in phpMyAdmin will seem like this:
Then, create an .env file in your app’s root folder. Inside .env, add your database title, host area, username, and password values to their corresponding variable names. These are the default values for MySQL:
DATABASE = login-db
DATABASE_HOST = localhost
DATABASE_ROOT = root
DATABASE_PASSWORD =
When you’ve set the variables, create app.js within the root folder. Open it together with your textual content editor and import the next dependencies:
const specific = require('specific');
const mysql = require("mysql")
const dotenv = require('dotenv')
Then, create an Categorical app:
const app = specific();
After that, specify the trail to the environmental variables:
dotenv.config({ path: './.env'})
Right here, we’re telling the server to search out .env inside the identical listing as app.js.
Subsequent, entry the variables from course of.env and go them to their respective connection properties:
const db = mysql.createConnection({
    host: course of.env.DATABASE_HOST,
    person: course of.env.DATABASE_USER,
    password: course of.env.DATABASE_PASSWORD,
    database: course of.env.DATABASE
})
Now that you’ve got configured the connection together with your database credentials, join the database:
db.join((error) => {
    if(error) {
        console.log(error)
    } else {
        console.log("MySQL related!")
    }
})
The connection will both succeed or fail. If it fails, we’ll see error within the callback, and we’ll print it on the console. In any other case, we output the "MySQL related!" string.
Lastly, begin the server by operating the next command in your terminal:
npm begin
If every part goes nicely, you’ll see MySQL is related. Let’s create the homepage.
Establishing the homepage
Inside your venture’s root folder, create the views folder. Then, in views, create index.hbs, register.hbs, and login.hbs. As you might have guessed, these are the Handlebars recordsdata for the house, login, and register pages.
Now, for every of them, embrace the bottom HTML markup:
<!DOCTYPE html>
<html lang="en">
<head>
    <hyperlink href="https://cdn.jsdelivr.internet/npm/[email protected]/dist/css/bootstrap.min.css" rel="stylesheet" integrity="sha384-iYQeCzEYFbKjA/T2uDLTpkwGzCiq6soy8tYaI1GyVh/UjpbCx/TYkiZhlZB6+fzT" crossorigin="nameless">
  </head>
</head>
<physique>

{{!-- Navigation hyperlinks --}}
    <nav>
        <h4>Node MySQL Login</h4>
        <ul>
            <li><a href="https://weblog.logrocket.com/">Residence</a></li>
            <li><a href="http://weblog.logrocket.com/login">Login</a></li>
            <li><a href="http://weblog.logrocket.com/register">Register</a></li>
        </ul>
    </nav>

    {{!-- Physique of every web page will go right here --}}
</physique>
</html>
Right here, we linked the 2 <hyperlink> parts to our customized type sheet and the Bootstrap CSS library. We additionally created a navigation menu that will likely be reused throughout all pages to incorporate hyperlinks to the login and register pages.
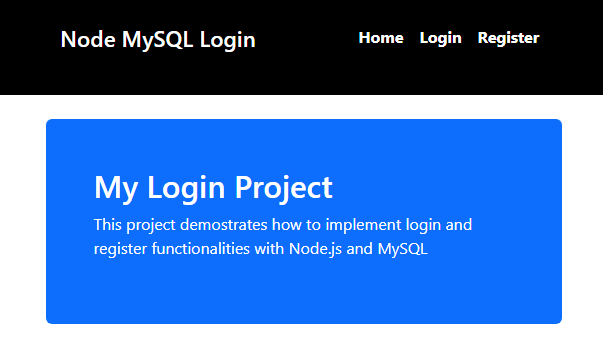
Subsequent, inside index.hbs, use the next markup inside the <physique> tags so as to add a jumbotron to your web site’s homepage:
    {{!-- Physique --}}
    <div class="container mt-4">
        <div class="mt-4 p-5 bg-primary text-white rounded">
            <h1>My Login Mission</h1>
            <p>This venture demonstrates learn how to implement login and register functionalities with Node.js and MySQL </p>
        </div>
    </div>
Then, specify the view engine as Handlebars in app.js:
app.set('view engine', 'hbs')
From there, import path to specify the static belongings utilized in your Handlebars templates:
// different imports
const path = require("path")

const publicDir = path.be a part of(__dirname, './public')

app.use(specific.static(publicDir))
Subsequent, register a route for rendering index.hbs on the homepage:
app.get("https://weblog.logrocket.com/", (req, res) => {
    res.render("index")
})
Lastly, configure the port for the app in app.pay attention():
app.pay attention(5000, ()=> {
    console.log("server began on port 5000")
})
Begin your server by operating npm begin, then navigate to localhost:5000 to view the homepage:
Subsequent, we’ll create the register and login kinds.
Creating the login and register kinds in Node.js
Open register.hbs in views and embrace the next markup inside <physique> and after <nav>:
<div class="container mt-4">
        <div class="card" type="width: 18rem;">
            <div class="card-header">Register Type</div>
            <div class="card-body">
                <type motion="/auth/register" methodology="POST">
                    <div class="mb-3">
                        <label for="name-reg" class="form-label">Title</label>
                        <enter sort="textual content" class="form-control" id="name-reg" title="title">
                    </div>
                    <div class="mb-3">
                        <label for="email-reg" class="form-label">E mail</label>
                        <enter sort="textual content" class="form-control" id="email-reg" title="e mail">
                    </div>
                    <div class="mb-3">
                        <label for="password-reg" class="form-label">Password</label>
                        <enter sort="password" class="form-control" id="password-reg" title="password">
                    </div>
                    <div class="mb-3">
                        <label for="password-conf-reg" class="form-label">Affirm Password</label>
                        <enter sort="password" class="form-control" id="password-conf-reg" title="password-confirm">
                    </div>

                    <button sort="submit" class="btn btn-primary">Submit</button>
                </type>
            </div>
        </div>
    </div>
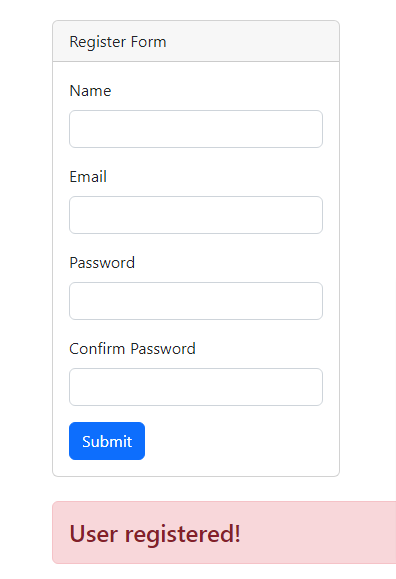
We’ll create an HTML Type with inputs for the person’s title, e mail, password, and password affirmation. The shape will put up the information to the route we laid out in motion.
Subsequent, in app.js, register the path to the register web page and save the file:
app.get("/register", (req, res) => {
    res.render("register")
})
After that, navigate to your browser and choose register within the navigation bar. It’s best to see the registration type:

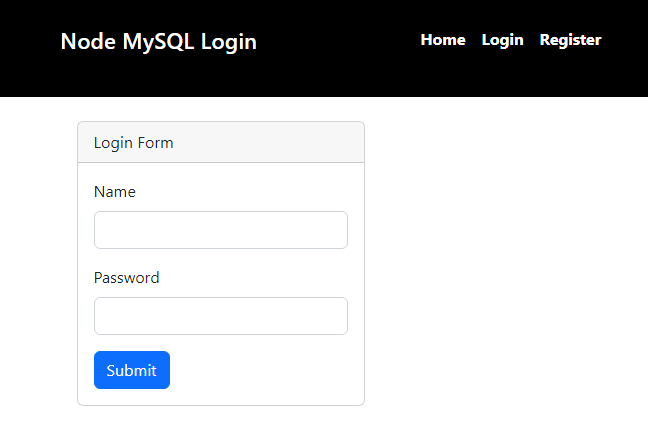
To create the login type, open login.hbs inside views and use the identical type as above. Delete inputs and labels for the e-mail and password affirmation. As well as, change id attributes and the cardboard title from Register Type to Login Type.
Subsequent, register the login route in app.js:
app.get("/login", (req, res) => {
    res.render("login")
})
Save the recordsdata and go to the browser. It ought to appear as if this when you choose Login on the navigation bar:
Now that we’ve completed the work on the entrance finish, let’s shift our focus to registering the person within the backend.
Registering the person
The shape values will likely be despatched to the /auth/register route when the registration type is submitted. Let’s construct it!
In app.py, start by importing bcrypt:
const bcrypt = require("bcryptjs")
Subsequent, configure the Categorical server to obtain the shape values as JSON:
app.use(specific.urlencoded({prolonged: 'false'}))
app.use(specific.json())
Then, create auth/register and retrieve the person’s type values:
app.put up("/auth/register", (req, res) => {
    const { title, e mail, password, password_confirm } = req.physique

    // db.question() code goes right here
})
Now that you’ve got the values, question the database to examine if the e-mail is on the server. That means, a person can’t register a number of occasions with the identical e mail:
    db.question('SELECT e mail FROM customers WHERE e mail = ?', [email], async (error, res) => {
       // remaining code goes right here
    })
If there’s an error whereas executing the question, we’ll entry error and show it on the server’s terminal:
        if(error){
            console.log(error)
        }
        // different code
Subsequent, examine if there’s a end result and if the 2 passwords are a match. If any situations are true, re-render the register web page to inform the person the e-mail is already in use or that the passwords don’t match:
        if( end result.size > 0 ) {
            return res.render('register', {
                message: 'This e mail is already in use'
            })
        } else if(password !== password_confirm) {
            return res.render('register', {
                message: 'Passwords don't match!'
            })
        }
       // different code
If the situations above will not be true, the person will likely be added to the database. Encrypt the password and put up it to the database together with the opposite values:
        let hashedPassword = await bcrypt.hash(password, 8)

        db.question('INSERT INTO customers SET?', {title: title, e mail: e mail, password: hashedPassword}, (err, res) => {
            if(error) {
                console.log(error)
            } else {
                return res.render('register', {
                    message: 'Person registered!'
                })
            }
        })
If there’s an error, we’ll print it on the console. In any other case, re-render the web page and ship a message to the person that they’re registered.
It’s essential to notice that to point out the person messages, you’ll must edit register.hbs and embrace the next template under <div>:
{{#if message }}
    <h4 class="alert alert-danger mt-4">{{message}}</h4>
{{/if}}
Lastly, save all file modifications and check the app in your browser:

Conclusion
I hope you had as a lot enjoyable following this tutorial as I did creating it. Be at liberty to fork the from the GitHub repository and play with the code. In spite of everything, getting your palms soiled is the easiest way to be taught.
You probably have questions, remark under!
200’s solely  Monitor failed and gradual community requests in manufacturing
Deploying a Node-based internet app or web site is the simple half. Ensuring your Node occasion continues to serve assets to your app is the place issues get harder. If you happen to’re fascinated with guaranteeing requests to the backend or third celebration providers are profitable, attempt LogRocket.  https://logrocket.com/signup/
LogRocket is sort of a DVR for internet and cell apps, recording actually every part that occurs whereas a person interacts together with your app. As a substitute of guessing why issues occur, you possibly can combination and report on problematic community requests to rapidly perceive the basis trigger.
LogRocket devices your app to report baseline efficiency timings reminiscent of web page load time, time to first byte, gradual community requests, and likewise logs Redux, NgRx, and Vuex actions/state. Begin monitoring without cost.
