
On this article, we’ll discover ways to use CustomScrollView and Slivers to create a customized scrolling display screen with a number of scrollable elements scrolling horizontally, vertically, or just placing a non-scrollable widget inside CustomScrollView.
This widget is particularly helpful if you wish to create customized scrolling results or have extra management over ScrollView’s scrolling content material.
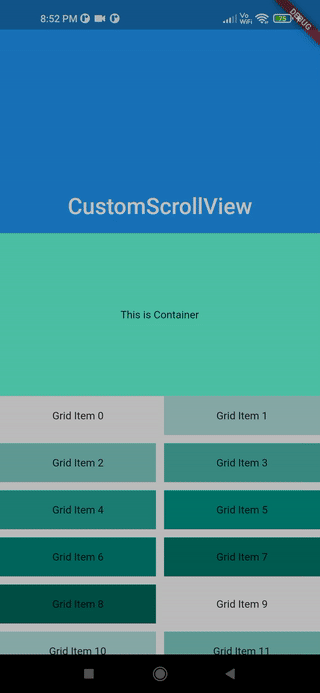
In case you construct a customized ScrollView like mine, it is best to find yourself with this end result:
Desk of contents
What precisely are Slivers?
A sliver is a portion of a scrollable space that you could configure to behave in a different way.
Because the official docs state, a sliver is a small portion of a scrollable space inside a CustomScrollview that may be configured accordingly to behave in a sure approach. Utilizing Flutter’s Slivers, we are able to simply create a plethora of incredible scrolling results. Slivers are utilized by all scrollable views in Flutter; for instance, ListView makes use of SliverList and GridView makes use of SliverGrid.
As a result of Slivers lazily construct their views when the widgets come into the viewport, it’s actually helpful to point out a large number of youngsters with out worrying about reminiscence points. Furthermore, we are able to simply make a lot of incredible scrolling results by utilizing Flutter Slivers.
CustomScrollView is a widget that makes use of a number of Slivers moderately than only one, as we noticed with ListView and GridView. It lets you immediately make the most of Slivers to create scrolling results akin to lists, grids, and increasing headers.
The implementation is simple; merely place all the Slivers contained in the CustomScrollView as proven:
CustomScrollView(
    slivers: [
      SliverAppBar(...),
    SliverToBoxAdapter(...),
      SliverGrid(...),
        SliverToBoxAdapter(...),
    SliverFixedExtenrList(...),
    ],
    controller: ScrollController(),
)
Give CustomScrollView a ScrollController to manage the preliminary scroll offset or to deal with scroll conduct usually.
Introduction to Slivers
As beforehand said, a Sliver is a portion of a scrollable space that can be utilized inside a CustomScrollView. There are quite a few Slivers obtainable, and we’ll choose a couple of to exhibit the right way to use them later.
- SliverAppBar: This sliver renders an app bar, and it is likely one of the mostly used sliver widgets that creates collapsible
AppBarsby setting each theflexibleSpaceandexpandedHeightparameters - SliverList: A sliver that renders a listing in a linear array alongside the ScrollView’s most important axis. To construct checklist objects as they scroll into view, SliverList accepts a delegate parameter. A
SliverChildListDelegatespecifies the fastened checklist of youngsters which are created , whereas aSliverChildBuilderDelegatespecifies how they’re constructed lazily - SliverFixedExtentList: SliverFixedExtentList is similar to SliverList, with the exception that SliverFixedExtentList ensures that each one checklist objects could have the identical dimension on the principle axis (i.e., equal peak on a vertical scrolling checklist or equal width on a horizontal scrolling checklist). This has a major influence on the efficiency of the ListView when scrolling as a result of understanding the scale of the objects earlier than loading them is kind of helpful whenever you want to bounce a protracted distance. For instance, if we all know every merchandise is fastened at 50px tall and we wish to scroll 5,000px down, we are able to simply leap 100 issues by loading the one hundred and first merchandise and displaying it
- SliverGrid: SliverGrid is a sliver that shows a 2D array of youngsters in a ScrollView. It accepts youngsters by way of a delegate or an specific checklist, and it additionally defines
gridDelegate, which determines the placement of the youngsters widget inside the grid - SliverPadding: A sliver that creates empty area round one other sliver. The one distinction between it and the Padding widget is that it generates RenderSliver moderately than RenderBox, in order that it may be used inside CustomScrollView
- SliverToBoxAdapter: A sliver that permits you to warp every other widget that isn’t a Sliver and use it inside CustomScrollView; this can be a very helpful sliver for creating intricate scrolling screens with varied widgets
- SliverOpacity: A sliver widget that makes its sliver baby partially clear. It’s an easy-to-use substitute to the Opacity widget, identical to SliverPadding
Sufficient speaking; now it’s time to dive into the code and apply all we’ve realized about CustomScrollView and Slivers. We’ll construct an instance app with a number of scrollable/non-scrollable widgets aligned vertically in a scroll view that capabilities as a single scrollable space.
Right here’s the construction of our CustomScrollView:
- SliverAppBar: A collapsible AppBar that expands and collapses as we scroll vertically. You may experiment with the
pinned,floating, andsnapparameters to manage how and when the SliverAppBar collapses, expands, or turns into pinned to the highest as we scroll additional - SliverToBoxAdapter: We’ll place a
Containerwith peak200and shadetealAccentbeneath theSliverAppBarto signify a non-Sliver widget that must be wrapped withSliverToBoxAdapterwith a view to be youngsters ofCustomScrollView SliverGrid: Beneath the Container is a SliverGrid with twenty baby objects every with a distinct shade taste oftealAccent. We usedSliverGridDelegateWithMaxCrossAxisExtent, which selects the most important cross-axis extent for the tiles; if you wish to create a format with a set variety of tiles within the cross axis, useSliverGridDelegateWithFixedCrossAxisCount- SliverToBoxAdapter: Under
SliverGrid, now we have aContainerwidget once more withamberAccentshade - ListView (Inside SliverToBoxAdapter): You may simply be questioning why we used a
ListViewinside aSliverToBoxAdapter. The reason being that we wished to make a listing that scrolls horizontally, which isn’t potential withSliverList, and since we needed to place this `ListView` insideCustomScrollView, we have to add this insideSliverToBoxAdapter - SliverFixedExtentList: As the ultimate sliver baby, we’re utilizing
SliverFixedExtentListto generate a vertically scrolling checklist with a setitemExtent, which implies that every baby could have a set peak, which can assist us enhance scrolling efficiency:
import 'bundle:flutter/materials.dart';

void most important() => runApp(const MyApp());

class MyApp extends StatelessWidget {
  const MyApp({Key? key}) : tremendous(key: key);

  static const String _title="Flutter Code Pattern";

  @override
  Widget construct(BuildContext context) {
    return const MaterialApp(
      title: _title,
      dwelling: CustomScrollingWidget(),
    );
  }
}

class CustomScrollingWidget extends StatefulWidget {
  const CustomScrollingWidget({Key? key}) : tremendous(key: key);

  @override
  State createState() => _CustomScrollingWidgetState();
}

class _CustomScrollingWidgetState extends State {
  @override
  Widget construct(BuildContext context) {
    return Scaffold(
      physique: CustomScrollView(
        slivers: [
          const SliverAppBar(
            pinned: true,
            expandedHeight: 250.0,
            flexibleSpace: FlexibleSpaceBar(
              title: Text('CustomScrollView'),
              centerTitle: true,
            ),
          ),
          SliverToBoxAdapter(
            child: Container(
              color: Colors.tealAccent,
              alignment: Alignment.center,
              height: 200,
              child: const Text('This is Container'),
            ),
          ),
          SliverGrid(
            gridDelegate: const SliverGridDelegateWithMaxCrossAxisExtent(
              maxCrossAxisExtent: 200.0,
              mainAxisSpacing: 10.0,
              crossAxisSpacing: 10.0,
              childAspectRatio: 4.0,
            ),
            delegate: SliverChildBuilderDelegate(
              (BuildContext context, int index) {
                return Container(
                  alignment: Alignment.center,
                  color: Colors.teal[100 * (index % 9)],
                  baby: Textual content('Grid Merchandise $index'),
                );
              },
              childCount: 20,
            ),
          ),
          SliverToBoxAdapter(
            baby: Container(
              shade: Colours.amberAccent,
              alignment: Alignment.middle,
              peak: 200,
              baby: const Textual content('That is Container'),
            ),
          ),
          SliverToBoxAdapter(
            baby: SizedBox(
              peak: 100.0,
              baby: ListView.builder(
                scrollDirection: Axis.horizontal,
                itemCount: 10,
                itemBuilder: (context, index) {
                  return SizedBox(
                    width: 100.0,
                    baby: Card(
                      shade: Colours.cyan[100 * (index % 9)],
                      baby: Textual content('Merchandise $index'),
                    ),
                  );
                },
              ),
            ),
          ),
          SliverFixedExtentList(
            itemExtent: 50.0,
            delegate: SliverChildBuilderDelegate(
              (BuildContext context, int index) {
                return Container(
                  alignment: Alignment.middle,
                  shade: Colours.lightBlue[100 * (index % 9)],
                  baby: Textual content('Listing Merchandise $index'),
                );
              },
            ),
          ),
        ],
      ),
    );
  }
}

Conclusion
On this article, you realized the right way to make a ScrollView with quite a few scrolling elements and now you possibly can design any kind of difficult scrollable display screen utilizing Slivers and CustomScrollView on this article. I hope you proceed to discover new issues.
Now that we’ve acquired all the things prepared, all you need to do is begin the applying and revel in.
Finest needs! Have enjoyable fluttering!
In case you have any questions, please put up them right here. Any and all suggestions is appreciated.


LogRocket proactively surfaces and diagnoses a very powerful points in your apps and web sites

1000’s of engineering and product groups use LogRocket to cut back the time it takes to know the foundation explanation for technical and value points. With LogRocket, you’ll spend much less time on back-and-forth conversations with prospects and take away the infinite troubleshooting course of. LogRocket permits you to spend extra time constructing new issues and fewer time fixing bugs.
Be proactive – strive LogRocket right this moment.
