
On this information, we’ll cowl the best way to construct a customized checkbox in React with out sacrificing accessibility for assistive expertise:
Beneath is the customized checkbox we’ll construct on this tutorial. You can work together with it, and after that, get began.
To observe this tutorial, guarantee you might be accustomed to React.
Default and customized checkboxes in React
The checkbox is a management component that gives an choice to toggle between true and false states. It’s an enter component with the sort attribute set to a checkbox like so:
<enter sort="checkbox" />
In its easiest type, an enter checkbox alongside some label textual content can appear to be this:
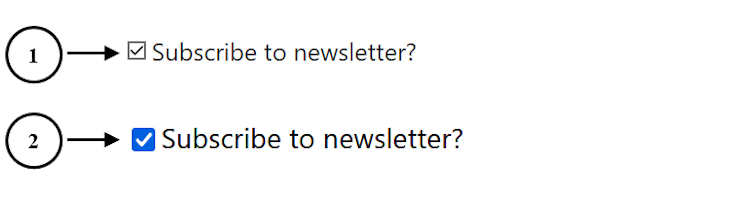
Enter checkboxes have default kinds utilized to them. These kinds come from the browser’s underlying working system, thus making the checkbox look fluctuate throughout varied browsers.
The primary instance labeled within the picture above exhibits how the design of the checkbox would seem within the Opera mini browser. The second instance is how the identical default checkbox would seem in Firefox, which additionally has an identical look in Chrome.
Typically, one cause we’d need to have a customized checkbox on an internet web page is to make sure the looks is constant throughout browsers and gadgets.
Utilizing managed inputs for type controls in React
Dealing with type controls in React is a bit totally different from dealing with them in common HTML.
In HTML, type controls — together with checkboxes — hearken to and are managed by the DOM. In that case, we don’t have to arrange any logic to toggle the bins; they are often toggled by default.
Nevertheless, in React, the checkbox should both be a managed or uncontrolled enter. A managed enter permits us to take the duty away from the browser DOM and hand it over to a element state (often, the element that’s rendering the inputs).
React recommends this method to type controls. This fashion, the state turns into the one supply of fact. Let’s see this in follow!
Making a checkbox element
Let’s begin by making a element referred to as Checkbox that accepts a label textual content as a prop and renders a checkbox alongside the textual content:
const Checkbox = ({ label }) => {
  return (
    <div className="checkbox-wrapper">
      <label>
        <enter sort="checkbox" />
        <span>{label}</span>
      </label>
    </div>
  );
};
export default Checkbox;
Then we’ll render the <Checkbox /> element wherever we need to show a checkbox. In our case, we’ll render it in an App element:
import Checkbox from "./Checkbox";

const App = () => {
  return (
    <div className="app">
      <Checkbox label="Subscribe to e-newsletter?" />
    </div>
  );
};
export default App;
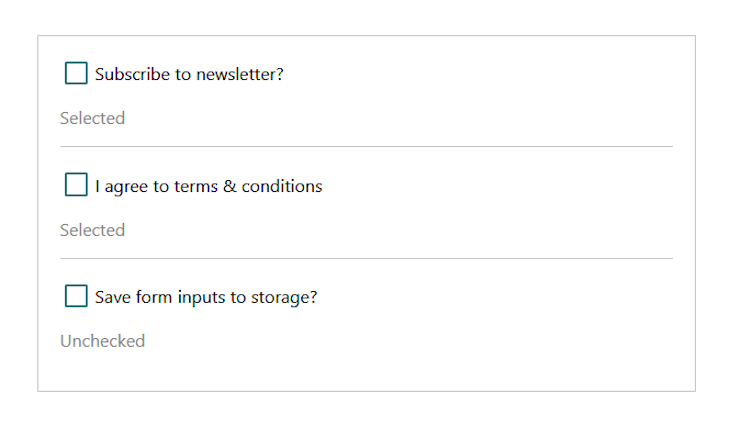
These steps ought to lead to one thing like this:
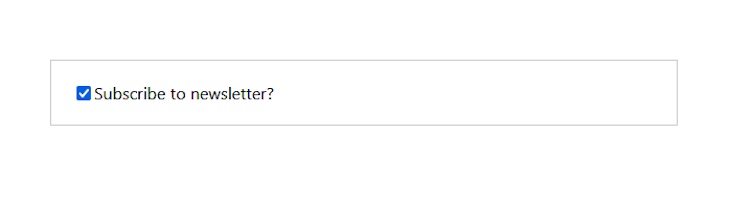
Be aware that we have included fundamental kinds that added a border for the containing parts. At this level, we haven’t achieved something particular in rendering the checkbox. The above is just like rendering a fundamental HTML checkbox.
Controlling the enter checkbox
As talked about earlier, React recommends making our type parts a managed subject. To do that, we should add a element state to handle the consumer’s enter after which go the state variable to the enter. For checkbox enter, we’ll assign the state to the enter checked attribute.
import { useState } from "react";
const Checkbox = ({ label }) => {
  const [isChecked, setIsChecked] = useState(false);
  return (
    <div className="checkbox-wrapper">
      <label>
        <enter sort="checkbox" checked={isChecked} />
        <span>{label}</span>
      </label>
    </div>
  );
};
export default Checkbox;
With the above implementation, the checkbox will not hearken to the DOM, however fairly the useState outlined within the element. Since we initialized the useState with a false worth, the checkbox subject will probably be unchecked on the preliminary DOM render.
Afterward this web page, we’ll outline logic that lets us go the preliminary state into the Checkbox element, whether or not we would like it checked, unchecked, or disabled.
At this level, now we have succeeded in making the checkbox a managed enter. Nevertheless, we can not toggle it as a result of it not listens to the browser DOM. So we have to deal with the toggling ourselves.
Utilizing the updater perform
The updater perform is the second parameter of the useState() React Hook. It permits us to replace the state and guarantee it holds the up to date state worth.
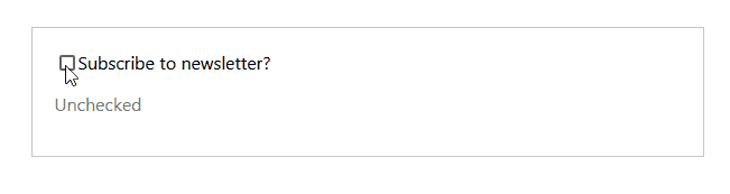
To make use of the updater perform, we should hearken to a change within the enter checkbox utilizing an onChange occasion handler. This handler will name the updater perform setIsChecked for each enter change with the most recent enter worth.
const Checkbox = ({ label }) => {
  // ...
  return (
    <div className="checkbox-wrapper">
      <label>
        <enter
          // ...
          onChange={() => setIsChecked((prev) => !prev)}
        />
        {/* ... */}
      </label>
      <p>{isChecked ? "Chosen" : "Unchecked"}</p>
    </div>
  );
};
export default Checkbox;
As seen within the code, the setIsChecked updater perform takes the earlier state worth and updates it by toggling its Boolean worth.
Discover that we added a paragraph after the label to indicate that the checkbox listens to the state outlined within the element:
Specifying the checkbox’s preliminary state and different management attributes
Let’s present an choice to go some props alongside the label into the Checkbox element. As an illustration, we will specify whether or not or not a checkbox must be checked by default, and whether or not the checkbox is disabled or not.
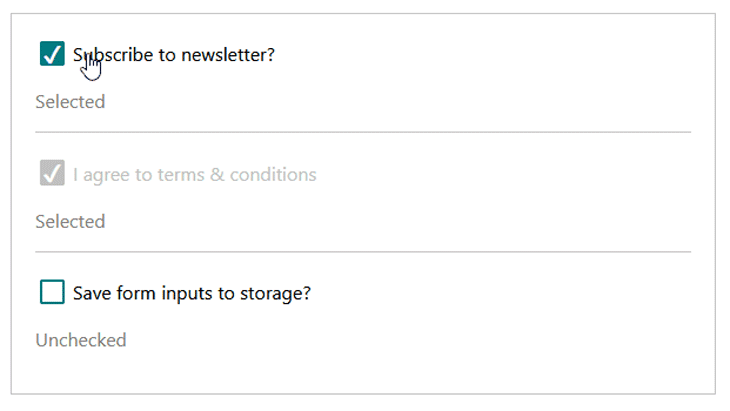
Within the App element under, we’ve added extra <Checkbox /> to incorporate a checked and disabled prop:
const App = () => {
  return (
    <div className="app">
      <Checkbox label="Subscribe to e-newsletter?" checked={true} />
      <Checkbox label="I comply with phrases & circumstances" checked={true} disabled />
      <Checkbox label="Save type inputs to storage?" />
    </div>
  );
};
export default App;
Assigning a true worth to the checked prop means we would like the checkbox subject checked by default. In any other case, we would like it unchecked. Likewise, passing a disabled prop means we would like the checkbox disabled.
Subsequent, let’s entry the props from the Checkbox element and use them:
const Checkbox = ({ label, checked, ...props }) => {
  const defaultChecked = checked ? checked : false;
  const [isChecked, setIsChecked] = useState(defaultChecked);

  return (
    <div className="checkbox-wrapper">
      <label>
        <enter
          // ...
          {...props}
        />
        {/* ... */}
    </div>
  );
};
export default Checkbox;
Within the code, we began through the use of the ternary operator to test if the worth of the checked prop is true or false. The result’s then used because the preliminary state worth that will get utilized to the checkbox on the preliminary DOM render.
Then, on the enter component, we unfold the opposite props that the element receives. As an illustration, the element might obtain a disabled prop, so it additionally will get utilized to the enter component. At this level, our checkboxes appear to be this:
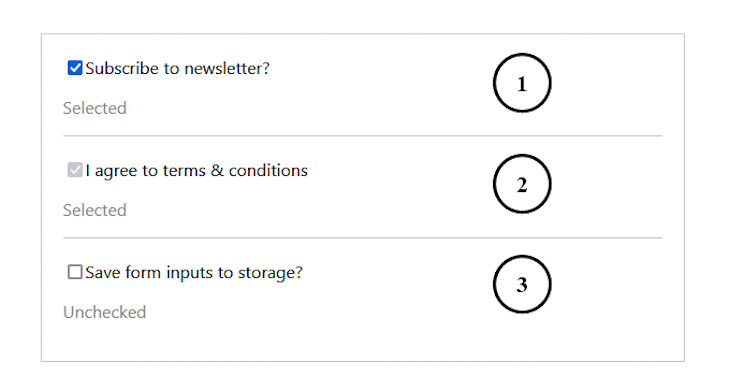
The primary and second checkboxes are checked by default as a result of we assigned a true worth to their checked prop. The second checkbox is disabled as a result of we additionally handed alongside a disabled prop. Within the subsequent part, we’ll give our checkboxes a customized appear and feel.
Styling the checkbox in React
We talked about earlier that the kinds utilized to the native checkbox are inherited from the browser’s working system. This leads to some styling restrictions on the checkbox.
There are varied methods to type React parts. A technique we will overcome these particular restrictions and supply a customized design for our checkbox is to take away the default look utilizing the look: none; CSS property.
One other technique — which is extra of a hack — is to cover the native checkbox after which create a customized design whereas nonetheless listening to occasions on the hidden checkbox.
For this second technique, we should not set the CSS show property to none or use the hidden attribute in order that the checkboxes usually are not invisible to the browsers and display screen readers.
As a substitute, we will merely apply opacity: 0; and place: absolute; to cover the native checkbox. Then, we create a pseudo-element on the label component that we will type to behave instead of the checkbox.
type an accessible checkbox in React
The customized checkbox on this tutorial is constructed on the native checkbox in React, which naturally gives assist for assistive expertise. We will strip off the browser kinds utilizing the CSS property look: none; and provides it a customized look, which we’ll cowl in additional element under.
Utilizing this technique or the opposite one utilizing opacity: 0; and place: absolute; that we talked about earlier, the checkbox will naturally assist assistive expertise and might be focusable and keyboard-accessible.
If we had set the CSS show property of the enter checkbox to none or used the hidden attribute on the enter, the checkbox could be invisible to the browsers. This doesn’t assist net accessibility, so we must always keep away from doing that.
One other manner we will customise a checkbox is to exchange the native enter with a non-focusable component like <div> or span after which type it to take the form of a checkbox. In that case, we should repurpose the component by including ARIA attributes like function="checkbox", aria-checked, tabindex="0" to assist assistive expertise.
Nevertheless, it’s higher to construct a customized checkbox on the native enter. Hold studying to see how now we have achieved so on this tutorial utilizing the look: none; CSS property.
Utilizing the look: none; CSS property
The method utilizing look: none; is trendy and appropriate for customizing the checkbox. We are going to begin by eradicating the default kinds of the native checkbox and including customized kinds:
.checkbox-wrapper enter[type="checkbox"] {
  /* eradicating default look */
  -webkit-appearance: none;
  look: none;
  /* making a customized design */
  width: 1.6em;
  peak: 1.6em;
  border-radius: 0.15em;
  margin-right: 0.5em;
  border: 0.15em strong #007a7e;
  define: none;
  cursor: pointer;
}
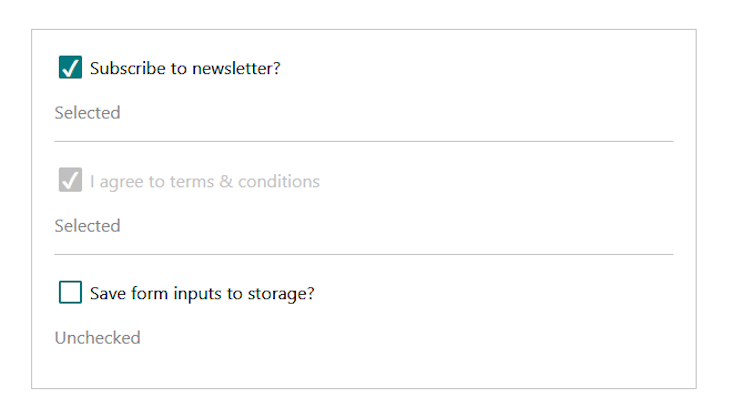
The main focus right here is on the look property, which we set to none. This lets us create a customized design for the checkbox. The checkboxes ought to now appear to be this:
Subsequent, we have to type the customized field when the sector is checked. We will do that by dynamically including a customized class to the enter component, which we will then type. We will additionally use the :checked pseudo-class selector to match each checked field.
Including a customized class to the enter component
We are going to use the ternary operator so as to add a customized class to the enter if the isChecked state variable is true:
const Checkbox = ({ label, checked, ...props }) => {
  // ...
  return (
    <div className="checkbox-wrapper">
      <label>
        <enter
          // ...
          className={isChecked ? "checked" : ""}
        />
      </label>
    </div>
  );
};
export default Checkbox;
Then we will type the chosen enter subject with CSS utilizing the dynamic class like so:
enter.checked {
  background-color: #007a7e;
  place: relative;
}
Earlier than we check out the design, let’s add a test mark to point that the sector is checked. To do that, we’ll use the CSS content material property with the ::earlier than pseudo-element to insert the test mark.
Our up to date CSS file ought to have the next:
enter.checked::earlier than {
  content material: "2714";
  font-size: 1.5em;
  shade: #fff;
  place: absolute;
  proper: 1px;
  prime: -5px;
}
Subsequent, let’s add the next kinds for the disabled and focus states:
.checkbox-wrapper enter[type="checkbox"]:disabled {
  border-color: #c0c0c0;
  background-color: #c0c0c0;
}

.checkbox-wrapper enter[type="checkbox"]:disabled + span {
  shade: #c0c0c0;
}

.checkbox-wrapper enter[type="checkbox"]:focus {
  box-shadow: 0 0 20px #007a7e;
}
The checkboxes ought to now appear to be so:
Utilizing the :checked selector as a substitute of including a customized class
If we don’t need to add a customized class to the enter as we did above, we will use the :checked selector on the enter to focus on the checked component after which type it accordingly. On this case, we will take away the className attribute from the enter component so it seems like this:
<enter
  sort="checkbox"
  checked={isChecked}
  onChange={() => setIsChecked((prev) => !prev)}
  {...props}
/>
Then, we exchange the .checked class selector with the :checked pseudo-class selector:
enter:checked {
  background-color: #007a7e;
  place: relative;
}

enter:checked::earlier than {
  content material: "2714";
  font-size: 1.5em;
  shade: #fff;
  place: absolute;
  proper: 1px;
  prime: -5px;
}
At this level, we will save all information and take a look at our undertaking. See the demo and full code on CodeSandbox.
The enter and label parts as siblings as a substitute of nested
Generally, we might need to have the enter and label parts as siblings as a substitute of nesting the enter instantly contained in the label. On this case, we should make provision for a singular id to affiliate each label with their enter component.
For this, every of the <Checkbox /> parts should embrace a singular id prop like so:
import Checkbox from "./Checkbox";
const App = () => {
  return (
    <div className="app">
      <Checkbox
        id="subscribeNews"
        label="Subscribe to e-newsletter?"
        checked={true}
      />
      {/* different checkboxes */}
    </div>
  );
}
export default App;
Then within the Checkbox element, we will entry the id and use it to affiliate the enter component with the label, like so:
const Checkbox = ({ id, label, checked, ...props }) => {
  // ...
  return (
    <div className="checkbox-wrapper">
      <enter
        id={id}
        sort="checkbox"
        checked={isChecked}
        onChange={() => setIsChecked((prev) => !prev)}
        {...props}
      />
      <label htmlFor={id}>{label}</label>
    </div>
  );
}

export default Checkbox;
Conclusion
Constructing a customized checkbox is right if we need to preserve a constant look throughout browsers and gadgets. In HTML, we solely have to customise the native checkbox. React, nevertheless, desires us to manage the checkboxes so they’re in sync with the element state.
On this tutorial, we realized the best way to work with type management in React whereas additionally constructing a customized checkbox. For those who loved studying this tutorial, endeavor to share it across the net. And you probably have questions and or contributions, share your ideas within the remark part.
Full visibility into manufacturing React apps
Debugging React functions might be tough, particularly when customers expertise points which are arduous to breed. For those who’re enthusiastic about monitoring and monitoring Redux state, mechanically surfacing JavaScript errors, and monitoring gradual community requests and element load time, strive LogRocket. 

LogRocket is sort of a DVR for net and cell apps, recording actually all the things that occurs in your React app. As a substitute of guessing why issues occur, you possibly can combination and report on what state your software was in when a difficulty occurred. LogRocket additionally displays your app’s efficiency, reporting with metrics like shopper CPU load, shopper reminiscence utilization, and extra.
The LogRocket Redux middleware package deal provides an additional layer of visibility into your consumer classes. LogRocket logs all actions and state out of your Redux shops.
Modernize the way you debug your React apps — begin monitoring at no cost.
