
One of many attention-grabbing issues about utilizing static website turbines (SSGs) is the flexibility to spin up apps and make additions and modifications to them simply. This makes it excellent for constructing blogs due to the fixed article additions and enhancing that occurs with blogs.
On this article, we’ll be utilizing Capri, a static website generator that generates static websites utilizing the islands structure mannequin.
Soar forward:
How does Capri work?
Ordinarily, Capri doesn’t ship any JavaScript to the frontend by default, simply static HTML and CSS. To deal with interactivity and dynamic information on our Capri weblog, we have to hydrate it by utilizing an *island.* suffix. Because of this should you’re fetching information or dealing with some interactivity along with your part, you’ll be able to identify it componentname.island.jsx. This identify format depends upon the framework/library we’re utilizing — as an illustration, if we’re utilizing Vue, it’ll be componentname.island.vue.
In circumstances the place we have to render each static and dynamic content material in the identical part, or when we’ve a dynamic part that passes props right into a static part, we use the *lagoon.* suffix. The purpose of that is to make sure that the positioning is quicker and hydrates dynamic parts solely when essential.
Getting began
Let’s spin up our weblog utilizing React and Capri. To set off a quickstart, run this command in your terminal:
npm init capri my-capri-site -- -e react
It units up a pattern Capri website in React. We’ll need to take away the boilerplate code and add customized parts for our venture.
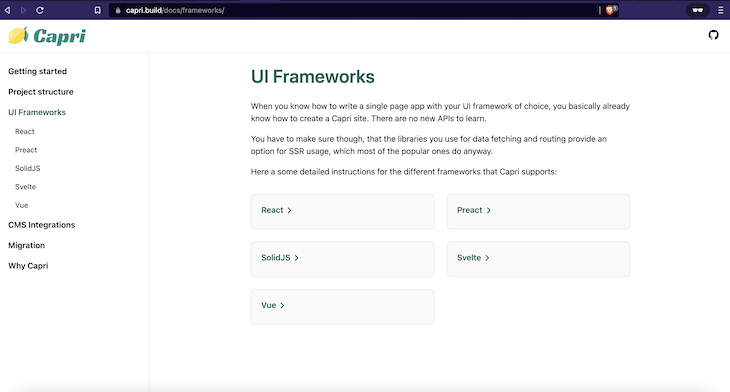
We will additionally use Capri with different well-liked UI frameworks which have SSR assist, like Vue, Svelte, Preact, and so forth.:
You need to know that Capri presents a preview mode that allows sizzling reloads whereas working our app regionally. It renders our app regionally as a SPA.
import { Navigate } from "react-router-dom";
/**
 * Deal with preview requests like `/preview?slug=/about` by redirecting
 * to the given slug parameter.
 */
export default operate Preview() {
  const url = new URL(window.location.href);
  const slug = url.searchParams.get("slug") ?? "https://weblog.logrocket.com/";
  return <Navigate to={slug} />;
}
/**
 * Element to show a banner when the positioning is seen as SPA.
 */
export operate PreviewBanner() {
  return <div className="banner">Preview Mode</div>;
}

// src/preview.tsx
We wrap the preview part across the <App/> part:
import { StrictMode } from "react";
import ReactDOM from "react-dom/consumer";
import { BrowserRouter } from "react-router-dom";
import { App } from "./App";
import { PreviewBanner } from "./Preview.jsx";
ReactDOM.createRoot(doc.getElementById("app")!).render(
  <StrictMode>
    <BrowserRouter basename={import.meta.env.BASE_URL}>
      <PreviewBanner />
      <App />
    </BrowserRouter>
  </StrictMode>
);

// src/essential.tsx
So, for our server rendering, the entry file appears like this:
import { RenderFunction, renderToString } from "@capri-js/react/server";
import { StrictMode } from "react";
import { StaticRouter } from "react-router-dom/server.js";
import { App } from "./App";
export const render: RenderFunction = async (url: string) => {
  return {
    "#app": await renderToString(
      <StrictMode>
        <StaticRouter location={url} basename={import.meta.env.BASE_URL}>
          <App />
        </StaticRouter>
      </StrictMode>
    ),
  };
};

// src/essential.server.tsx
One other factor to notice is that Capri makes use of Vite out of the field for its config.
import capri from "@capri-js/react";
import react from "@vitejs/plugin-react";
import { defineConfig } from "vite";
export default defineConfig({
  plugins: [
    react(),
    capri({
      spa: "/preview",
    }),
  ],
});
Lastly, we’ve the foundation index.html in our root folder:
<!DOCTYPE html>
<html lang="en">
  <head>
    <meta charset="UTF-8" />
    <meta identify="viewport" content material="width=device-width, initial-scale=1" />
    <hyperlink rel="icon" kind="picture/svg+xml" href="https://weblog.logrocket.com/src/capri.svg" />
  </head>
  <physique>
    <div id="app"></div>
    <script kind="module" src="/src/essential.tsx"></script>
  </physique>
</html>
Constructing our weblog
We’ll be constructing a Rick and Morty weblog, the place every submit accommodates details about characters within the collection.
Scaffolding the house web page
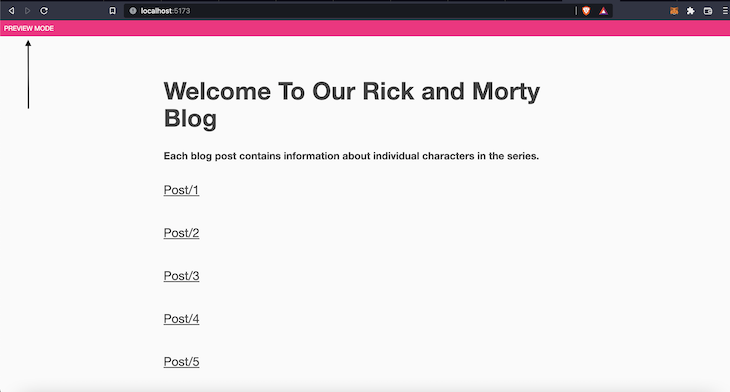
Let’s construct our weblog’s house web page. Create a Residence.tsx file in our src folder. It’s the primary web page the consumer sees as soon as they land on the weblog. It’s going to be a static part.
export default operate Residence() {
  return (
    <essential>
      <h1>Welcome To Our Rick and Morty Weblog</h1>
      <h5>
        Every weblog submit accommodates details about particular person characters within the
        collection.
      </h5>
      <Posts />
    </essential>
  );
}

// src/Residence.tsx
We will now go into our App.tsx file and import our Residence.tsx file.
import "./App.css";
import { Suspense } from "react";
import Preview from "./Preview.jsx";
import { Route, Routes } from "react-router-dom";
import Residence from "./Residence";

export operate App() {
  return (
    <Suspense fallback={<div>loading...</div>}>
      <Routes>
        <Route index ingredient={<Residence />} />
        <Route path="/preview" ingredient={<Preview />} />
      </Routes>
    </Suspense>
  );
}

// src/App.tsx
We wrap our part utilizing React Router and Suspense to deal with our app’s routing and information fetching, respectively.
Displaying the listing of posts
Subsequent, we have to show the listing of posts. To try this, let’s create a Posts part in a file we’ll name Posts.lagoon.tsx:
import { Hyperlink } from "react-router-dom";

export default operate Posts() {
  const container = {
    show: "grid",
  };
  const containerItem = {
    paddingBottom: "3rem",
  };
  return (
    <div fashion={container}>
      {[...Array(10)].map((x, i) => (
        <div fashion={containerItem}>
          <Hyperlink to={`/submit/${i + 1}`}>
            Submit/{i + 1}
          </Hyperlink>
        </div>
      ))}
    </div>
  );
}

// Posts.lagoon.tsx
Right here, we loop via ten gadgets in an array and show ten posts. Every merchandise has a Hyperlink (from React Router) that makes use of dynamic parameters to go an id to the web page. We’ll get to that id later within the article.
For now, let’s import the Posts.lagoon.tsx part into our Residence.tsx part.
import Posts from "./Posts.lagoon";

export default operate Residence() {
  return (
    <essential>
      <h1>Welcome To Our Rick and Morty Weblog</h1>
      <h5>
        Every weblog submit accommodates details about particular person characters within the
        collection.
      </h5>
      <Posts />
    </essential>
  );
}
We listing out the ten submit gadgets. As beforehand talked about, we’re at the moment in preview mode since we’re nonetheless working the app regionally.
Then, we have to create a brand new part that’s referred to as the PostItem.lagoon.tsx file to show every submit.
import { Hyperlink, useParams } from "react-router-dom";
import axios from "axios";
import useSWR from "swr";
export default operate PostItem() {
  let { id } = useParams();
  const url = `https://rickandmortyapi.com/api/character/${id}`;
  const fetcher = (url: string) =>
axios.get(url).then((res: any) => res.information);
  const { information, error } = useSWR(url, fetcher, { suspense: true });
  if (error) return <div>didn't load</div>;
  return (
    <essential>
      <h1>{information.identify}</h1>
      <img src={information.picture}></img>
      <part>Standing: {information.standing}</part>
      <part>Species: {information.species}</part>
      <part>Variety of episodes featured: {information.episode.size}</part>
      <part>
        <h5>Location: {information.location.identify}</h5>
        <h5>Gender: {information.gender}</h5>
      </part>
      <Hyperlink to="https://weblog.logrocket.com/">Again Residence</Hyperlink>
    </essential>
  );
}
Inside this part, we’re going to retrieve the id from Posts.lagoon.tsx. We’ll make use of the useParams Hook from our React Router occasion to get the present id from our URL params. We’ll then take this id and append it to our Rick and Morty endpoint.
To name this endpoint, we’ll make use of useSWR and Axios. To make use of this, we’ll have to put in each packages:
yarn add swr

yarn add axios
Subsequent, we write a fetcher operate that receives the endpoint, makes a GET request utilizing axios, and returns the response.
const fetcher = (url: string) =>
axios.get(url).then((res: any) => res.information);
const { information, error } = useSWR(url, fetcher, { suspense: true });
We then make the precise request utilizing useSWR. We go within the fetcher operate and assign suspense as true to deal with our loading state.
The loading state is the momentary timeframe after we’re ready for a response from the endpoint. If our requests work as anticipated, we assign the response to information. If there’s an error, we’ll show <div>didn't load</div>.
Extra nice articles from LogRocket:
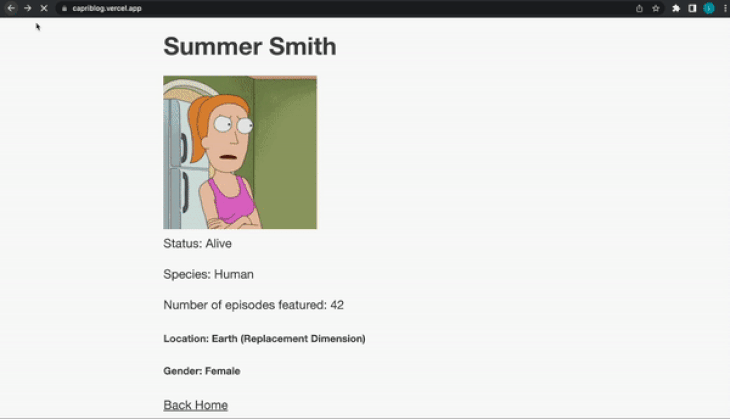
After this, we will show all the information throughout the part. We’ll additionally add a Hyperlink that’ll take us again to the house web page.
<essential>
  <h1>{information.identify}</h1>
  <img src={information.picture}></img>
  <part>Standing: {information.standing}</part>
  <part>Species: {information.species}</part>
  <part>Variety of episodes featured: {information.episode.size}</part>
  <part>
    <h5>Location: {information.location.identify}</h5>
    <h5>Gender: {information.gender}</h5>
  </part>
  <Hyperlink to="https://weblog.logrocket.com/">Again Residence</Hyperlink>
</essential>
Let’s now import this PostItem.lagoon.tsx part into our App.tsx as a route.
import "./App.css";
import { Suspense } from "react";
import { Route, Routes } from "react-router-dom";
import Residence from "./Residence";
import Preview from "./Preview.jsx";
import PostItem from "./PostItem.lagoon";
export operate App() {
  return (
    <Suspense fallback={<div>loading...</div>}>
      <Routes>
        <Route index ingredient={<Residence />} />
        <Route path="/preview" ingredient={<Preview />} />
        <Route path="/submit/:id" ingredient={<PostItem />} />
      </Routes>
    </Suspense>
  );
}

// App.tsx
The dwell demo is correct right here, whereas the code is hosted on my GitHub.
Conclusion
Congratulations . We’ve efficiently gotten began with Capri and spun up our personal weblog in report time.
For those who’re on the lookout for one other venture, you’ll be able to merge the superpowers of Capri with headless content material administration methods (CMS) like Contentful or Storyblok. These CMSs act as a supply for our information. You’ll be able to add the information to your most popular CMS and pull it into your Capri app.
LogRocket: Full visibility into your internet and cellular apps

LogRocket is a frontend software monitoring answer that permits you to replay issues as in the event that they occurred in your individual browser. As an alternative of guessing why errors occur, or asking customers for screenshots and log dumps, LogRocket permits you to replay the session to shortly perceive what went mistaken. It really works completely with any app, no matter framework, and has plugins to log extra context from Redux, Vuex, and @ngrx/retailer.
Along with logging Redux actions and state, LogRocket information console logs, JavaScript errors, stacktraces, community requests/responses with headers + our bodies, browser metadata, and customized logs. It additionally devices the DOM to report the HTML and CSS on the web page, recreating pixel-perfect movies of even probably the most complicated single-page and cellular apps.
Are you including new JS libraries to enhance efficiency or construct new options? What in the event that they’re doing the alternative?
There’s little doubt that frontends are getting extra complicated. As you add new JavaScript libraries and different dependencies to your app, you’ll want extra visibility to make sure your customers don’t run into unknown points.
LogRocket is a frontend software monitoring answer that permits you to replay JavaScript errors as in the event that they occurred in your individual browser so you’ll be able to react to bugs extra successfully.

LogRocket works completely with any app, no matter framework, and has plugins to log extra context from Redux, Vuex, and @ngrx/retailer. As an alternative of guessing why issues occur, you’ll be able to mixture and report on what state your software was in when a problem occurred. LogRocket additionally screens your app’s efficiency, reporting metrics like consumer CPU load, consumer reminiscence utilization, and extra.
Construct confidently — Begin monitoring without cost.
