
Desk of Contents
Since COVID-19 appeared on the planet, eCommerce has exploded. Based on the Worldwide Commerce Administration, there’s been a 19% improve in income between pre- and post-covid eCommerce in 2020. Because of this, entrepreneurs turned to on-line platforms equivalent to Shopify, WordPress (and its plugin, wooCommerce), and Squarespace to arrange their on-line shops.
With Shopify, not solely can customers arrange a web-based retailer, however because of their Storefront API, builders can create a customized shopper software to hook up with it.
On this article, you’ll discover ways to arrange a Shopify retailer and get your Storefront API token. As soon as your token is acquired, you’ll create a Subsequent.js software to checklist and show your merchandise with dummy knowledge. Lastly, you’ll join your Subsequent.js software to your Shopify software to fetch your actual merchandise.
Create a Shopify Retailer (optionally available)
If you have already got a Shopify retailer arrange, you’ll be able to skip this step and head to step 2.
If not, head to Shopify’s web site and join a free trial. As soon as accomplished, you can begin by creating some collections, that are used to categorize your merchandise.
To create a group, go to Merchandise, then Collections. Subsequent, click on on Create assortment. Enter a title and select Handbook for the gathering kind. With the latter, you’ll be able to manually add merchandise to this assortment.
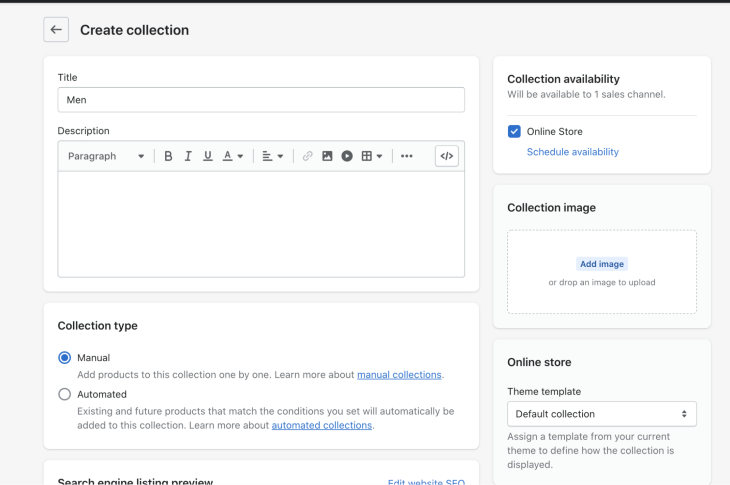
For this tutorial, two collections are essential: Males and Ladies.
As soon as your collections are arrange, click on on Merchandise after which Add product.
To create a product, listed below are some steps to observe:
- Enter a title
- Add an image within the media file enter
- Select a kind (i.e., footwear)
- Choose a assortment (i.e., girls or males)
- Enter a worth
- Within the stock part, add a amount within the accessible column
- Set the product standing as lively
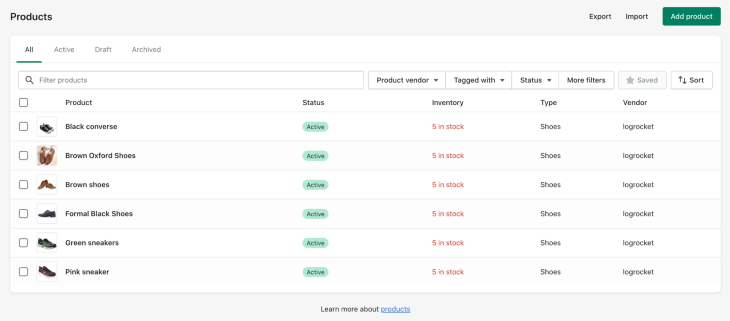
- Lastly, click on save. It will create an lively product in your retailer. Repeat these steps a number of occasions to fill your retailer. For instance, right here is a web-based retailer with some footwear:
Get Shopify’s Storefront API token
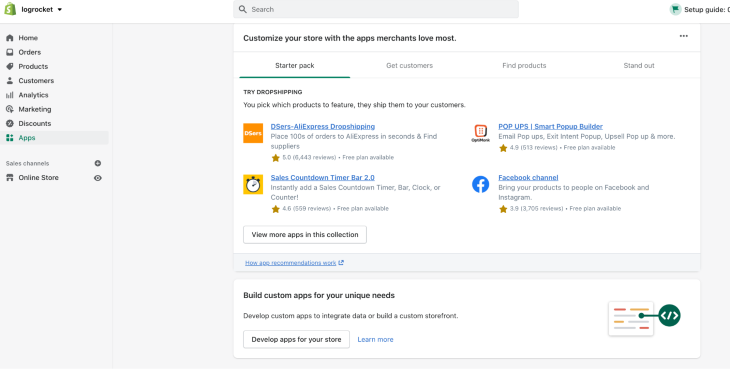
As soon as your retailer is ready up, you will want an API token to entry it from a third-party software. Go to Apps, click on on Develop apps to your retailer, and undergo the step to allow app growth.
As soon as this function is enabled, click on on Create an App and fill out your app identify.
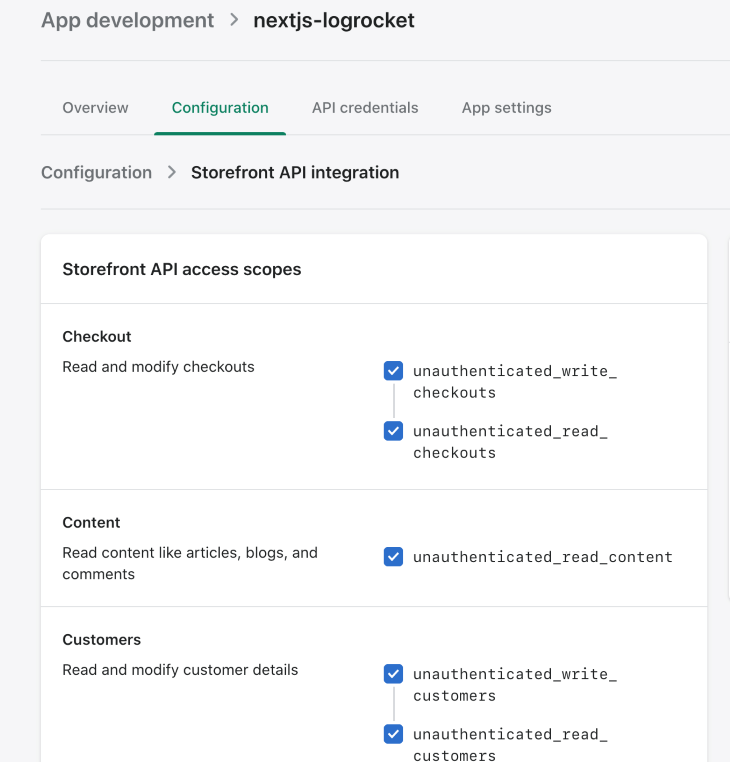
As soon as your app is created, click on in your new app and head to Configuration. Within the Storefront API part, click on on Configure.
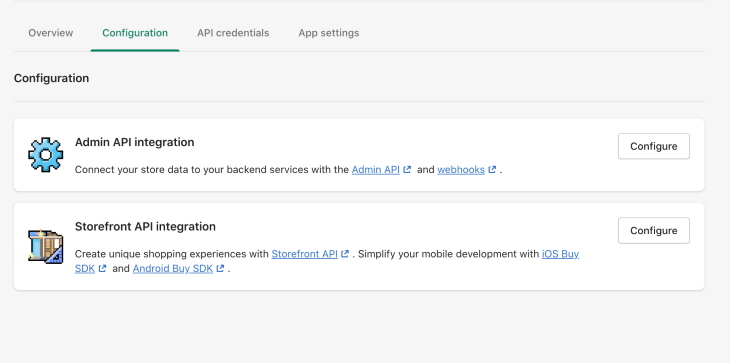
Subsequent, below Storefront API entry scopes, choose all of the checkboxes. It will grant you the power to fetch knowledge out of your retailer, equivalent to your merchandise, whereas being unauthenticated. Click on Save.
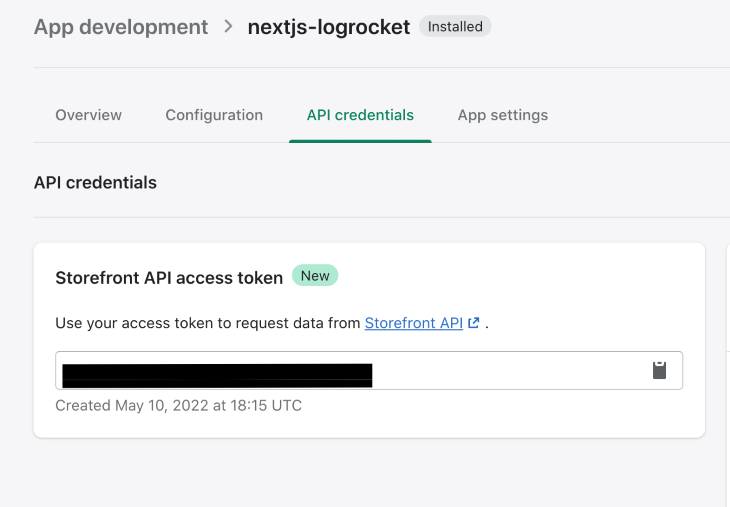
To get your Storefront entry token, you will want to put in your newly created app, so click on on the inexperienced Set up button.
Now you can retrieve your entry token by going again to your software and to API credentials. Word that token down, as you will want it later.
Arrange the Subsequent.js app
For this tutorial, you’ll use MUI. This element library permits you to get pre-built elements to construct UI far faster.
Fortunately, MUI additionally comes with a Subsequent.js starter challenge which you will get by working this command:
curl https://codeload.github.com/mui/material-ui/tar.gz/grasp | tar -xz --strip=2 material-ui-master/examples/nextjs
The earlier command, sadly, will create the challenge with the default identify nextjs. if you want to rename it, run:
    mv nextjs <your_app_name> # Mac
    ren nextjs <your_app_name> # Home windows
As soon as accomplished, enter your challenge and set up the dependencies:
    cd <your_app_name>
    npm set up
    npm run dev
Creating your UI might be simpler with some dummy knowledge. To take action, create a knowledge.js inside your root folder and add some dummy merchandise:
    const PRODUCTS = [
      {
        handle: 1,
        name: 'Women Black Shoes',
        price: '14.99',
        collection: 'women',
        image: 'https://external-content.duckduckgo.com/iu/?u=http%3A%2F%2Fcohenwoodworking.com%2Fwp-content%2Fuploads%2F2016%2F09%2Fimage-placeholder-500x500.jpg&f=1&nofb=1'
      },
      {
        handle: 2,
        name: 'Women Brown Shoes',
        price: '14.99',
        collection: 'women',
        image: 'https://external-content.duckduckgo.com/iu/?u=http%3A%2F%2Fcohenwoodworking.com%2Fwp-content%2Fuploads%2F2016%2F09%2Fimage-placeholder-500x500.jpg&f=1&nofb=1'
      },
      {
        handle: 3,
        name: 'Women Purple Shoes',
        price: '14.99',
        collection: 'women',
        image: 'https://external-content.duckduckgo.com/iu/?u=http%3A%2F%2Fcohenwoodworking.com%2Fwp-content%2Fuploads%2F2016%2F09%2Fimage-placeholder-500x500.jpg&f=1&nofb=1'
      }
    ];

    export default PRODUCTS;
Create the eCommerce retailer’s homepage with Subsequent.js
Inside your Subsequent.js root folder, create a elements folder.
Inside this folder, you’ll create a element to checklist your merchandise referred to as ProductList. MUI has some pre-built elements to create a listing with photos and titles beneath them in a grid format.
These elements are referred to as: ImageList, ImageListItem, and ImageListItemBar. You’ll find the documentation right here.
Inside your elements folder, create ProductsList.js. Import all the mandatory elements from MUI and arrange your grid. Assume that your element will obtain an array of merchandise and map over it to create a single product entry with a picture and a title beneath.
 import * as React from 'react';
    import Typography from '@mui/materials/Typography';
    import ImageList from '@mui/materials/ImageList';
    import ImageListItem from '@mui/materials/ImageListItem';
    import ImageListItemBar from '@mui/materials/ImageListItemBar';


    export default operate ProductsList({merchandise}) {
      return (
        <ImageList cols={5} hole={20}>
          {merchandise.map((product) => (
            <ImageListItem key={product.picture}>
              {/* Product's picture*/}
              <img
                src={`${product.picture}?w=250&match=crop&auto=format`}
                srcSet={`${product.picture}?w=250&match=crop&auto=format&dpr=2 2x`}
                alt={product.identify}
                loading="lazy"
              />
              {/* Product's identify + worth below the picture */}
              <ImageListItemBar
                title={product.identify}
                subtitle={<span>Worth: {product.worth}</span>}
                place="under"
              />
            </ImageListItem>
          ))}
        </ImageList>
      )
    };
One other element you will want is a navigation bar. You should use MUI’s AppBar and Toolbar to create one. Inside, add your collections as textual content. You’ll discover ways to arrange routing later.
Right here is the results of your Navigation.js element:
  import * as React from 'react';
    import AppBar from '@mui/materials/AppBar';
    import Toolbar from '@mui/materials/Toolbar';
    import Typography from '@mui/materials/Typography';


    export default operate Navigation() {
      return (
        <AppBar place="static">
          <Toolbar>
            <Typography mr={2}>All merchandise</Typography>
            <Typography mr={2}>Ladies</Typography>
            <Typography>Males</Typography>
          </Toolbar>
        </AppBar>
      )
    };
Lastly, use your newly created elements, ProductsList and Navigation.js, in your software’s homepage. This web page is out there on the URL and is rendered from the pages/index.js file.
Word: If you’re unfamiliar with Subsequent.js’s web page performance and its rendering, take a look at the documentation.
Inside index.js, import Navigation, ProductLists, and your dummy knowledge. You possibly can cross your knowledge into your checklist of merchandise:
  import * as React from 'react';
    import Container from '@mui/materials/Container';
    import Field from '@mui/materials/Field';


    import Navigation from '../elements/Navigation';
    import ProductsList from '../elements/ProductsList';
    import PRODUCTS from '../knowledge.js';


    export default operate Index() {
      return (
        <Field>
          <Navigation />
          <Container maxWidth="lg">
            <ProductsList merchandise={PRODUCTS} />
          </Container>
        </Field>
      );
    }
By this level, when you refresh your web page, it’s best to see this:

Create totally different assortment pages within the eCommerce app
Now that your homepage is ready up, you want collections pages. Most on-line outlets break up their merchandise into classes, so it’s simpler for customers to browse their catalogs. Because of this, we’ll create a particular assortment.
Subsequent.js gives dynamic routing. If you’re unfamiliar with it, it permits you to create routes, equivalent to /collections/[collectionName. By doing so, URLs such as /collections/women or /collections/men will use the same .js page.
Inside your pages folder, create a collections folder and inside that, a [collectionName].js file. This element might be similar to your homepage. You’ll, nevertheless, filter your merchandise to seize solely those from the right assortment.
Fortunately, Subsequent.js additionally comes with a useRouter hook from which you will get the question params from the URL. After getting the collectionName, you need to use it when filtering your merchandise. Lastly, cross your filtered checklist of merchandise to ProductsList.
 import * as React from 'react';
    import { useRouter } from 'subsequent/router'


    import Container from '@mui/materials/Container';
    import Field from '@mui/materials/Field';


    import Navigation from '../../elements/Navigation';
    import BreadcrumbsNavigation from '../../elements/BreadcrumbsNavigation';
    import ProductsList from '../../elements/ProductsList';
    import PRODUCTS from '../../knowledge.js';


    export default operate CollectionPage() {
      const router = useRouter()
      const { collectionName } = router.question
      const merchandise = PRODUCTS.filter(product => product.assortment === collectionName)
      return (
        <Field>
          <Navigation />
          <Container maxWidth="lg">
            <BreadcrumbsNavigation assortment={collectionName} />
            <ProductsList merchandise={merchandise} />
          </Container>
        </Field>
      );
    }
Discover that your assortment’s web page is utilizing a customized element referred to as BreadcrumbsNavigation. That is to render customized breadcrumbs to your retailer.
To create this element, inside your elements folder, create a BreadcrumbsNavigation.js. MIU gives a Breadcrumbs element so that you can use. Added to this, the Hyperlink element permits you to add routing to get again to your homepage.
Right here is the tip outcome:
    import * as React from 'react';


    import Field from '@mui/materials/Field';
    import Breadcrumbs from '@mui/materials/Breadcrumbs';
    import Typography from '@mui/materials/Typography';
    import Hyperlink from '@mui/materials/Hyperlink';


    export default operate BreadcrumbsNavigation({title}) {
      return (
        <Field mt={2}>
          <Breadcrumbs separator="›" aria-label="breadcrumb">
            <Hyperlink underline="hover" key="1" shade="inherit" href="https://weblog.logrocket.com/">
              Merchandise
            </Hyperlink>
            <Typography key="3" shade="textual content.main">
              {title && title.substitute(/^w/, c => c.toUpperCase())}
            </Typography>
          </Breadcrumbs>
        </Field>
      )
    }
In Navigation.js, import the MUI’s Hyperlink element you simply used and add some routing in your app bar to your homepage and your collections:
    import * as React from 'react';


    import AppBar from '@mui/materials/AppBar';
    import Toolbar from '@mui/materials/Toolbar';
    import Typography from '@mui/materials/Typography';
    import Hyperlink from '@mui/materials/Hyperlink';


    export default operate Navigation() {
      return (
        <AppBar place="static">
          <Toolbar>
            <Hyperlink href="https://weblog.logrocket.com/" underline="none" shade="inherit"><Typography mr={2}>All merchandise</Typography></Hyperlink>
            <Hyperlink href="http://weblog.logrocket.com/collections/girls" underline="none" shade="inherit"><Typography mr={2}>Ladies</Typography></Hyperlink>
            <Hyperlink href="http://weblog.logrocket.com/collections/males" underline="none" shade="inherit"><Typography>Males</Typography></Hyperlink>
          </Toolbar>
        </AppBar>
      )
    };
In your ProductList.js, you’ll be able to add a examine in case there are not any merchandise:
    import * as React from 'react';


    import Field from '@mui/materials/Field';
    import Typography from '@mui/materials/Typography';
    ...


    export default operate ProductsList({merchandise}) {
      return (
        <Field>
          {
            (merchandise && merchandise.size > 0) ?
            <ImageList cols={5} hole={20}>
              ...
            </ImageList>:
            <Typography variant="body1" align="heart">There are not any merchandise on this assortment</Typography>
          }
        </Field>
      )
    };
When you head to http://localhost:3000/collections/girls, it’s best to now see this:
![]()
Create a product web page in Subsequent.js and Shopify
Along with your homepage and collections pages arrange, you’ll be able to transfer on to the product web page. Just like the collections web page, Subsequent.js dynamic routing can be utilized to arrange the web page.
Create a merchandise folder. Inside, add a brand new file referred to as [productHandle].js. Whether or not you need to use IDs or handles like black-converse as productHandle, this web page will render your product web page.
After getting the productHandle parameter from the URL, you need to use it to seize your product. To show your product’s picture, Subsequent.js gives an Picture element that comes with built-in picture optimization.
Right here is the outcome for a product web page:
  import * as React from 'react';
    import { useRouter } from 'subsequent/router';
    import Picture from 'subsequent/picture';


    import Container from '@mui/materials/Container';
    import Field from '@mui/materials/Field';
    import Grid from '@mui/materials/Grid'
    import Typography from '@mui/materials/Typography';
    import Button from '@mui/materials/Button';


    import Navigation from '../../elements/Navigation';
    import BreadcrumbsNavigation from '../../elements/BreadcrumbsNavigation';
    import ProductsList from '../../elements/ProductsList';
    import PRODUCTS from '../../knowledge.js';


    export default operate ProductPage() {
        const router = useRouter()
      // Get productHandle from url: /merchandise/[productHandle]
      const { productHandle } = router.question
      // Get product knowledge
      const product = PRODUCTS.discover(product => product.deal with === parseInt(productHandle))
      const { identify, picture, worth } = product || {}


      return (
        <Field>
          <Navigation />
          {product &&
            <Container maxWidth="lg">
              <BreadcrumbsNavigation title={identify} />
                <Grid container course="row">
                  <Grid merchandise xs={6}>
                    <Picture
                      src={picture}
                      alt={`Image of ${identify}`}
                      width={500}
                      peak={500}
                    />
                  </Grid>
                  <Grid merchandise xs={6}>
                    <Typography variant="h3" my={2}>{identify}</Typography>
                    <Grid mt={4}>
                      <Typography variant="h6" element="span">Worth: </Typography>
                      <Typography variant="body1" element="span">{worth}</Typography>
                    </Grid>
                    <Grid mt={1}>
                      <Button variant="contained">Add to cart</Button>
                    </Grid>
                  </Grid>
                </Grid>
            </Container>
          }
        </Field>
      );
    }
If you find yourself utilizing the Picture element, you will want so as to add your picture’s area to subsequent.config.js, like this:
  module.exports = {
      reactStrictMode: true,
      photos: {
        domains: ['external-content.duckduckgo.com'],
      },
    };
You’ll have to restart your server when altering subsequent.config.js.
Lastly, let’s implement routing to your product web page. To take action, head again to your elements/ProductsList.js and use the Subsequent.js router to navigate to your product web page when a consumer clicks on the picture within the product’s checklist. Add on onClick in your ImageListItem, together with the cursor styling, and create a goToProductPage to navigate.
Right here is the tip outcome:
import * as React from 'react';
    import { useRouter } from 'subsequent/router'


    ...


    export default operate ProductsList({merchandise}) {
      const router = useRouter()
      // Navigate to product's web page
      const goToProductPage = productHandle => router.push(`/merchandise/${productHandle}`)


      return (
        <Field>
          {
            (merchandise && merchandise.size > 0) ?
            <ImageList cols={5} hole={20}>
              {merchandise.map((product) => (
                <ImageListItem
                  key={product.picture}
                  model={{cursor: 'pointer'}}
                  onClick={() => goToProductPage(product.deal with)}>
                  ...
                </ImageListItem>
              ))}
            </ImageList>:
            <Typography variant="body1" align="heart">There are not any merchandise on this assortment</Typography>
          }
        </Field>
      )
    };
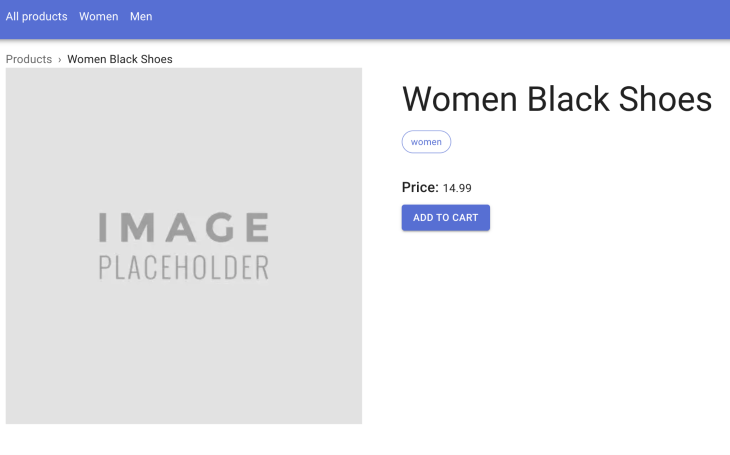
As soon as rendered, here’s what you’ll get:
Retrieve your merchandise with the Shopify Storefront API
Your shopper software is now arrange. Nonetheless, it’s counting on dummy knowledge. To complete your challenge, knowledge out of your Shopify retailer must be fetched and used.
To take action, you will want the Shopify JavaScript Purchase SDK, which you will get by putting in the mandatory package deal:
npm set up shopify-buy
Bear in mind the Storefront API tokens we obtained at first of this text? You’ll retailer them in setting variables. Inside your root challenge, create a file referred to as .env.native and add your token, alongside along with your Shopify area:
  SHOPIFY_STORE_FRONT_ACCESS_TOKEN=*****
    SHOPIFY_STORE_DOMAIN=********
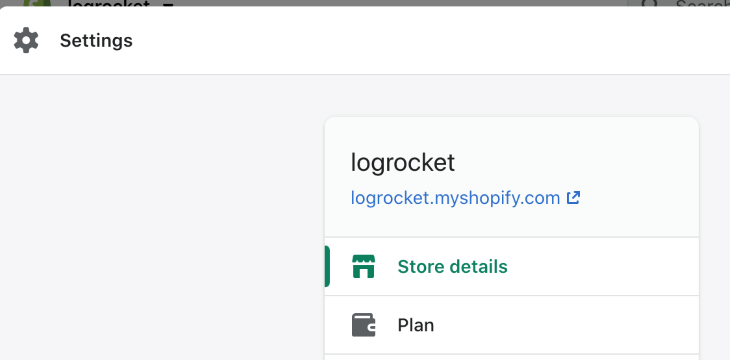
It’s also possible to discover your area by clicking on Settings in your Shopify retailer:
As soon as your variables are arrange, create a lib folder in your root challenge and a shopify.js file inside. On this file, you’ll import your shopify-buy library and create a Shopify shopper along with your variables.
When you make an API name to Shopify, the response returned will have to be stringified and parsed for use as a JSON object later. Because of this, create a parseShopifyResponse operate so you need to use it repeatedly all through your app:
  import Shopper from "shopify-buy";
    export const shopifyClient = Shopper.buildClient({
      storefrontAccessToken: course of.env.SHOPIFY_STORE_FRONT_ACCESS_TOKEN,
      area: course of.env.SHOPIFY_STORE_DOMAIN,
    });


    export const parseShopifyResponse = (response) =>  JSON.parse(JSON.stringify(response));
Let’s proceed by fetching all of your merchandise to your homepage. In index.js, use Subsequent.js’ getServerSideProps to make an API name when the web page is requested. With shopifyClient.product.fetchAll(), you’ll be able to fetch all of the merchandise in your retailer. As soon as the information is returned, it is going to be handed as props to your homepage and in your ProductsList element:
   import * as React from 'react';
    import Container from '@mui/materials/Container';
    import Field from '@mui/materials/Field';


    import Navigation from '../elements/Navigation';
    import ProductsList from '../elements/ProductsList';
    import { shopifyClient, parseShopifyResponse } from '../lib/shopify'


    export default operate Index({merchandise}) {
      return (
        <Field>
          <Navigation />
          <Container maxWidth="lg">
            <ProductsList merchandise={merchandise} />
          </Container>
        </Field>
      );
    }


    export const getServerSideProps = async () => {
      // Fetch all of the merchandise
      const merchandise = await shopifyClient.product.fetchAll();


      return {
       props: {
        merchandise: parseShopifyResponse(merchandise),
      },
     };
    };
The format out of your dummy knowledge shouldn’t be the identical as what Shopify will return. You will want to adapt ProductsList.js to this new knowledge. Inside this file, let’s create a Product element and seize the ID, title, picture, worth, and deal with out of your product.
The Shopify API response could be a bit complicated. For instance, your product’s worth might be within the variants object. Right here is the whole documentation to get a greater thought of a product’s construction.
Shopify’s product additionally comes with a deal with subject generated if you create merchandise. A product labeled “Black converses” would have a deal with equivalent to black-converses. That is very useful for search engine marketing, as strings to URLs equivalent to productId/1 are most popular. You’ll use it in your routing when navigating to your product web page.
Right here is the up to date outcome:
  import * as React from 'react';
    import { useRouter } from 'subsequent/router'


    import Field from '@mui/materials/Field';
    import Typography from '@mui/materials/Typography';
    import ImageList from '@mui/materials/ImageList';
    import ImageListItem from '@mui/materials/ImageListItem';
    import ImageListItemBar from '@mui/materials/ImageListItemBar';


    const Product = ({product, goToProductPage}) => {
      const { id, title, photos, variants, deal with } = product
      const { src: productImage } = photos[0]
      const { worth } = variants[0]
      return (
        <ImageListItem
          model={{cursor: 'pointer'}}
          onClick={() => goToProductPage(deal with)}>
          <img
            src={`${productImage}?w=250&auto=format`}
            srcSet={`${productImage}?w=250&auto=format&dpr=2 2x`}
            alt={title}
            loading="lazy"
          />
          <ImageListItemBar
            title={title}
            subtitle={<span>Worth: {worth}</span>}
            place="under"
          />
        </ImageListItem>
      )
   }
    export default operate ProductsList({merchandise}) {
      const router = useRouter()
      // Navigate to product web page with deal with i.e /merchandise/black-converses
      const goToProductPage = productHandle => router.push(`/merchandise/${productHandle}`)


      return (
        <Field>
          {
            (merchandise && merchandise.size > 0) ?
            <ImageList cols={5} hole={20}>
              {merchandise.map((product) => (
                <Product
                  key={product.deal with}
                  product={product}
                  goToProductPage={goToProductPage}
                />
              ))}
            </ImageList>:
            <Typography variant="body1" align="heart">There are not any merchandise on this assortment</Typography>
          }
        </Field>
      )
    };
Now, you’ll be able to transfer on to replace your product web page. In your merchandise/[productHandle].js, seize the deal with out of your question. Shopify JS SDK comes with a operate referred to as fetchByHandle that fetches a single product from its deal with. Use your productHandle to get your product and add it to your props.
Now, you will want to replace your product web page as you probably did to your checklist of merchandise. You possibly can seize your title, picture, and worth in the identical approach and use them in your web page:
    import * as React from 'react';
    import Picture from 'subsequent/picture'


    import Container from '@mui/materials/Container';
    import Field from '@mui/materials/Field';
    import Grid from '@mui/materials/Grid'
    import Typography from '@mui/materials/Typography';
    import Button from '@mui/materials/Button';


    import Navigation from '../../elements/Navigation';
    import BreadcrumbsNavigation from '../../elements/BreadcrumbsNavigation';
    import ProductsList from '../../elements/ProductsList';
    import { shopifyClient, parseShopifyResponse } from '../../lib/shopify'


    export default operate ProductPage({product}) {


      const { id, title, photos, variants, deal with } = product
      const { src: productImage } = photos[0]
      const { worth } = variants[0]


      return (
        <Field>
          <Navigation />
          {product &&
            <Container maxWidth="lg">
              <BreadcrumbsNavigation title={title} />
                <Grid container course="row">
                  <Grid merchandise xs={6}>
                    <Picture
                      src={productImage}
                      alt={`Image of ${title}`}
                      width={500} mechanically offered
                      peak={500} mechanically offered
                    />
                  </Grid>
                  <Grid merchandise xs={6}>
                    <Typography variant="h3" my={2}>{title}</Typography>
                    <Grid mt={4}>
                      <Typography variant="h6" element="span">Worth: </Typography>
                      <Typography variant="body1" element="span">{worth}</Typography>
                    </Grid>
                    <Grid mt={1}>
                      <Button variant="contained">Add to cart</Button>
                    </Grid>
                  </Grid>
                </Grid>
            </Container>
          }
        </Field>
      );
    }


    export const getServerSideProps = async ({params}) => {
      const { productHandle } = params
      // Fetch one product
      const product = await shopifyClient.product.fetchByHandle(productHandle);


      return {
       props: {
        product: parseShopifyResponse(product),
      },
     };
    };
In your assortment’s web page, you’ll, sadly, want a little bit of filtering. At this second, Shopify JS SDK solely comes with the choice to fetch merchandise by assortment’s ID, however not with its deal with. In collections/[collectionName].js, you need to use shopper.assortment.fetchAllWithProducts() to fetch all of the collections and their merchandise.
After getting them, you’ll be able to seize the suitable one by checking its deal with and passing it to your props.
    import * as React from 'react';


    import Container from '@mui/materials/Container';
    import Field from '@mui/materials/Field';


    import Navigation from '../../elements/Navigation';
    import BreadcrumbsNavigation from '../../elements/BreadcrumbsNavigation';
    import ProductsList from '../../elements/ProductsList';
    import { shopifyClient, parseShopifyResponse } from '../../lib/shopify'


    export default operate CollectionPage({merchandise, collectionName}) {
      return (
        <Field>
          <Navigation />
          <Container maxWidth="lg">
            <BreadcrumbsNavigation title={collectionName} />
            <ProductsList merchandise={merchandise} />
          </Container>
        </Field>
      );
    }


    export const getServerSideProps = async ({params}) => {
      const { collectionName } = params
      // Fetch all of the collections
      const collectionsData = await shopifyClient.assortment.fetchAllWithProducts();
      const collections = parseShopifyResponse(collectionsData);
      // Get the suitable one
      const assortment = collections.discover(assortment => assortment.deal with === collectionName)


      return {
       props: {
        collectionName,
        merchandise: assortment.merchandise,
      },
     };
    };
Lastly, if you’re utilizing the Picture element, you will want to replace subsequent.config.js so as to add Shopify’s picture area:
   module.exports = {
      reactStrictMode: true,
      photos: {
        domains: ['external-content.duckduckgo.com', 'cdn.shopify.com'],
      },
    };
The ultimate outcome seems like this:
The whole codebase might be discovered on this GitHub repo.
Conclusion
On this article, you discovered how you can arrange a Shopify retailer, allow the Storefront API, and get your entry token. You then found how you can create a Subsequent.js app and arrange your frontend by making a homepage, together with assortment and product pages. Lastly, you put in the Shopify JS SDK and discovered how you can use it to fetch merchandise out of your on-line retailer.
From there, many extra functionalities might be applied. Whether or not it’s the creation of a cart, including merchandise to it, or finishing checkout, Shopify’s JS SDK might help you accomplish your targets.
LogRocket: Full visibility into manufacturing Subsequent.js apps
Debugging Subsequent functions might be tough, particularly when customers expertise points which are tough to breed. When you’re fascinated about monitoring and monitoring state, mechanically surfacing JavaScript errors, and monitoring gradual community requests and element load time, attempt LogRocket. 

LogRocket is sort of a DVR for internet and cellular apps, recording actually all the pieces that occurs in your Subsequent app. As an alternative of guessing why issues occur, you’ll be able to mixture and report on what state your software was in when a problem occurred. LogRocket additionally displays your app’s efficiency, reporting with metrics like shopper CPU load, shopper reminiscence utilization, and extra.
The LogRocket Redux middleware package deal provides an additional layer of visibility into your consumer classes. LogRocket logs all actions and state out of your Redux shops.
Modernize the way you debug your Subsequent.js apps — begin monitoring totally free.
