
Vitepress is a static website generator powered by Vite and Vue.js that’s rapidly gaining reputation within the frontend world. It has wonderful options that simplify constructing static websites and gives minimal functionalities with out compromising efficiency. With Vitepress, you’ll be able to design your pages and content material utilizing Markdown and completely different themes to construct net pages sooner.
This text goals to familiarize you with Vitepress by constructing a weblog utilizing Vitepress and Vue.js with Markdown.
Soar forward:
What are Vite and Vitepress?
Vitepress, because the identify suggests, is powered by Vite. Vite replaces instruments like Rollup and Webpack and goals to deal with the ache factors of Webpack and different frontend construct instruments. The first advantages of utilizing Vite are:
- Quicker server begin
- Prompt sizzling module reloading(HMR)
- Much less time configuring
Yow will discover extra particulars about Vite right here.
Webpack takes longer to begin a improvement server, which might be insufferable for builders. When the documentation website will get bigger, it turns into very annoying to work with Webpack. This was the first motivation for creating Vitepress. In case you have labored with Vuepress earlier than, Vitepress could be very comparable, and each frameworks concentrate on constructing documentation pages with ease. One distinction is that Vuepress makes use of Webpack and Vitepress makes use of Vite.
As a substitute of refactoring the codebase of Vuepress, Evan You, the founding father of Vue and Vitepress, created the brand new static website generator with assist for Vite and Vue 3. Their layouts are additionally designed for documentation websites. Nonetheless, you’ll be able to create layouts too.
As a result of it’s in its alpha section, Vitepress nonetheless lacks extra options than Vuepress, however it’s also easy to work with as a result of the staff behind Vitepress wished to maintain it minimal.
It’s value mentioning that Vitepress doesn’t assist the present Vuepress ecosystem as a result of the staff at Vitepress desires to maintain the theming API minimal in order that customizations might be achieved within the theme. To study extra about how Vitepress differs from Vuepress, consult with their official documentation.
Constructing a weblog with Vitepress and Vue.js
Despite the fact that Vitepress can be utilized to construct well-designed documentation websites rapidly, you’ll be able to lengthen the options of Vitepress to develop your weblog. On this article, we’ll concentrate on making a weblog and studying the theming and customizations in Vitepress.
After going by means of the article, you’ll be able to develop your documentation website or weblog utilizing Vitepress and Vue 3. However earlier than diving into the article, please guarantee you’ve gotten a fundamental understanding of Vue 3.
Making a static website with Vitepress
Getting began with Vitepress is extraordinarily straightforward. You can begin constructing your web site with Vitepress by putting in two main developer packages. In your working listing, set up vue and vitepress as developer dependencies.
To put in the packages, run the next instructions:
npm i -D vue vitepress
The -D flag will set up the packages as developer dependencies. Now, create a folder contained in the working listing and identify it no matter you need. Usually, the folder is known as docs, so I’ll additionally use the docs identify for the folder.
After creating docs, you’ll want so as to add some scripts to your package deal.json file. Copy the next scripts and paste them into your package deal.json file:
"scripts": {
    "docs:dev": "vitepress dev docs",
    "docs:construct": "vitepress construct docs",
    "docs:serve": "vitepress serve docs"
  },
Now, the setup for a barebone Vitepress app is prepared. Create a Markdown file with the title index.md and add some dummy content material contained in the docs. Begin the event server by operating the command npm run docs:dev contained in the terminal.
The default improvement port for Vitepress is localhost:5173. The index.md file will function the index.html file or the entry level on your Vitepress static website. In the event you go to the URL, you’ll be capable to view your Vitepress web page. Vitepress ships with a default theme. You should utilize completely different choices the theme supplies for customizing your web site.
Nonetheless, as a result of the index.md file is empty, you gained’t be capable to see something. You’ll be able to add some textual content to index.md to see the adjustments in your Vitepress web page. To customise the options, create a folder known as .vitepress (watch out with the dot at the beginning) contained in the docs. This folder is used to configure the Vitepress choices.
Three forms of configurations might be achieved on Vitepress: app config, theme config, and entrance matter config. The app config contains options like website title, Markdown parser customization, and extra. On the similar time, the theme config determines the appliance’s look. For instance, if you wish to add a navigation bar to your web site, you’ll have to replace the theme config.
The entrance matter config can override the worldwide configuration for a particular web page, app configs, and theme configs.
Vitepress configurations
Create a file known as config.js inside this file. Vitepress will learn this file to customise your utility. This file may also be created with extensions like .ts, .mjs, .mts and so forth.
Let’s take a look at a dummy config.js file to know how the theme might be custom-made:
export default {
  title: 'My Weblog',
  description: 'Simply enjoying round.',
  themeConfig: {
    nav: [
      { text: 'Home', link: "https://blog.logrocket.com/" },
      { text: 'Blog', link: '/articles/' },
      { text: 'External', link: 'https://google.com' },
    ],
  },
};
The thing within the above code consists of three choices: title, description, and themeConfig. The title and description keys are used for describing your web site’s title and meta description. All these are app configurations.
Including a head key also can add particular hyperlinks for Google fonts or CSS information to the pinnacle. Yow will discover all of the app config choices right here.
The theme configurations might be added to an object with a themeConfig key, as proven above. The nav array defines the weather within the navigation bar, and you can even add dropdowns for navigation objects. Right here’s an instance of use this:
export default {
  themeConfig: {
    nav: [
      { text: 'Guide', link: '/guide' },
      {
        text: 'Dropdown Menu',
        items: [
          { text: 'Item A', link: '/item-1' },
          { text: 'Item B', link: '/item-2' },
          { text: 'Item C', link: '/item-3' }
        ]
      }
    ]
  }
}
You may also add sidebars, footers, social hyperlinks, and extra with themeConfig.
Including posts to the weblog with Vitepress and Vue
Now, let’s add some posts to our weblog. Create a folder known as articles contained in the docs folder and add any submit in Markdown format. For instance, let’s add a Markdown submit known as article1.md.
Now, open the index.md file we created earlier, and add the article1.md hyperlink. The index.md Markdown file will appear to be this:
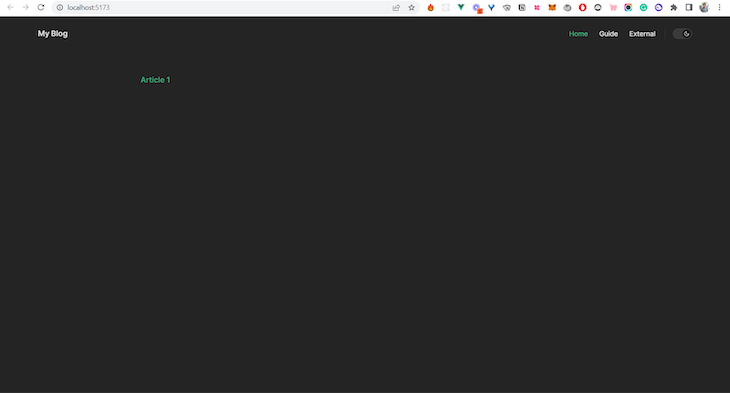
[Article 1](/articles/article1)
Including it will render the submit as beneath in your homepage:
In the event you click on the hyperlink, it should render your Markdown file as an HTML web page. One beauty of Vitepress is which you can add Vue 3 parts on to your Markdown information to configure your homepage simply.
Designing weblog submit playing cards on the homepage
Let’s add a weblog submit card on the homepage. Create a parts folder contained in the docs. Now, create a file known as ArticleCard.vue. A Vue element can comprise a template, script, and fashion. First, let’s check out the template:
<template>
  <a :href="https://weblog.logrocket.com/build-blog-vitepress-vue-js/href">
    <div class="card">
      <div class="flex">
        <div class="media">
          <img :src="picture" :alt="title" />
        </div>
        <div class="particulars">
          <h2 class="title">{{ title }}</h2>
          <p class="excerpt">{{ truncateText(excerpt, 50) }}</p>
          <div class="creator">
            <div>
              <h3 class="identify">{{ creator }}</h3>
              <p class="date">{{ date }}</p>
            </div>
          </div>
        </div>
      </div>
    </div>
  </a>
</template>
The code is pretty easy, as we solely use just a few props to cross knowledge into the element. Let’s take a look at the script to discover the props:
<script>
export default {
  props: {
    title: {
      sort: String,
      required: true,
    },
    excerpt: {
      sort: String,
      required: true,
    },
    picture: {
      sort: String,
      required: true,
    },
    creator: {
      sort: String,
      required: true,
    },
    date: {
      sort: String,
      required: true,
    },
    href: {
      sort: String,
      required: true,
    },
  },
  strategies: {
    truncateText(textual content, size) {
      if (textual content.size > size) {
        return textual content.substring(0, size) + "...";
      }
      return textual content;
    },
  },
};
</script>
Styling the weblog homepage with Vitepress and Vue
The props for the cardboard are title, excerpt, picture, creator, date, and href. The names of the props are self-explanatory. Together with that, we now have a operate that truncates the excerpt measurement. It takes some textual content and the size of the characters as arguments and returns a truncated textual content with trailing dots. I gained’t clarify the fundamental styling as a result of I assume the fundamentals of CSS.
The kinds for this element are seen beneath:
<fashion scoped>
.card {
  border-radius: 0.5rem;
  box-shadow: 0 0.5rem 1rem rgba(0, 0, 0, 0.15);
  margin-bottom: 1.5rem;
  overflow: hidden;
  width: 100%;
}

.card:hover {
  box-shadow: 0 0.5rem 1rem rgba(0, 0, 0, 0.25);
  transition: ease-in-out 0.2s all;
}

.flex {
  show: flex;
}

.media {
  width: 45%;
  top: 100%;
  object-fit: cowl;
  object-position: middle;
}

.particulars {
  margin-left: 1.2rem;
}

.title {
  border-top: none;
  margin: 0 0;
}

.identify {
  margin: 0 0;
  font-size: 0.7rem;
  coloration: #999;
}
</fashion>
I’ve additionally made a hero element. Right here’s the code for the Hero.vue:
<template>
  <div class="hero">
    <div class="hero-body">
      <div class="container">
        <h1 class="title">Hey, I am {}.</h1>
        <h2 class="subtitle">
          {{ subtitle }}
        </h2>
      </div>
    </div>
  </div>
</template>

<script>
export default {
  props: {
    identify: {
      sort: String,
      required: true,
    },
    subtitle: {
      sort: String,
      required: true,
    },
  },
};
</script>

<fashion>
h2.subtitle {
  font-size: 1.2rem;
  border-top: none;
}
</fashion>
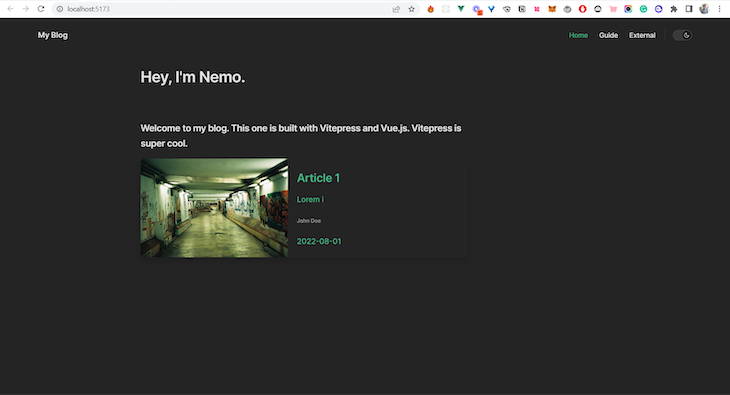
Now that we now have created the parts, let’s add them to the index.md file:
<script setup>
  import Hero from './parts/Hero.vue'
  import ArticleCard from './parts/ArticleCard.vue'
</script>

<Hero identify="Nemo" subtitle="Welcome to my weblog. This one is constructed with Vitepress and Vue.js. Vitepress is tremendous cool." />

<ArticleCard title="Article 1" excerpt="Lorem i" picture="https://pictures.unsplash.com/photo-1664663751485-c58e9276ccce?ixlib=rb-1.2.1&ixid=MnwxMjA3fDB8MHxwaG90by1wYWdlfHx8fGVufDB8fHx8&auto=format&match=crop&w=1167&q=80" creator="John Doe" href="https://weblog.logrocket.com/articles/article1" date="2022-08-01" />
This is rather like any customary Vue element. Nonetheless, if you wish to add Markdowns on this file, you’ll be able to instantly add them after the ending script tag.
Your homepage will now appear to be this:
Proper now, we now have the default colours set by Vitepress. You’ll be able to customise the colours of the element by means of the fashion tag within the element. For the Markdown-specific information, you can even override the default kinds. You’ll be able to consult with the documentation for extra particulars.
Proper now, there’s one downside with the weblog. It will likely be a horrible concept to manually add all of the articles to the index .md file each time you add a brand new article. So, how will we repair this?
Accessing entrance matter in Vitepress
Vuepress has inbuilt assist for entrance matter fetching. You’ll be able to entry the entrance matter particulars by accessing the $website variable. However this isn’t the case with Vitepress. To maintain Vitepress minimal, it doesn’t assist it. We now have to determine a means to do that ourselves.
One technique to obtain that is to write down a easy script that may fetch the entrance matter particulars and write it to a JSON file.
Let’s check out a easy script for doing this:
// Credit to Divyansh Singh
// Twitter: @_brc_dd

import fs from 'node:fs/guarantees';
import matter from 'gray-matter';
import removeMd from 'remove-markdown';

const articles = await fs.readdir('./docs/articles');

const knowledge = await Promise.all(
  articles.map(async (article) => {
    const file = matter.learn(`./docs/articles/${article}`, {
      excerpt: true,
      excerpt_separator: '

',
});
const { knowledge, excerpt, path } = file;
const contents = removeMd(excerpt)
.trim()
.break up(/rn|n|r/);
return {
...knowledge,
title: contents[0].change(/s{2,}/g, '').trim(),
path: path.change('./docs/', '').change(/.md$/, '.html'),
excerpt: contents
.slice(1)
.be part of('')
.change(/s{2,}/g, '')
.trim(),
};
})
);
await fs.writeFile('./knowledge.json', JSON.stringify(knowledge), 'utf-8');
First, we have to set up gray-matter and remove-markdown. The grey-matter package deal reads the entrance matter from Markdown information, whereas the remove-markdown package deal is used to take away any Markdown from a textual content. To put in the packages, run the npm i remove-markdown gray-matter command.
Finalizing the weblog with Vitepress and Vue.js
Now let’s talk about the script. Step one is to learn the listing the place the articles are saved. On this case, the articles are contained in the docs/articles folder. We’re storing the values contained in the folder in a variable known as articles.
Now, inside a Promise, we’ll map by means of every merchandise accessible contained in the articles folder. The Markdown is learn utilizing the matter.learn operate accessible within the gray-matter package deal. This operate returns all the required data just like the path, excerpt, and so forth. It additionally incorporates a knowledge object that shops the entrance matter particulars.
Extra nice articles from LogRocket:
The excerpt is learn by studying the quote(>) after the heading. For the <!-- extra --> divider, it might contemplate the quote because the excerpt. The divider is outlined within the above code as excerpt_separator:
---
Writer: Nemo
Up to date: 2022-06-01
picture: https://pictures.unsplash.com/photo-1664575198263-269a022d6e14?ixlib=rb-1.2.1&ixid=MnwxMjA3fDF8MHxwaG90by1wYWdlfHx8fGVufDB8fHx8&auto=format&match=crop&w=1170&q=80
---
# Si tempo advert caput
> lorem ipsum dolor sit amet consectetur adipiscing elit sed do eiusmod tempor incididunt ut labore et dolore magna aliqua
Now, the required knowledge is restructured from the file. The excerpt is cleaned utilizing the removeMd package deal. A regex operation is used to wash the CRLF and LF line breaks. Lastly, the info is returned.
Within the knowledge, the trail is changed from ./docs/articles/article.md to /articles/article.html for rendering it as an HTML. Save the script as getArticles.mjs. If you would like, you’ll be able to maintain it with none extensions as properly.
The mjs extension is used in order that we are able to use ECMAScript modules. The info generated from the script is written right into a knowledge.json file in JSON format. To run this script each time a brand new construct is began, change your package deal scripts to this:
"scripts": {
    "docs:dev": "node getArticles.mjs && vitepress dev docs",
    "docs:construct": "node getArticles.mjs && vitepress construct docs",
    "docs:serve": "vitepress serve docs"
  },
Including the node getArticles.mjs command at the beginning ensures that the script runs earlier than the Vitepress server begins.
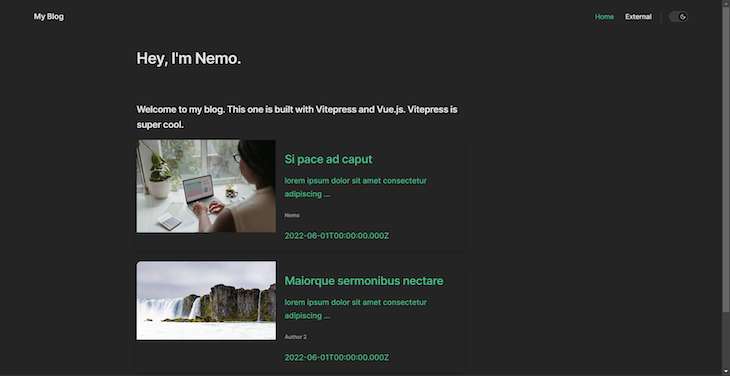
Now, on the homepage, let’s iterate over the articles and render them within the ArticleCard. A easy v-for loop can be utilized for rendering the articles. Let’s check out the ultimate index.md web page:
<script setup>
  import Hero from './parts/Hero.vue'
  import ArticleCard from './parts/ArticleCard.vue'

  import knowledge from '../knowledge.json'
</script>

<Hero identify="Nemo" subtitle="Welcome to my weblog. This one is constructed with Vitepress and Vue.js. Vitepress is tremendous cool." />

<div v-for="(article, index) in knowledge" :key="index">
  <ArticleCard :title="article.title" :excerpt="article.excerpt" :picture="article.picture" :creator="article.Writer" :href="https://weblog.logrocket.com/build-blog-vitepress-vue-js/article.path" :date="article.Up to date" />
</div>
While you begin your Vitepress app, your homepage will look much like the screenshot beneath:
Your weblog is now prepared!
You’ll be able to go to this Stackblitz repo to test a working model of this, or you can even try the GitHub repository for the entire code.
Conclusion
The aim of the article was that can assist you get began with Vitepress. It confirmed you lengthen Vitepress to construct your weblog and customise the pages as you need. Vitepress supplies a minimal strategy to constructing static websites for documentation websites or blogs.
Vitepress continues to be in its alpha stage, so issues can break. It’s a good suggestion to not use Vitepress on your manufacturing apps simply now. However if you wish to discover extra concerning the library, you’ll be able to try the documentation.
Expertise your Vue apps precisely how a person does
Debugging Vue.js functions might be tough, particularly when there are dozens, if not lots of of mutations throughout a person session. In the event you’re desirous about monitoring and monitoring Vue mutations for your entire customers in manufacturing, attempt LogRocket. 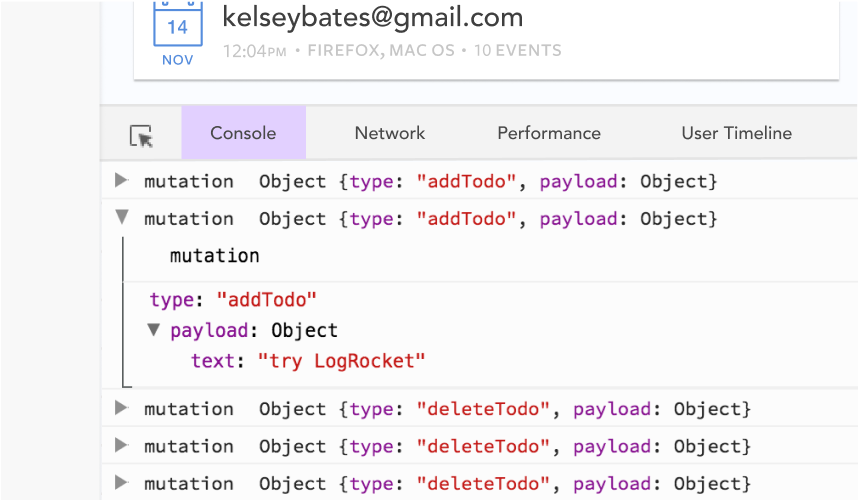 https://logrocket.com/signup/
LogRocket is sort of a DVR for net and cell apps, recording actually all the things that occurs in your Vue apps together with community requests, JavaScript errors, efficiency issues, and way more. As a substitute of guessing why issues occur, you’ll be able to combination and report on what state your utility was in when a difficulty occurred.
The LogRocket Vuex plugin logs Vuex mutations to the LogRocket console, providing you with context round what led to an error, and what state the appliance was in when a difficulty occurred.
Modernize the way you debug your Vue apps – Begin monitoring free of charge.
