Shopify is a platform that permits companies to create on-line shops and purposes. An internet retailer is vital to ecommerce companies. The shop must be environment friendly and constructed to serve the consumer. Shopify is without doubt one of the most well-liked platforms for the event of ecommerce purposes.
Advantages of utilizing Shopify vary from a high-grade consumer expertise to nice frontend design. Shopify additionally supplies nice advertising and marketing methods. On this article, our focus shall be on constructing a Node.js software that works with Shopify.
Bounce forward:
Integrating with Shopify
Third-party builders develop a big portion of Shopify apps that serve to increase the bottom performance of Shopify. With third-party purposes, integrating new options into Shopify is tremendous straightforward and so they enable us to increase the service provider expertise. With Shopify, we will create an incredible buying expertise for our clients.
There’s virtually no restrict to what we will do with third-party apps. Retailers can entry and work together with our software throughout the Shopify admin dashboard.
Integrating with Shopify is feasible in a number of alternative ways:
- Extending new options within the Shopify admin dashboard for the point-of-sale app
- Integrating with Shopify APIs, e.g., the admin API to permit purposes to learn and write merchandise, and many others.
Shopify accepts two sorts of purposes:
- Public purposes: These purposes can be found for all companies, which assist in making a companion dashboard
- Customized purposes: Custom-made purposes to satisfy particular enterprise wants
Let’s arrange our TypeScript and Node.js undertaking.
Establishing our Node.js undertaking with TypeScript
The necessities for organising one of these software are as follows:
Create a folder to carry our undertaking:
mkdir shopifyNode
cd shopifyNode
Utilizing Yarn and the -y flag, we arrange our package deal.json, which can approve all defaults throughout creation.
yarn init -y
Now, add TypeScript as a growth dependency:
yarn add typescript
As soon as the set up of TypeScript completes, we achieve entry to the command line TypeScript compiler by the tsc command.
Putting in Node.js sorts for TypeScript
TypeScript possesses completely different sorts of sorts. We are going to set up the DefinitelyTyped kind definition on this software.
yarn add --dev @sorts/node
Let’s create a tsconfig.json to carry the choices for our TypeScript compiler. Let’s create tsconfig utilizing the command line.
npx tsc --init --rootDir src --outDir construct --esModuleInterop --resolveJsonModule --lib es6 --module commonjs --allowJs true --noImplicitAny true
Let’s break down the code above:
rootDir: That is the placement during which TypeScript appears to be like for the undertaking code. In our case, it’s configured to thesrcfolderoutDir: The code output from the compiler, which will get saved within theconstruct/folderesModuleInterop: This handles the module system in our software. An instance of module methods embrace AMD, SystemJS, ES Modules, and many others.; for this software, we’re setting CommonJS totrueas a result of it’s the foremost module system for Node.js appsresolveModule: Allows JSON in our TypeScript softwarelib: Provides ambient sorts to our undertaking and allows the appliance to depend on options from completely different ECMA Script variations. With this, we will use testing libraries, the DOM API, and ES 2015 langauge options — all of which will get compiled to ES 2009module: CommonJS, customary module system for Node.jsallowjs: Converts our JavaScript undertaking to TypeScript. With this,.jsinformation are usable with.tsinformationnoImplicitAny: Each kind must have a selected kind or be explicitly outlined asany
As soon as accomplished, the tsconfig.json file ought to appear to be the picture beneath: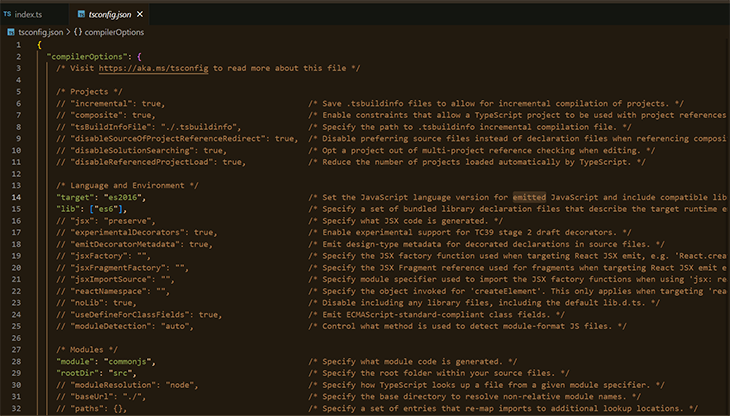
Clear out the feedback that aren’t wanted: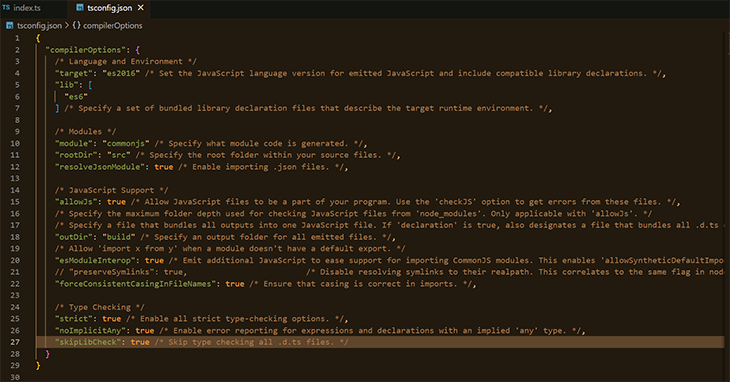
Lastly, create the src folder and create an index TypeScript file.
mkdir src
contact src/index.ts
Compiling our TypeScript code
To compile, we depend on the tsc command utilizing npx. tsc reads the tsconfig.json within the present listing and applies the configuration. The TypeScript compiler generates the compiled JavaScript code.
npx tsx
As soon as this command runs within the construct folder, it creates an index.js file. Our first TypeScript file!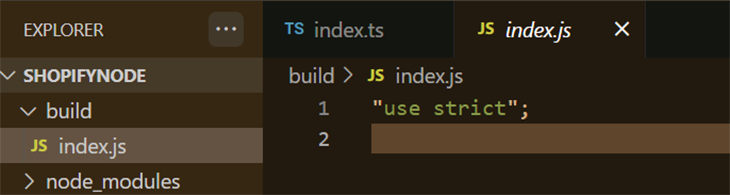
Including dependencies and scripts
Our software can have chilly reloading enabled, which in flip allows sooner growth occasions when growing domestically. Implementing chilly reloading in our software depends on a few packages:
Ts-node: Runs TypeScript code with out ready for compilation- nodemon: Watches adjustments in our code and restarts when a file adjustments
yarn add ts-node nodemon
Add a nodemon.json config:
contact nodemon.json
Paste the code block into the nodemon.json file:
{
  "watch": ["src"],
  "ext": ".ts,.js",
  "ignore": [],
  "exec": "ts-node ./src/index.ts"
}
In our package deal.json, add a script to handle nodemon:
"scripts": {
    "begin:dev": "nodemon",
  },
When yarn run begin:dev runs, nodemon begins our software utilizing ts-node within the ./src/index.ts. It appears to be like for adjustments to .ts and .js information with /src.
Initializing our software
Within the index.ts file, let’s begin constructing our software.
code index.ts
Let’s import the mandatory dependencies and initialize our software.
const crypto = require("crypto");
const nonce = require("nonce");
const request = require("request-promise");
const querystring = require("querystring");
const cookie = require("cookie");
const categorical = require("categorical");

const app = categorical(); // initialize software
app.pay attention(3434, () => console.log("Software listening on port 3434!"));
Internet hosting the server
ngrok allows us to host our native server and make it publicly accessible. As soon as ngrok is downloaded, set up and open it. A terminal window ought to fireplace up; enter the next command to host the server with ngrok.
ngrok http 3434
You need to then see this: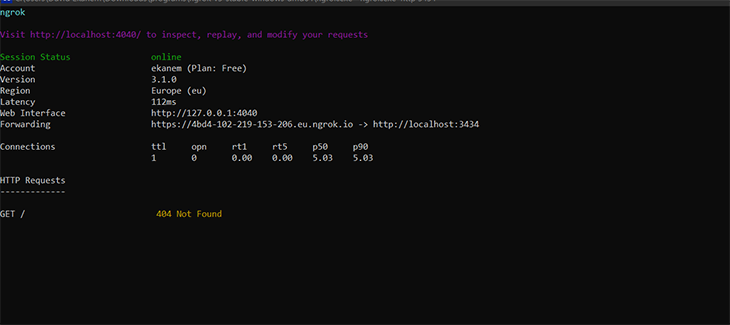
Creating a brand new software in Shopify’s companion dashboard
Navigate to the Shopify Companions dashboard.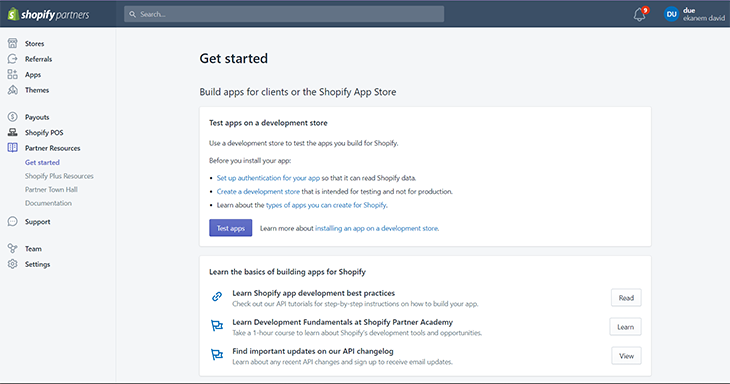
Click on the Apps tab: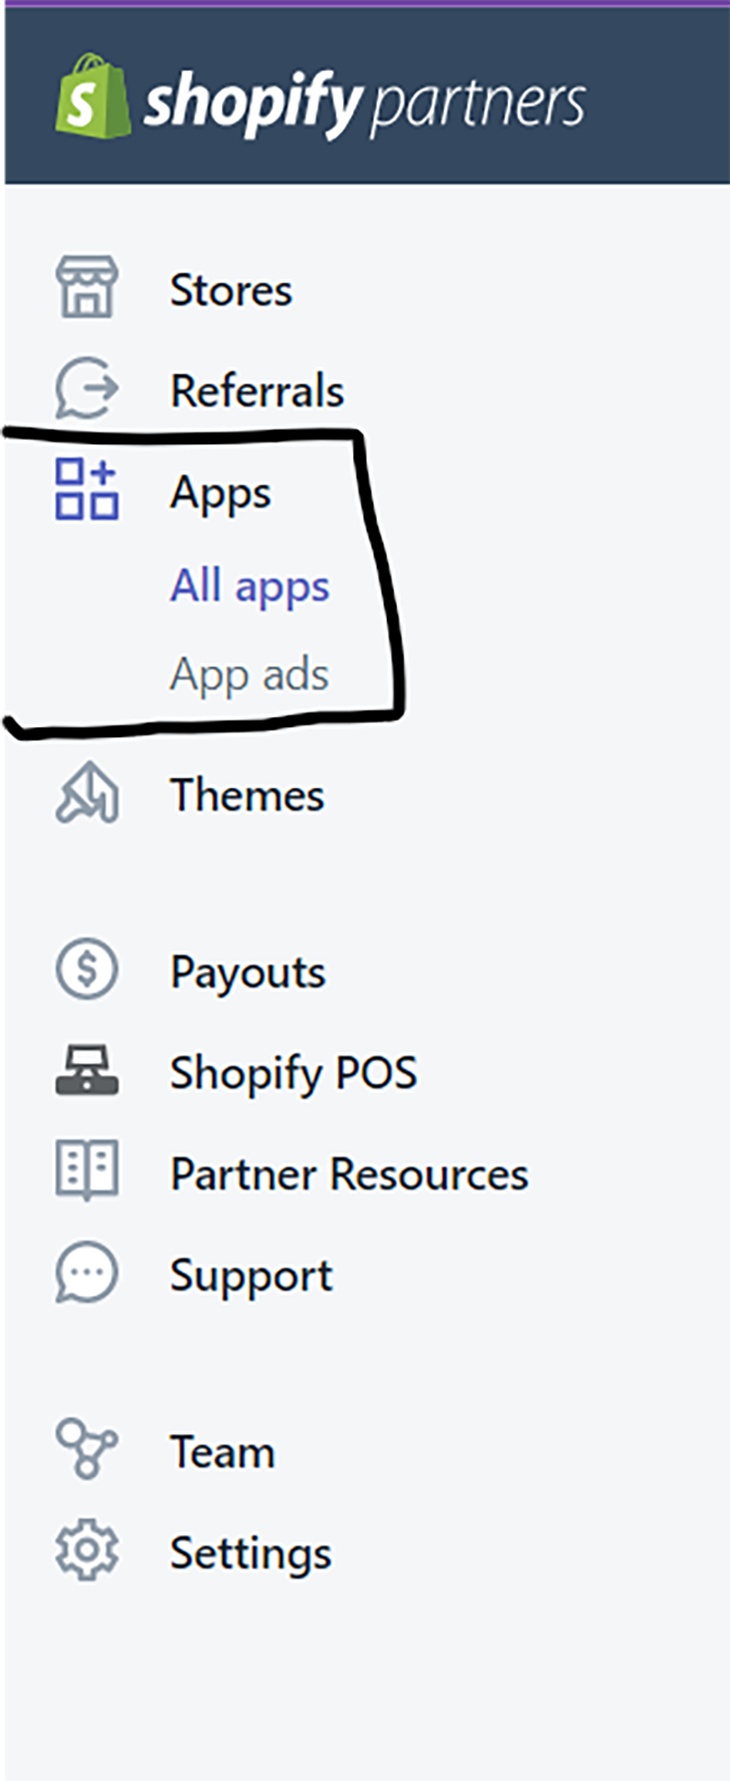
Click on the Create app button:
You’ll be prompted to resolve how you can create the appliance. You need to use both the Shopify CLI or create the app manually. Enter your required title; for this text, our title is dueWidget. Click on the Create button.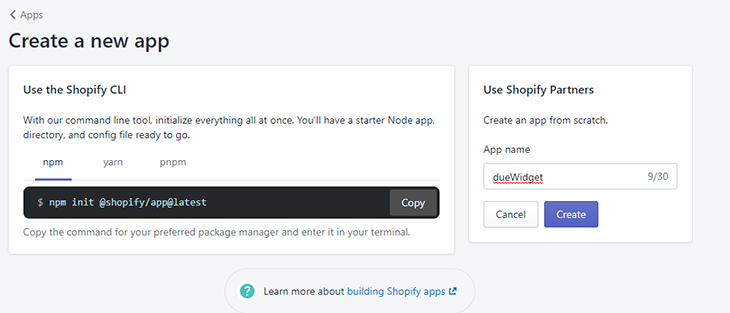
As soon as we click on the Create button, the CLIENT ID and CLIENT SECRET are displayed. We’ll want these particulars to authenticate our software.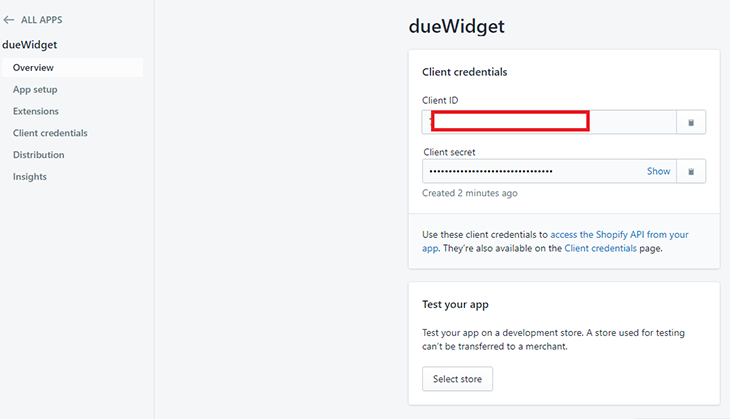
Within the navigation tab, click on App setup.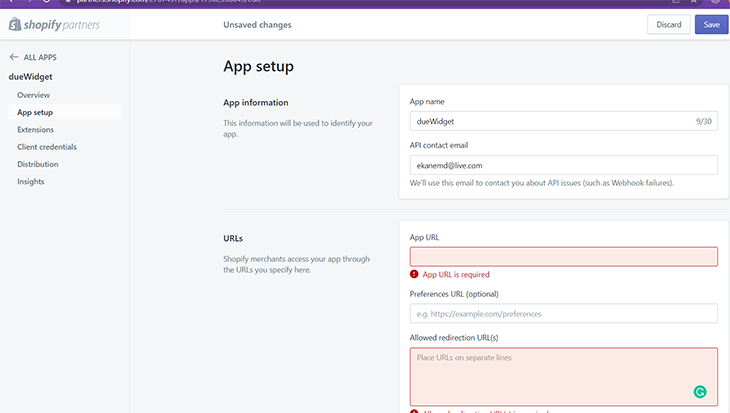
Within the part beneath URLs, copy the generated ngrok URL and paste it into App URL and Redirection URL. The URL in my console is https://d9f5-102-219-153-216.eu.ngrok.io/.
Append /shopify to the ngrok URL to present us entry to the user-route. The App URL is the URL we redirect retailers to as soon as they click on our app itemizing.
The Redirection URL works to redirect the service provider as soon as they allow the appliance. We add a /callback to establish it.
Save, return to the Overview part, then go to the Take a look at your app part and click on the Choose retailer button. Right here, we’ll join our software to the event retailer.
The hyperlink to creating the event retailer is within the Necessities part above.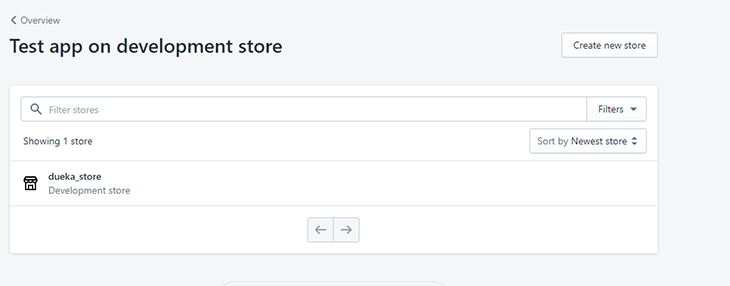
Creating our Node.js software
With that every one arrange, let’s run again to our IDE and proceed growing our software contained in the index.ts file.
Utilizing a terminal window, open the index.ts file, and create an atmosphere variable and gitignore file within the root undertaking listing. The env file allows us to securely retailer our secrets and techniques, and the gitignore prevents us from deploying undesirable information to Git.
code index.ts
contact .env .gitignore
code .gitignore
Add the road beneath into the .gitignore file:
.env
Utilizing a terminal window, open the .env file:
code .env
The main points from the picture beneath are what’s wanted. The Shopper ID represents your SHOPIFY_API_KEY. The Shopper Secret represents your SHOPIFY_API_SECRET.
Extra nice articles from LogRocket:
SHOPIFY_API_KEY= //YOUR CLIENT ID FROM SHOPIFY APP OVER PAGE
SHOPIFY_API_SECRET=//YOUR CLIENT SECRET FROM SHOPIFY APP OVER PAGE
The main points may be discovered within the Software Overview web page of our Shopify software dashboard.
Within the index.ts file, let’s proceed writing our code.
We’re going to outline two endpoints in our software:
- The
/shopifyroute: This receives the title of the store within the request and creates a nonce to handle state. The nonce authenticates that the request to the callback URL is from Shopify - The
/shopify/callbackroute: Handles the callback from Shopify. As soon as we’re sure that the request emanated from Shopify, the consumer is redirected
Copy the code block beneath and paste it into your index.ts file:
const PORT = 3342;
const apiKey = course of.env.SHOPIFY_API_KEY;
const apiSecret = course of.env.SHOPIFY_API_SECRET;
const scopes = "write_products";
const forwardingAddress = "https://1649-102-88-34-8.eu.ngrok.io"; // our ngrok url

// set the url, to the url used within the APP URL
app.get("/shopify", (req: any, res: any) => {
  const shopName = req.question.store;
  if (shopName) {
    // use nonce to set a parameter known as state
    // the nonce is random string that may be set
    // it will be acquired on the request
    // the callback from shopify would echo the state
    // the 2 states could be in contrast
    // in the event that they match, we're positive the request got here from shopify
    // if they do not match, they request is being spoofed
    // this could throw an error
    const shopState = nonce();
    // shopify callback redirect
    const redirectURL = forwardingAddress + "/shopify/callback";

    // set up url for app set up
    const installUrl =
      "https://" +
      shopName +
      "/admin/oauth/authorize?client_id=" +
      apiKey +
      "&scope=" +
      scopes +
      "&state=" +
      shopState +
      "&redirect_uri=" +
      redirectURL;

    // in a manufacturing app, the cookie needs to be encrypted
    // however, for the aim of this software, we cannot do this
    res.cookie("state", shopState);
    // redirect the consumer to the installUrl
    res.redirect(installUrl);
  } else {
    return res.standing(400).ship('Lacking "Store Identify" parameter!!');
  }
});
The callback URL redirects the consumer. This route checks whether or not or not the state saved within the cookie is from Shopify. Whether it is, we generate a hash and use it for HMAC validation. If this validation fails, the URL set up fails.
If HMAC validation is true, the appliance set up within the growth retailer is profitable.
app.get("/shopify/callback", (req: any, res: any) => {
  const { store, hmac, code, shopState } = req.question;
  const stateCookie = cookie.parse(req.headers.cookie).shopState;

  if (shopState !== stateCookie) {
    return res.standing(400).ship("request origin can't be discovered");
  }

  if (store && hmac && code) {
    const Map = Object.assign({}, req.question);
    delete Map["hmac"];
    delete Map["signature"];

    const message = querystring.stringify(Map);
    const providedHmac = Buffer.from(hmac, "utf-8");
    const generatedHash = Buffer.from(
      crypto
        .createHmac("sha256", course of.env.SHOPIFY_API_SECRET)
        .replace(message)
        .digest("hex"),
      "utf-8"
    );
    let hashEquals = false;
    attempt {
      hashEquals = crypto.timingSafeEqual(generatedHash, providedHmac);
    } catch (e) {
      hashEquals = false;
    }
    if (!hashEquals) {
      return res.standing(400).ship("HMAC validation failed");
    }
    const accessTokenRequestUrl =
      "https://" + store + "/admin/oauth/access_token";
    const accessTokenPayload = {
      client_id: course of.env.SHOPIFY_API_KEY,
      client_secret: course of.env.SHOPIFY_API_SECRET,
      code,
    };
    request
      .submit(accessTokenRequestUrl, { json: accessTokenPayload })

      .then((accessTokenResponse: any) => {
        const accessToken = accessTokenResponse.access_token;

        const apiRequestURL = `https:// + ${store} + /admin/store.json`;

        const apiRequestHeaders = {
          "X-Shopify-Entry-Token": accessToken,
        };

        request
          .get(apiRequestURL, { headers: apiRequestHeaders })

          .then((apiResponse: any) => {
            res.finish(apiResponse);
          })

          .catch((error: any) => {
            res.standing(error.statusCode).ship(error.error.error_description);
          });
      })

      .catch((error: any) => {
        res.standing(error.statusCode).ship(error.error.error_description);
      });
  } else {
    return res.standing(400).ship("required parameter lacking");
  }
});

app.pay attention(PORT, () => console.log(`Software listening on port ${PORT}`));
Testing our software
It’s time to check our software. The URL for use is:
https://5235-102-88-62-59.eu.ngrok.io/shopify?store=duetestapplicationstore.myshopify.com/
This URL may be despatched to potential retailers to put in our software of their Shopify retailer.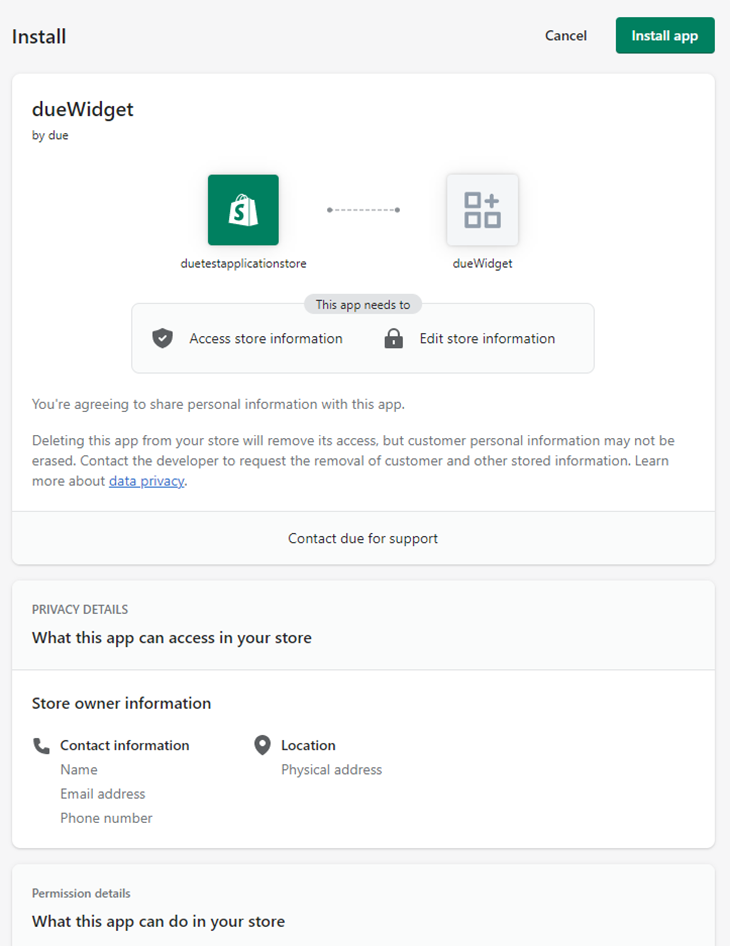
You’ll be redirected to the set up display screen. Click on the Set up App button. If the set up is profitable, the app shall be displayed within the Software Overview web page.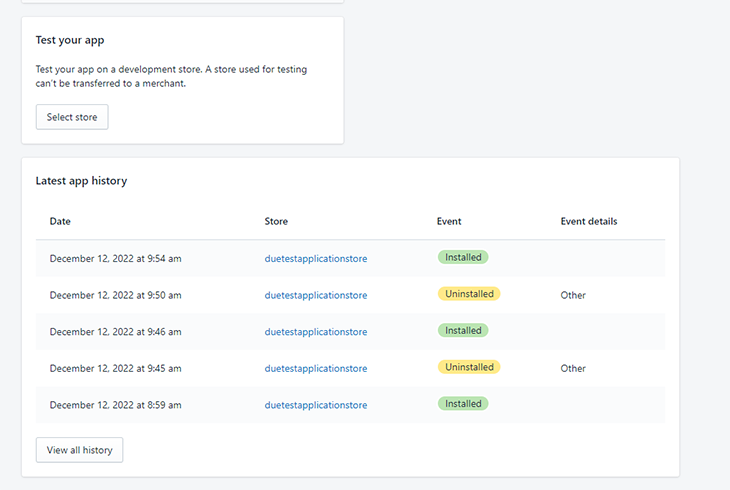
The appliance set up is profitable. Our software is efficiently built-in with the duetestapplication retailer that we created. If we return to our growth retailer, we must always see our software beneath the Apps part.
Click on dueWidget to see the performance of our software.
Our software works as supposed, enabling us to learn details about our retailer.
There are numerous different ways in which we will lengthen our software. In growing our software, we added the power to write_products beneath scopes, which permits us so as to add merchandise to our Shopify retailer.
Conclusion
On this article, we discovered how you can arrange a growth retailer on Shopify and make use of the Shopify API to retrieve knowledge. We additionally discovered how you can create a Node.js software and host our server with ngrok.
Then, we linked our software to our growth retailer and used it to retrieve particulars concerning the retailer. The steps outlined on this article allow builders to construct purposes for Shopify utilizing Node and allows retailers to increase the performance of their shops.
There are a lot of extra functionalities that may be applied, starting from including merchandise to our retailer, and many others. Check out a few of them to see what your Shopify retailer can do for you!
LogRocket: See the technical and UX causes for why customers don’t full a step in your ecommerce move.

LogRocket is sort of a DVR for net and cellular apps and web sites, recording actually every part that occurs in your ecommerce app. As an alternative of guessing why customers don’t convert, LogRocket proactively surfaces the foundation explanation for points which might be stopping conversion in your funnel, corresponding to JavaScript errors or lifeless clicks. LogRocket additionally displays your app’s efficiency, reporting metrics like shopper CPU load, shopper reminiscence utilization, and extra.
Begin proactively monitoring your ecommerce apps — attempt at no cost.
