From constructing the app to deployment — with code included

In my earlier article, we fine-tuned a Named Entity Recognition (NER) mannequin, educated on the wnut_17[1] dataset.
On this article, we present step-by-step find out how to combine this mannequin with Streamlit and deploy it utilizing HugginFace Areas. The purpose of this app is to tag enter sentences per person request in actual time.
Additionally, take into accout, that opposite to trivial ML fashions, deploying a big language mannequin on Streamlit is difficult. We additionally deal with these challenges.
Let’s dive in!
Streamlit is an easy-to-use device for creating interactive purposes that sit on high of an information science challenge.
There are related ML-friendly instruments like Sprint and Gradio. Each has its strengths. For instance, Gradio has a tremendous drag-and-drop part, appropriate for picture classification fashions.
Normally, I favor Streamlit as a result of:
- It has a spectacular trajectory to date — in the course of the previous yr, Streamlit has been releasing main updates at the least as soon as a month.
- It has a robust group. Members at dialogue boards are super-helpful. Additionally, you possibly can add your app without cost on Streamlit Cloud. In case your app is fascinating, the group managers will attain out to you and have your app on the Streamlit web site! They might even ship you presents!
Other than development and robust group, Streamlit is a fully-fledged device, appropriate for interactive purposes in each knowledge science area.
Subsequent, let’s construct our app!
The total instance may be discovered right here.
This text focuses on constructing and deploying our mannequin with Streamlit.
If you wish to study extra about how the mannequin is produced, be happy to examine my earlier submit.
There may be one change although: We use the roberta-large mannequin from HugginFace as a substitute of bert-base. RoBERTa[2] launched just a few novelties like dynamic masking, which make RoBERTa superior to BERT.
Libraries
First, we want the next libraries. For readability, check out the necessities.txt file:
pytorch-lightning==0.9.0
torch==1.10.0
torchtext==0.8.0
torchvision==0.11.1
datasets==2.3.2
numpy==1.20.3
pandas==1.3.5
streamlit==1.11.1
transformers==4.12.5
Streamlit aesthetics
The purpose is to make our app minimal and UX-friendly. And Streamlit is the suitable device for this job.
Let’s arrange the web page’s metadata:
In 2 traces of code, we now have arrange the web page’s headers, title, and favicon.
Load the mannequin
We create the load_model perform for this job:
Discover the next:
- We use the
@st.cachedecorator to cache our mannequin — as a result of it’s too giant(~2BG), we don’t need to reload it each time. - We use the
allow_output_mutation=Trueto inform Streamlit that our mannequin ought to be handled as an immutable object — a singleton.
Add helper features for tags era
Subsequent, we add our helper features. We are going to use the tag_sentence perform later to generate tags for the enter sentence.
Add helper perform for downloading outcomes
Generally, it’s useful if a person can obtain the prediction outcomes as a separate file (e.g. for later utilization).
Streamlit API supplies the st.download_button for such functions. We are going to present find out how to convert our outcomes into CSV, textual content, and JSON codecs. For this job, we use the next helper features:
The obtain buttons will appear to be this:

Observe: There may be presently a bug in Streamlit, the place generally the file is just not correctly downloaded.
Alternatively, we are able to create the obtain button in a customized approach. The code for this part is included within the app’s code, as a remark.
Create the shape
We’ve now concluded the setup and we’re able to assemble our knowledge pipeline.
The app ought to do the next:
- Ingest the person enter.
- Examine if the enter sentence is empty.
- Examine if the person enter sentence comprises a single phrase (there’s no level tagging a single phrase).
- If all the things is okay, load our mannequin and calculate the tags for the enter sentence.
- Render the ends in the UI.
Thus, we now have:
And that’s it! The textual content type will appear to be this:

Non-compulsory — add an ‘About’ part
For UX functions, we are able to add an About part on the backside of this web page:
That is how this part is displayed:

Presently, there 3 methods to deploy the Streamlit app without cost:
- Streamlit cloud
- Hugginface Areas
- Heroku
All choices are super-easy — without charge, and no containers are required.
For our case, we select HugginFace Areas as a result of it could possibly higher deal with giant recordsdata. The method is as follows:
1. Setup Git
First, ensure you have git put in.
2. Set up Git LFS
As a result of our mannequin is a big binary file >1GB, we also needs to set up Git LFS, which might model giant recordsdata.
To obtain it, observe the directions right here. The web page consists of directions for Home windows, Mac, and Linux.
3. Add necessities file
Hugginface requires that we provide a necessities.txt file with the libraries that our challenge makes use of.
We will generate a necessities.txt file immediately utilizing the pipreqs library. Plus, pipreqs generates solely the libraries that our challenge makes use of:
pip set up pipreqs
pipreqs /cd/to/challenge
4. Log in to HugginFace and create a House
In the event you don’t have already got a HugginFace account, go to this web page.
Then, create a House (you will discover it within the top-right nook). Primarily, a House acts as a standard Git repo. Fill within the required particulars and initialize youe repo.
Afterwards, clone your repo, add the recordsdata of your challenge into the folder, and add them to the House:
git clone https://huggingface.co/areas/nkaf/ner-tagger-streamlit
cd /cd/to/challenge
git add .
git commit -m “first commit”
git push origin primary
And that’s it!
4. Go to your App
You’ll have to wait a couple of minutes for the app to initialize. Then, go to the App tab, and if all the things is okay, your internet software can be reside!
You will discover the challenge for this internet software right here! Be happy to enter your sentences and experiment!
Let’s see some examples!
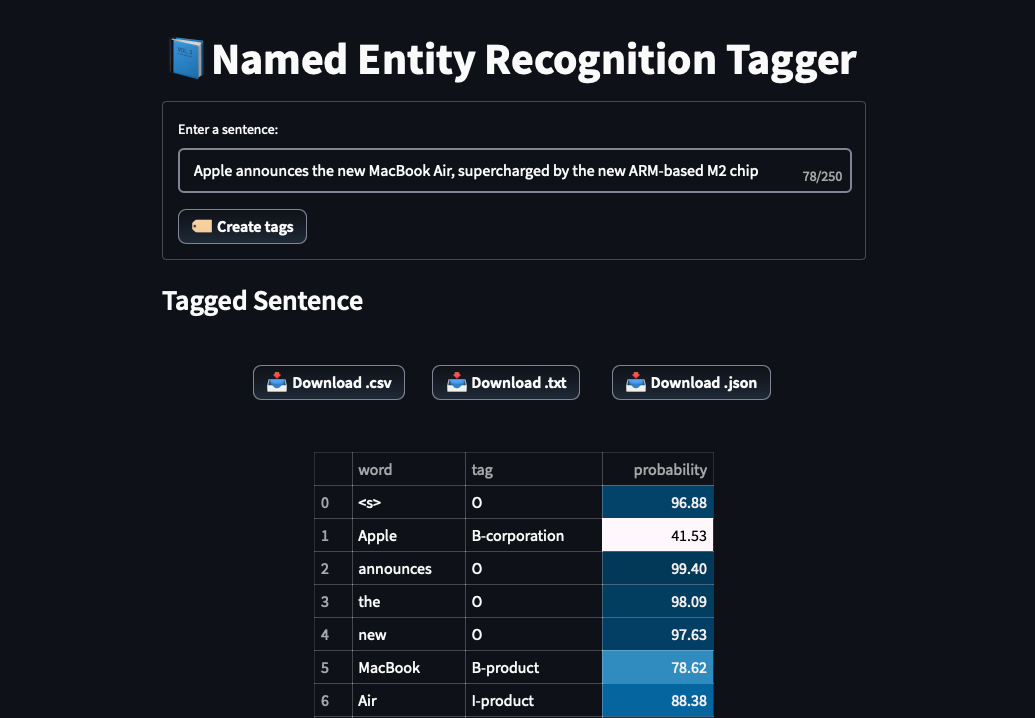
Instance 1:
Apple declares the brand new MacBook Air, supercharged by the brand new ARM-based M2 chip

The mannequin appropriately tags Apple as a company. Additionally, it appropriately identifies and acknowledges MacBook Air and ARM-based M2 as merchandise.
Instance 2:
Empire State constructing is positioned in New York, a metropolis in United States

Once more our mannequin appropriately acknowledges all 3 places of our sentence.
Streamlit is an easy-to-use device that could be very environment friendly at demonstrating the performance of an information science challenge.
Additionally, you possibly can take combine your knowledge science challenge with Streamlit nearly seamlessly.
Lastly, discover that we used solely Python — we are able to create superb Streamlit apps with nearly zero information of both HTML, CSS, or Javascript. Additionally, Streamlit is appropriate with standard knowledge science libraries comparable to Numpy, Pandas, OpenCV, and Plotly.
