
Most full-stack functions separate frontend and backend code into distinct information; most internet frameworks are constructed based mostly on this construction. Because the variety of information and contours of code will increase, it might enhance the complexity of your codebase, thereby making it much more tough to debug. The complexity attributable to these separate information was minimized via the introduction of a framework referred to as Tetra.
This tutorial will introduce you to the Tetra framework and its elements. Additionally, you will discover ways to construct a easy full-stack weblog utility that performs CRUD functionalities utilizing Tetra.
We’ll cowl the next:
What’s Tetra?
Tetra is a full-stack framework constructed with Django on the server facet and Alpine.js to carry out frontend logic. Tetra permits you to have frontend and backend logic in a unified location and reduces code complexity in your utility. It connects the backend implementation with the frontend utilizing a category referred to as the Element class.
The Tetra part
A tetra part is a unit of code that handles its Python, HTML, CSS, and JavaScript logic as an entity in a single Python file. In case you’re conversant in the React framework, you may liken the habits of its elements to the Tetra elements, besides that React elements carry out solely the frontend functionalities.
Parts might be both depending on or impartial of each other. This means you could invoke one part from one other or have it as a standalone part. You’ll be able to learn extra details about the tetra part right here.
Let’s construct a Tetra weblog app
The remainder of this tutorial will information you thru the way to set up Tetra in your Django utility and a step-by-step circulate of the way you’d construct a weblog app utilizing Tetra. The weblog app shall be offered from an admin perspective, the place you’ll be capable of create a brand new publish, replace an present publish, delete a publish, and examine all weblog posts.
The appliance is not going to embody any authentication or authorization layer. The intention is to maintain it so simple as potential whereas specializing in Tetra’s core functionalities.
Stipulations
- Proficiency in constructing monolithic functions utilizing Django
- Working information of HTML, CSS, and JavaScript
- Any appropriate IDE or textual content editor
- Python model 3.9 or increased put in in your machine
- npm package deal supervisor put in in your machine
Undertaking setup
Step one is to create a digital atmosphere for the appliance. Run the next command in your terminal to arrange your undertaking listing and digital atmosphere:
mkdir tetra
cd tetra
python -m venv tetra
cd tetra
Scripts/activate
The subsequent step is to put in Django. Since Tetra operates on the Django framework, it’s required to combine Django in your utility.
pip set up django
django-admin startproject tetra_blog
cd tetra_blog
Subsequent, create the weblog app:
python handle.py startapp weblog
Add the weblog app to the INSTALLED_APPS listing within the settings.py file, as proven beneath:
INSTALLED_APPS = [
    'blog.apps.BlogConfig',
    ...
 ]
Inside the app listing, create a elements.py file that may comprise all of the elements you’ll construct within the undertaking.
Tetra set up and configuration
After efficiently establishing the Django undertaking, the following step is to put in the Tetra framework in your utility.
pip set up tetraframework
Within the settings.py file, add tetra to the INSTALLED_APPS listing, as proven beneath:
INSTALLED_APPS = [
    ...
    'tetra',
    'django.contrib.staticfiles',
    ...
]
Guarantee tetra is listed earlier than the django.contrib.staticfiles component.
Subsequent, you’ll wish to embody tetra.middleware.TetraMiddleware on the finish of the MIDDLEWARE listing. This provides the JavaScript and CSS out of your part to the HTML template.
Extra nice articles from LogRocket:
MIDDLEWARE = [
    ...
    'tetra.middleware.TetraMiddleware'
]
Apply the beneath modifications to the foundation urls.py file to show Tetra’s endpoints via your public strategies:
from django.urls import path, embody
from django.conf import settings
from django.conf.urls.static import static

urlpatterns = [
    ...

    path('tetra/', include('tetra.urls')),
  ] + static(settings.STATIC_URL, document_root=settings.STATIC_ROOT)
Set up esbuild
Tetra builds your JS/CSS elements and packages them utilizing esbuild. This lets you hint any errors which will happen on the frontend implementation to your supply Python information.
npm init
npm set up esbuild
In case you’re utilizing Home windows OS, you’ll need to explicitly declare the construct path for esbuild in your settings.py file:
TETRA_ESBUILD_PATH = '<absolute-path-to-project-root-directory>/node_modules/.bin/esbuild.cmd'
Weblog publish mannequin
The appliance will carry out CRUD capabilities on a weblog publish. The Put up mannequin will comprise three attributes: title, content material, and date.
Add the next code to the fashions.py file to arrange the Put up mannequin:
from django.db import fashions
from django.utils import timezone
from django.urls import reverse


class Put up(fashions.Mannequin):
    title = fashions.CharField(max_length=100)
    content material = fashions.TextField()
    date_posted = fashions.DateTimeField(default=timezone.now)


    def __str__(self):
        return self.title
    // generate a reverse url for the mannequin
    def get_absolute_url(self):
        return reverse('post-detail', kwargs={'pk': self.id})
Carry out the migration instructions to create a desk for the mannequin:
python handle.py makemigrations
python handle.py migrate
The AddPost part
This part is chargeable for rendering the UI to create a brand new publish. It can additionally comprise the Python logic we have to create a Put up mannequin and persist the info within the database.
Create add_post.py file within the elements folder and add the next code to the file:
from sourcetypes import javascript, css, django_html
from tetra import Element, public, Library
from ..fashions import Put up

default = Library()

@default.register
class AddPost(Element):
    title=public("")
    content material=public("")


    def load(self):
        self.publish = Put up.objects.filter(id=0)


    @public
    def add_post(self, title, content material):
        publish = Put up(
            title = title,
            content material = content material
        )
        publish.save()
Within the code above, the AddPost class is a subclass of the Tetra part class, which is the bottom class upon which you construct your customized elements. Utilizing the @default.register decorator, you register your AddPost part to the Tetra library.
The title and content material variables are public attributes of the part, every with an preliminary worth of an empty string. The values of public attributes can be found to the templates, JavaScript, and server logic.
The load methodology runs when the part initiates, and when it resumes from a saved state. You’ll be able to consider the load methodology because the constructor of the part; it runs while you invoke the part from a template.
The add_post methodology is a public methodology that receives the title and content material as arguments to create a Put up occasion after which saves it to the database. Similar to public attributes, public strategies are uncovered to the template, JavaScript, and Python. You declare a technique as public by including the @public decorator above the tactic signature.
Right here is the HTML code you need to embody within the add_post.py file as a part of the AddPost part:
template: django_html = """

    <div class="container">
        <h2>Add weblog publish</h2>
        <label> Title
        <em>*</em>
        </label>
        <enter sort="textual content" maxlength="255" x-model="title" identify="title" placeholder="Enter publish title" required/>

        <label> Content material
        <em>*</em>
        </label>
        <textarea rows="20" cols="80" x-model="content material" identify="content material" placeholder="Enter weblog content material" required /> </textarea>

        <button sort="submit" @click on="addPost(title, content material)"><em>Submit</em></button>
    </div>

    """
The enter discipline receives the publish title and binds it to the title public attribute via the Alpine.js x-model property. Likewise, the textarea receives the content material of the weblog publish and binds the worth to the part’s content material public attribute.
Utilizing the Alpine.js @click on directive throughout the button tag, the template invokes the JavaScript addPost methodology:
script: javascript = """
    export default {

        addPost(title, content material){
            this.add_post(title, content material)
        }

    }
    """
The JavaScript addPost methodology passes the values obtained from the title and content material as arguments to the add_post public methodology of the part. You may as well invoke the add_post public methodology instantly from the HTML template above.
The intention of passing it via the JavaScript perform right here is to display the way you’d carry out a JavaScript operation inside your Tetra part. That is useful for conditions during which you wish to have extra management over the consumer’s habits, corresponding to probably disabling a button after a consumer has clicked it to stop them from sending a number of requests whereas processing earlier ones.
Right here is the CSS code to fashion the template:
fashion: css = """
    .container {
        show: flex;
        flex-direction: column;
        align-items: left;
        justify-content: middle;
        border-style: stable;
        width: fit-content;
        margin: auto;
        margin-top: 50px;
        width: 50%;
        border-radius: 15px;
        padding: 30px;
    }

    enter, textarea, label{
        margin-bottom: 30px;
        margin-left: 20px;
        ;
    }

    label {
        font-weight: daring;
    }

    enter{
        top: 40px;
    }

    h2 {
        text-align: middle;
    }

    button {
        width: 150px;
        padding: 10px;
        border-radius: 9px;
        border-style: none;
        background: inexperienced;
        coloration: white;
        margin: auto;
    }

    """
The subsequent step is to invoke the AddPost part from the Django view template. Create a add_post.html file within the weblog app templates folder that you just created within the earlier part of this tutorial. Add the next snippet to the file:
{% load tetra %}
<!Doctype html>
<html lang="en">
  <head>
    <title> Add publish </title>
    {% tetra_styles %}
    {% tetra_scripts include_alpine=True %}
  </head>
  <physique>
     <kind enctype="multipart/form-data" methodology="POST">
      {% csrf_token %}
      {% @ add_post / %}
    </kind>
  </physique>
  </html>
This template begins by loading the Tetra template tags into the template. It achieves this via the {% load tetra %} command depicted on the high of the code. You’ll additionally have to inject the CSS and JavaScript into the template via {% tetra_styles %} and {% tetra_scripts}, respectively.
By default, Tetra doesn’t embody Alpine.js in your template. You need to explicitly declare it by including include_alpine=True when injecting the part’s JavaScript.
The {% @ add_post / %} tag throughout the kind tag invokes the load methodology of the AddPost part and renders the HTML content material you declared above when creating the part.
Discover that the part identify used to load the part is in snake case. That is the default configuration for invoking elements from templates. You may as well set a customized identify while you create the part, as proven beneath:
...
@default.register(identify="custom_component_name")
class AddPost(Element):
...
Then you may load the part utilizing {% @ custom_component_name / %}.
Subsequent, add the beneath snippet to the views.py file:
from django.shortcuts import render

def add_post(request):
    return render(request, 'add_post.html')
Create a urls.py file within the weblog app listing and add the next snippet to the file:
from django.urls import path
from . import views


urlpatterns = [
     path("add", views.add_post, name="add-post"),

]
Within the root urls.py file, add the beneath path:
urlpatterns = [
    ...
    path('tetra/', include('tetra.urls')),
    path('post/', include('blog.urls'))
]
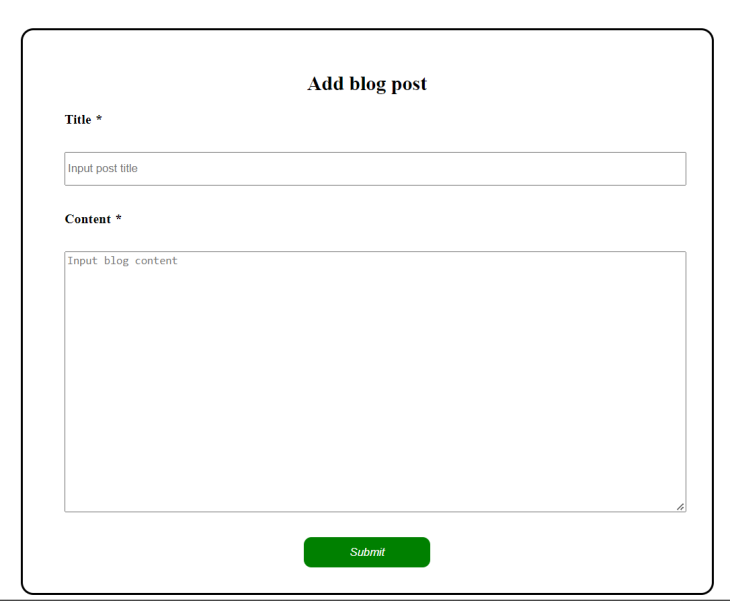
Run the appliance with python handle.py runserver command. View the web page in your browser via localhost:8000/publish/add.
Right here is the output of the web page:
The PostItem part
The PostItem part accommodates the template for rendering a created publish on the house display.
@default.register
class PostItem(Element):

    def load(self, publish):
        self.publish = publish
The load methodology receives the Put up occasion as its argument and exposes it to the HTML template that renders its title and content material on the display.
 template: django_html = """

    <article class="post-container" {% ... attrs %}>
            <small class="article-metadata">{{ publish.date_posted.date}}</small>
            <p class="article-title"> {{ publish.title }}</p>
            <p class="article-content">{{ publish.content material }}</p>

        </article>

    """
The {% ... attrs %} tag is a Tetra attribute tag that the template makes use of to obtain the arguments handed right down to it when invoking the part. When receiving arguments utilizing the attributes tag, you need to declare the tag within the root node of the HTML template, as executed within the article tag within the snippet above.
Right here is the CSS implementation of the template:
fashion: css = """

    .article-metadata {
        padding-bottom: 1px;
        margin-bottom: 4px;
        border-bottom: 1px stable #e3e3e3;

    }


    .article-title{
        font-size: x-large;
        font-weight: 700;
    }

    .article-content {
        white-space: pre-line;
    }

    .post-container{
        margin: 50px;
    }

    a.article-title:hover {
        coloration: #428bca;
        text-decoration: none;
    }

    .article-content {
        white-space: pre-line;
    }

    a.nav-item{
        text-align: proper;
        margin-right: 100px;
    }

    h1 {
       text-align: middle;
    }
    """
Here’s what a publish will appear to be via the PostItem part:

The ViewPosts part
This part is chargeable for rendering all of the created posts. Add the next snippet to the elements.py file:
@default.register
class PostView(Element):

    def load(self):
        self.posts = Put up.objects.all()

    template: django_html = """
        <div>
            <h1> Tetra weblog </h1>
            <div class="navbar-nav">
                <a category="nav-item nav-link" href="https://weblog.logrocket.com/build-full-stack-app-tetra/{% url"add-post' %}">New Put up</a>
            <div>
            <div class="list-group">
                {% for publish in posts %}
                    {% @ post_item publish=publish key=publish.id / %}
                {% endfor %}
            </div>
         </div>
        """
The load methodology within the elements retrieves all of the created posts from the database. The HTML template accommodates an anchor tag that directs to the add-post URL to create a brand new publish.
For every publish fetched from the database, the HTML creates a PostItem part by passing the publish object as its argument throughout the for-loop.
Subsequent, invoke the ViewPost part from the Django view template. Create a house.html file within the weblog app’s templates folder and add the next snippet to the file:
{% load tetra %}
<!Doctype html>
<html lang="en">
  <head>
    <title> Weblog house </title>
    <hyperlink rel="stylesheet" href="https://maxcdn.bootstrapcdn.com/bootstrap/4.0.0/css/bootstrap.min.css" integrity="sha384-Gn5384xqQ1aoWXA+058RXPxPg6fy4IWvTNh0E263XmFcJlSAwiGgFAW/dAiS6JXm" crossorigin="nameless">
    {% tetra_styles %}
    {% tetra_scripts include_alpine=True %}
  </head>
  <physique>
      {% @ view_post / %}
  </physique>
  </html>
Subsequent, add the next to the views.py file:
def house(request):
    return render(request, 'house.html')
Lastly, replace the urlpatterns listing within the weblog app urls.py file.
urlpatterns = [
     path("", views.home, name="home"),
    ...
]
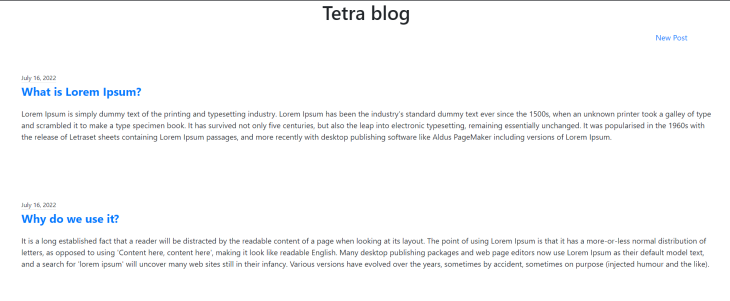
You’ll be able to view the web page through localhost:8000/publish.
The PostDetail part
This part will render the total publish on a single web page. The web page may also comprise two buttons: one every for deleting and updating the publish. Add the next code to the elements.py file:
@default.register
class PostDetail(Element):

    def load(self, pk):
        self.publish = Put up.objects.filter(id=pk)[0]

    @public(replace=False)
    def delete_item(self):
        Put up.objects.filter(id=self.publish.id).delete()
        self.consumer._removeComponent()
The load methodology receives the id of the publish via the pk variable and fetches the Put up occasion, whose ID matches the pk worth from the database.
The delete_item methodology deletes the Put up occasion from the database, mechanically eradicating it from the house display. By default, a public methodology will re-render a part while you invoke it. By setting the replace property to False within the @public decorator, it ensures that it doesn’t try and re-render a beforehand deleted publish.
Right here is the HTML template:
 template: django_html = """
        <article >
            <small class="text-muted">{{ publish.date_posted.date}}</small>

            <h2 class="article-title">{{ publish.title }}</h2>
            <p class="article-content">{{ publish.content material }}</p>

            <div class="post-buttons">
            <button id="delete-button" sort="submit" @click on="delete_item()"><em>Delete</em></button>
           <button id="update-button"> <em>Replace</em> </button>
            </div>

        </article>
    """
The template retrieves the date, title, and content material of the publish fetched from the load methodology and renders these values. It additionally accommodates buttons to delete and replace the publish. The Delete button invokes the delete_item methodology to carry out the delete operation on the publish. We’ll implement the Replace button within the subsequent part.
Right here’s the CSS for the template:
 fashion: css = """

        article{
            margin: 100px;
        }

        .post-buttons{
            place: absolute;
            proper: 0;
        }

        #delete-button, #update-button{
            width: 150px;
            padding: 10px;
            border-radius: 9px;
            border-style: none;
            font-weight: daring;
            margin: auto;
        }

        #update-button{
            background: blue;
            coloration: white;
        }

        #delete-button{
            background: purple;
            coloration: white;
        }

    """
Within the PostItem template created within the earlier part, replace the HTML code by together with an anchor tag that may direct the consumer to the publish element web page from the house display.
@default.register
class PostItem(Element):

  ...

    template: django_html = """

    <article class="post-container" >
           ...
            <a href="https://weblog.logrocket.com/build-full-stack-app-tetra/{% url"post-detail' pk=publish.id %}"> {{ publish.title }}</a>
          ...

        </article>

    """
Within the templates folder, create a post-detail.html file that may function the foundation HTML file for the post-detail web page and embody the next code within the file:
Subsequent, replace the views.py and urls.py information to incorporate the trail to the post-detail web page:
def post_detail(request, **kwargs):
    return render(request, 'post_detail.html', kwargs)
urlpatterns = [
     path("<int:pk>/", views.post_detail, name="post-detail")
]
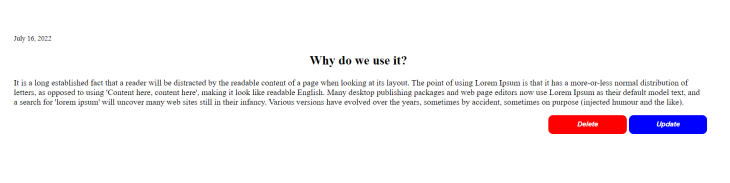
View the publish particulars in your browser by clicking the publish title from the weblog house web page.
The UpdatePost part
This part is chargeable for updating the title and content material of an present publish.
@default.register
class PostUpdate(Element):
    title=public("")
    content material=public("")


    def load(self, pk):
        self.publish = Put up.objects.filter(id=pk)[0]
        self.title=self.publish.title
        self.content material=self.publish.content material

    @public
    def update_post(self, title, content material):
        self.publish.title = title
        self.publish.content material = content material

        self.publish.save()
The load methodology receives the ID of the publish you wish to replace and fetches it from the database. Then, it assigns its title and content material to the title and content material public attributes respectively.
The update_post methodology receives the up to date title and content material and assigns them to the fetched publish, then saves it to the database.
Under is the HTML template of the part:
 template: django_html = """
        <div class="container">
            <h2>Replace weblog publish</h2>
            <label> Title
            <em>*</em>
            </label>
            <enter sort="textual content" maxlength="255" x-model="title" identify="title" required/>

            <label> Content material
            <em>*</em>
            </label>
            <textarea rows="20" cols="80" x-model="content material" identify="content material" required> </textarea>

            <button sort="submit" @click on="update_post(title, content material)"><em>Submit</em></button>
        </div>
        """
The above template renders the worth of the title and content material public attributes via the Alpine.js x-model property, whereas the button makes use of the Alpine.js @click on perform to invoke the update_post methodology and cross the brand new worth of the title and content material as arguments.
Within the PostDetail template created within the earlier part, replace the HTML code by together with an anchor tag that may direct the consumer to the publish replace web page from the house display.
@default.register
class PostDetail(Element):

   ...

    template: django_html = """
        <article  {% ... attrs %} >
            ...
            <a category="nav-item nav-link" href="https://weblog.logrocket.com/build-full-stack-app-tetra/{% url"update-post' pk=publish.id %}"><button id="update-button"> <em>Replace</em> </button></a>
         ...

        </article>
    """
Subsequent, throughout the template folder, create a post_update.html file that may function the foundation HTML template for the PostUpdate part. Add the next snippet to the file:
{% load tetra %}
<!Doctype html>
<html>
  <head>
    <title> Replace publish </title>
    {% tetra_styles %}
    {% tetra_scripts include_alpine=True %}
  </head>
  <physique>
     <kind enctype="multipart/form-data" methodology="POST">
      {% csrf_token %}
      {% @ post_update pk=pk / %}
    </kind>
  </physique>
  </html>
Lastly, replace the views.py and urls.py information with the next code respectively:
def update_post(request, **kwargs):
    return render(request, 'post_update.html', kwargs)
urlpatterns = [
     ...
     path("<int:pk>", views.update_post, name="update-post"),
     ...

]
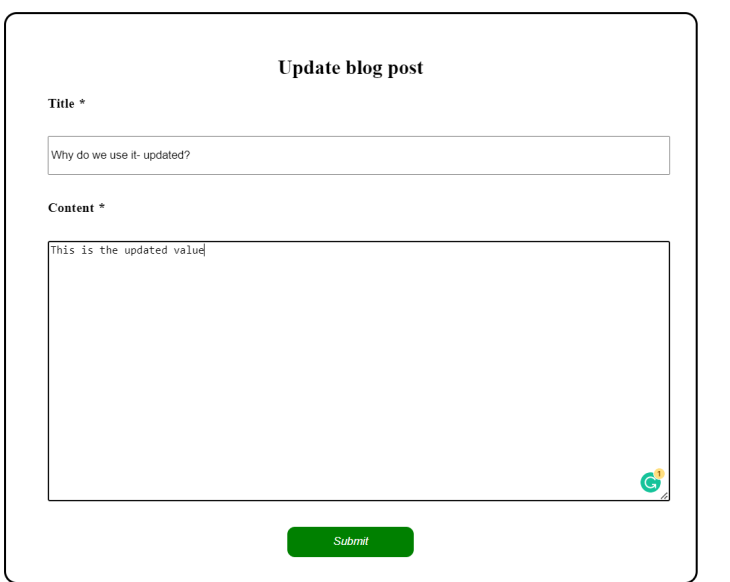
You’ll be able to navigate to the update-post web page by clicking the Replace button on the publish element display.

Notes on Tetra’s production-readiness
On the time of writing this text, Tetra continues to be in its early levels of growth and at the moment helps Python 3.9 and above. Nevertheless, the Tetra staff is engaged on increasing the functionalities of this framework to older variations of Python.
One factor you need to know earlier than starting manufacturing with Tetra is that the framework documentation wants a whole lot of enchancment. It was too concise, as some dependencies have been both not defined in any respect or weren’t detailed sufficient. For instance, the documentation doesn’t focus on the way to deal with photographs, which is why we constructed a weblog app for this demo.
It wasn’t till after I had accomplished the undertaking that I spotted the framework isn’t as complicated because the documentation offered it.
Conclusion
This text launched you to Tetra and its elements. You discovered how Tetra capabilities and performs full-stack operations from a single file by constructing a easy weblog app that performs CRUD operations.
The Tetra house web page accommodates some further examples of how one can construct some easy functions with Tetra. In case you’re additionally fascinated about studying extra about this framework, the documentation is obtainable to information you. You’ll be able to take a look at the total implementation of the weblog app on GitHub.
LogRocket: Full visibility into your internet and cellular apps

LogRocket is a frontend utility monitoring resolution that permits you to replay issues as in the event that they occurred in your personal browser. As an alternative of guessing why errors occur, or asking customers for screenshots and log dumps, LogRocket enables you to replay the session to shortly perceive what went unsuitable. It really works completely with any app, no matter framework, and has plugins to log further context from Redux, Vuex, and @ngrx/retailer.
Along with logging Redux actions and state, LogRocket information console logs, JavaScript errors, stacktraces, community requests/responses with headers + our bodies, browser metadata, and customized logs. It additionally devices the DOM to document the HTML and CSS on the web page, recreating pixel-perfect movies of even probably the most complicated single-page internet and cellular apps.
