
Welcome to a different lesson from our course, Intermediate Flash Images. On this lesson, you are going to find out about a lighting sample known as break up lighting.
You are additionally going to find out about broad lighting, quick lighting, and rim lighting. You may uncover how they have an effect on your pictures and when to make use of them. By the top of this lesson, you’ll have a really strong set of instruments to make use of at any time when you’ll want to gentle an individual for a portrait.
Let’s get began with our last lighting sample.
Break up Lighting
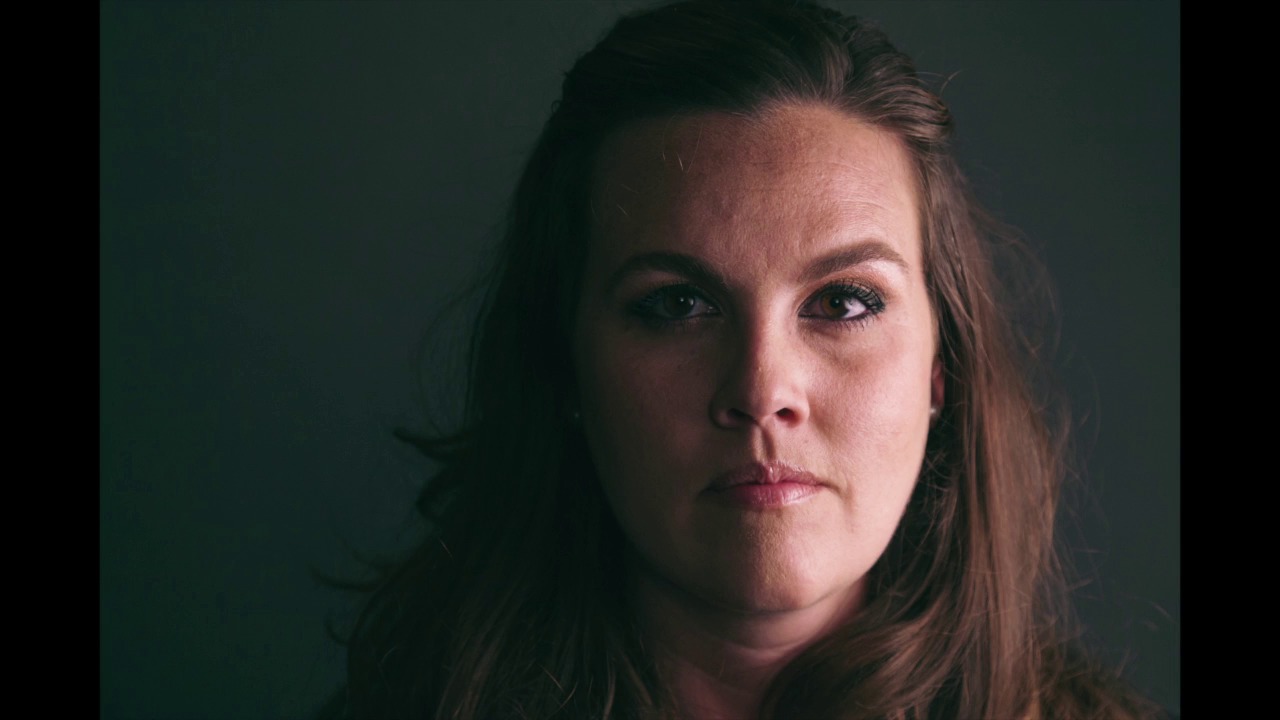
Break up lighting is an easy lighting sample to create and use. It is known as break up lighting as a result of, when performed appropriately, the lighting will break up the face proper down the center of the nostril into a light-weight aspect and a darkish aspect. This is an instance of break up lighting:


As you possibly can see, break up lighting will be fairly dramatic and moody. So, on this kind, it is best reserved for particular portraits. Break up lighting is beneficial for demonstrating the best way to discover the perimeters of your lighting, the transition areas between gentle and darkish, and for comparability with the opposite types we have seen on this collection up to now.
Break up lighting can be fairly simple to create, and is principally the other of butterfly lighting; we’ll need to carry our key gentle round our topic to in regards to the 90-degree place. Someplace round right here:


As you possibly can see, the rationale it is known as “break up” lighting is as a result of we’ll see a line proper down the center of our topic’s face. Their nostril, lips, and chin, have been divided, or break up, right into a brilliant aspect and a darkish aspect.


That is just about excellent break up lighting. As you possibly can see, it is fairly dramatic and a bit foreboding. Due to this, you do not see it used an entire lot, however it may be excellent for a selected use.
A method we will take a number of the drama out of break up lighting is by bringing in a reflector. Let’s herald our silver reflector and see what that does to our topic.


As you possibly can see, the reflector brings a little bit of brightness onto the shadow aspect, and this creates an attention-grabbing look. Now let’s examine a portrait made with this lighting setup.


Posing Variations
So that’s break up lighting! When you’ve additionally adopted the different classes on this course, you now have 4 lighting setups that you should use. To let you know the reality, you possibly can just about make any portrait when you understand solely these 4 lighting setups. It may appear that issues might get fairly boring, fairly quick with solely 4 decisions of lighting, however let me let you know how we’ll treatment that.
You might have seen that in each instance, our topic has been dealing with instantly into the digicam and that we have been shifting the lights round them. Properly, one of many best methods to vary issues up is to begin to change the path our topic is dealing with within the picture.
Let me present you an instance. This is a photograph with commonplace Rembrandt lighting, trying instantly into the digicam.


Now here is the identical lighting with our topic simply turned barely.


And here is the identical lighting once more, with our topic turned the opposite approach.


After which here is the identical lighting yet another time, with the topic turned 90 levels away from the digicam.


It is loopy to me how a lot the sensation of a picture can change with out altering the lighting or the topic. The truth is, in all of those photos, the one distinction was in shifting the digicam across the topic in a semicircle. You might additionally get the identical outcomes by having your topic flip away out of your digicam, however then you definately would even have to maneuver your lights to stick with your topic.
Now that you’ve seen this in motion, let’s dissect these pictures a little bit bit and work out precisely what is going on on and provides us some definitions in order that we have now some widespread vocabulary to explain these completely different pictures.
Let’s begin with this picture the place our topic is dealing with barely on this path.
That is what we’d name broad lighting. Broad lighting is when the aspect of the face with probably the most gentle is nearer to the digicam, and the shadow aspect of the face is additional away from the digicam. Broad lighting usually makes your topic’s pores and skin look softer and extra even by hiding wrinkles and pores and skin irregularities.
Broad lighting additionally makes your topic’s face look wider, and most of the people I do not know do not actually like that, so you’ll want to watch out about who you are photographing once you’re utilizing broad lighting.
The alternative of broad lighting is brief lighting. In quick lighting, the aspect with probably the most gentle is away from the digicam, and the shadowed aspect of the face is nearer to the digicam. Like this picture:
Quick lighting is a really flattering gentle in that it slims down your topic’s face and makes them look thinner, which many individuals like. Alternatively, quick lighting additionally accentuates wrinkles and pores and skin imperfections and texture. In my expertise, this can be a helpful place for portraits for most individuals, except for some individuals with very skinny faces. As soon as once more, it is all about studying the best way to learn the face of your topic after which deciding which lighting patterns work.
So if we take quick lighting to the acute, we get what’s known as rim lighting or profile lighting. Rim lighting is a really dramatic gentle and positively offers a sure really feel of thriller and thoughtfulness to a picture.
Once we do rim lighting, the digicam will nearly be capturing proper into the important thing gentle, so it is necessary to just remember to’re not getting any lens flares.
Now we will take our 4 portrait lighting patterns and blend them up with these three new lighting instructions to get various combos to work with.
Listed below are only a few examples. This picture is brief Rembrandt lighting:
The sunshine a part of the face is away from us, and the small triangle is nearer to us.
And that is broad loop lighting, the place the intense aspect of the face is nearer to the digicam, and the small shadowed aspect of the nostril is on the opposite aspect of the digicam.


The combos go on and on from right here, and I would like you to go and make up a few of your personal and see which of them you want finest.
In our subsequent lesson, we’ll transfer on from the easy portrait setups, and you are going to learn to add a second flash to your setups—as soon as once more, providing you with extra management and extra inventive freedom. Comply with the total course to continue learning!
