Had been you unable to finish a pending work as a result of an error message saying “Automated Restore couldn’t restore your PC” prevented your Home windows laptop from beginning? Such an error may result in an Automated Restore loop and stop you from accessing your vital recordsdata and utilizing your PC.

Our article will concentrate on primary troubleshooting steps that restore your system and bypass such error messages. However first, allow us to study extra about this error.
What does ‘Automated Restore couldn’t restore your PC’ imply?

Suppose you might be booting the Microsoft Home windows 10 or 11 working system in your PC, and the machine fails to start out up consecutively greater than two instances. In that case, an automated restore software makes an attempt to scan the error and restore the earlier working state.
If the software fails to run accurately, one of many following errors happen:

- An limitless black display saying: “Making ready Automated Restore” or “Diagnosing Your PC.”
- Because of the automated restore loop, the Making ready Automated Restore progress share doesn’t enhance past a sure stage.
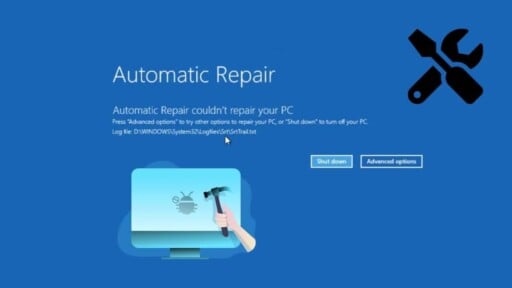
- A blue display reveals the next message: “Automated Startup Restore couldn’t restore your PC.” Press “Superior choices” to strive different choices to restore your PC or “Shut Down” to show off your PC. Log file: C:WindowsSystem32LogfilesSrtSrtTrail.txt”
After the error message, you may both click on on Restart Now to reboot your PC or entry protected mode, bios settings, command immediate home windows, chkdsk, and different helpful instruments by way of the Superior choices button.
What does the Automated Restore Instrument do?
The Automated Restore Instrument is a Home windows system-recovery software launched in Home windows 8 that diagnoses and troubleshoots generally occurring boot errors. It’s normally activated routinely after two failed boot makes an attempt.
When turned on, this utility will verify for and try to repair any points that maintain your machine from booting up by way of a collection of diagnostic exams. Sadly, this software sometimes will get caught in an automated restore loop quite than addressing your default boot issues.
Why Automated Restore Couldn’t Restore Your PC?
Your machine could be caught in an everlasting loop of reboots, and any saved information shall be misplaced when the automated restore software couldn’t restore your PC. Due to this fact, it turns into needed to grasp the explanations behind why the automated restore software couldn’t restore your PC, as given beneath:
- Lacking system information recordsdata or corrupted file system or arduous drive partitions
- Uncommon error within the MBR and modifications within the BIOS settings
- Pointless interference by recently-installed third-party software program or malware
- Misguided entry within the Home windows Registry
- Problematic set up of the newest Home windows Replace recordsdata
- File corruptions within the Home windows Boot Supervisor
- Home windows Restoration Atmosphere not discovered
- Change in drive letters of the first boot partition
- Incompatible or defective arduous drives and USB units
Tips on how to repair Automated Startup Restore couldn’t restore your PC?
In case you are receiving the “Automated Restore couldn’t restore your PC” error, you might be amongst a number of different Home windows customers who in all probability can’t consider another technique to restore startup difficulties and depend on automated troubleshooters like this one. Luckily, this text offers a number of environment friendly troubleshooting options, as listed beneath. Comply with them sequentially till Home windows boots up:
- Restart the Microsoft working system
- Restore default Home windows registry configuration from RegBack listing
- Rebuild MBR, fixboot, and restore MBR utilizing the Bootrec Home windows Restoration setting
- Run chkdsk to scan disk partition and discover file system errors
- Execute the SFC Scannow and DISM utility in Protected mode
- Rollback to a working Home windows picture utilizing System Restore
- Disable Automated Startup Restore from BCD settings
- Disable Early launch anti-malware safety in Startup Settings
- Disable Driver Signature Enforcement
- Delete the file inflicting the Automated Restore loop
- Verify machine and osdevice partition parameters in Boot Configuration Knowledge
- Verify Home windows boot precedence within the BIOS boot menu
- Modify the disk controller mode in BIOS
- Activate NX, XD, or XN Safety Settings in BIOS
- Disconnect and reinsert your arduous drive
- Take away the laptop computer battery
- Take away exterior USB units
- Change the RAM slot
- Reset your PC
- Refresh Home windows utilizing Microsoft ISO File
Restart the Microsoft working system
Restarting your Home windows 10/11 desktop, which has been working for a protracted whereas, is commonly the simplest strategy to repair conditions the place Automated Restore couldn’t restore your PC. Rebooting removes short-term recordsdata, refreshes reminiscence, and restarts Home windows processes. Comply with the steps given beneath for performing a clear restart:
- In case your Home windows desktop is caught on the “Making ready Automated Restore” or “Diagnosing your PC” display, a handy strategy to start the restore course of is by forcing your laptop to carry out a tough reboot.

- Maintain down the Energy button on the CPU cupboard or your laptop computer till the Home windows error message disappears and the PC model emblem seems. The booting may resume with out arriving on the automated restore display.

- Press the Shut Down button if you’re on the blue display saying Automated Restore couldn’t restore your PC. Restart your laptop by urgent the facility button once more.
- If a reboot fails to repair your Home windows system, proceed to the step given beneath.
Restore default Home windows registry configuration from RegBack listing
The Home windows registry is a configuration settings database for varied purposes put in in your PC. In case you are going through the Automated Restore couldn’t restore your PC error after a current set up or Home windows Replace, observe the steps beneath to revive the registry settings to its most up-to-date backup:
Be aware: Home windows silently disabled automated registry backup since model 1803. So the RegBack folder could be both empty or containing a number of registry hives with none content material within the newest variations.
- Firstly, we should entry the RegBack folder inside the first Home windows partition.

- Choose the Superior choices button from the error message display.

- Click on on Troubleshoot from the Select an possibility display to view an prolonged checklist of choices.

- Choose Superior choices once more to view totally different choices aside from Reset this PC.

- Click on the Command Immediate button to open the Command Immediate window for superior troubleshooting.

- You may have to enter the username and password earlier than opening the command immediate.

- Contained in the command immediate terminal, we should navigate by way of the arduous drives the place Home windows 10/11 is put in.
- Kind
c:and press enter to move to the C drive. Execute thedircommand to checklist the directories. - Repeat the above step for d: e: f: till you discover arduous drive partitions the place the Program Information, Program Information (x86), Customers, and Home windows folders are listed as directories. That is the partition the place your Home windows was put in.

- Kind
cd WindowsSystem32configto navigate to the default registry folder. - Carry out a backup of your present registry entries by executing the instructions given beneath when you have one thing to revive as soon as your laptop boots up:
- Kind
cd RegBackto move to the Registry Backup folder, and sort dir to checklist the saved entries.

- If there aren’t any entries in RegBack or the quantity beside every entry is 0 (as proven within the screenshot above, merely sort
EXITand proceed to the opposite strategies.

- In any other case, execute
copy *.* ..to repeat all directories from RegBack to the unique registry. - Kind
Ato substantiate the overwrite of all registry directories. - Kind
exitand press Enter to Proceed as well the Home windows working system. - If the Home windows Startup error persists, proceed to the next technique.
Rebuild MBR, fixboot, and restore MBR utilizing the Bootrec Home windows Restoration setting
Automated Restore couldn’t restore your PC in case your Boot Configuration Knowledge (BCD) was configured resulting from a current change or you will have a corrupt Grasp Boot Document (MBR) as a result of set up of malware or a separate working system. Comply with these directions to repair the startup utilizing the bootrec utility:

- Choose the Superior Choices button from the “Automated Restore couldn’t restore your PC” blue display.

- Open the Troubleshoot menu and click on Superior Choices to view an prolonged checklist of restoration choices.

- Launch the Command Immediate window by clicking the icon as indicated above.

- Select the person account identify created to your laptop, sort the account password (not the PIN) and press Proceed to entry your disk partitions.

- The command immediate must be open within the Administrator mode.
- Kind the next instructions and execute them sequentially:
bootrec /fixmbrbootrec /fixboot
- Be aware: If the fixboot command returned an error, strive executing
bootsect /nt60 sysand working fixboot once more
bcdedit /export C:bcdbackupattrib C:bootbcd -h -r -sren C:bootbcd bcd.outdatedbootrec /rebuildbcd

- Be aware Whereas executing the instructions above, if you happen to obtain a message totally different from “The operation accomplished efficiently”, exit from right here and proceed to different troubleshooting strategies to repair Automated Restore couldn’t repair your PC.
- The
bcdeditcommand will again up the present BCD listing. - The final
bootreccommand will scan for current Window set up entries. If they’re discovered, add them to the boot checklist by coming into Y.and urgent Enter to finish. - Kind
exitand press Enter two instances to Proceed utilizing your Home windows desktop.
Run chkdsk to scan disk partition and discover file system errors
Other than fixing the boot sector, you may as well scan for dangerous sectors and corrupted chunks within the file system of your main partition by way of the chkdsk command: Comply with the directions given right here to revive dangerous sectors and repair the Automated Restore couldn’t restore your PC error:
- In case you are caught within the automated restore loop, drive reboot your laptop consecutively 3 times when the Home windows emblem seems. The restoration menu will seem on the third reboot.

- Choose the Superior Choices button and open Command Immediate.

- Choose your username and enter the password to Proceed.

- Kind the next instructions as given beneath, relying on the variety of arduous drive partitions you will have.
chkdsk /f /r c:chkdsk /f /r d:
- Should you don’t know the drive volumes in your PC, execute
diskpartwithin the command immediate and sortchecklist quantityto show the entire partition checklist. - Kind
exitand press Enter in your keyboard 2 instances to restart your laptop. - If the Automated Restore couldn’t repair your PC error is seen once more, check out the strategy given beneath.
Execute the SFC Scannow and DISM utility in Protected mode
The System File Checker (SFC) and Deployment Picture Servicing and Administration (DISM) utilities may help to scan and restore any corrupt system recordsdata or machine drivers within the Home windows partition:

- Open Superior choices from the blue error display.

- Head to Troubleshoot > Superior choices.

- Click on on Startup Settings to view the checklist of startup choices.

- Press the Restart button to proceed.


- Open a Command Immediate window utilizing the Run as administrator mode from the Search menu.

- Execute the next instructions concurrently to verify for errors in Home windows picture (DISM) and discover if any system file is lacking or damaged (SFC):
DISM /On-line /Cleanup-Picture /RestoreHealthsfc /scannow

- The utilities will take vital time to finish the entire course of.
- Restart your laptop to see if Automated Restore couldn’t restore your PC.
Rollback to a working Home windows picture utilizing System Restore
Every time any machine driver or Home windows Replace set up begins, your laptop routinely creates a system restore level earlier than any vital modifications are made. You need to use the System Restore level to revive Home windows to its working model and repair the Automated Restore couldn’t restore your PC error:
- Click on the Superior Choices button from the error message display.

- Navigate to Troubleshoot > Superior possibility menu, and click on on the System Restore button on the top-left nook.

- The System Restore window will open after a while. Click on on Subsequent to proceed.

- The system restore factors shall be listed with the newest one on the prime.
- Choose the Restore level and click on on Subsequent.

- Lastly, click on on End to use the modifications. Choose Sure to substantiate.

- Wait patiently because the utility restores the recordsdata within the indicated Home windows drive.

- Click on the Restart button upon the completion of the method.
- If Home windows fails to restart now, strive utilizing older variations of System Restore or observe different strategies given beneath.
Disable Automated Startup Restore from BCD settings
If Automated Restore couldn’t restore your PC, probably the most logical resolution is to disable the automated startup restore from launching on boot. This may be achieved by way of the next process:

- Click on on the Superior choices button from the error message.

- Head to Troubleshoot > Superior choices, and click on on Command Immediate.

- Choose your Microsoft account and enter the password to open the cmd window.
- Kind
bcdeditand press enter to checklist the present BCD configuration.

- Be aware the values underneath Identifier and recoveryenabled choices of the Home windows Boot Loader.
- If recoveryenabled is about to Sure, proceed with the steps given right here; else, observe different options.

- Kind the next command and press Enter to disable automated startup restore:
bcdedit /set {default} recoveryenabled no
- After the operation completes efficiently, sort exit and press Enter twice to restart your laptop.
Disable Early launch anti-malware safety in Startup Settings
Home windows enforces its personal anti-malware safety earlier than your laptop boots up. Due to this fact if Home windows finds any suspicious file, it could attempt to block the startup totally and create an automated restore loop. Comply with the steps given right here to show off this function and repair “Automated restore couldn’t restore your PC”:

- Firstly, click on the Superior choices button from the blue display.

- Head to Troubleshoot > Superior possibility and click on on the Startup Settings menu.

- Click on on Restart to permit the modification of the checklist of choices proven on the display.

- After the pc restarts, you will note totally different modification choices within the subsequent Home windows Startup.
- Press 8 or F8 to pick out the Disable Early Launch Anti-Malware Safety possibility, and Home windows will routinely restart with out enabling this function.
- Verify if the startup is profitable. Comply with the opposite strategies if this resolution fails.
Disable Driver Signature Enforcement
If a current third-party utility had put in a driver in Home windows that Microsoft didn’t digitally signal, the “Automated Restore couldn’t restore your PC” message may pop up. The Home windows OS verifies put in drivers earlier than startup; any unknown driver file may forestall a profitable boot. Right here’s easy methods to keep away from it:

- Open the Home windows restoration window and head to Troubleshoot > Superior choices.

- Click on on Startup Settings, and you will note a listing of modifications you may make on the following boot.

- Click on on Restart to proceed.

- When Home windows restarts once more, press 7 or F7 in your keyboard to disable driver signature enforcement.
- Home windows will try to boot once more with out checking for unknown drivers and see if the Automated Startup Restore problem is fastened.
- If Home windows boots up, open the Machine Supervisor from the Begin menu and delete, replace or roll again any driver with a yellow error signal beside it.
Delete the file inflicting the Automated Restore loop
The SrtTrail (Startup Restore Instrument Path) file discovered on the “Automated Restore couldn’t restore your PC” error display is a log file that shops verbose messages when the pc fails as well up. A better inspection of the log will assist us discover and delete the problematic file inflicting the error.
Be aware: Should you obtain any error message whereas deleting the problematic file from the command immediate, allow protected mode and take a look at deleting the file once more.

- Click on on the Superior choices button, as seen within the error message.

- Navigate to Troubleshoot > Superior Choices > Command Immediate.

- Select your username and sort the password when required.

- Execute the next instructions to search out the log file:
C:cd WindowsSystem32LogFilesSrtSrtTrail.txt
- You’ll now see the error log created by the Startup restore software.

- Discover a line of code that’s just like:
Boot vital file C:windowssystem32driverstmel.sys is corrupt
- The following step is figuring out the character of the file inflicting the problem and easy methods to repair it. As an example, our automated restore loop was attributable to the tmel.sys file, a corrupt driver known as TrendMicro ELAM Driver.
- Provided that this isn’t a vital Home windows 10 system file, we might safely take away it.

- To take away a file, you could use the Command Immediate to go to the given location and execute the
delcommand. In our case, the command could be as follows:cd c:windowssystem32driversdel tmel.sys
- Once more, that is simply an instance; you could have to take away a special file from one other folder. Earlier than deleting a file, guarantee it’s not a elementary Home windows 10 file; in any other case, you threat harming your OS.
- Restart your laptop, and uninstall the applying that put in the driving force if Home windows efficiently boots up.
Verify machine and oSdevice partition parameters in Boot Configuration Knowledge
If Automated Restore couldn’t restore your PC, the machine and OSdevice partition values won’t be set to the first Home windows partition within the BCD. Right here’s easy methods to repair it:

- Select Superior choices > Troubleshoot > Superior Choices > Command Immediate.
- Kind the next command to show the Boot Configuration Knowledge:

- Verify if the values for machine partition and osdevice partition underneath Home windows Boot Loader are set to the disk the place Home windows was put in.

- If they’re incorrect, enter these instructions to set them to the right partition:
bcdedit /set {default} machine partition=c:bcdedit /set {default} osdevice partition=c:
- Be aware: Exchange C: with the partition the place Home windows is put in.
- Reboot Home windows to see if the startup restore error is fastened.
In case your arduous drive will not be set as the primary boot machine within the BIOS boot precedence settings, the “Automated Startup Restore couldn’t restore your PC” error may happen. Right here’s easy methods to repair it:

- Boot up your laptop and constantly faucet any one of many following buttons till you enter the BIOS setup menu: F1, F2, F3, Esc, Del.
- Head to the Boot choices menu.
- Make the arduous disk the main boot machine. In case your laptop has a couple of arduous drive, the one with Home windows 10 put in must be designated as the first boot drive.
- Press F5 to Save modifications and exit from the BIOS, and settle for the affirmation window that comes afterward.
- Verify if the Automated Startup Restore problem is fastened on the following boot.
Modify the disk controller mode in BIOS
Altering the disk controller mode in BIOS will change how your arduous disk or SSD is accessed by your laptop and resolve the Automated Startup Restore couldn’t repair your PC error:

- Open the BIOS menu utilizing the important thing proven within the earlier technique.
- Discover the disk controller mode within the bios and alter it to Commonplace (IDE, SATA, or Legacy).
- Carry on altering the controller mode till your PC boots up accurately. If not, return the disk controller mode to the earlier one and use different strategies as given beneath.
Activate NX, XD, or XN Safety Settings in BIOS
NX (No eXecute), XD (eXecutive Disable), and XN is a hardware-level safety function of the CPU that’s accessible in solely a choose few BIOS interfaces. So don’t panic in case your PC doesn’t present them:

- Entry the BIOS settings utilizing the F2, Esc, or Del keys, and head to the Safety tab.
- Seek for CPU XD Help or Execute Disable, and allow it.
- Should you can’t discover that function, seek for NX or XN in the identical menu and allow them.
- Press F5 to avoid wasting BIOS settings and restart.
Disconnect and reinsert your arduous drive
A number of Home windows customers have beforehand talked about reconnecting their arduous disk solved the “Automated Restore couldn’t restore your PC” downside, so that you may wish to strive that:
Be aware: We aren’t chargeable for opening inner {hardware} components that may void your guarantee. So please proceed with warning and provided that what you might be doing.
- Flip off the PC and unplug it from the facility socket.
- Open the CPU cupboard and take away the SATA and energy cables from the again of the arduous drive. Look ahead to a couple of minutes and insert them once more of their ordinary slots.
- Activate the facility to see if the pc boots with none error.
- If there are a number of arduous drives, repeat the above step for every of them.
- You additionally must reconnect these disks the place you don’t have Home windows put in.
- Hold just one disk related to the pc and take a look at booting it up. Reconnect the disconnected ones if the problem is fastened.
Take away the laptop computer battery

- When you’ve got a detachable laptop computer battery, you may strive working the laptop computer with out the battery and see if it fixes the Automated Restore couldn’t repair your PC error.
- Merely disconnect the battery, plug in the AC charging cable, and activate your laptop computer.
- In case your laptop boots up, use it for a while earlier than turning it off correctly and reinserting the laptop computer battery.
Take away exterior USB units

- Unplug any USB machine related to your laptop, which could remove their interference within the startup restore course of.
- Merely pull out their cable from the USB port, restart your laptop and verify if the error is fastened.
Change the RAM slot
Few prospects have claimed that eradicating the RAM reminiscence and altering their slots was adequate to resolve the Home windows 10 Automated Restore Loop:

- To do that, you could energy down your laptop, take away the CPU cupboard or laptop computer panel, and gently wiggle out the RAM playing cards. Change their locations with the RAM slots and take a look at turning on the pc.
- In case your laptop has a couple of RAM slot, strive booting up with solely one RAM module eliminated.
Reset your PC
Should you don’t have any problem with shedding out on the put in Home windows app and settings with out erasing different valuable recordsdata (photos, movies, paperwork, downloads), then you may attempt to reset the Home windows PC by way of Home windows Restoration:
- From the error message, open the Superior choices part.
- Choose the Troubleshoot menu to view methods to repair your laptop.


- Click on on the Hold my recordsdata button (If you wish to maintain your important private recordsdata) or Take away every part (All recordsdata shall be deleted completely).

- On the following display, choose both Cloud obtain (To obtain Home windows ISO from WiFi and reinstall Home windows) or Native reinstall (To make use of Home windows Picture out of your machine).

- After ready, Home windows will remind you what recordsdata will get deleted. Click on on Reset to proceed.

- After Home windows completes resetting your PC, the Home windows OS will boot up routinely.
Refresh Home windows utilizing Microsoft ISO File
Reinstalling Home windows in your PC is the final word troubleshooting technique for fixing the Automated Restore couldn’t restore your PC error and different Startup issues, offered that your essential information and recordsdata are backed up.
Be aware: This technique will delete every part in your PC.
Creating Home windows Set up Media on One other PC

- Should you don’t have an official Home windows ISO file, obtain the Home windows Media Creation Instrument from the Home windows 10 Obtain Web page.

- Settle for the license agreements and click on on Create set up media for one more PC.

- Choose your most popular language, structure (relying on the PC), and version.

- Choose ISO file when you have a DVD and wish to use it as an set up media.
- Choose USB flash drive if you wish to use your USB drive to Refresh Home windows.

- Be certain that the detachable media is already inserted.
- The setup will obtain and proceed with USB or burn the downloaded ISO on the DVD.
Reinstall Home windows on Your PC
- Insert the DVD or USB drive into the PC with the startup error, and restart the machine.
- To open the Boot menu, maintain urgent F11 simply when the boot emblem seems (F12, F9, or F10 can also work, relying in your motherboard).

- Choose a USB flash drive or DVD–ROM because the boot machine. Save modifications and restart the pc.

- Your Home windows set up recordsdata ought to now start to load. Comply with the instructions to have a brand-new system up and working very quickly.
Conclusion
Final however not least, if not one of the previous measures helped, and also you’re certain the recent set up of the working system didn’t repair the “Automated Restore couldn’t restore your PC” error, then there have to be a {hardware} problem and consulting a PC technician is your solely possibility. We hope you have been ready to make use of one in all our options to restore it. Remark beneath and tell us how your restore turned out!
FAQs
What Do You Do When Automated Restore Doesn’t Work?
If Automated restore doesn’t work, you may attempt to restore Home windows to the newest restore level, get better the backed-up registry, rebuild the boot sector, or reset your PC to default settings.
How Do I Repair Automated Restore Couldn’t Restore My Pc?
If automated restore couldn’t restore your laptop, you may repair it manually by rebuilding the MBR and boot sector, restoring the registry entries, utilizing a restore level to revert Home windows, and utilizing a Home windows set up media to reinstall the OS.
What Does Making ready Automated Restore Imply?
When the Home windows boot display reveals that it’s Making ready Automated Restore, it implies that Home windows is making an attempt to repair the startup downside by itself by making use of totally different automated methods.
How Do I Bypass Automated Restore On Home windows 8?
The Automated Restore function in Home windows 8 or 8.1 could be disabled by executing the next command on a Command Immediate with Administrator privileges: bcdedit /set recoveryenabled NO
