
 MicroPython is much like Python 3, however it’s meant for microcontrollers. MicroPython comes with an interactive Learn-Consider-Print-Loop (REPL), which is a tremendous function that permits us to hook up with a microcontroller, execute code shortly with out the necessity to compile or add code, and offers fast suggestions. Additionally, most significantly, the group assist obtainable for it makes using this firmware simpler.
ESP8266 is a low-cost Wi-Fi module that’s splendid for DIY initiatives involving the web of issues (IoT). As MicroPython is straightforward to make use of, which is essential for rookies, it may be programmed simply. However the default firmware of ESP8266 and different ESP Wi-Fi boards are totally different. On this DIY undertaking, we flash the MicroPython in Node MCU board and use the MicroPython to program the board and management its GPIO over community utilizing Pico framework.
Flashing MicroPython firmware on the board
With the intention to use the PicoWeb framework and program the ESP in MicroPython to regulate GIPO on Node MCU, we have to erase the present firmware on ESP chip within the Node MCU. We are able to obtain the MicroPython firmware from its official web site, which is in .bin format. The official web site for downloading MicroPython firmware for the board is: http://MicroPython.org/obtain/#esp8266
After downloading the firmware, we have to first erase the present firmware. For that, estool is used to erase or flash new firmware into the ESP board. To put in esptool, open the command immediate and run the next command and set up the esp device:
pip set up esptool
Now, we have to join Node MCU to the system and establish the port to which it’s related. If you’re utilizing a Linux primarily based system, the command beneath will assist you to establish the port:
dmesg | grep tty
Subsequent, we have to clear the board earlier than flashing the MicroPython firmware with the beneath syntax. Please word, the port recognized within the above step is used within the syntax as –p.
~/.native/bin/esptool.py -p /dev/ttyUSB0
erase_flash
Now, we are able to flash the MircoPython firmware and open the folder the place the MicroPython firmware has been downloaded. Then, copy the trail and file identify of that .bin firmware file and flash it to the Node MCU board utilizing the next command. (It’s essential to change the trail and filename of the firmware within the command.)
~/.native/bin/esptool.py – port /dev/tty
USB0 – baud 460800 write_flash – flash_
measurement=detect 0 esp8266-20210202-v1.14.bin
Notice. esp8266-20210202-v1.14.bin is the firmware identify downloaded, which must be changed with the identify of the firmware file in your system.
Wola! The board is prepared, so we are able to enter the REPL immediate and discover. However to enter the REPL immediate we want one other CLI device, named picocom, which might be put in via the command beneath:
sudo apt-get set up picocom
Subsequent, use the syntax beneath, which is able to show some data on the ESP board. Press ctl+B to enter the REPL immediate.
picocom /dev/ttyUSB0 -b115200
The command to smooth reset the board from the REPL immediate is ctl+D
Pushing the file out of your system onto the board would require cli device adafruit-ampy. To put in it in your system, use the next syntax:
pip set up adafruit-ampy
pip set up adafruit-ampy – improve
Notice. In some instances, you would possibly face challenge with picocom. In that case, you need to use any serial terminal and monitor to put in the pico framework. Additionally, after flashing the MicroPython, the board might typically not get related to Wi-Fi and the web and present an error. In that case it’s essential to comply with the directions given below the community setup part beneath.
Organising the community and connecting to Wi-Fi
Open the serial terminal and provides the instructions talked about beneath to hook up with the Wi-Fi community:
import community
sta_if = community.WLAN(community.STA_IF)
ap_if = community.WLAN(community.AP_IF)
sta_if.energetic(True)
sta_if.join(‘<your SSID>’, ‘<your
key>’) # Change the SSID along with your
Wi-Fi community identify and key along with your
community password
sta_if.isconnected()
sta_if.ifconfig()
Now, with the Node MCU related to Wi-Fi, we are able to examine its IP handle utilizing following command and word the IP handle:
sta_if.ifconfig()
It provides an output like:
(‘192.168.0.2’, ‘255.255.255.0’,
‘192.168.0.1’, ‘8.8.8.8’)
Setting PicoWeb framework of MicroPython
We are actually prepared to put in the PicoWeb, which is a micro net framework for MicroPython. If you’re acquainted with Flask net framework in Python, you can see it much like work with. Two essential options of PicoWeb are:
- Asynchronous, which implies it may well deal with a number of concurrent requests.
- Small reminiscence utilization.
To put in the framework in Node MCU, clone the repo to a location in your system utilizing the code:
$ git clone https://github.com/
peterhinch/MicroPython-samples
Dependencies of PicoWeb framework
To put in the framework onto the board, we have to first set up a number of dependencies. Open the REPL immediate, as talked about earlier, and set up the packages as talked about beneath:
$ import upip
$ upip.set up(‘MicroPython-uasyncio’)
$ upip.set up(‘MicroPython-ulogging’)
$ upip.set up(‘MicroPython-pkg_resources’)
$ upip.set up(‘utemplate’)
Step out of REPL, utilizing ctl+A+X, and duplicate some file from the native system into the board. Transfer to the folder the place the PicoWeb repo from git is downloaded, try for the information __init__.py and utils.py. Copy these information to the PicoWeb listing on the board. To do that, make use of the opposite cli device, adafruil-ampy, which was put in earlier.
Step 1. Create the PicoWeb listing utilizing the code:
$ ampy – port /dev/ttyUSB0 mkdir picoweb
Step 2. Copy the information from the native system to the PicoWeb listing on the board utilizing the code:
$ ampy – port /dev/ttyUSB0 put __init.py
/picoweb/__init__.py
$ ampy – port /dev/ttyUSB0 put utils.py
/picoweb/utils.py
Creating API endpoints utilizing PicoWeb framework
Now, we have to create the Python script by the identify major.py, which will likely be performed in two steps. First, by connecting to the obtainable Wi-Fi and, second, by creating the api endpoint to regulate GPIO pin state of the board. We may also create an entry level (AP) for the board, in order that if there is no such thing as a Wi-Fi obtainable, we are able to nonetheless connect with the board AP and management the state of the GPIO pins.
sudo nano major.py
Now, copy the next code in major.py file:
import picoweb
import community
from machine import Pin
import time
ip=[]
app = picoweb.WebApp(__name__)
#create the Entry Level
ap = community.WLAN(community.AP_IF)
ap.energetic(True)
ap.config(essid=’espAP’,
password=’espAPpassword’)
myip = ap.ifconfig()
print(myip)
#connect with the obtainable wifi networks
station = community.WLAN(community.STA_IF)
station.energetic(True)
station.join(“wifi-network-name”,
”wifi-network-password”)
myip2 = station.ifconfig()
print(myip2)
def qs_parse(qs):
parameters = {}
ampersandSplit = qs.break up(“&”)
for ingredient in ampersandSplit:
equalSplit = ingredient.break up(“=”)
parameters[equalSplit[0]] =
equalSplit[1]
return parameters
#create the api endpoint to regulate the
pin supplied as parameter on API name
@app.route(“/pin_ctl”)
def index(req, resp):
queryString = req.qs
parameters = qs_parse(queryString)
print(parameters)
x= int(parameters[‘pin’])
pin = machine.Pin(x, machine.Pin.OUT)
pin.worth(0)
time.sleep(0.5)
pin.worth(1)
time.sleep(0.5)
pin.worth(0)
time.sleep(0.5)
pin.worth(1)
time.sleep(0.5)
yield from picoweb.start_
response(resp)
yield from resp.awrite(“performed”)
if __name__ == “__main__”:
app.run(debug=True,host=”0.0.0.0”,
port=80)
Press ctrl+x after which Y to save lots of the code. Copy this major.py file to Node MCU board utilizing the next syntax:
ampy – port /dev/ttyUSB0 put major.py
Connecting and working from wherever
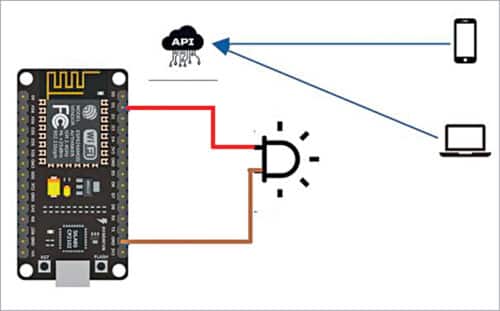
Join the LED to GPIO pin of Node MCU to check the API.
Login to the Wi-Fi homepage and examine the IP handle assigned to the gadget. Enter the handle in any browser and add on the finish the pin you wish to management as parameter, like the instance beneath:
$ http://192.168.1.14/pin_ctl?pin=3
To manage the LED, we might join it to GPIO 10 within the circuit diagram and run the next URL in net browser:
http://192.168.1.14/pin_ctl?pin=10
Obtain supply code
Pleasure Maitra is Senior Technical Architect at Hexaware Applied sciences. He’s a know-how fanatic and an open supply contributor
