
Preact is a small, light-weight various to React with the identical fashionable API. As a part of its newest updates, Preact just lately launched Indicators, a performant state administration library with a set of reactive primitives for managing the applying state.
Indicators routinely updates the state when the worth adjustments, comes with no dependency arrays, and updates the DOM instantly — making it lightning quick. The Preact crew claims this makes Indicators a greater strategy to handle state.
On this article, we’ll learn the way Indicators works, its advantages, options, and extra.
Bounce forward:
What’s Indicators?
Indicators is a library written in pure JavaScript, which suggests we will use it in Vue.js, Angular, Svelte, and any software with a JavaScript file. Whereas it may be utilized in any JavaScript file, the Preact crew additionally developed packages for Preact and React. Indicators was constructed by drawing inspiration from Stable and Vue.
In response to the docs, at its core, a sign is an object with a .worth property that holds some worth. Accessing a sign’s worth property from inside a part routinely updates that part when the worth of that sign adjustments. We’ll perceive this extra and see the way it works later within the article.
On the time of writing, there are presently three variations of Preact Indicators packages:
The motivation behind Indicators
The Indicators crew includes builders with years of expertise constructing software program functions for startups and large-scale companies. Over time, they’ve found a recurring drawback with managing the applying state.
To grasp the issue Indicators goals to resolve, let’s take into account a real-world situation. Say a mum or dad part holds some state has two youngsters elements, and one of many youngsters has to entry that state:
import { useState } from "react";

export default operate App() {
  const [count, setCount] = useState(0);
  operate addToCount() {
    setCount((rely) => rely + 1);
  }
  return (
    <div className="App">
      <Mother or father rely={rely} addToCount={addToCount} />
    </div>
  );
}

operate Mother or father({ rely, addToCount }) {
  return (
    <div>
      <ChildOne />
      <ChildTwo rely={rely} addToCount={addToCount} />
    </div>
  );
}

operate ChildOne() {
  return <p>A Dummy Counter App</p>;
}

operate ChildTwo({ rely, addToCount }) {
  return (
    <div>
      <span>{rely}</span>
      <div>
        <button onClick={addToCount}>+</button>
      </div>
    </div>
  );
}
Within the code snippet beneath, the Mother or father acts as a container that passes the rely state to ChildTwo, whereas ChildOne is a stateless part. The issue lies in what occurs once we click on the button to replace the state.
Mother or father, ChildOne, and ChildTwo all re-render, although ChildTwo is the one part instantly utilizing the state. Whereas we will deal with this drawback of pointless re-renders utilizing strategies similar to memoization, the Preact crew goals to remove this situation altogether with Indicators.
We are able to deal with this efficiency situation of pointless re-renders by switching to Indicators:
import { sign } from "@preact/signals-react"; //importing sign

export default operate App() {
  const rely = sign(0); //creating the sign

  operate addToCount() {
    return (rely.worth = rely.worth + 1); //updating the rely
  }

  return (
    <div className="App">
      <Mother or father rely={rely} addToCount={addToCount} />
    </div>
  );
}

operate Mother or father({ rely, addToCount }) {
  return (
    <div>
      <ChildOne />
      <ChildTwo rely={rely} addToCount={addToCount} />
    </div>
  );
}

operate ChildOne() {
  return <p>A Dummy Counter App</p>;
}

operate ChildTwo({ rely, addToCount }) {
  return (
    <div>
      <span>{rely.worth}</span> //accessing the rely worth
      <div>
        <button onClick={addToCount}>+</button>
      </div>
    </div>
  );
}
The appliance has turn into extra performant by altering solely 4 strains of code. How does Indicators obtain this? How does it forestall pointless re-rendering and guarantee optimum efficiency when reacting to state updates?
That is attainable as a result of a sign is an object that incorporates a price. In contrast to the useState situation that passes the state instantly by the part tree, Indicators solely passes the article, which acts as a reference to the worth. This ensures that solely the elements that entry the .worth of the sign object render when the state adjustments.
Indicators monitor when their worth is accessed and up to date. Accessing a sign’s .worth property from inside a part routinely re-renders the part when that sign’s worth adjustments. Consequently, a sign will be up to date with out re-rendering the elements it was handed by as a result of these elements see the sign and never its worth.
What makes Indicators completely different?
Indicators was constructed with efficiency in thoughts, and the next options and behaviors make it distinct. The crew behind Indicators describes it as follows:
- Lazy by default: Solely alerts which might be presently used someplace are noticed and up to date — disconnected alerts don’t have an effect on efficiency
- Optimum updates: If a sign’s worth hasn’t modified, elements and results that use that sign’s worth gained’t be up to date, even when the sign’s dependencies have modified
- Optimum dependency monitoring: The framework tracks which alerts every little thing depends upon for you — no dependency arrays like with Hooks
- Direct entry: Accessing a sign’s worth in a part routinely subscribes to updates with out the necessity for selectors or Hooks
The advantages of managing state with Indicators
The primary advantage of managing state with Indicators is that Indicators doesn’t re-render a complete part or software when state adjustments. As a substitute, it updates the a part of the applying hooked up to the state worth being tracked. This ensures that functions stay performant whereas making certain reactivity in response to consumer actions. In response to the documentation, what makes Indicators distinctive and nice is that:
State adjustments routinely replace elements and UI in probably the most environment friendly method attainable. Automated state binding and dependency monitoring permits Indicators to offer glorious ergonomics and productiveness whereas eliminating the commonest state administration footguns.
Second, we will declare international Indicators and import them into youngsters elements all through the applying. It simplifies the complexities round state administration by offering a easy and intuitive plug-and-play API that’s straightforward to make use of.
Lastly, we don’t need to arrange a dependencies array like React’s useEffect Hook. Indicators will routinely detect dependencies and name results when dependencies change.
Managing React app state with Indicators
Let’s implement our data of Indicators and use it to handle the state of a easy counter software.
First, begin by organising a contemporary React app with npx create-react-app signals-react-app. Then, set up the React bundle utilizing npm set up @preact/signals-react.
Copy the code beneath into your App.js file to arrange the counter software:
import { sign } from "@preact/signals-react";

const rely = sign(0);

operate increaseCount() {
  return (rely.worth = rely.worth + 1);
}
operate reduceCount() {
  return (rely.worth = rely.worth - 1);
}

export default operate App() {
  return (
    <div className="App">
      <span>{rely}</span>
      <div>
        <button onClick={reduceCount}>-</button>
        <button onClick={increaseCount}>+</button>
      </div>
    </div>
  );
}
Within the code above, we accessed the sign object from the @preact/signals-react bundle and used that to arrange a rely state. The worth we handed to the sign is now accessible from its .worth property.
Second, we arrange two features, increaseCount and reduceCount, which enhance and scale back the worth of the rely, respectively. And we handed the features to the buttons’ onClick handler.
This can be a primary implementation of Indicators, nevertheless it does job of displaying us the way it works.
Deriving state utilizing computed alerts
Moreover the sign object, Indicators additionally has a computed operate that we will use to arrange derived states. With computed, we will create a brand new sign from the opposite alerts’ values. The returned computed sign is read-only and is routinely up to date when any sign that depends upon it adjustments.
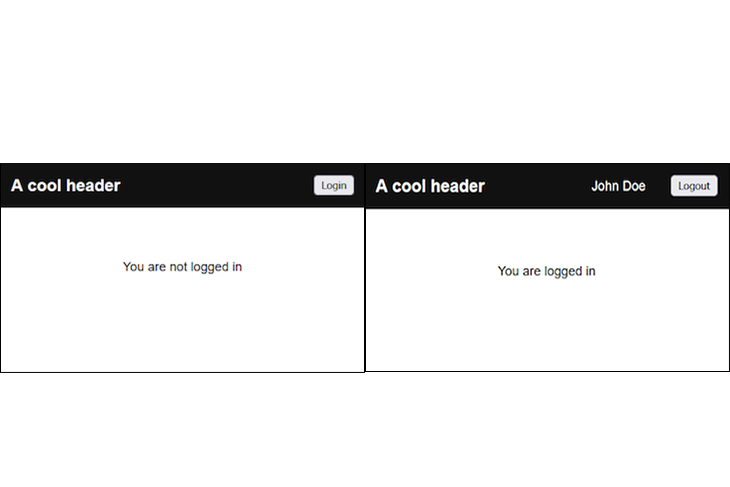
Let’s arrange a dummy consumer authentication software to see how computed works. Listed here are some photos of what we’ll construct:
We’ll begin by creating an AuthSignal.js file containing the state and authentication logic. Copy and paste the next code into the file:
import { sign, computed } from "@preact/signals-react";

export const consumer = sign(null); //the default state

//derived state based mostly on whether or not a consumer exists
export const isLoggedIn = computed(() => {
  return !!consumer.worth;
});
Within the code above, we imported sign and computed from @preact/signals-react. We additionally arrange a consumer sign with a default worth of null, that means there is no such thing as a logged in consumer at first.
We additionally used the consumer sign to derive the worth of isLoggedIn. If a consumer exists, isLoggedIn will likely be true. Then, we exported consumer and isLoggedIn to be used in different components of the applying.
The Header part consists of the logged in consumer’s identify and two buttons: one for logging in and the opposite for logging out.
To set it up, copy and paste the code beneath:
import { consumer } from "../AuthSignals";

const dummyUserData = {
  identify: "John Doe",
  electronic mail: "[email protected]"
};
export default operate Header() {
  return (
    <header>
      <h1>A cool header</h1>
      <ul>
        {consumer.worth && <li>{consumer.worth.identify}</li>}
        {!consumer.worth ? (
          <li>
            <button onClick={() => { consumer.worth = dummyUserData }}>
              Login
            </button>
          </li>
        ) : (
          <li>
            <button onClick={() => { consumer.worth = null }}>
              Logout
            </button>
          </li>
        )}
      </ul>
    </header>
  );
}
Let’s break it down and have a look at what we did:
- Imported the
consumersign fromAuthSignals - Outlined a
dummyUserDatacontaining some random consumer particulars - Conditionally rendered the consumer’s identify if there’s a logged in consumer
- Conditionally rendered the login and logout button based mostly on the state of the
consumersign’s worth - When the login button is clicked, we populate the
consumersign with thedummyUserData - When the logout button is clicked, we set the
consumersign tonull
Establishing the Dwelling part
The Dwelling part shows a easy message notifying us if we’re logged in or not. Let’s set it up:
import { isLoggedIn } from "../AuthSignals";
export default operate Dwelling() {
  return (
    <div>
      <span>
        {isLoggedIn.worth ? "You're logged in" : "You aren't logged in"}
      </span>
    </div>
  );
}
Keep in mind, isLoggedIn is a derived state with a Boolean worth that adjustments based mostly on the worth of consumer sign. We conditionally render a message base on the worth of isLoggedIn.
Extra nice articles from LogRocket:
Lastly, we deliver the elements collectively within the App.js file:
import Header from "./elements/Header";
import Dwelling from "./elements/Dwelling";
export default operate App() {
  return (
    <div>
      <div className="App">
        <Header />
        <Dwelling />
      </div>
    </div>
  );
}
With that, we have now realized extra about computed and used it to create a dummy consumer authentication system.
Preact Indicators vs. SolidJS Indicators
Like Preact, Stable additionally comes with its personal state administration resolution referred to as Indicators. As we noticed earlier, Stable is among the frameworks from which the Preact crew drew inspiration.
Stable offers a createSignal operate that’s much like React’s useState Hook:
import { createSignal } from "solid-js";

const [count, setCount] = createSignal(0);

operate Counter() {
  const increment = () => setCount(rely() + 1);

  return (
  <button sort="button" onClick={increment}>
    {rely()}
  </button>);
}
It would take the preliminary state as a parameter and return two objects we will entry by array destructuring. The primary merchandise within the array is the getter and the second merchandise is the state’s setter.
Observe, like Preact Indicators, we don’t have to maintain createSignal contained in the part operate. Much like Preact Indicators’ computed operate, Stable additionally offers a strategy to create derived alerts:
const doubleCount = () => rely() * 2;

return (
  <button sort="button" onClick={increment}>
    {rely()}
    <div>Rely: {doubleCount()}</div>;
  </button>);
Though the two-state administration packages share some similarities, there are some variations between the 2.
First, Preact and Stable’s Indicators have completely different APIs, the place Stable’s implementation is much like React’s useState. Stable’s methodology for creating derived alerts is completely different from Preact’s. And in contrast to Preact, Stable’s Indicators can solely be utilized in Stable functions.
Conclusion
Preact Indicators is a contemporary and welcoming resolution to the issues associated to state administration points. It’s nonetheless comparatively new, nevertheless it seems to have a promising future due to its minimalistic and easy structure.
When you might not be instantly bought on utilizing it for large-scale initiatives, take into account attempting it out in private and observe ones. Chances are you’ll fall in love with it. Seize the code for the demo functions we constructed by the counter app and consumer auth system.
LogRocket: Full visibility into your manufacturing React apps
Debugging React functions will be tough, particularly when customers expertise points which might be laborious to breed. In case you’re keen on monitoring and monitoring Redux state, routinely surfacing JavaScript errors, and monitoring gradual community requests and part load time,
attempt LogRocket.


LogRocket
combines session replay, product analytics, and error monitoring – empowering software program groups to create the best net and cellular product expertise. What does that imply for you?
As a substitute of guessing why errors occur, or asking customers for screenshots and log dumps, LogRocket allows you to replay issues as in the event that they occurred in your personal browser to rapidly perceive what went mistaken.
No extra noisy alerting. Sensible error monitoring allows you to triage and categorize points, then learns from this. Get notified of impactful consumer points, not false positives. Much less alerts, far more helpful sign.
The LogRocket Redux middleware bundle provides an additional layer of visibility into your consumer periods. LogRocket logs all actions and state out of your Redux shops.
Modernize the way you debug your React apps —
begin monitoring without spending a dime.
