
A decade in the past, if anybody advised you that you possibly can construct native cellular functions utilizing JavaScript with out compromising UX, you wouldn’t imagine it, proper? Then React Native got here alongside and made it attainable.
A couple of years in the past, if anybody advised you that you possibly can construct cross-platform apps utilizing JavaScript with out heavy emulators/developer environments akin to Android Studio or Xcode, you wouldn’t think about this working, both, proper? Then Expo was created.
Expo and React Native are sometimes interchanged for one another. That is comprehensible as a result of they’ve related options, however there are just a few variations between them:
- Expo builds a layer of instruments on prime of React Native, permitting builders to construct functions with out writing any native code
- Expo has a CLI (
expo cli) that enables builders to create tasks, deploy them, and open apps on their units - Expo has a consumer app, Expo Go, the place you may open your tasks without having Android Studio or Xcode
Nevertheless, Expo and React Native have shared one main function: navigation. Routing in React Native functions is applied utilizing React Navigation, which wraps your app with a navigator part that manages the navigation historical past and presentation of screens within the app.
This labored nice, nevertheless it had its issues:
- You needed to set up peer dependencies akin to
react-native-screens,react-native-safe-area-context. This provides further weight to your app - JavaScript builders love file-based routing. Subsequent.js’s file-based routing type works effectively, and it has rapidly change into like the present normal for routing in JavaScript functions
This led Evan Bacon, creator of Expo, to construct a brand new library referred to as Expo Router. Expo Router works equally to the Subsequent.js router. They each generate nested navigation and deep hyperlinks based mostly fully on a venture’s file construction.
On this article, we’ll look into some execs and cons of Expo Router. Expo Router is at present in beta, however we are going to construct a React Native software utilizing Expo Router for navigation to show its core ideas.
Leap forward:
Core options of Expo Router
These are the core options of the brand new Expo Router:
- Offline-first and quick: Native apps should deal with incoming URLs with out an web connection. Expo Router permits this by implementing these options throughout your entire framework
- Error Dealing with: You’ll be able to arrange React error boundaries on every route
- Structure routes: Most screens in your app will share the identical format elements. Expo Router lets you create a mother or father format part within the
applisting - Subsequent.js-like linking and dynamic and static routing: Much like the Subsequent.js router, you may hyperlink routes utilizing the
Hyperlinkpart
import { Hyperlink } from "expo-router";

export default operate Web page() {
return (

Residence
);
}
The one main tradeoff with the brand new Expo router to this point is that it’s restricted and opinionated. Some builders might recognize the Expo Router options ,however wish to rearrange the file listing construction. Sadly, attributable to its limitations, you won’t be capable to customise your Expo Router occasion to suit your most popular construction simply but.
Let’s go forward and construct a contacts listing app that makes use of the Expo Router to navigate between screens.
To observe via the tutorial, guarantee you will have the next:
- Node.js ≥v14 put in
- Data of JavaScript and React
- AWS Amplify CLI put in:
npmset up -g @aws-amplify/cli - AWS Amplify configured:
amplify configure - Expo CLI put in:
npm set up -g expo-cli - Expo Go (put in out of your cellular play retailer)
That is the GitHub repo with the entire code for the demo.
Getting began
Let’s get began by scaffolding a brand new Expo app. Run this command in your terminal:
npx create-react-native-app -t with-router
It will create a brand new React Native software with Expo Router configured. Change the listing, initialize Amplify, and set up peer dependencies utilizing these instructions in your terminal:
cd ReactNativeContactExpoApp
npx [email protected]
npm set up aws-amplify @react-native-community/netinfo @react-native-async-storage/async-storage
To run the app, run yarn begin or npm run begin.
Beginning Metro Bundler
▄▄▄▄▄▄▄▄▄▄▄▄▄▄▄▄▄▄▄▄▄▄▄▄▄▄▄
█ ▄▄▄▄▄ █▄▄███▀ ███ ▄▄▄▄▄ █
█ █   █ █ ▀█ ▄ █▄██ █   █ █
█ █▄▄▄█ █▄ ▄▄▀▀█▄██ █▄▄▄█ █
█▄▄▄▄▄▄▄█▄▀▄▀▄█ █ █▄▄▄▄▄▄▄█
█▄▄▄ ▀▀▄█ ▀████▀██▄██▄ ▄▀▄█
█▀▄▀▄▄▄▄▀▄██▀▀▀▄█▄█ ▀██▀███
█▄▀█▀ ▄▄▀▄▄▀ ▄ █ ▄█ ▄ █ █▀█
█▀▄▀██▀▄█ ▀ █▀███ ▀▀█▀▀█ ▀█
███▄▄▄▄▄█ ▄▀ ▄  ▄ ▄▄▄ ▀▄█▀█
█ ▄▄▄▄▄ ███ ▀▄███ █▄█ █▄  █
█ █   █ █▀▀█▀ ▀▀▀▄▄   █▀▀ █
█ █▄▄▄█ █  ▄▄█▀ ▀▄▀▄█▄▄ ▄██
█▄▄▄▄▄▄▄█▄█▄██▄█▄██████▄▄▄█

› Metro ready on exp://192.168.55.200:19000
› Scan the QR code above with Expo Go (Android) or the Digicam app (iOS)

› Internet is ready on http://localhost:19000

› Press a │ open Android
› Press i │ open iOS simulator
› Press w │ open net

› Press j │ open debugger
› Press r │ reload app
› Press m │ toggle menu

› Press ? │ present all instructions
Scan the QR code in your cellular Expo Go app and it’ll compile.
Identical to with each different database, DataStore requires a mannequin. To generate this mannequin, head to the Amplify Listing > Backend > API > (Amplify venture identify) > schema.graphql. Modify the schema.graphql with these traces of code:
kind Contact @mannequin {
  id: ID!
  identify: String!
  cellphone: String!
  electronic mail: String!
  handle: String
  message: String
}
The contact mannequin has id, identify, title, cellphone, and electronic mail as fields. Let’s now go forward to generate the mannequin with this command in your terminal:
npm run amplify-modelgen
It will create a src/fashions folder with the mannequin and GraphQL schema.
Initializing the backend setting
We have to initialize an Amplify backend setting for the appliance. To do that, run this command in your terminal:
amplify init
? Enter a reputation for the setting dev
? Select your default editor: Visible Studio Code
Utilizing default supplier  awscloudformation
? Choose the authentication methodology you wish to use: AWS profile
It will create a configuration file in src/aws-config.js. Subsequent, we are going to deploy the backend and create AWS assets utilizing this command:
amplify push
...
Do you wish to generate code on your newly created GraphQL API? No
...
This would possibly take a while to deploy based mostly on the standard of your web connection.
Configuring the app with DataStore
Let’s go forward and configure the Expo app to work with Amplify. Create an app/index.js and add these traces of code:
import config from '../src/aws-exports';
import { DataStore, Amplify } from 'aws-amplify';

Amplify.configure(config)
Creating contacts utilizing Amplify Studio
Let’s add some contacts to our DataStore. To realize this, head to the AWS Amplify console in your browser. The shortcut is working amplify console in your terminal and choosing AWS Console.
To create contacts with Amplify Studio, go to the Amplify dashboard and click on Launch Studio:
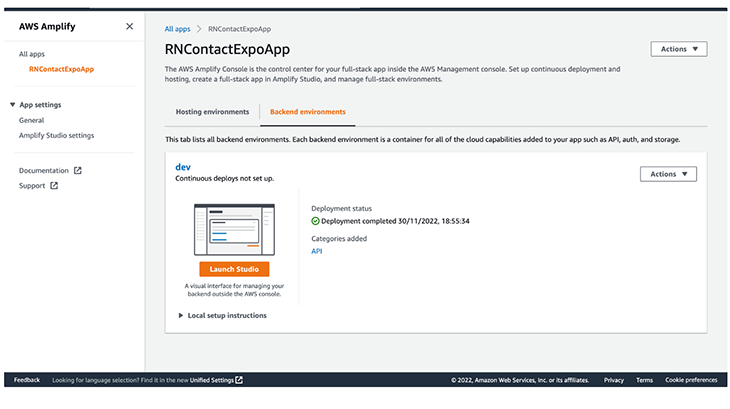
It is best to see one thing like this:
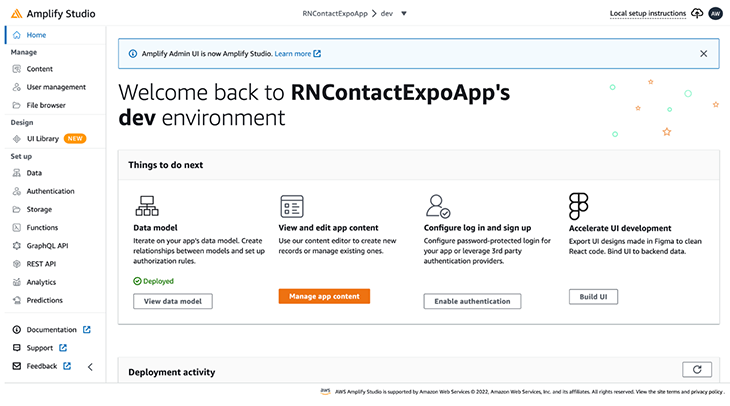
Click on the Information menu by the left sidebar of the dashboard and click on Save and Deploy.
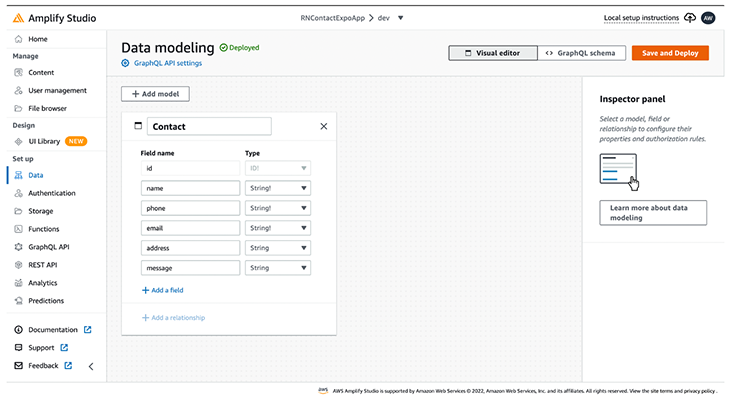
Now you can see the schema we created and edit it utilizing the UI. Deploying the info mannequin would possibly take couple of minutes, relying in your web connection.
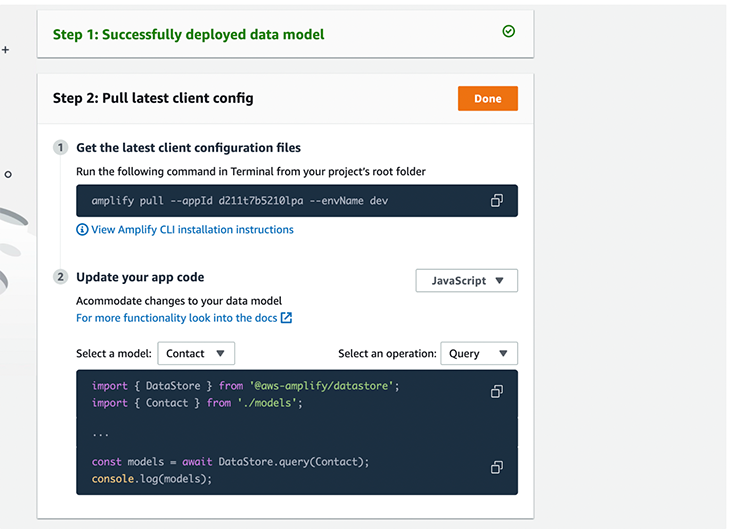
When it’s accomplished deploying, open the Content material menu.
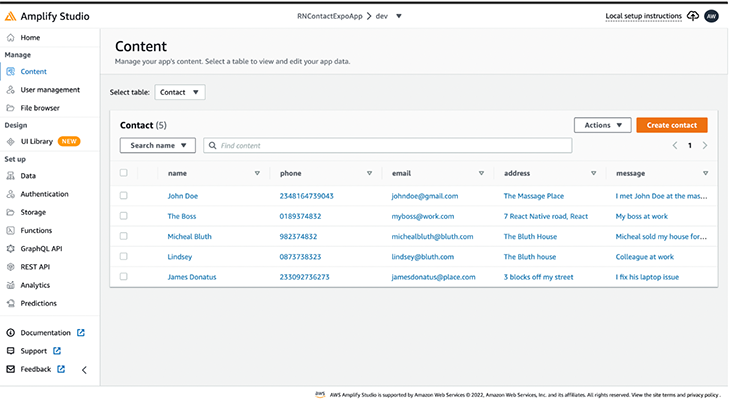
Click on the Create contact button to create a brand new contact. You may also auto-generate seed information by clicking the Actions dropdown and choosing Auto-generate information.
That’s it! We’ve efficiently created contacts for the appliance.
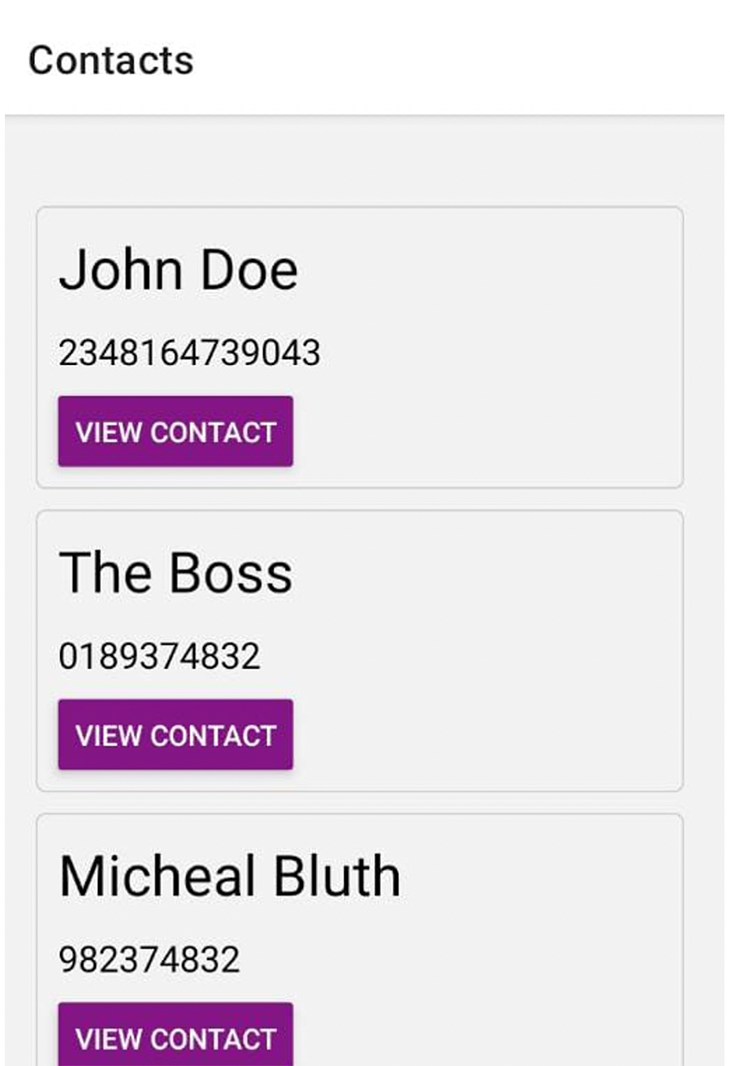
Let’s render the contacts. Replace the app/index.js with these traces of code:
import { View, Textual content, Button } from "react-native";
import { Hyperlink, Stack } from "expo-router";
import config from '../src/aws-exports';
import { DataStore, Amplify } from 'aws-amplify';
import { Contact } from '../src/fashions'
import { useState } from "react";

Amplify.configure(config)

export default operate Residence() {
    const [contacts, setContacts] = useState([])

    async operate fetchContacts() {
        const allContacts = await DataStore.question(Contact)
        setContacts(allContacts)
    }

    fetchContacts()

    return (
        <View type={container}>
            <Stack.Display screen choices={{ title: "Contacts" }} />
            {
                contacts.map(contact => (
                    <View key={contact.id} type={contactBox}>

                        <View>
                            <Textual content type={textStyleName}>{contact.identify}</Textual content>
                            <Textual content type={textStyle}>{contact.cellphone}</Textual content>

                        </View>
                        <Hyperlink href={`contacts/${contact.id}`}>
                            <Button
                                title="View contact"
                                coloration="#841584"
                            />
                        </Hyperlink>
                    </View>
                ))
            }
        </View>
    );
}
Right here, we question the contacts from DataStore by passing the mannequin to the DataStore .question() methodology.
DataStore.question(Contact)
To get extra particulars for every contact, we used the brand new Expo Router hyperlink part and handed the [contact.id](<http://contact.id>) to the href attribute. The dynamic route will probably be contacts/[contactId].
Let’s create the display for contact particulars. Within the app listing, create a contacts folder and an [id].js file.
Extra nice articles from LogRocket:
import { Textual content, View } from "react-native";
import { Stack } from "expo-router";
import { useEffect, useState } from "react";
import { Contact } from "../../src/fashions";
import { DataStore } from "aws-amplify";

export default operate SingleContact({ route }) {
    const [contact, setContact] = useState('')
    useEffect(() => {
        if (!route.params?.id) {
            return
        }
        DataStore.question(Contact, route.params.id).then(setContact)
    }, [route.params?.id])
    return (
        <View type={container}>
            <Stack.Display screen choices={{ title: contact.identify }} />
            <View type={contactBox}>
                <Textual content type={textStyleName}>{contact.identify}</Textual content>
                <Textual content type={textStyle}>{contact.cellphone}</Textual content>
                <Textual content type={textStyle}>{contact.electronic mail}</Textual content>
                <Textual content type={textStyle}>{contact.handle}</Textual content>
                <Textual content type={textStyle}>{contact.message}</Textual content>
            </View>
        </View>
    );
}
Should you’ve labored with Subsequent.js, this code ought to look acquainted. The key distinction is that the Expo Router makes the route object out there with out importing it.
In DataStore, to question a single merchandise by its ID, you go the mannequin and ID you wish to question. In our case, we go the params ID. Superior! Run your app, and you must get one thing like this:
Conclusion
This text taught us concerning the Expo Router, the way it works, its core options, and its tradeoffs. We constructed a React Native app with Expo and information from Amplify DataStore.
File-based routing is the way forward for easy navigation expertise for cellular functions. Expo Router implements this answer into its library. Though it’s solely in its beta launch, the Expo Router options are spectacular and will certainly excite React Native builders.
LogRocket: Immediately recreate points in your React Native apps.

LogRocket is a React Native monitoring answer that helps you reproduce points immediately, prioritize bugs, and perceive efficiency in your React Native apps.
LogRocket additionally helps you improve conversion charges and product utilization by exhibiting you precisely how customers are interacting along with your app. LogRocket’s product analytics options floor the the explanation why customers do not full a selected movement or do not undertake a brand new function.
Begin proactively monitoring your React Native apps — strive LogRocket at no cost.
