Within the earlier article, “Constructing a 3D out of doors scene with zero code”, we primarily launched the development of 3D out of doors scenes. On this article, we’ll perceive using particle programs and the creation of some typical pure results and the standard course of of constructing a particle impact. This put up will share :
-
Use a texture or mannequin to find out the form of every particular person particle and create a corresponding particle materials.
-
Create a particle system to find out the emission frequency, density, and flight pace of particles.
-
Use the dynamics module so as to add dynamic adjustments to simulate bodily results.
-
Transfer the particle system to an inexpensive location within the scene.
Subsequent, let’s begin with the fundamentals.
PS. This text might be divided into fundamentals – smoke (regular particles) – efficiency optimization – starlight (animation particles) – rainfall (3D particles) – flames (composite particles) – fireplace and candle fireplace (variants of particles), and different a number of elements. The size of this put up is lengthy, and it is strongly recommended to learn what pursuits you first.
Fundamentals
First, we have to create a brand new empty node within the scene: click on the plus button within the higher left nook of the hierarchy supervisor, or right-click on any empty a part of the hierarchy supervisor and choose Create → Empty Node. Choose the newly created empty node, click on Add Part on the finish of the property inspector, choose Results → ParticleSystem, and add a particle module to the empty node.
Particles are a rendering system that constantly emits renderable graphics outward from a set emission level. It’s roughly composed of three essential practical modules: emitter, particle, and renderer. Amongst them, we are able to management the place of the particles shot within the scene by way of the parameters of the emitter, the frequency and randomness of particle technology, the lifetime of every particle after it’s shot, and so forth. By way of the particle-related perform modules, we are able to management the change of every particle’s place, dimension, coloration, and different attributes after it’s ejected. We will assign textures to every particle by way of the renderer, decide the mixing mode of the particle system and the complete scene, the coordinate relationship between particles and the digicam, and so forth.
By default, the particle system will begin producing particles as quickly as it’s activated within the scene. We don’t want any guide method to begin it. Once we choose a node with a particle system, there might be preview management choices for particle results within the decrease proper nook of the scene editor, together with begin, pause, reset, cease, and playback pace. We will consider the particle system as a rendering system that generates animation by itself, and these preview controls are not any totally different from the acquainted animation management system. We will use them to manage the preview impact of the particle system within the scene editor.
It may be seen that the default particle system will use the place of its mother or father node because the emission level and constantly emit a white translucent sq. form in a single route. As a result of the emission frequency is excessive, the emitted particles do not need the slightest change in displacement and kinetic vitality, so the emitted particles are linked right into a white straight line. It is a far cry from the particle results we imagined, and the very first thing we have now to do is work out how the particles are emitted.
The present emission frequency is undoubtedly too excessive, so we first want to cut back the variety of particles produced. With the particle system chosen, change the parameter from 10 to 1 within the Property Inspector. Go to RateOverTime within the scene editor, and press the reset button on the underside left playback management to re-render the particle system from scratch.
After the modification, the frequency of particle emission is way smaller. In line with visible statement, it’s in regards to the frequency of emitting one particle per second. As well as, the utmost distance that the particles can journey has not modified. In different phrases: the size of the “straight line” fashioned by the particles connecting collectively has not modified. At current, the pace of a single particle continues to be too quick. We will attempt to change the StartSpeed parameter from 5 to 2.5.
The flight pace of the particles is diminished by half. On the identical time, the longest distance that the particles can journey can also be diminished by half as a result of the frequency of particle emission doesn’t change, so the variety of particles emitted in the identical time interval doesn’t lower. Accordingly, the space between the entrance and rear particles is diminished.
Though the pace of particle flight is diminished, we nonetheless need to get the identical most flight distance as earlier than: we are able to change the StartLifetime parameter from 5 to 10.
The utmost flying distance of particles is restored to its earlier degree. In distinction, the pace at which every particle travels and the space between particles stay the identical as we final modified. However there’s a corresponding enhance within the variety of particles co-existing: from about 5, which we noticed earlier, to about 10.
So what occurs in the event you change StartSpeed from 2.5 again to the default 5?
We will see from RateOverTime that StartLifetime nonetheless maintains a state of 10 whole particles and are unchanged. However since StartSpeed is doubled, the space the particles can journey has doubled in the identical period of time. In different phrases: the size of the strains connecting the particles have doubled.
To sum up, we appear to have the ability to observe particular legal guidelines between StartLifetime, RateOverTime, and StartSpeed. These three parameters are:
-
RateOverTime– Management the variety of particles emitted per second. -
StartSpeed– Controls the pace at which particles fly after being emitted. -
StartLifetime– Controls the lifetime of a particle, which is how lengthy a particle can exist after being emitted. The particles will routinely disappear from the scene when the life cycle ends.
Not solely that, from the above experiments, we are able to additionally deduce these embody the worth of the variety of particles that presently exist on the identical time, how far a particle can fly, and the space between two adjoining particles:
-
The variety of particles that presently exist on the identical time is roughly equal to the product of the variety of particles emitted per second and the particle life cycle, specifically
RateOverTime*StartLifetime; -
The utmost distance {that a} particle can fly is roughly equal to the product of the particle’s flying pace and the particle’s lifetime, specifically
StartSpeed*StartLifetime. -
Reducing the space between two adjoining particles, or growing the density of particles, will increase the variety of particles emitted per second (
RateOverTime) whereas conserving the utmost distance a particle can journey (StartSpeed*StartLifetime) fixed and vice versa.
Having mastered these, we are able to use the utmost distance of particles to fly and the density of particles to manage the general form of the particle system to a sure extent. As well as, we have now been in a position to calculate the variety of particles within the present particle system, which can assist us maximize the efficiency of the particle system.
With a sure understanding of the emission precept of particles, we additionally want to offer particular shapes to the particles. This white sq. is clearly not relevant anymore. We have to assign a particular materials to the particle.
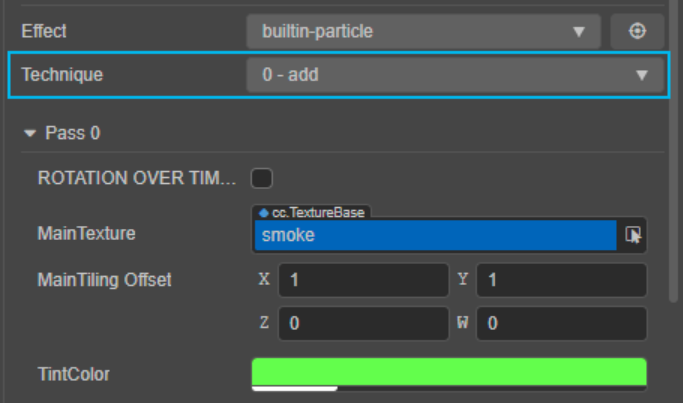
Click on the plus button on the high left of the Explorer, or right-click in any clean space of the Explorer and choose Create → Materials to create a brand new empty materials file. The particle system wants a shader specifically ready for it, so within the new materials parameters, we have to choose the Impact parameter as a builtin-particle.
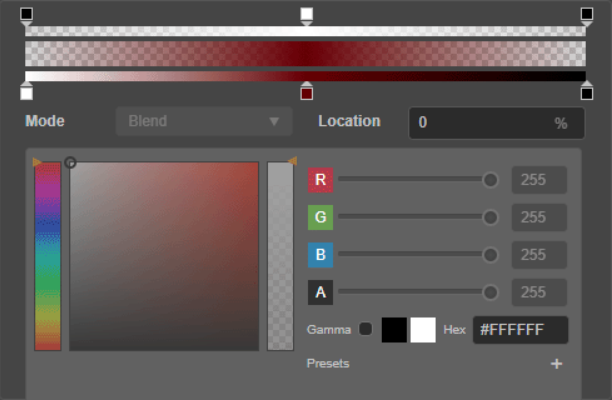
The particle materials is simple. Simply give the corresponding map to the MainTexture, then use the TintColor parameter to fine-tune the colour and alpha. Save the adjustments to the fabric, return to the particle properties inspector and drag the particle materials to the ParticleMaterial parameter below the Renderer tab.
By default, the rendering technique of the particle system is identical because the rendering technique of the Billboard we talked about earlier, which is to render the 2D pixels into the 3D scene in a approach that all the time faces the digicam. This setting we are able to select within the RenderMode parameters. Within the earlier article, we talked about that utilizing a billboard with a gradient map to create the phantasm of volumetric gentle can use the identical technique on particle programs: particle programs are sometimes used to simulate smoke, fireplace, and flare results. A flat texture to simulate the impact of a particular quantity in actuality. Subsequently, Billboard can also be the most typical method to render particles. So, how are varied results in nature achieved utilizing particle programs? Let’s begin with smoke/fog.
Smoke (Regular Particles)
smoke closing impact
Since our purpose is to make smoke, we first want a smoke texture materials.
The lightness, coloration, and so on., of the fabric doesn’t matter as a result of we solely want part of the fabric. First, use a DCC comparable to Photoshop to take away the fabric’s coloration and solely retain lightness data. Then modify the degrees to ensure the background is pure black. Save the fabric as a map, import it into the engine, and assign it to the newly created particle materials.

After utilizing the smoke materials, the unique translucent sq. turns into a translucent texture patch, and a specific coloration is given to the feel by way of the TintColor parameter. Due to Billboard rendering, the patch all the time faces the digicam. At first look, It appears that there’s certainly some that means to a mass with quantity.
You will have most likely additionally found that the black background of the feel isn’t rendered, and there’s an overlapping relationship between the feel patches. It is because the particle’s materials makes use of the add alpha mixing mode by default. The engine will use the brightness of the rendered particle pixel because the opacity and immediately superimpose the particle pixel on the Body Buffer in a linear addition method. This impact is identical as selecting “Linear Dodge (Add)” in Photoshop. The alpha mixing mode of the particle materials is managed by the Method parameter.
Within the default Add mode, the particle map used doesn’t must be clear. Simply ensure that the elements we need to be clear are pure black on the map. Even a darkish grey with very low brightness, which isn’t seen to the bare eye, will go away traces of the map edges in Add mode, resulting in the issue of “unclean keying.” Equally, we don’t want to incorporate any coloration data within the opaque half as a result of we are able to modify the colour immediately by way of the fabric’s TintColor parameter. If the feel already comprises coloration data, the particle materials will produce a mix of two colours, making it troublesome to exactly management the particle coloration.
The Add mode appears to work effective, however there’s a downside: what if we need to make black smoke? Should you set the TintColor parameter to black, you will discover that the particles disappear fully, it’s because all of the pixels of the feel are set to black and thus are thought to be fully clear by the Add mode.
To repair this, we first want to change the feel. Return to Photoshop, copy all of the black and white textures which were made earlier than, paste them as a brand new alpha channel, create a brand new pure white layer, choose pixels from the brand new alpha channel and, generate a masks, reserve it as a format with an alpha channel (e.g., .png ).
Import the brand new texture into the engine and assign it to the particle materials, and on the identical time, choose the Method parameter to 1-alpha-blend. This mode is the alternative of the Add mode: solely semi-transparent pixels are superimposed on the Body Buffer, whereas opaque pixels retain their very own coloration. So when utilizing this mixing mode, we’d like a map with an express alpha channel. For the reason that opaque pixel coloration is preserved, we are able to use black within the TintColor parameter, which gained’t trigger the particles to vanish.
Now that our particles are “lengthy” like smoke, what we have to do subsequent is to make use of the dynamics module of the particle system to make the particles transfer extra like smoke.
Presently, particle programs generate equivalent particles at an ideal uniform velocity, every shifting horizontally at an ideal uniform velocity and disappearing on the identical time limit. All we have to do is escape of this good state and insert some randomness into the particle system.
To start with, for smoke, the scale of every particle may be bigger. We will enter a bigger worth within the StartSize parameter to attain this.
Bigger particles can higher replicate the quantity of smoke, however at current, every particle is exactly the identical. Can they’ve totally different rotation angles?
Use the StartRotation parameter to assign a rotation angle to the particles and enter a worth. The result’s that every particle adjustments the angle accordingly, and every particle continues to be exactly the identical. Is it doable to offer every particle a random rotation angle when generated?
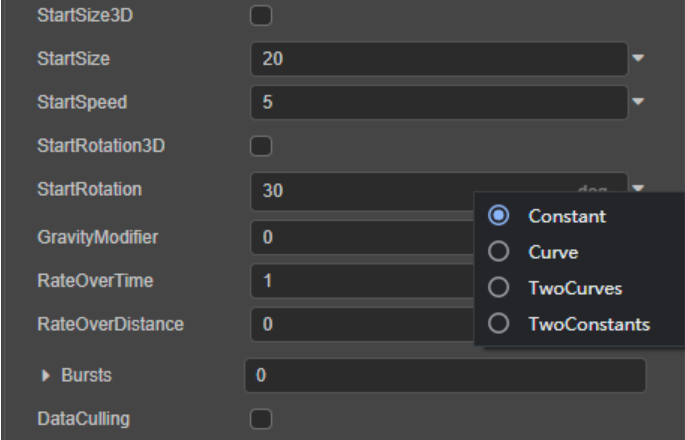
Click on on the inverted triangle on the finish of the StartRotation parameter to get a menu of worth sorts. The present choice is Fixed, which signifies that the StartRotation parameter accepts solely a relentless worth. By deciding on TwoConstants within the menu, the StartRotation parameter adjustments, and we have to enter two values, ConstantMin and ConstantMax, i.e., a most and a minimal worth.
Now, every particle is given a random rotation worth when it’s generated, and this rotation worth is set by the interval between the utmost and minimal values that we outline. In fact, the bigger the worth vary of the interval, the larger the diploma of randomness.
With this technique, we are able to do the identical, including randomness to the particle dimension (StartSize), flight pace (StartSpeed), and lifelong (StartLifetime).
Now we have now a bunch of particles with random rotations, various sizes, flying speeds, and most distances. Nonetheless, they appear extra like just a few floating items of cotton somewhat than a single fluid. It is because the variety of particles being generated is presently too low, and we’d like the sensation that extra particles overlap one another.
The impact of the smoke is shut, however the particles are nonetheless emitted horizontally. Can we make the smoke float into the air?
We use an empty node because the mother or father node of the particle system in the beginning. It’s, in fact, possible to attain a vertical particle emission route by rotating this node, however doing so will change the world coordinate system of the particle, which is straightforward when the particle system is extra complicated — A confusion of instructions.
A number of modules may be checked below the property inspector of the particle system. Checking ShapeModule will allow the parameter settings associated to the transmitter.
Particle emitters are divided into 5 shapes: field, circle, cone, sphere, and hemisphere. They decide the vary and route of particle emission. Particle emission can solely happen inside the scope of the emitter. We will mix particles with totally different fashions and takes benefit of the traits of various emitter shapes to make sure that particles don’t go the place they shouldn’t be.
Emitters comprise parameters for place, rotation, and scale, which might change the place and orientation of the emitter within the scene with out affecting the alignment of the complete particle’s coordinate system to world coordinates. RandomDirectionAmount and RandomPositionAmount can add sure randomness to the route and place of particle emission primarily based on the emitter. The SphericalDirectionAmount parameter permits particles to extend the random chance of being emitted in all instructions round them with out ignoring the emitter.
Simply rotate the emitter 90 levels alongside the X-axis to alter the route of particle emission.
The general impact now seems acceptable, however every particle is inflexible within the technique of flying. Should you observe it alone, you’ll be able to nonetheless see the sensation of the feel.
Along with including randomness to the particle’s emission, we are able to additionally add dynamic adjustments to the particle’s flight after it’s launched.
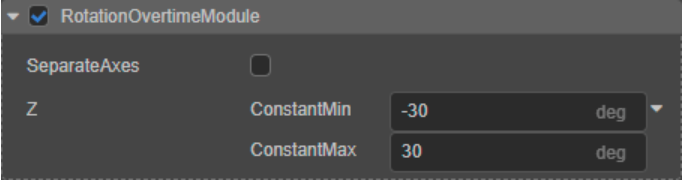
Examine to RotationOvertimeModule and allow this module. The perform of this module is to make every particle rotate in accordance with a sure angle each second in the course of the flight. In fact, it’s also doable to assign a spread of random values to its parameters so that every particle rotates barely otherwise.
After including the dynamic change of rotation, the 2D feel and look of the feel is additional weakened. The rotation of the particles also can simulate the sensation of fuel evaporation.
The processing of the person particles is sort of finished. We nonetheless want to contemplate the habits of the entire particle system or the entire column of smoke.
The column is now the identical dimension from high to backside. In different phrases: the particle is one dimension from delivery till the top of its life cycle. This impact is clearly unnatural, particularly after we need to create the impact of smoke popping out of a small outlet.
Examine SizeOvertimeModule to allow this module. The distinction with RotationOvertimeModule is that this module’s parameters solely make every particle StartSize scale by a particular worth a number of in accordance with the scale that has been set. Even whether it is given a most worth and a minimal worth, every particle might be randomly scaled within the interval. The issue of the general dimension of the smoke column has not been solved. At this level, we have to name two different numeric sorts: Curve and TwoCurves.
Choose Curve and click on the enter field of the parameter to pop up the curve enhancing window.
The numerical relationship of the curve is straightforward to grasp: The horizontal axis of the curve represents the time, that’s, the life cycle of a single particle; the vertical axis of the curve represents the worth, since we’re modifying SizeOvertimeModulethe worth, the horizontal axis, in fact, represents the a number of of the scale scaling. By default, the curve is a horizontal line, which has the identical impact as if we entered a relentless worth: the particles use the identical scaling issue from delivery to the top of their lifetime. Our purpose is a big plume on the high and a small plume on the backside. Translate this logic with curves: we wish a curve that goes “all the way in which uphill” from left to proper.
Beneath the Preset tab on the left aspect of the curve enhancing window, we are able to shortly choose a curve that meets our necessities, the best of which is a straight line from (0, 0) to (1 1). In fact, the impact it produces is a linear enhance within the dimension of the particles from new to outdated, forming an almost conical column of smoke.
Though a linear curve might be acceptable, we are able to additionally fine-tune the mannequin primarily based on the curve for a extra pure impact. Click on any anchor level on the curve to pull the place of the anchor level on the curve, right-click on the anchor level, choose Interpolation Mode → Cubic to alter the interpolation mode of the curve, and use the Bezier curve to generate easy values over.
Proper-click any a part of the curve section, choose Create keyframe, insert a brand new anchor level on the curve, right-click on the anchor level, and choose Edit. You possibly can manually enter the coordinate worth of the anchor level and click on the anchor level to finish the enter and ensure.
Lastly, right-click on the anchor level and choose Delete to delete the anchor level.
Now that you’re aware of these operations, we are able to use curves to create varied parametric animation results. To place it merely, these parameter animations are for every particular person particle, and the length of the animation is the life cycle of the particle. In case your particle life cycle is brief, irrespective of how difficult these parameter animations are, they are going to move accordingly immediately.
Now that we have now seen the curve worth sorts, let’s check you earlier than persevering with the next content material. We launched you to RotationOvertimeModule earlier than, however what’s going to occur if we enter curve values in RotationOvertimeModule?
As we talked about, the perform of the RotationOvertimeModule is to make every particle rotate at a sure angle per second throughout its flight. So its parameter worth is definitely equal to the pace of rotation somewhat than the displacement worth, so if we give it a curved worth, it would seem that the particles rotate quicker and quicker or slower and slower as they undergo their life cycle.
Now that we have now the “form” of the column, we nonetheless have to cope with the “state” of the column. A straight column of smoke in actual life is sort of non-existent, and the column might be deflected to some extent by the airflow.
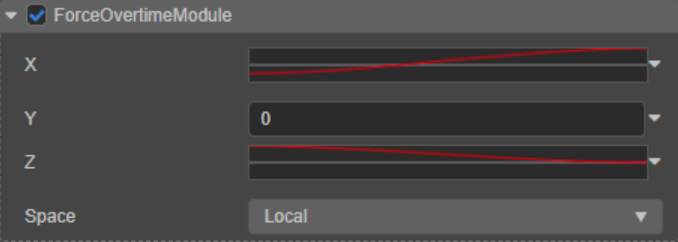
We will use ForceOvertimeModule so as to add a drive impact to the particles in flight. Though the smoke makes use of 2D textures, the particles are emitted in 3D area, so you may as well apply forces to the particles from the three axes of x, y, and z. Likewise, we are able to use curve values as an alternative of fixed values so as to add dynamic adjustments to it.
Doing this, we lastly have the final module of the smoke, and doubtless an important one: the colour change.
Let’s first observe just a few reference footage: In line with the totally different burning impurities, the thick smoke produced by the flame is darker when near the flame, near a black coloration, and slowly turns into darkish grey and lightweight grey because the smoke drifts, till it disappears fully.
Now we have beforehand applied totally different colours of smoke utilizing the TintColor parameters. Nonetheless, what must be adjusted now could be the general coloration change of the smoke column. The modification TintColor will solely use all particles indiscriminately, so pure white continues to be used within the particle materials.
Examine ColorOverLifetimeModule to allow this module. This module is similar to the modules we touched on earlier than. Its parameters obtain a relentless coloration by default. Utilizing a relentless coloration has the identical impact as altering the colour of the particle materials and can produce a smoke column with all particles dyed indiscriminately. ColorOverLifetimeModule also can obtain two fixed colours (TwoColors), totally different from TwoConstants we touched on earlier. Every particle will randomly select a coloration between the 2 fixed colours, forming a mottled smoke column. We’re going to make use of right this moment the third numeric kind, Gradient.
Click on the parameter enter field to pop up the colour gradient enhancing window.
The colour gradient is identical because the logic of the curve we touched earlier than. From left to proper, the complete size of the gradient is equal to the entire life cycle of the particle, and the Alpha and coloration on the gradient are akin to the alpha and the colour that the particle ought to have within the corresponding life cycle. The enhancing of coloration gradients may be very intuitive, and it’s the identical as making coloration gradients in Photoshop: the higher slider controls the alpha worth. You possibly can click on any a part of the slider to generate a brand new node, choose the node, and provides it an Alpha worth within the decrease coloration selector. The slider beneath controls the RGB worth. Equally, click on any half to generate a node and assign an RGB worth.
Presently, the particles do not need any gradual fading in and fading out impact when generated and disappearing. Since SizeOvertimeModule has little impact, this abrupt disappearance dramatically impacts the feel and appear when the particle disappears.
ColorOverLifetimeModule may be very appropriate for fixing this downside. We solely have to create a coloration gradient with an alpha worth of 0 on the head and tail in order that the particles which have simply been emitted and are about to vanish grow to be absolutely clear, leaving solely the central half within the center. On this foundation, in accordance with the colour adjustments noticed within the reference picture, we are able to create a number of grey nodes of various lightness on the gradient to create a coloration change impact from darkish to gentle.
Having finished this, the smoke column is now formed. Earlier than we finish the manufacturing, we lastly fine-tune the parameters as soon as in accordance with the main points. After the above course of, I consider you’re aware of the parameters that must be adjusted to attain totally different results:
-
Is the smoke flying too quick or too gradual? modify
StartSpeed -
Is the plume too excessive or too low? Based mostly on the
StartSpeed, modifyStartLifetime -
Is the smoke too skinny or too thick? Regulate the RateOverTime to find out the
StartSpeedandStartLifetime. Additionally, modify the alpha worth of the particle materialsTintColor -
Is smoke popping out in all instructions indiscriminately? Regulate
ShapeModule -
Is the plume too skinny or too free? modify
SizeOvertimeModule -
Does the smoke look too inflexible or messy? modify
RotationOvertimeModule; -
Is the smoke drifting within the flawed route? modify
ForceOvertimeModule; -
The colour of the smoke isn’t wealthy sufficient? modify
ColorOverLifetimeModule.
Efficiency optimization
Probably the most vital issue affecting the efficiency of the particle system is undoubtedly the variety of particles on the display screen on the identical time. Simply taking a look at our present smoke particles makes little sense for the efficiency influence it might need. But when it’s a particle system with a large variety of particles, the flight trajectory may be very complicated, and every particle is a particle system of a 3D mannequin. The efficiency influence is troublesome to disregard.
Probably the most vital influence is on the Capability parameter for the variety of particles on the identical display screen concurrently. Its perform logic is: when the variety of particles that exist within the particle system on the identical time is increased than the Capability’s specified worth, the particle system will briefly cease emitting particles and anticipate the top of the present particle life cycle till the present variety of particles drops beneath the Capability worth, after which the particle emission will resume as regular. So after we flip up the RateOverTime parameter to a sure degree, there might be a “stutter” of particle emission, which is exactly when the Capability parameter comes into play.
Subsequently, to acquire one of the best efficiency and cut back the frequency of particle emission (RateOverTime) so the impact is suitable, we additionally want to manage the variety of particles (Capability) that may exist on the identical time to the minimal vary.
Fortuitously, the variety of particles that exist on the identical time may be calculated by RateOverTime * StartLifetime. Subsequently, we solely have to take a worth barely bigger than RateOverTime * StartLifetime to make sure that Capability is not going to trigger the particle to droop emission to make sure the execution of the particle system runs easily with out affecting the impact.
As well as, we are able to additionally open the RenderCulling perform of the particle system by checking RenderCulling and urgent Generate bounding field. The engine will kind a bounding field primarily based on the world the particles might fly to. When RenderCulling is turned on, if the bounding field doesn’t seem within the observable vary of the digicam, the complete particle system is not going to be rendered. When the bounding field returns to the digicam’s area of view, particle rendering might be turned on once more. The dimensions of the bounding field may be adjusted manually by way of parameters. Turning on RenderCulling can keep away from consuming meaningless rendering assets when the particles usually are not noticed.
Starlight (animated particles)
starlight closing impact
Our first particle system has been accomplished. With the conclusion of the smoke impact, we’re already aware of the essential logic of the Cocos Creator particle system and the tactic of common impact creation. For smoke, the important thing to the impact lies within the rendering technique of the particles and the dynamic change relationship. Every particular person particle is definitely only a static map, and the static map is totally unchanged.
In fact, static maps can’t meet all our wants for particle results. What if every particular person particle must be animated?
Billboard’s rendering technique is right for merging 2D textures as particles right into a 3D scene. We will use the identical technique to import dynamic textures into the engine to be used by particle programs, so the query is: import dynamic textures into the engine?
Whether or not video format or a .gif file, it’s primarily a set of static pixel photos of many frames. A dynamic image impact is fashioned when this system performs these pixel photos in sequence at a sure pace. Within the area of post-production particular results, the picture sequence continues to be a generally used device. The so-called picture sequence is to render every body of an animation or video as a static image in a particular format for recombination and playback in a DCC. At current, most mainstream video enhancing software program, post-processing software program, and 3D design software program help rendering picture sequences.
Picture sequences typically generate numerous picture information. For instance, a 1-minute video performed at 30 FPS at 1K decision (1920 × 1080) would export 1800 particular person photos, a complete quantity of knowledge extra vital than any video file of the precise decision and body price. Sport engines are sometimes very delicate to the Capability of assets, and picture sequences are clearly not going to work.
Within the area of 2D video games, we have now come into contact with the idea of Sprite Sheet. The Sprite Sheet is just like the picture sequence. It additionally shops every body of the animation as a static picture. The distinction is that the Sprite Sheet will Assemble all nonetheless photos into the identical texture. Sadly, only a few DCCs available on the market help the export of sprite atlas for direct use by artists, apart from Adobe Animate. So, in the event you can convert a picture sequence right into a sprite atlas, will it open the door to a brand new world?
Let’s check out the method of importing starlights as particles into Cocos Creator.

The starlight impact was created utilizing the Pink Large plugin in After Results, this straightforward flickering animation is 2 seconds lengthy, and the body price is 30 FPS. The very first thing we’ll do is export it as a picture sequence. (Search on how to do this on YouTube)
After rendering is full, the pictures contained within the picture sequence may be discovered within the listing you selected. All that must be finished is mix these photos right into a single map.
Granted, we may open Photoshop and manually drag them collectively on a big sufficient canvas. Nonetheless, this operation is time-consuming and labor-intensive, and in the event you encounter an animation with a extra vital variety of frames and an extended length, the variety of footage within the picture sequence will enhance accordingly, and guide dragging is not going to work.
Right here we use Free Texture Packer, a free software program, to assist us full the stacking of images. Free Texture Packer is a sprite atlas technology device specifically designed for sport engines comparable to Cocos, Unreal Engine, Phaser, and so on. It supplies cross-platform help and is completely open-source.
Obtain Free Texture Packer:
After downloading and putting in, open it immediately, click on Add Photos, and choose all photos within the picture sequence to import.
Slide the Scale slider to see a preview of the stacked sprite atlas. You possibly can enter the related parameters for producing the sprite atlas within the property bar on the proper. To accurately apply to the particle system, the next parameter settings must be made:
• Set Packer to MaxRectsBin
• Set Methodology to BottomLeftRule
• Don’t tick Detect equivalent
• Don’t tick Permit rotation
• Don’t tick Permit trim
• Padding and Extrude each are 0
Enter the best decision dimension of the sprite atlas within the Width and Top parameters. If there are too many footage within the presently imported picture sequence, a sprite atlas might not match, and the software program will routinely put the elements that can’t match into it right into a second set of images. That is, in fact, not the consequence we wish. Regulate the values of Width and Top, attempt to make full use of the area of an atlas, and on the identical time make sure that all footage may be positioned in a single atlas. We don’t want to make sure that the values of Width and Top are the identical or POW values as a result of after the atlas is generated, you’ll be able to open the entire picture and scale it in Photoshop to our superb dimension.
After the settings are full, Save and click on Export to generate the atlas.
The next is the appliance of the sprite atlas to the particle system. Import the atlas as a standard texture into Cocos Creator, create a brand new particle materials, and immediately assign the imported atlas to the particle materials.
Create a brand new node, and add a brand new element. Choose Results → ParticleSystem. This time, immediately open the ShapeModule module and choose a spherical emitter. It may be seen that, by default, particles are randomly emitted from all instructions of the sphere.
The impact we wish is for the starlight to flicker on the mannequin’s floor, and the particles shouldn’t fly off after spawning. Recall the main points of the parameters we mastered in the course of the smoke-making course of above: StartSpeed is ready to 0.
When StartSpeed is 0, the particles is not going to fly out after spawning however will keep the place they had been born. To make sure that particles are solely generated outdoors the emitter, you may as well choose Shell below the EmitFrom parameter below the ShapeModule module.
Particle supplies can now be assigned to particle programs. Drag and drop the fabric that makes use of the sprite atlas to the ParticleMaterial parameter below the Render part.
The white squares of the particles flip right into a bunch of dense highlights. We’ve talked about this earlier than: the particle materials makes use of the “Add Alpha” mix mode by default, making it very simple to mix the black background’s mapping. The linear overlay additionally matches the linear overlay nature of sunshine in actuality. As for why it’s a dense spotlight, it’s not laborious to grasp: the sprite atlas seems like a dense stack of decals on the floor. We have to get the particle system to acknowledge the sprite atlas as a dynamic impact.
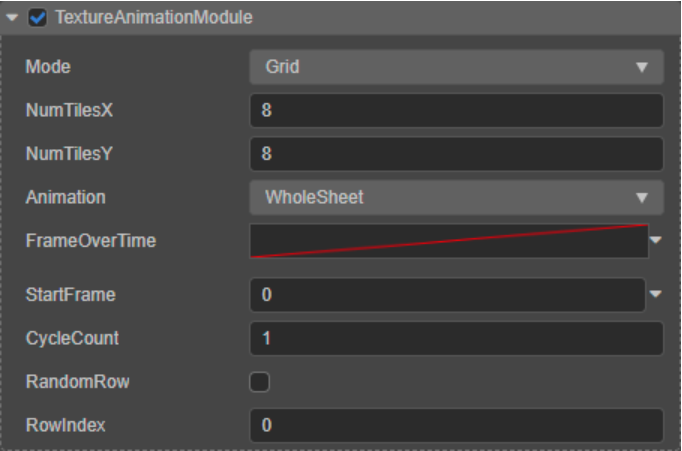
First, verify TextureAnimationModule to allow the associated module. A sprite atlas is a set of picture sequences, so it’s worthwhile to inform the module how it’s assembled: have a look at the sprite atlas, notice its variety of rows and columns, and enter it into NumTilesX and NumTilesY.
Subsequent, it’s worthwhile to make the sprite set transfer, which the FrameOverTime parameter will create. We talked about the curve worth of the parameter beforehand: the horizontal axis of the curve is the complete life cycle of the particle, and the vertical axis of the curve is the numerical worth. Subsequently, it’s essential to enter a curve worth for FrameOverTime, and the animation impact is achieved by the worth of the curve. The simplest approach is to make use of a straight line from (0, 0) to (1, 1), which signifies that every picture sequence within the sprite atlas is ready linearly because the particle lifetime goes by, which is identical as video playback.
So what in the event you use a straight line from (0, 1) to (1, 0)? Which means ranging from the final picture sequence within the sprite atlas, the earlier picture sequence is used linearly, and the impact is identical because the video performed in reverse.
What if, as an alternative of straight strains, I used bezier curves? The impact can also be properly understood: “Uphill” means ahead sequence playback, “Downhill” means reverse order playback, and “Up/Downhill” amplitudes something increased than 45 levels that means the next than common use of frames (“Quick ahead” impact), and vice versa means decrease body price (“gradual rewind” impact).
Now that we’ve instructed the module to “play” these picture sequences and “play” them, we have to inform the module what number of instances to “play” it. Enter the worth into the CycleCount parameter, if the worth is 0, the sprite atlas is not going to play, and the particle will keep on the primary body of the sequence; if the worth is larger than 1, the particle will play the corresponding variety of instances in the course of the life cycle.
After finishing the settings, we efficiently imported the consequences created by After Results into Cocos Creator as particles within the type of picture sequences and the medium of a sprite atlas. You’ll discover that the playback pace of every starlight appears to be a bit of gradual: the animation is barely two seconds when exporting the picture sequence. The explanation for this was talked about earlier: the particle will use its total cycle to play the picture sequence, which is equal to stretching or shortening the animation within the sequence to the identical size because the particle’s life cycle. We simply want to alter the particle’s lifetime accordingly (StartLifetime) or enhance the variety of instances it’s performed within the lifetime (CycleCount).
Lastly, add some randomness in dimension and rotation to the particles, utilizing the opposite mods you discovered in the course of the smoke-making course of. The ultimate impact seems just like our video instance.
In concept, any animation impact may be exported as a picture sequence with an alpha channel after which imported into Cocos Creator by way of sprite atlas.
So TextureAnimationModule modules may also be used to create varied different results. For instance, if we need to create a flower petal impact with particles, and we wish the petals to have extra motion and flip in the course of the technique of falling, however utilizing a 3D petal mannequin is a bit inflexible, we are able to create a 2D petal transformation animation first, and export the picture sequence to a sprite set for use as particles for every petal. This replaces the 3D particles with 2D particles, thus giving extra efficiency area and giving the artist the liberty to find out the assorted poses of the petals.
Rain (3D Particles)
rain closing impact
Whether or not it’s smoke or starlight, they’re the phantasm of 3D results achieved by exploiting 2D belongings. So, is it doable to make use of actual 3D fashions as particles? The particle impact of the rain that we’ll make beneath requires a 3D mannequin as a particle to attain.
The ultimate impact requires two separate particle programs: the raindrops falling within the air and the water splashing on the bottom. At current, the Sub-particle system isn’t supported in Cocos Creator. That’s to say, we can’t begin the emission of one other particle system on the place the place the particles of 1 particle system fall. Nonetheless, this doesn’t have an effect on our manufacturing of extra passable rainfall results.
The presentation of liquids is often a headache, however we are able to begin with the supplies of raindrops and water splashes.
In actuality, falling raindrops are highlighted on account of gentle refraction, so raindrops often seem brighter than the scene within the background, particularly when seen from a backlit angle. The fabric of the raindrop particles is comparatively easy. We solely have to make a map of the raindrops in flight and create a distinction in brightness with totally different Alpha mixing modes of the fabric. Though the raindrops have their very own form when flying within the air, we don’t have to pay particular consideration as a result of it doesn’t matter what type of rainfall impact, the raindrops will solely move in entrance of our eyes immediately. As well as, because of the affect of dynamic blur, the raindrops in flight may be abstracted as a slender column. We simply want to offer it a bit of thickness to ensure the refraction highlights are seen.
On this case, the feel of the raindrops is straightforward to attract: use the comb device in Photoshop and draw just a few white vertical bars. In case you are on the lookout for particulars, you’ll be able to add some small round protrusions to the vertical bars to simulate the sensation of raindrops gathering right into a stream. Lastly, you may as well add a layer of radial blur to the drawn vertical bars to simulate the movement blur impact when falling.
Nonetheless, simply counting on just a few falling vertical bars could also be too monotonous. Mixed with the splash impact of raindrops falling on the bottom, the sensation of rain may be made extra convincing.
It may be noticed from the reference: when the raindrops fall on the bottom, they are going to splash the same cylindrical spray, after which the spray will collapse from high to backside, and the cylindrical spray will steadily grow to be a cone with a big high and a small backside. Till it fully collapses right into a airplane and merges with the bottom.
Since we’d like the splash impact, we are able to gather some splash supplies. In the identical approach as raindrops, the colour and precision of the fabric usually are not obligatory. Solely the form of the water splash is required. Apply the method we did when making the smoke, decolorize the fabric, degree it, and eventually add a layer of a radial blur. In spite of everything, splashes, like raindrops, solely flash briefly earlier than our eyes.
After the textures are made, import them into the engine to make particle supplies. We’ll use the GPU Particle Materials this time: open the Impact parameters drop-down menu and choose builtin-particle-gpu.
Raindrop’s particle system is simple: activate the ShapeModule, choose the box-shaped emitter, and rotate the emitter 90 levels to emit vertically downwards. Transfer the mother or father node of the complete particle system to a place with the next vertical top, modify the flight pace (StartSpeed) to make the particles fly at a pace near the falling of raindrops, and modify the life cycle (StartLifetime) in order that the particle life cycle ends when it roughly falls to the bottom.
For the reason that particle materials we created for raindrops is appropriate for GPU particles, the particle system must verify the UseGPU parameter.
GPU particles are extra environment friendly than the conventional particles we used earlier than. Contemplating using 3D fashions, we selected to make use of GPU particles when making rain results. Nonetheless, all implementations of the rain impact may be achieved utilizing peculiar particles.
Return to the raindrop map, and you will discover that that is truly a sprite atlas, which comprises 4 raindrop maps. Nonetheless, these 4 textures usually are not a sequence. They don’t represent an animation. We would like the raindrop particles to decide on one among these 4 textures to make use of randomly. So, how can this impact be achieved?
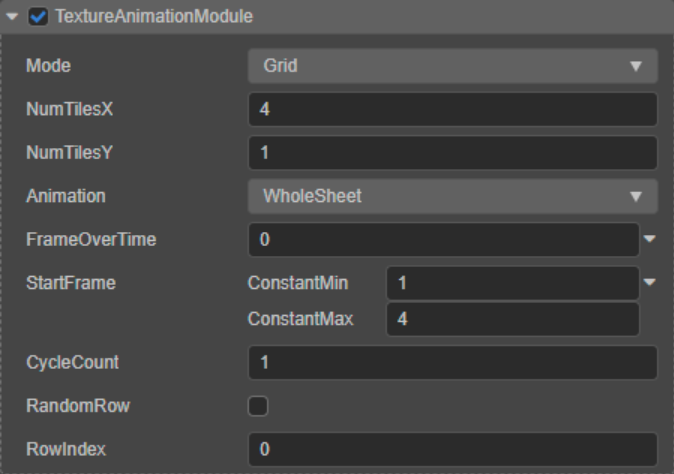
Open the TextureAnimationModule module, which we used within the course of of constructing starlight to create the perform of a sprite atlas animation, and in addition used it to let particles randomly choose a sequence within the sprite atlas as a static map. We nonetheless want to inform the TextureAnimationModule how the sprite atlas was assembled, by getting into the variety of rows and columns of the sprite atlas in NumTilesX and NumTilesY, respectively. For the reason that animation impact is now not required, it’s now not obligatory to offer the FrameOverTime curve a worth and let it hold the default fixed worth at 0. StartFrame controls the beginning body of the animation.
Since there isn’t any animation impact, the particles will nonetheless be on the StartFrame. Keep in mind our trick to make random results utilizing max and min values? In the identical approach, you’ll be able to set the utmost body worth and the minimal body worth for StartFrame, and let the particle system randomly choose frames in it (notice: the minimal body quantity is 1, not 0). Lastly, we nonetheless have to enter a worth for CycleCount, as a result of though there isn’t any animation, the particle system nonetheless must cycle by way of all of the sequences within the sprite set to randomize the frames.
The random body of the raindrops is offered, however the texture of the raindrops may be very severely stretched. It is because the rain map isn’t a sq.. The particles in Billboard’s render mode will stretch the map to a 1:1 side ratio. To repair this, we are able to use the StartSize parameters.
By default, the StartSize module controls the particle dimension isometrically. We will verify StartSize3D and enter values within the StartSizeX, StartSizeY and StartSizeZ axis, respectively, and scale the particles to the ratio that matches the raindrop map.
With that downside solved, Billboard has one other downside: Billboard is all the time going through the digicam. However we don’t need the raindrops to fall within the scene all the time going through the digicam: after we look down, the raindrops ought to sweep longitudinaly from our viewing angle and never nonetheless a vertical line. So, Billboard is now not appropriate for raindrop particles, and we’d like correct 3D fashions for raindrop particles.
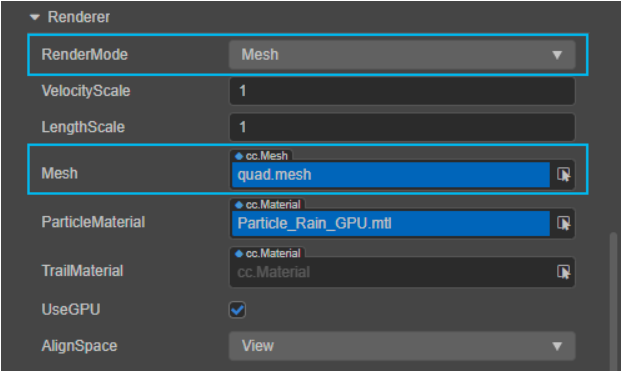
Choosing the RenderMode parameter Mesh will trigger every particle to be emitted as a 3D mannequin. Then, select the mannequin to make use of within the Mesh parameters. We will drag and drop any mesh file imported into the mannequin into the Mesh parameters. Right here a easy patch will do the trick so that you could use the engine’s built-in quad mannequin quad.mesh.
Though the 3D mannequin is used as a particle, every particle that’s generated nonetheless faces in a single route, and we additionally have to make every particle receives a random rotation worth when it’s born. The StartRotation parameters we have now used earlier than are just like StartSize. Examine StartRotation3D, enter values for StartRotationX, StartRotationY, and StartRotationZ, respectively, or use the utmost and minimal values to outline a random vary.
Again to the particle materials of the raindrops: Add mode continues to be too robust for raindrops. Within the Method parameter, choose 2-add-multiply. On this mode, the pixels of the particles will first be linearly multiplied by the pixels within the Body Buffer (equal to constructive overlay in Photoshop). After which linearly add to the pixels of the Body Buffer. This permits the particles to brighten the scene whereas mixing the colours within the scene, extra intently highlighting the impact produced by raindrops refracting gentle within the atmosphere.
Lastly, modify the frequency of particle emission (RateOverTime) in accordance with the depth of the rainfall we need to obtain, modify the rotation parameter of the mother or father node to introduce a sure slope for the rainfall, and the raindrop half is accomplished.
Subsequent, we have to make the splashes on the bottom. Make a duplicate of the mother or father node of the raindrop particle and transfer it to a place near the bottom. Splashes keep on the bottom and don’t fly outward like peculiar particles. Now we have handled the same downside within the course of of constructing starlight. Set the StartSpeed to 0.
Within the ShapeModule module, give the sq. field emitter a small Scale worth for the Z-axis. We need to get a box-shaped emitter with a really effective thickness, which can present a effective top variation to the emitted particles.
Now we have already used a 3D mannequin as a particle when creating the rain, and there’s no doubt that the particle for the water splash additionally requires a 3D mannequin and, extra importantly, that this 3D mannequin is able to implementing the adjustments from columnar, to conical, to flat as noticed within the reference. For the reason that particle system can solely settle for mesh information as 3D fashions, animating them in DCC is clearly not possible. The splash form change can solely be achieved through the use of the rotation and dimension modules which were used earlier than.
For the reason that particle system can solely settle for mesh information as 3D fashions, animating them in a DCC is clearly not possible. The splash form change can solely be achieved through the use of the rotation and dimension modules which were used earlier than.
So, what sort of mannequin do we’d like?
Since we have already got the mapping of the water splash, we are able to begin with a face piece: create a brand new easy face piece and provides it a specific amount of mesh density. By bending and deforming the airplane, modify it to be raised on the corners and depressed within the center. Guarantee that the anchor level (Pivot) of the mannequin is within the middle of the melancholy, in order that the mannequin will begin deforming from the depressed half.
Import the mannequin into the import engine and drag the mesh file onto the Mesh parameter.
First, apply the splash map to the mannequin. The splash map additionally comprises 4 totally different variations. We will use the identical technique we did for raindrops, utilizing the TextureAnimationModule module randomly taking frames.
There’s a purpose why a face piece with protruding corners and a depressed middle was chosen because the mannequin for the splash: if the facepiece is enlarged within the vertical axis route, the corners of the mannequin are pulled up and tackle a cylindrical-like kind; conversely, when it’s diminished within the vertical axis route, the corners of the mannequin are then lowered, and the melancholy within the middle stays the identical, making the entire nearer to a cone. When the worth within the vertical axis route reaches 0, the 4 corners now not differ from the middle within the vertical place, and the cone turns into flat. So, the totally different types of the water splash may be achieved by resizing the mannequin within the vertical axis route with the help of coordination within the different axes.
Now we have already used the SizeOvertimeModule module. Examine SeparateAxes, and modify the scale on the X, Y, and Z axes, respectively. To start with, we’d like an impact of the general blooming of the spray. By way of the earlier understanding of the curve worth: you’ll be able to enter a straight line from (0, 0) to (1, 1) on the X, Y, and Z axes, respectively, to attain the spray from small to massive. Fade out impact. What we’d like is that the water blooms after which collapses right into a airplane, so we have to make some modifications to the curve on the vertical axis: right-click at in regards to the center of the curve and choose Create keyframe to create a brand new node on the curve. With the brand new node, you’ll be able to drag the node on the finish of the curve to the place the place the vertical axis is 0, thus forming a triangle curve. Choose all of the nodes on the curve, in flip, right-click to pick Interpolation Mode → Cubic, and interpolate between the nodes to acquire a bell-shaped curve.
Utilizing the motion of the SizeOvertimeModule module, the animation results of water bloom and collapse have been created.
Nonetheless, this isn’t the ultimate consequence: the present dimension of the spray is a bit too massive, and it isn’t practically cylindrical sufficient when it first blooms. If we proceed to regulate the SizeOvertimeModule curve by way of, it’s troublesome to see the corresponding outcomes intuitively and will destroy the prevailing animation impact. Keep in mind StartSize parameters? We used it to alter the scale of the raindrop Billboard indiscriminately to adapt to the raindrop map. Now we are able to additionally use it to regulate the general dimension of the water splash: verify StartSize3D, and assign a worth on the X, Y, and Z axes, which might create a perfect The water splash kind is not going to have an effect on the animation impact that has already been finished.
Lastly, as earlier than, modify the emission frequency and life cycle of the particles (this may have an effect on the pace of the splash animation), and the splash creation is full.
Flames (composite particle)
fireplace closing impact
Once we use particle programs to create an impact, in actuality, we frequently discover that simply utilizing a single particle system isn’t sufficient. Numerous results are often a mixture of a number of elements. Visually restoring these particulars is commonly more practical than continually sprucing a single particle system. Within the following examples, we’ll use varied programs to attain the impact of fireplace.
First, you want a sprite atlas of flames. The flame atlas we used was made with procedural textures. The manufacturing of procedural textures usually follows the identical logic: regular geometry → deform the geometry with various kinds of procedural noise textures after which use totally different alpha mixing modes to overlay totally different deformation results → use the parameters of the procedural noise texture to displace the noise and thus animate the deformation → use a gradient coloration in accordance with the brightness.
After exporting the picture sequence, comply with the earlier course of to transform the picture sequence right into a sprite atlas. Import the sprite atlas into the engine and make corresponding particle supplies. The default Add mode of particle supplies may be very appropriate for fireplace manufacturing.
For the particle system, choose a cone-shaped emitter, set the Angle and Size parameters to 0 in order that the emitted particles is not going to scatter outward, and make sure that the particles are all emitted on the identical horizontal airplane. The flame particles must be organized densely and rise at a price barely decrease than that of the fuel, however the flame can solely rise to a sure most top, indicating that the life cycle of the particles is comparatively brief. Subsequently, a worth barely lower than 1 for StartSpeed may be taken, and a smaller worth for StartLifetime can also be required.
Flames usually look like general bell-shaped, which signifies that particles are comparatively massive in dimension when they’re first fired and steadily lower over their lifetime. A lot of the particle circumstances we’ve encountered earlier than have been “uphill” curves which can be small at launch and progressively enhance over their lifetime. For flames, a “downhill” curve can be utilized within the SizeOvertimeModule module.
Assign the fabric to the particle system, and open the TextureAnimationModule module. Now we have used the Curve and TwoConstants worth sorts earlier than. TwoCurves is a mixture of the 2: the particles will randomly take a worth between the values of the 2 curves at a time limit in the identical life cycle. We will set the FrameOverTime parameter to TwoCurves kind and provides it an “uphill” curve and a “downhill” curve. The result’s that some particles play the sprite atlas in constructive order, some play in flashback, and a few take two median values. We’ve additionally used the StartFrame parameter, which determines the beginning body of the sprite atlas playback, utilizing a most and minimal worth to let the particles randomly select a body from the atlas to start out taking part in.
As with smoke, you should use the ColorOverLifetimeModule module to cover the particles which can be simply emitting and disappearing utilizing an alpha worth, making the general form of the fireplace smoother. Utilizing the RGB values within the gradient, you’ll be able to fine-tune the colour of a sure interval of the flame to complement the colour and brightness of the flame.
The flight path, randomness, and general form of the particles are all there. We simply want to regulate the frequency and density of the particles as earlier than, add some randomness of rotation and dimension, and the impact of the flame might be achieved.
For a lot of initiatives, the flame-making ends right here. Nonetheless, despite the fact that our particles look extra like fireplace, they nonetheless have a faux really feel when positioned within the scene alone. On this case, we don’t want to contemplate growing the complexity of rendering and pursue the next variety of particles. Quite the opposite, we are able to create some particulars that may accompany particles in actuality, such because the technology of smoke accompanied by the fireplace, there might be incompletely burned sparks flying out; when the rainfall is comparatively intense, a skinny layer of water vapor types close to the bottom, and so on.
Now we have accomplished the manufacturing of smoke, and the manufacturing of sparks isn’t difficult: the atlas of the flames is already accessible, and we solely have to make particles that conform to the flight legal guidelines of sparks.
We are going to modify this foundation of the flames to attain the impact of sparks. Make a duplicate of the flame particle system, and sparks can proceed to make use of the flame sprite atlas. We will barely modify ColorOverLifetimeModule gradient coloration to make it extra vivid.
Probably the most vital options of sparks are:
-
If the scale is small, the worth of the
StartSizeparameter orSizeOvertimeModulemodule must be comparatively small however nonetheless seen to the bare eye; -
The flight trajectory is totally different. Sparks are small stable particles with incomplete combustion. It mustn’t collect collectively like a flame. Quite the opposite, it ought to are likely to fly out below the motion of thermal vitality. Affected by its high quality after flying out, there must be a downward pattern.
The cone emitter we select when making the flame itself emits particles within the route of the cone, and we solely want to revive the Angle parameter to a particular worth to offer the cone a sure angle.
The RandomDirectionAmount, RandomPositionAmount, and SphericalDirectionAmount parameters on the backside of the emitter properties we launched earlier can add random adjustments in place and route to the emission of particles. As well as, in actuality, some sparks may be ejected very excessive, and a few can solely fly to a decrease altitude. This distinction is the distinction within the flying pace of the particles, which may be simply realized with the StartSpeed parameters. Lastly, we have to make the kinetic vitality of sparks fall below the affect of gravity. Within the course of of constructing the smoke, we used the ForceOvertimeModule module to offer the kinetic vitality change for the floating of the smoke. There’s a handy GravityModifier parameter within the fundamental parameters of peculiar particles, which may give gravity properties to the particles. When its worth is the same as 0.98, the particle will fall on to the bottom after being emitted like most objects in actuality. So we simply want to offer sparks a really small GravityModifier worth in order that they will fly whereas sustaining the kinetic vitality affected by gravity.

After the sparks are made, put the flames, sparks, and smoke in a bunch and place them within the scene. In fact, don’t neglect to place a fiery crimson spherical lamp to light up the flames. After doing this, has the credibility of the flame improved loads?
Spitfire and Candlelight (Variants of Particles)
Now we have accomplished a whole flame particle system. Nonetheless, though there are a lot of locations the place flames are used within the challenge, there are nonetheless restricted alternatives to make use of a bonfire that’s upright. What if we have to make different types of flames: like jet flames or candle flames?
fire-breathing closing impact
The sprayed flame seems difficult, however it’s no totally different from the particles we have now made earlier than: the primary is the form. We’re very aware of controlling the particle emission pace, density, particle dimension change, and different elements. In truth, we have now already answered to a sure extent make this sort of spewing flame: when making a bonfire, primarily based on the expertise of manufacturing smoke, we give SizeOvertimeModule a “downhill” curve to make the particles smaller with the life cycle, and now we solely have to Conversely, giving SizeOvertimeModule an “uphill” curve can get the flame particles that increase constantly after emission, which is identical as the scale management of the smoke particles. The robust kinetic vitality of the flame jet may be interpreted because the pace of particle emission, so StartSpeed continues to be the only option.
The smoke produced by the jet ought to float upwards into the air due to its lighter mass. We’re already aware of controlling the particle’s flight trajectory after emission, and ForceOvertimeModule will assist us obtain its impact. We launched the GravityModifier parameter after we created sparks. Setting GravityModifier to a damaging worth also can get the impact of anti-gravity, inflicting the particles to drift into the air. As well as, the VelocityOvertimeModule module can present a particular numerical and directional addition to the particle emission. Should you want a sure diploma of resistance to ForceOvertimeModule and GravityModifier may be turned on to affect the particle flight.
In distinction, the LimitVelocityOvertimeModule module can present a counterweight to the VelocityOvertimeModule, prioritizing particles on the finish of their lifecycle. Used along side the VelocityOvertimeModule, this enables us to make transitions the place the particles are first affected by the jet’s kinetic vitality. The kinetic vitality is exhausted, and the particles are solely affected by gravity and the ForceOvertimeModule.
As for the sparks, after the ejection, they are going to first comply with the route of the ejection, however because of the affect of the smoke, its tendency to fall to the bottom isn’t obvious, however a part of it will likely be carried into the air by the smoke. Utilizing the above modules, we are able to additionally specify the flight drive and trajectory of the spark.
Lastly, it ColorOverLifetimeModule continues to be an important a part of the general presentation of the particles. We will modify the colour of the left aspect of the gradient, the a part of the particle that simply shot out, to make it seem a blue-green coloration, simulating the colour of the flame of some chemical parts at extraordinarily excessive temperatures. Not solely does the colour change, however the alpha worth of the flame can also be essential. The flame particle materials makes use of the Add mode. We will attempt to add darker coloration nodes to the gradient to make the alpha worth extra pure whereas producing coloration adjustments.

Candlelight closing impact
In contrast with the depth of fire-breathing, candlelights are simpler to construct. In some initiatives, even the diminished model of the bonfire is immediately used as a candle. Though theoretically, there isn’t any distinction between candlelight and an peculiar bonfire, from a visible viewpoint, candlelight has its distinctive traits:
-
The colour is brighter, solely the tail will present some fireplace crimson, and the principle half is sort of white;
-
The general form is comparatively uniform, there are not any complicated form and element adjustments, nevertheless it nonetheless has a way of leaping flames;
We will nonetheless use the scaled-down bonfire as a place to begin. First, because the candle flame has a extra constant kind, there isn’t any want for the sprite atlas of the flame to make an look. Use a static round gradient immediately, or choose the Default-Particle mapping that comes with the engine within the drop-down menu of the MainTexture materials parameter. Now {that a} circle texture is used, the change within the particle rotation is now not obligatory. In contrast with candles, there are a lot of tiny flames on the tail of the bonfire. Now we have been utilizing ColorOverLifetimeModule to cover the particles on the head and tail.
Equally, we may be extra aggressive when utilizing ColorOverLifetimeModule, and additional increase the hidden vary to the tail of the bonfire. The result’s a seamless candlelight define. Lastly, the colour change of the candle may also be achieved with ColorOverLifetimeModule, which can be utilized when making the fireplace: The left aspect of the gradient is ready to blue, and the proper aspect is ready to fireside crimson, that are the top and tail of the candle, respectively. A transparent and clear candle flame with coloration adjustments is full.
As we speak, by way of the particle system of Cocos Creator, we have now realized the particle impact presentation of smoke, starlight, rain, flame, fireplace, and candlelight and launched the principle practical modules and manufacturing strategies within the particle system. You will see that though varied results in nature appear to be fickle, there are particular guidelines to comply with. We will create varied convincing particle results by including random adjustments and superimposing a sure variety of particles.
