Figma’s first auto format model was initially launched again in 2019, however it was not too long ago up to date throughout config in Might 2022. New options have been added and a few up to date, and relating to interface visuals, some have moved or modified.
This text will discover the most recent model of auto format. We’ll deep dive into studying how one can use this highly effective characteristic and its main capabilities or functionalities so you possibly can create design techniques with it. Let’s begin.
Desk of contents
On this article, we’ll stroll by the next factors:
What’s auto format?
Auto format is a characteristic that can will let you create frames that reply to content material or format dimension adjustments. These dynamic elements or frames reply to the scale of their little one objects, similar to a button that grows with the size of its label or a button that now has an icon added and once more grows with the size of the part.
For these which can be newbies, a body is sort of a container product of smaller objects, and all collectively kind a body. So the body is the guardian object that controls all of the little one objects that reside inside.
Frames have a dimension that’s explicitly set by the designer, whereas teams are simply a number of objects mixed with none dimension specification. Typically frames are known as elements as effectively.
Auto format could be utilized to the entire following already defined :
- A number of single objects.
- A gaggle
- A body
You’ll find frames, teams, or single objects positioned throughout a canvas, the restricted backdrop the place designers make the magic occur. In line with Figma, a canvas has a finite dimension of -65,000 by +65,000 on every axis.
There are a number of capabilities we’ll discover on this article just like the padding to let your gadgets breathe or the alignment to alter their place throughout the body.
Auto format could be utilized to nearly all your elements of a design system, making them extra versatile and cohesive when utilized by the completely different workforce members on every of the initiatives the workforce is engaged on.
Why is auto format vital?
There are two vital ideas to grasp the significance of this characteristic: first, we have to know what a format is; and second, what it means to make use of a responsive format.
First, a format is outlined because the association of single or compound gadgets similar to photographs, textual content, or elements on a display screen. Layouts use easy or advanced elements and spacing to encourage consistency throughout platforms and display screen sizes.
Second, a responsive format permits a body to alter and readapt dynamically primarily based on the display screen dimension, guaranteeing consistency throughout gadgets.
Responsive design is essential to constructing merchandise for various system sizes from cellular to desktop and pill in between. Designers have been utilizing layouts and grids to raised readapt designs to completely different display screen sizes. If utilizing auto format, you possibly can place every part in numerous layouts and they’ll dynamically adapt to the brand new content material dimension, saving you time readjusting manually every part for every viewport.
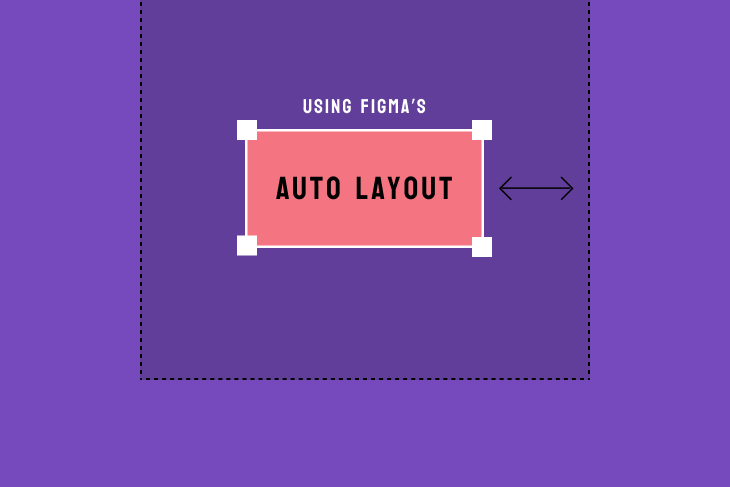
Learn how to use Figma’s auto format
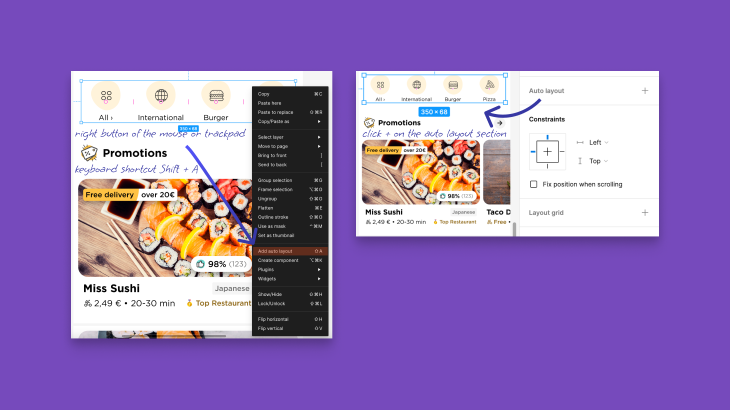
There are three completely different potentialities to use auto format to a body or a gaggle, all the time by choosing all the body, group, or simply the a number of parts you need to convert:
- Click on the suitable button of the mouse or trackpad and choose Add auto format on the menu.
- Subsequent, click on the plus button on the auto format part within the Properties panel you’ll discover on the suitable of the display screen.
- Or, use the keyboard shortcut Shift + A (legitimate for Mac and Home windows).
In both case, after making use of the auto format, you will notice on the properties panel on the left of the display screen {that a} new body will seem. You’ll be able to change its title in case you double-click the brand new body together with your mouse or trackpad; clicking the right-facing arrow will will let you unfold the kid objects residing within the guardian body. The kid objects are proven so as of look on the canvas, from prime to backside or left to proper.
After getting created the auto format, you will notice new choices on the auto format panel or menu on the suitable. Additionally, a brand new characteristic will seem on the Body menu.
Within the following part, we’ll stroll by the fundamental choices of auto format first, after which transfer to the extra superior options that can make your work shine.
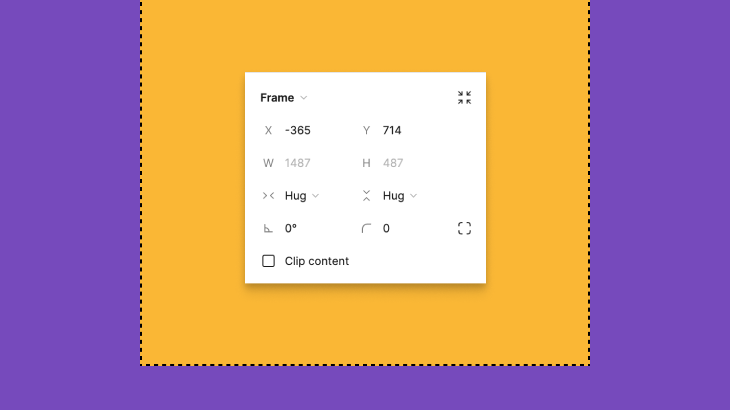
A brand new part named horizontal and vertical resizing will present up after creating the auto format. This part has two doable variables which can be price utilizing, relying in your objective:
- Fastened width and peak: This selection works properly whenever you need your body to develop vertically or horizontally throughout the canvas. The kids objects will stay aligned within the chosen possibility contained in the body whereas it grows. An important possibility if you wish to have frames aware of the format. A traditional instance could be a prime navigation bar for a web site
- Hug contents: This selection properly works if you need your body to develop vertically and horizontally relying on the scale of its kids objects. So mainly, the auto format body will enhance its dimension relying on the scale of its kids objects and never comply with the foundations of the responsive format. An important possibility if you wish to have frames aware of the kids objects. A traditional instance could be a button
Tip: Utilizing the Absolute Place possibility
This selection can also be new and does assist you place kids in an absolute positioning inside an auto format body. It’s good to choose one of many kids after which choose the plus button on the top-right nook.
The item will mechanically change its properties and can be mounted to the place you’ve set. You’ll be able to transfer it wherever you need, however it is going to stay mounted whereas resizing the part.
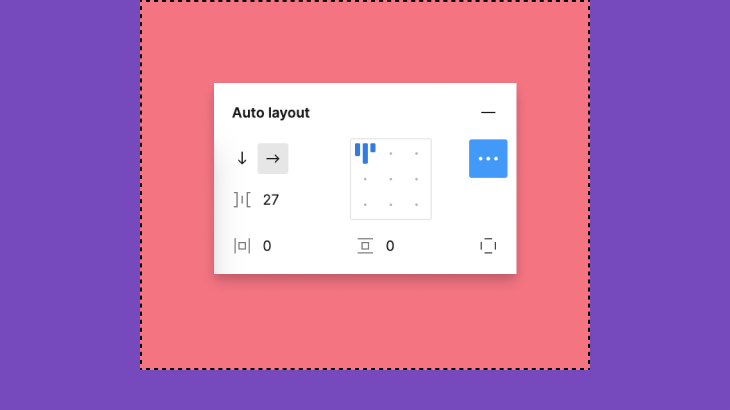
There are a number of choices on this simplified menu on the suitable panel. Keep in mind to maintain the body chosen to have the panel seen, and I’ll stroll you thru all of the choices from prime to backside and left to proper:
- Take away auto format: Click on the minus button to take away auto format or right-click and press Take away auto format. This won’t delete your body and even its properties, it is going to simply convert the auto format body to an everyday body
- Instructions: The arrows will assist you choose a vertical or horizontal path of the parent-children contained in the body
- Spacing between gadgets: The pixels discovered between every object or little one. Word that the quantity will all the time repeat, so you possibly can’t select completely different pixels between completely different kids objects. From the final Figma launch, you now can set the unfavorable spacing between kids objects of an auto format body to create stacking, and it really works horizontally and vertically
- Alignment: How the kids objects are aligned contained in the restricted area of the body. There are 9 doable alignment choices relying on the way you cross and blend the next choices: prime/center/backside and left/middle/proper. It appears extra advanced than what’s in actuality, you will notice visible clues to set the positioning of the objects
- Padding: The horizontal and vertical area between the kids and the body. We encounter 4 kinds of padding — prime and backside padding and proper and left padding. Each single padding could be set independently
Tip: On-canvas management for padding and spacing
Now you possibly can management the padding and the spacing between gadgets inside the identical body. You simply have to search for the little purple handles that seem whereas hovering the body and drag them manually to extend or lower the sizing. In the event you press one of many handles, a controller will immediate and you’ll manually change the spacing or padding utilizing your keyboard.
There are a few keyboard shortcuts that could be price it mentioning:
In the event you maintain the Shift key whereas dragging the handler, the pixels will enhance or lower with the pixel quantity set beforehand on the auto format menu.
In the event you press Alt whereas dragging the handler for padding, either side of the vertical or horizontal realm will enhance or lower equally.
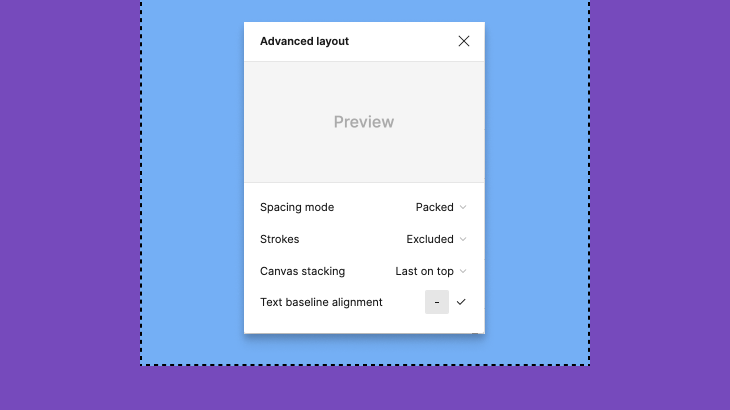
By clicking the three dots of the auto format menu, a sophisticated menu will immediate on prime. The very first thing you’ll discover is a preview part to point out the completely different phases of your choices. Let’s discuss these choices:
- Spacing mode: There are two choices right here and packed is the default
- Packed: This retains the spacing between gadgets as set within the earlier menu
- House between: This selection distributes the kids objects throughout the area out there on the body utilizing all of the vertical or horizontal area
- Strokes: Now you possibly can select if the strokes are a part of the auto format body or not. So the stroke surrounds the entire body and never the kids individually, and even the kids can have strokes independently as effectively. That is helpful to maintain the part clear
- Canvas stacking: Whereas utilizing unfavorable spacing, you now can obtain the stacking impact in your kids’s objects. Use this feature to alter the order of the layers; you possibly can select between the primary or final on prime
- Textual content baseline alignment: You probably have textual content in your auto format body, choose if you wish to align it within the middle or by its baseline. Solely relevant to horizontal alignment
Tip: Place objects on prime of an auto format body
Is just not doable to put an object on prime of an auto format body, until you add the thing to the body and also you place it wherever you need.
Now the tip holds the spacebar whereas inserting the thing on prime of the body and the magic is finished, the thing is now set on prime of it.
To sum up
Fairly spectacular for all of the issues you are able to do utilizing Figma’s auto format characteristic, the most recent launch skyrocketed the capabilities to a different degree of customization. There may be nonetheless room for enchancment, and I’m fairly certain Figma will shock all of us fairly quickly with extra updates, however nonetheless fairly good.
I’d advocate all customers mess around with all of the choices on the simplified menu after which the superior one to study extra in-depth about all the probabilities out there.
Auto format is a good choice to create design techniques for groups working and designing for responsive gadgets. Elements created utilizing auto format are simple to devour in every kind of viewpoints with out the necessity for a lot guide work, so general accelerates the design course of and retains the design clear and cohesive.
Now that you understand all of the tips, you don’t have any excuses to have enjoyable taking part in with auto format!
LogRocket: Analytics that offer you UX insights with out the necessity for interviews

LogRocket enables you to replay customers’ product experiences to visualise wrestle, see points affecting adoption, and mix qualitative and quantitative information so you possibly can create wonderful digital experiences.
See how design selections, interactions, and points have an effect on your customers — strive LogRocket in the present day.
