
ASP.NET Core 6 launched a simplified internet hosting mannequin that permits us to construct light-weight APIs with minimal dependencies. These minimal API tasks make it simple to get our utility up and working quick, by writing much less boilerplate code. ASP.NET Core 7 additional improved minimal APIs by including help for filters.
Everytime you work with APIs—together with minimal APIs—you’ll typically wish to doc your endpoints. Happily, ASP.NET Core supplies built-in help for the OpenAPI specification, so you may make the most of OpenAPI and the Swagger UI to generate good documentation for your entire APIs.
The purpose of this submit is to offer you a head begin on doing so. To make use of the code examples supplied on this article, you need to have Visible Studio 2022 Preview put in in your system. In case you don’t have already got a duplicate, you may obtain Visible Studio 2022 right here.
Create a minimal Net API undertaking in Visible Studio 2022
First off, let’s create an ASP.NET Core 7 undertaking in Visible Studio 2022. Observe these steps:
- Launch the Visible Studio 2022 Preview IDE.
- Click on on “Create new undertaking.”
- Within the “Create new undertaking” window, choose “ASP.NET Core Net API” from the checklist of templates displayed.
- Click on Subsequent.
- Within the “Configure your new undertaking” window, specify the title and site for the brand new undertaking.
- Optionally test the “Place resolution and undertaking in the identical listing” test field, relying in your preferences.
- Click on Subsequent.
- Within the “Extra Data” window proven subsequent, uncheck the test field that claims “Use controllers…” since we’ll be utilizing minimal APIs on this instance. Go away the “Authentication Kind” set as “None” (default). Examine the “Configure for HTTPS” and “Allow Open API Assist” test containers. Lastly, make sure that the “Allow Docker” test field is unchecked as we gained’t be utilizing Docker right here. (See Determine 1 beneath.)
- Click on Create.
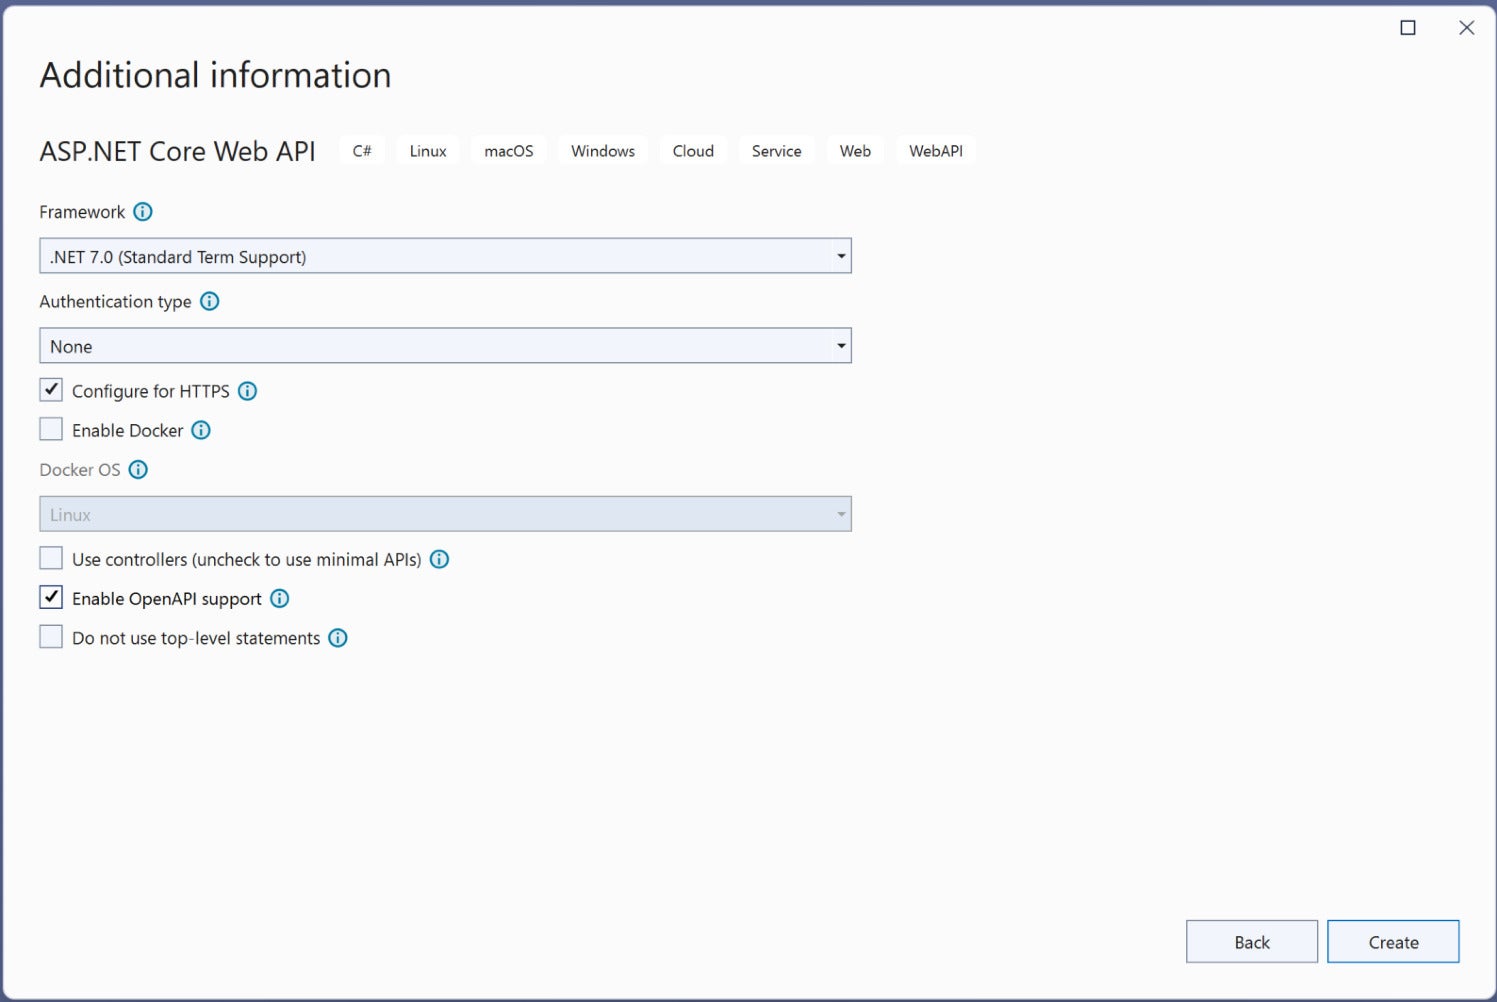 IDG
IDGDetermine 1. Examine the Configure for HTTP and Allow OpenAPI Assist test containers. Go away Authentication set to None and the opposite test containers unchecked.
We’ll use this ASP.NET Core 7 Net API undertaking to make use of OpenAPI to doc minimal API endpoints within the sections beneath.
What’s the OpenAPI specification?
Beforehand referred to as the Swagger specification, the OpenAPI specification defines an ordinary, machine-readable, programming language-agnostic interface description language (IDL) for APIs. It’s a language-independent normal for describing HTTP APIs. The usual is supported by a mix of built-in APIs and open-source libraries.
The three most important points of OpenAPI integration in an utility are:
- Creating details about the app’s endpoints.
- Placing the info collectively in a format suitable with the OpenAPI normal.
- Exposing the created OpenAPI schema by means of a graphical person interface or a serialized file.
As a result of we enabled OpenAPI help after we created our ASP.NET Core 7 Net API undertaking, the Swashbuckle.AspNetCore bundle can be added to the undertaking mechanically. Swashbuckle is an open supply undertaking that allows the era of Swagger documentation.
Notice which you could at all times add the Swashbuckle.AspNetCore NuGet bundle to your different tasks manually.
Create a easy minimal API endpoint in ASP.NET Core
Whenever you create a brand new ASP.NET Core Net API undertaking in Visible Studio, the default controller (named WeatherForecast) and mannequin class can be created mechanically. As a result of we’re utilizing minimal APIs right here, these information is not going to be created.
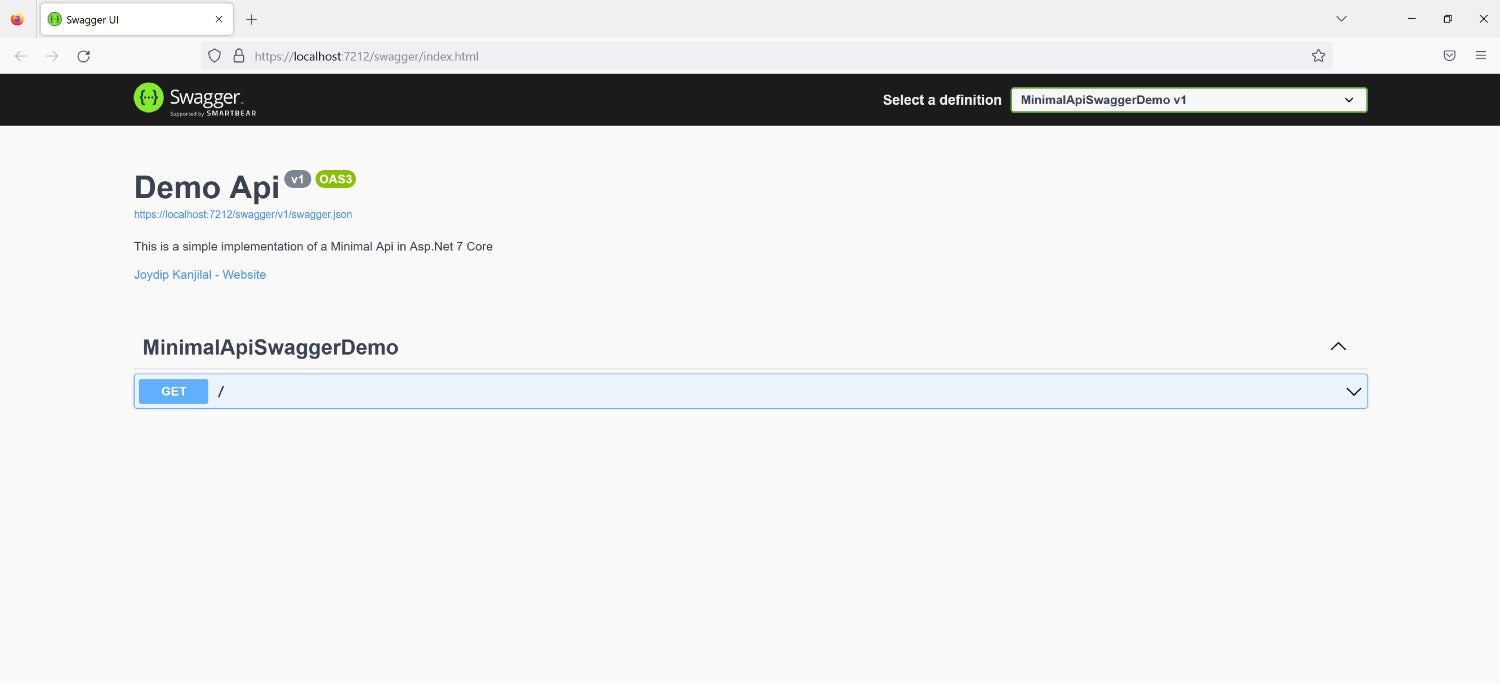
As an alternative, a default HTTP GET endpoint can be created within the Program.cs file. Now, change the default generated code of the HTTP GET endpoint with the next code.
app.MapGet("https://www.infoworld.com/", () => "Hiya World!")
.WithName("Welcome")
.WithOpenApi();
Whenever you run the appliance, you’ll be capable of see the Swagger UI in your internet browser, as proven in Determine 2.
 IDG
IDGDetermine 2. The Swagger UI.
Configure Swagger in a minimal API in ASP.NET Core
The code snippet beneath illustrates how one can configure the Swagger middleware so as to add metadata for the API doc.
builder.Providers.AddSwaggerGen(setup => setup.SwaggerDoc("v1", new OpenApiInfo()
{
    Description = "This can be a easy implementation of a Minimal Api in Asp.Internet 7 Core",
    Title = "Demo Api",
    Model = "v1",
    Contact = new OpenApiContact()
    {
        Title = "Joydip Kanjilal",
        Url = new Uri("https://joydipkanjilal.com")
    }
}));
Whenever you execute the appliance now, the metadata you added can be displayed within the Swagger UI as proven in Determine 3.
 IDG
IDGDetermine 3. Including API metadata.
Create a mannequin class
Now let’s flesh out our minimal API instance utility. First, create a mannequin class utilizing the next code.
public class Writer
{
    public int Id { get; set; }
    public string FirstName { get; set; }
    public string LastName { get; set; }
    public string Handle { get; set; }
    public string Electronic mail { get; set; }
    public string Cellphone { get; set; }
}
Create and implement an interface
Subsequent, create an interface named IAuthorRepository and enter the next code.
public interface IAuthorRepository
{
    Writer GetById(int id);
    void Create(Writer entity);
    void Delete(Writer entity);
    void Replace(Writer entity);
}
Now create one other class named AuthorRepository and enter the next code.
public class AuthorRepository : IAuthorRepository
{
    void IAuthorRepository.Create(Writer entity)
    {
        throw new NotImplementedException();
    }
    void IAuthorRepository.Delete(Writer entity)
    {
        throw new NotImplementedException();
    }
    Writer IAuthorRepository.GetById(int id)
    {
        throw new NotImplementedException();
    }
    void IAuthorRepository.Replace(Writer entity)
    {
        throw new NotImplementedException();
    }
}
Notice that not one of the strategies of the AuthorRepository class have been carried out. We’ll use this skeleton implementation only for the needs of seeing how we are able to work with OpenAPI in minimal API purposes.
Create a minimal API endpoint
Lastly, delete the endpoint we created earlier since we gained’t be needing it anymore. As an alternative, add the next piece of code to your Program.cs file to create 4 new endpoints.
app.MapGet("/authors/{id}", async ([FromServices] Writer entity, int id) =>
{
    return Outcomes.Okay();
});
app.MapPost("/authors", async ([FromServices] Writer entity) =>
{
    return Outcomes.Okay();
});
app.MapPut("/authors/{id}", async ([FromServices] int id, Writer entityToUpdate) =>
{
    return Outcomes.Okay();
});
app.MapDelete("/authors/{id}", async ([FromServices] int id) =>
{
    return Outcomes.Okay();
});
Whenever you run the appliance, you need to see these endpoints displayed in your Swagger UI as in Determine 4.
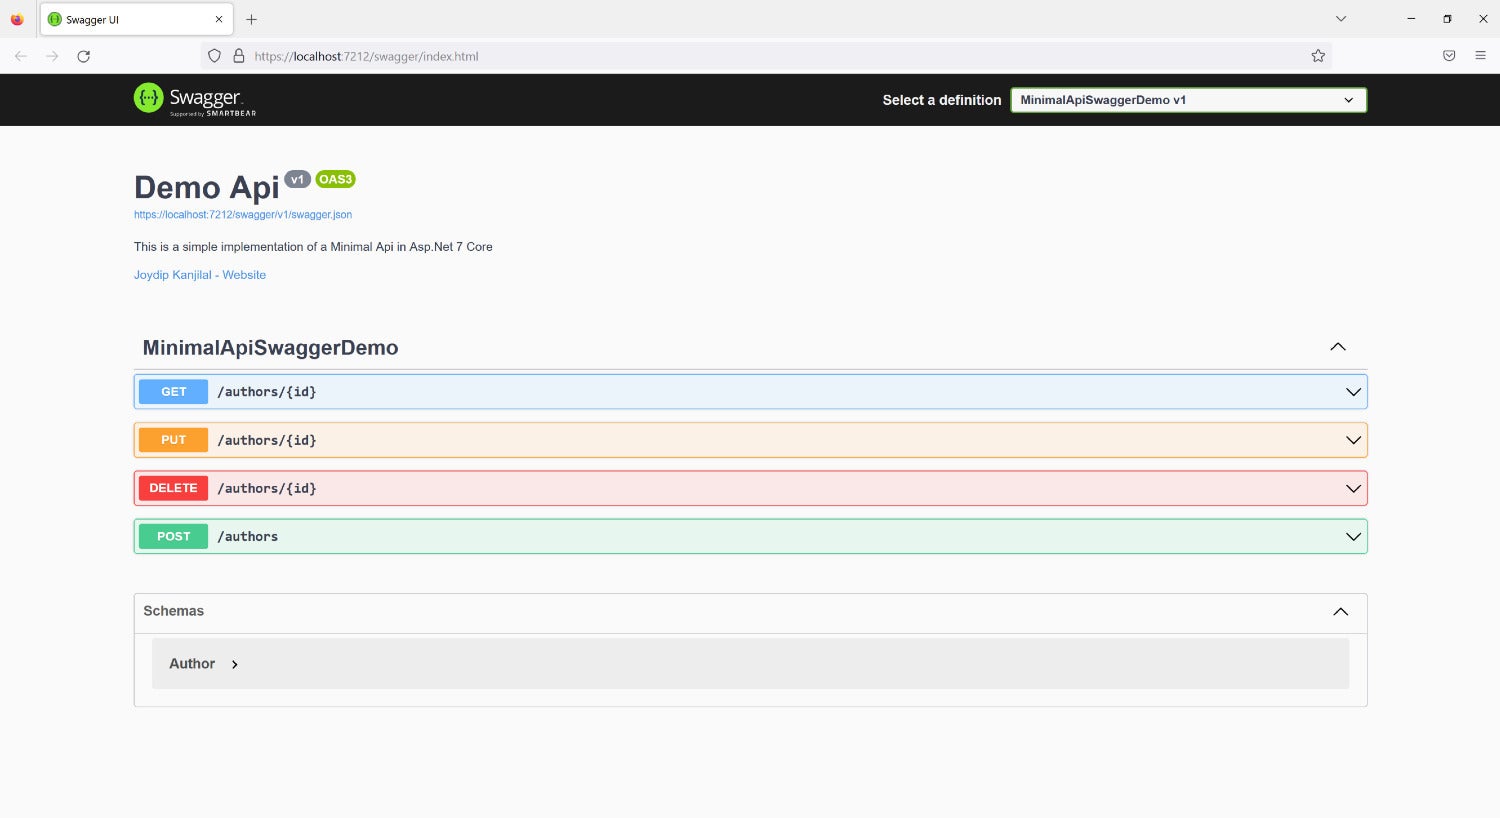 IDG
IDGDetermine 4. The 4 endpoints of our minimal API.
Full minimal API instance in ASP.NET Core
The entire code itemizing for our OpenAPI-documented minimal API is given beneath to your reference.
utilizing Microsoft.AspNetCore.Mvc;
utilizing Microsoft.OpenApi.Fashions;
var builder = WebApplication.CreateBuilder(args);
// Add companies to the container.
builder.Providers.AddEndpointsApiExplorer();
builder.Providers.AddSwaggerGen();
builder.Providers.AddSwaggerGen(setup => setup.SwaggerDoc("v1", new OpenApiInfo()
{
    Description = "This can be a easy implementation of a Minimal Api in Asp.Internet 7 Core",
    Title = "Demo Api",
    Model = "v1",
    Contact = new OpenApiContact()
    {
        Title = "Joydip Kanjilal",
        Url = new Uri("https://joydipkanjilal.com")
    }
}));
var app = builder.Construct();
// Configure the HTTP request pipeline.
if (app.Setting.IsDevelopment())
{
    app.UseSwagger();
    app.UseSwaggerUI();
}
app.UseHttpsRedirection();
app.MapGet("/authors/{id}", async ([FromServices] Writer entity, int id) =>
{
    return Outcomes.Okay();
});
app.MapPost("/authors", async ([FromServices] Writer entity) =>
{
    return Outcomes.Okay();
});
app.MapPut("/authors/{id}", async ([FromServices] int id, Writer entityToUpdate) =>
{
    return Outcomes.Okay();
});
app.MapDelete("/authors/{id}", async ([FromServices] int id) =>
{
    return Outcomes.Okay();
});
app.Run();
public class Writer
{
    public int Id { get; set; }
    public string FirstName { get; set; }
    public string LastName { get; set; }
    public string Handle { get; set; }
    public string Electronic mail { get; set; }
    public string Cellphone { get; set; }
}
public interface IAuthorRepository
{
    Writer GetById(int id);
    void Create(Writer entity);
    void Delete(Writer entity);
    void Replace(Writer entity);
}
public class AuthorRepository : IAuthorRepository
{
    void IAuthorRepository.Create(Writer entity)
    {
        throw new NotImplementedException();
    }
    void IAuthorRepository.Delete(Writer entity)
    {
        throw new NotImplementedException();
    }
    Writer IAuthorRepository.GetById(int id)
    {
        throw new NotImplementedException();
    }
    void IAuthorRepository.Replace(Writer entity)
    {
        throw new NotImplementedException();
    }
}
By enabling OpenAPI help in your Net API tasks whenever you create them, you may have ASP.NET Core mechanically doc your HTTP endpoints, and you may view that info by means of the Swagger UI. Notice you may customise the Swagger UI utilizing Cascading Fashion Sheets, present enum values as string values, and create completely different Swagger paperwork for various variations of your API.
Copyright © 2023 IDG Communications, Inc.
