On this article, we’re going to take a look on the subject of first-party occasion monitoring. Google introduced earlier this yr that third-party cookies will now not be supported in Chrome, and consequently, this subject has grow to be extra related. On this context, we’re going to look at what first-party monitoring really is and easy methods to implement privacy-friendly monitoring with a library known as walker.js. For that objective, we’ll create an instance app with Subsequent.js and walker.js from scratch. This tutorial is not going to cowl matters like managing consent and consumer identification.
Soar forward:
What’s first-party knowledge?
Earlier than we dive into the precise code and the walker.js library, let’s perceive what first-party knowledge is. This might be essential in an effort to perceive the advantages and worth of instruments like walker.js.
Ultimately, it’s fairly easy: first-party knowledge is info collected and owned by an organization or web site itself. The information is gathered utilizing the corporate’s or web site’s personal instruments; in distinction, third-party knowledge comes from an organization from the surface whose enterprise mannequin is to gather knowledge and promote it.
Introduction to walker.js
walker.js is an open supply library and first-party monitoring answer, which suggests the info you seize utilizing the library is totally owned by you.
walker.js additionally addresses privateness in a number of different methods. With walker.js, you’re free to ship knowledge on to your personal endpoint, simply as you possibly can with Google Tag Supervisor or Google Analytics, which makes it doable to personal the complete assortment course of, from capturing knowledge within the browser to ingesting and finally analyzing it. No third-party vendor required!
GDPR forces you to pay attention to which instruments obtain what kind of information out of your customers and doc it. That is a lot simpler if you happen to personal the info assortment course of earlier than the info arrives at any third-party instruments.
Above that, walker.js makes the communication simpler amongst your web site, consent administration platform (a.ok.a., your CMP or cookie notification banner), and third-party instruments due to its consent characteristic. With a easy operate, walker.js handles initialization and any additional communication — together with the suitable race circumstances in your practical, statistics, and advertising instruments that you simply want the consumer’s consent for. This fashion, no instrument might be loaded with out the corresponding consent out of your customers because of technical points or dangerous implementation.
It’s also doable to make use of walker.js if you wish to implement cookie-less monitoring by capturing anonymized session IDs or doing campaign-based attribution with out amassing any private identifiable info (PII). Cookie-less monitoring lets you measure fundamental marketing campaign efficiency with out with the ability to tie this knowledge to a single consumer.
If you happen to’re utilizing a first-party knowledge collector and an specific monitoring strategy with walker.js, it’s also much less doubtless that delicate knowledge might be captured accidentally, decreasing your danger of dropping vital info and growing give attention to the consumer occasions you actually need to concentrate to.
One other actually cool factor about walker.js is that you simply don’t essentially want JavaScript to trace occasions. Relatively, HTML attributes are used in an effort to observe consumer occasions and enrich them with mandatory info. This makes your code and monitoring system extra readable and maintainable.
Beneath, you will discover an instance of tagging a web page with walker.js from their documentation:
<!-- Generic utilization -->
<div
  data-elb="ENTITY"
  data-elb-ENTITY="KEY:VALUE"
  data-elbaction="TRIGGER:ACTION"
  data-elbcontext="KEY:VALUE"
  data-elbglobals="KEY:VALUE"
/>

<!-- Instance utilization -->
<div data-elbglobals="language:en">
  <div data-elbcontext="take a look at:engagement">
    <div data-elb="promotion" data-elbaction="seen:view">
      <h1 data-elb-promotion="identify:Organising monitoring simply">
        Organising monitoring simply
      </h1>
      <p data-elb-promotion="class:analytics">Analytics</p>
    </div>
  </div>
</div>
As you possibly can see, walker.js is predicated on an entity-action mannequin. So as to perceive the context during which a sure occasion happened, we will outline an entity scope with the data-elb attribute. You may even lengthen the context to incorporate extra normal data with the data-elbglobals and data-elbcontext attributes.
By setting the data-elbaction attribute, you possibly can outline the set off that fires an motion and at last use data-elb-ENTITY in an effort to set the entities properties.
The instance from above will result in the next knowledge construction, which might be saved in your browser’s knowledge layer as soon as the div container is seen within the viewport:
{
  occasion: 'promotion view', // mixture of entity and motion
  knowledge: {
    // arbitrary set properties with the data-elb-promotion attribute
    identify: 'Organising monitoring simply',
    class: 'analytics',
  },
  context: {
    // Associated properties outlined with the data-elbcontext attribute
    take a look at: 'engagement'
  },
  globals: {
    // Basic Properties outlined with the data-elbglobals attribute
    language: 'en'
  },
  consumer: {
    // saved consumer ids (manually added as soon as)
    id: 'userid',
    gadget: 'cookieid',
    hash: 'sessionid',
  },
  nested: [], // all nested entities throughout the promotion
  id: '1647968113641-01b5e2-5', // timestamp, group & depend of the occasion
  set off: 'seen', // identify of the set off that fired
  entity: 'promotion', // entity identify
  motion: 'view', // entity motion
  timestamp: 1647968113641, // time when the occasion fired
  timing: 3.14, // how lengthy it took from the web page load to set off the occasion
  group: '01b5e2', // random group id for all occasions on a web page
  depend: 2, // incremental counter of the occasions on a web page
  model: {
    // Useful when working with uncooked knowledge
    walker: 1.5, // used walker.js model
    config: 42, // a customized configuration model quantity
  },
  walker: true, // flag to filter occasions
}
Getting began with Subsequent.js and walker.js
If you happen to’re considering different tagging examples other than Subsequent.js, you possibly can take a look at the examples listing within the elbwalker bundle. On this case, I construct a easy ecommerce demo web site with residence, product particulars, and login pages.
I’m not going to elucidate easy methods to setup a Subsequent.js venture on this weblog publish; if you happen to need assistance with that go to their docs. So as to combine walker.js in your present Subsequent.js venture, run the next command:
npm i --save @elbwalker/walker.js
The following factor we have to get issues operating is to initialize the walker:
// ./knowledge/index.ts
import Elbwalker, { elb, WebDestination } from "@elbwalker/walker.js";

export default operate setupAnalytics() {
 window.elbLayer = [];
 window.elbwalker = Elbwalker();
 window.elb = elb;

 elb("walker vacation spot", {
   push: console.log,
 } as WebDestination.Perform);

 elb("walker run");
}
As a primary step, we take within the setupAnalytics() operate, then create the elblayer array, the place we’ll retailer all of our info. With the creation of the Elbwalker() operate, we will additionally cross different choices to the elbLayer.
We additionally imported the elb helper operate that pushes occasions to the elbLayer. At this level, it’ll assist us outline a vacation spot and name elb("walker run") to really begin the walker.
For the sake of simplicity, we’ll solely outline the console as our vacation spot on this tutorial. walker.js helps the next locations by default (there are extra to come back):
- GA 4
- GTM
- Believable Analytics
- Google Advertisements
- Meta Pixel
Typically, you possibly can add any vacation spot to the walker. Try the docs relating to locations to learn the way so as to add your customized vacation spot.
We are going to use the setupAnalytics() operate contained in the pages/_app.tsx element to really setup the walker:
// pages/_app.tsx
...
import "../kinds/globals.css";
import kind { AppProps } from "subsequent/app";
import { useEffect } from "react";

export default operate App({ Part, pageProps }: AppProps) {
 useEffect(() => {
   const initTracking = async () => {
     const setupAnalytics = (await import("../knowledge/index")).default;
     setupAnalytics();
   };
   initTracking();
 }, []);

 return (
   <>
    ...
   </>
 );
}
You’ll discover that I outsourced the import and the decision of the setupAnalytics() operate inside a useEffect Hook. Since Subsequent.js creates this web page on the server facet, we have to wait with the setup till the web page masses within the browser. The explanation for that’s as a result of walker.js wants entry to the doc interface, which is barely out there on the shopper facet. If we known as the setupAnalytics() operate exterior the useEffect Hook, we’d get a ReferenceError saying that the doc will not be outlined.
The right way to tag pages with walker.js
Now that we have now efficiently arrange the walker, we will transfer on to tagging pages. In step one, we’ll use a few of the pre-defined triggers that include walker.js. Beneath is a desk itemizing all out there triggers:
| Occasion | Definition |
load |
after loading a web page when the DOM is prepared |
click on |
when the component or a baby is clicked |
seen |
after the component has been within the viewport for not less than 50 % for one second |
hover |
every time the mouse enters the corresponding component |
submit |
on a legitimate type submission |
wait(ms) |
waits ms seconds (15 seconds by default) till triggering |
pulse(ms) |
recurring triggers each ms seconds (15 seconds by default) if web page will not be hidden |
customized |
calling elbLayer.push(), see utilizing JavaScript |
scroll(y) |
fires when min. y % of the component’s peak is above the underside of the window, e.g., scroll(80) for an 80 % threshold |
Within the following sections, we’ll add web page view, hover, and click on occasions.
Including web page view occasions
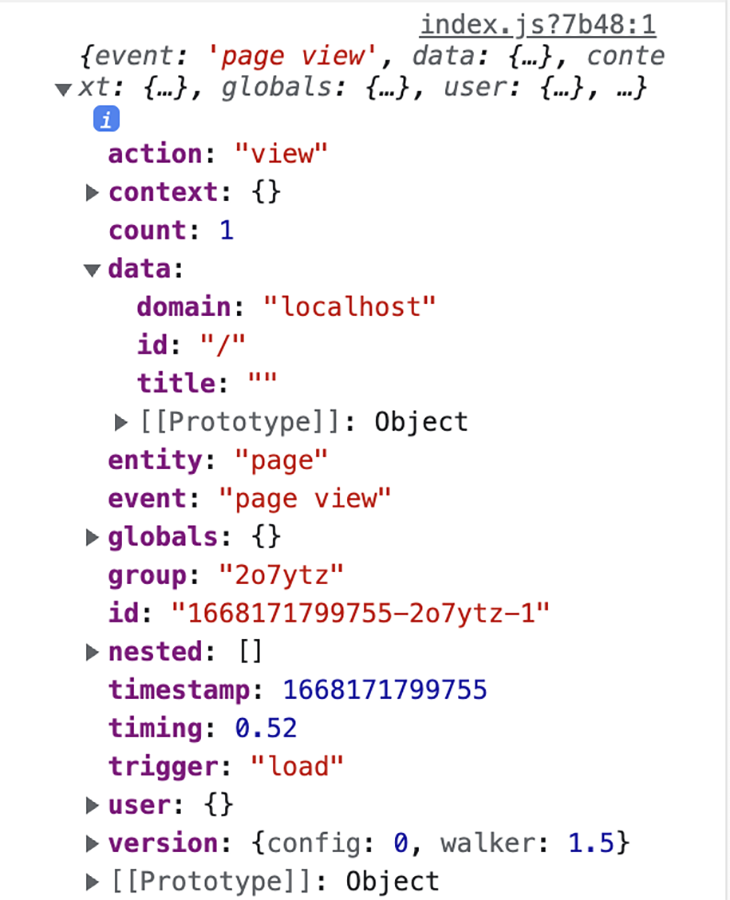
Within the pages/index.tsx file, which represents our homepage, we’ll firstly add load and wait triggers. Because of how we arrange our walker, we don’t need to explicitly add a load set off in an effort to for our instance to generate a web page view occasion; this might be thrown routinely with every walker run.
If we go to the homepage of the demo webpage, following output might be generated within the console:
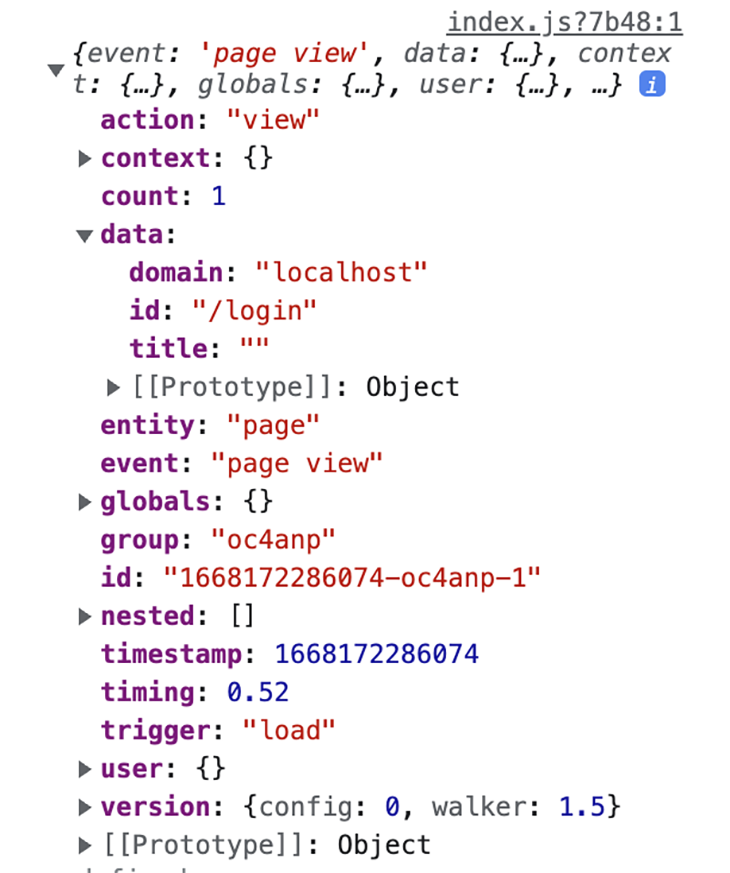
The login route will generate this occasion:
 Nonetheless, we should explicitly add the remainder of the triggers.
Including the wait set off to our homepage
Subsequent, we wish to add the wait set off to our homepage. This set off can be utilized to find out whether or not or not a consumer is usually considering our web site (i.e., to measure bounce charges). The walker will wait a specified quantity of milliseconds till triggering.
// pages/index.tsx
export default operate Dwelling() {
 ...

 return (
   <div
     className="relative bg-gray-800 overflow-hidden"
     data-elbcontext="take a look at:home_engagement"
   >
     <div className="relative pt-6 pb-16 sm:pb-24">
       <essential className="mt-16 sm:mt-24">
         <div className="mx-auto max-w-7xl" data-elb="residence">
           <div
             className="lg:grid lg:grid-cols-12 lg:gap-8"
             data-elbaction="wait(10000):"
           >
        ...
         );
}
On this case, we wait 10 seconds till the set off is fired. With data-elbcontext="take a look at:home_engagement", we are saying that we’re usually testing consumer engagement on the homepage; with data-elb="residence", we set the entity and scope, and at last, data-elbaction="wait(10000):" units the set off and the corresponding motion.
Including click on and hover occasions
Subsequent, let’s implement click on and hover occasions for the merchandise overview:
The corresponding code appears like this, and might be present in elements/organisms/merchandise.tsx:
import { merchandise } from "../../utils/mockProducts";

export default operate Merchandise() {
 return (
   <div className="bg-white" data-elbcontext="take a look at:products_engagement">
     <div className="mx-auto max-w-2xl py-16 px-4 sm:py-24 sm:px-6 lg:max-w-7xl lg:px-8">
       <h2 className="text-3xl font-extrabold tracking-tight text-gray-900 sm:text-4xl mb-10">
         Trending merchandise
       </h2>

       <div className="grid grid-cols-1 gap-y-10 gap-x-6 sm:grid-cols-2 lg:grid-cols-3     xl:grid-cols-4 xl:gap-x-8">
         {merchandise.map((product) => (
           <a
             key={product.id}
             href={product.href}
             className="group"
             goal="_blank"
             data-elb="product"
             data-elbaction="click on"
             data-elb-product={`id: ${product.id}`}
           >
          <div data-elbaction="seen" className="aspect-w-1 aspect-h-1 w-full overflow-hidden rounded-lg bg-gray-200 xl:aspect-w-7 xl:aspect-h-8">
            …
           </div>

       );
}
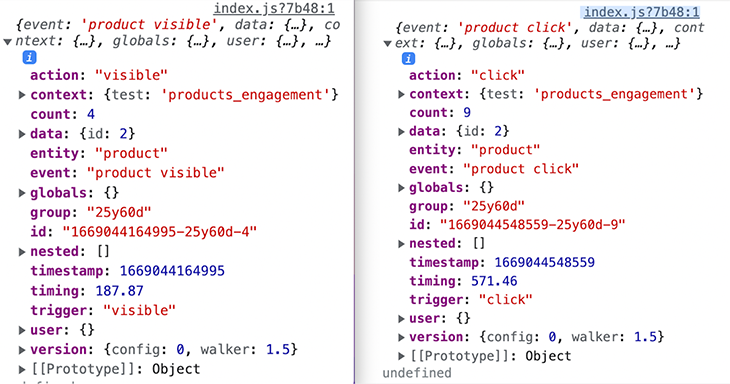
An important info on this snippet might be discovered within the map-method, the place we iterate over all objects within the merchandise array. With data-elb="product", we set our entity to be a product. We will use data-elbaction="click on; hover" in an effort to observe the customers clicking and hovering over the merchandise.
If you happen to take a more in-depth have a look at the screenshots displaying the console logs from the hover and click on occasions, you’ll discover that the knowledge property holds the product ID for the hovered/clicked product. We will dynamically add the product ID to the occasion by including data-elb-product={`id: ${product.id}`} to our code. You may add any property to your entity, however on this case, we will additionally add the identify, value, and many others.
The right way to add customized occasions with JavaScript
To date, we’ve checked out easy methods to simply tag pages with the pre-built triggers. However Walker.js additionally permits us to implement customized triggers that we will push to the elbLayer by ourselves utilizing JavaScript.
For this objective, we’re going to implement a set off to detect whether or not a consumer has typed an invalid password (password size shorter than 8 characters) and one other set off that may observe whether or not a consumer centered on a particular enter area.
Yow will discover additional info on easy methods to use JavaScript to trace occasions within the walker.js documentation. Typically, the workflow appears like this:
import { elb } from '@elbwalker/walker.js';

elb('entity motion', knowledge, set off, nested, context);
First, let’s implement the password validation occasion. Just like the code snippet above, we will outline a brand new occasion known as checkPassword:
// utils/customEvents.ts
export const checkPassword = async (entity: string) => {
 const { elb } = await import('@elbwalker/walker.js');
 elb(`${entity} shortPassword`, { area: 'localhost' }, 'validation', {
   take a look at: 'password validation',
 });
};
As a second step, we have to import the checkPassword operate within the location we wish to validate the password enter. The handleSubmit operate, under, might be known as every time the Create your account button is clicked.
Extra nice articles from LogRocket:
// elements/organisms/account.tsx
const handleSubmit = (e: MouseEvent<HTMLButtonElement>) => {
   if (password.size < 8) {
     e.preventDefault();
     checkPassword('account');
   }
 };
For the second customized occasion, we once more want a operate that pushes the occasion to the elbLayer:
// utils/customEvents.ts
export const trackInput = async (
 e: React.ChangeEvent<HTMLInputElement>,
 entityAction: string
) => {
 const { elb } = await import("@elbwalker/walker.js");

 elb(entityAction, { area: "localhost", inputField: e.goal.id }, "focus", {
   take a look at: "enter area engagement",
 });
};
We’re passing inputField: e.goal.id to our knowledge object in order that we will distinguish our focus between a number of enter fields. This occasion can now be added to any enter area in your app. In our case, we’ll add it to the signup element on our homepage.
// elements/organisms/account.tsx/AccountSignUp
<div>
     <label htmlFor="identify" className="sr-only">
       Full identify
     </label>
     <enter
       onFocus={(e) => {
          trackInput(e, "account focus");
       }}
       kind="textual content"
       identify="identify"
       id="identify"
       autoComplete="identify"
       placeholder="Full identify"
      />
…
</div>
As you possibly can see, we merely added the trackInput operate to the onFocus property of the enter component. Beneath you will discover the results of this implementation:
Conclusion
On this weblog publish, we lined the subject of privacy-friendly knowledge monitoring and had an in depth have a look at the walker.js library, which lets you implement first celebration knowledge monitoring in your utility simply.
If you happen to’re considering utilizing the walker.js library, be at liberty to take a look at the GitHub repo!
LogRocket: Full visibility into your manufacturing React apps
Debugging React purposes might be tough, particularly when customers expertise points which are exhausting to breed. If you happen to’re considering monitoring and monitoring Redux state, routinely surfacing JavaScript errors, and monitoring sluggish community requests and element load time,
attempt LogRocket.


LogRocket
combines session replay, product analytics, and error monitoring – empowering software program groups to create the best internet and cell product expertise. What does that imply for you?
As an alternative of guessing why errors occur, or asking customers for screenshots and log dumps, LogRocket enables you to replay issues as in the event that they occurred in your personal browser to shortly perceive what went unsuitable.
No extra noisy alerting. Good error monitoring enables you to triage and categorize points, then learns from this. Get notified of impactful consumer points, not false positives. Much less alerts, far more helpful sign.
The LogRocket Redux middleware bundle provides an additional layer of visibility into your consumer classes. LogRocket logs all actions and state out of your Redux shops.
Modernize the way you debug your React apps —
begin monitoring without spending a dime.
