
In fashionable internet improvement, we frequently want an authentication resolution to retailer person data and restrict entry to sure options and assets. Creating such an answer from scratch entails lots of time and assets. There are additionally many considerations associated to such a job, together with safety and knowledge storage.
Fortunately, there are ready-made options that assist us with the authentication course of, equivalent to Auth0, AWS Cognito, Firebase, or Azure AD B2C. Choosing the proper resolution will depend on your undertaking’s necessities and limitations, equivalent to developer expertise or out there price range.
On this article, we’re going to go over the steps {that a} frontend developer should carry out to combine a React app with msal-react, the Azure AD B2C authentication service. We’ll cowl:
All of the code snippets can be written utilizing TypeScript.
What’s Azure AD B2C?
Azure AD is constructed on the identical know-how as Azure Energetic Listing (Azure AD), however is a separate business-to-client (B2C) service. It was developed by Microsoft, which gives an easy-to-scale and safe resolution for all of the authentication wants of an app.
This resolution affords assist for email-based authentication, accounts for a office, faculty, or some other group, and social login suppliers equivalent to Google, Fb, Linkedin, and others.
There are some apparent benefits to selecting Azure AD B2C. For example, you make sure that the person knowledge is safely saved, the system is safe and never uncovered to threats, and that monitoring of the system is supplied throughout the identical ecosystem.
As well as, in keeping with the official docs, AzureAD helps hundreds of thousands of customers and billions of authentications every day. These are arguably spectacular numbers that can’t be simply achieved in any other case.
Microsoft affords a reside demo web site the place you’ll be able to check out the AzureAD authentication, together with seeing the kinds of authentication that it has to supply:

Within the following sections, we’re going to check out the official msal-react library created by Azure particularly for enabling JWT token retrieval in React internet apps. All of the code snippets that we are going to have a look at use TypeScript, however you need to use them simply in JavaScript with no issues.
Integrating msal-react in your undertaking
The msal-react library out there via Azure AD B2C is supposed for use in single-page purposes developed with React.
Integrating this library assumes that you’ve pre-existing expertise with creating internet apps utilizing React. You could even have arrange a undertaking and efficiently built-in the authentication service in your backend.
Along with this, the frontend app should be registered within the AzureAD portal. Microsoft gives a tutorial that covers the steps for this course of. That is within the scope of the backend a part of the work.
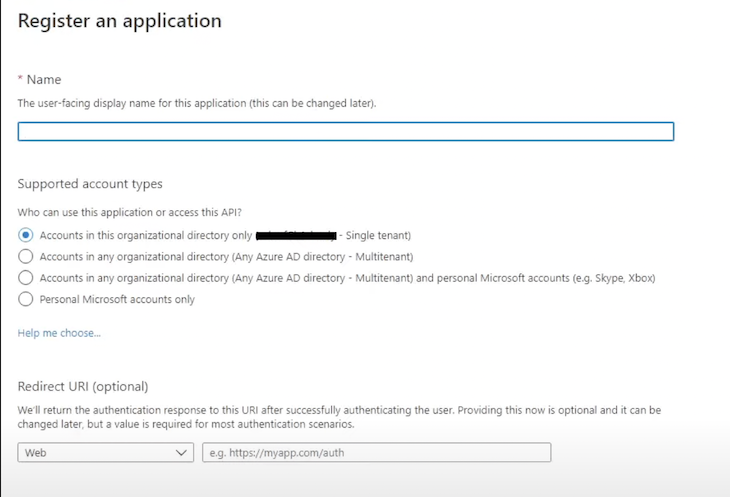
The screenshot beneath is what you will note when you’ll head over to portal.azure.com, into Azure Energetic Listing, then over to App Registrations, and choose the “New Registration” choice. For the aim of this tutorial, you’ll be able to go together with http://localhost:3000 because the redirect URL:
After finishing these steps, you can begin integrating msal-react in your frontend app.
Including the msal-react and msal-browser packages
To make use of this bundle, we first want so as to add two packages to our undertaking.
The primary bundle — @azure/msal-react — is the library itself. The second bundle — @azure/msal-browser — is a peer dependency that permits your app to authenticate with out utilizing a backend server.
Run the next command:
npm set up @azure/msal-react @azure/msal-browser
The command above will set up the corresponding packages to our undertaking.
Wrapping the app within the MsalProvider part
Now we’re going to add the mandatory code to our undertaking. This library makes use of the Context API. Thus, we have to wrap our app within the MsalProvider part like this:
<MsalProvider occasion={pca}>
       <App />
</MsalProvider>
Through the use of this wrapper, we allow every part in our app to make use of the authentication end result. For instance, we’re going to want this data when constructing our router to restrict entry to some locations of the app solely to authenticated customers.
Initializing the general public shopper software
Within the snippet above, you could have observed the occasion prop that’s wanted for MsalProvider. This prop expects an object of sort PublicClientApplication.
This object from the library permits us to acquire the JWT token that tells us a person is certainly authenticated. It affords sure APIs for acquiring and retrieving authentication tokens for our SPA.
To initialize the general public shopper software object (pca), we have to go in a configuration file. This configuration gives some data that’s distinctive to our Azure app, thus letting the pca know the place it is going to connect with in AzureAD to authenticate our customers. Let’s see learn how to receive this configuration file.
The configuration file can comprise a number of fields. Notice that with the intention to entry these fields, you should have accomplished the steps that we talked about within the conditions part. These steps register our internet app within the Azure portal.
Out of the fields within the configuration file, we’ll look over the next:
- Shopper ID — necessary
- Authority — non-compulsory
- Redirect URI — non-compulsory
The clientId discipline
The clientId discipline uniquely identifies our particular app on the platform. For this primary discipline, you will want to enter the Azure portal and navigate to the Overview web page of your Azure app.
The authority discipline
The authority discipline is obtained by concatenating the id supplier occasion URL and the target market for the app. Let’s unwrap this a bit earlier than shifting ahead.
Extra nice articles from LogRocket:
The id occasion refers back to the cloud occasion that can be used for signing customers in. There are two kinds of cases — public cloud and nationwide cloud.
The msal-react bundle will default to Azure public cloud cases if no express occasion is specified, since this covers most use instances. The URL you need to use is as follows:
https://login.onmicrosoftonline.com
Nationwide cloud cases are remoted Azure cases restricted to a particular nation or area to adjust to sure knowledge regulation or native guidelines — for instance, if the person knowledge shouldn’t be saved outdoors of the stated nation or area. You’ll be able to receive the suitable URL on your use case within the Microsoft docs.
To specify the viewers within the authority discipline, use the area title related together with your Azure AD occasion for single-tenant purposes. For the worldwide occasion frequent case, you’d merely use /frequent.
After appending the viewers to the id occasion, the ensuing string provides you the contents of the authority discipline. For instance, an authority for a typical occasion can be:
https://login.microsoftonline.com/frequent
For a single-tenant app with a customized area, the authority can be:
https://login.microsoftonline.com/instance.com
The redirectUri discipline
Lastly, the redirectUri discipline is fairly self-explanatory. Because the authentication course of takes place outdoors of our internet app, we have to inform the id supplier the place the person can be taken in our internet app after a profitable authentication.
For instance, let’s say the person begins from the /signIn web page earlier than going into the id supplier and logging in efficiently. We might wish to redirect them to the /house web page afterwards somewhat than sending them again to the join web page.
Different concerns when coping with the configuration object
As talked about above, msal-react assumes the frequent tenant by default. On this case, you’ll solely have to specify the clientId in your configuration object.
In case you are coping with a single-tenant app, then again, you might want to additionally present the authority discipline, which is able to embrace the viewers specification — additionally referred to as the tenant ID. The authority discipline will then appear to be this:
'https://login.microsoftonline.com/{your_tenant_id}'
In case you additionally opted for a separate authority or id server, you’ll moreover want to supply the knownAuthorities array. For instance, let’s say you could have the next authority discipline:
'https://login.microsoftonline.com/{tenant_id}'
In that case, the knownAuthorities discipline can be ["login.microsoftonline.com"]. You may also try the library docs for extra data on the authority discipline.
Instance configuration
Beneath is an instance configuration. This instance assumes that you’re utilizing the frequent cloud occasion and that you just wish to redirect the person to a route now we have outlined referred to as root after efficiently authenticating:
import { Configuration } from '@azure/msal-browser';

export const msalConfig: Configuration = {
  auth: {
    clientId:  "11111111-1111-1111-111111111111",
    authority: "https://login.microsoftonline.com/frequent"
    redirectUri: "/root",
  }
}
Within the instance above, root corresponds to a web page that checks whether or not or not the person is logged in after which redirects the person accordingly. We’ll have a look at an instance for this habits later within the article.
In case you had been to make use of login.reside.com as an authority, then your config would appear to be this:
export const msalConfig: Configuration = {
    auth: {
        clientId: "11111111-1111-1111-111111111111",
        authority: 'https://login.reside.com',
        knownAuthorities: ["login.live.com"]
    }
};
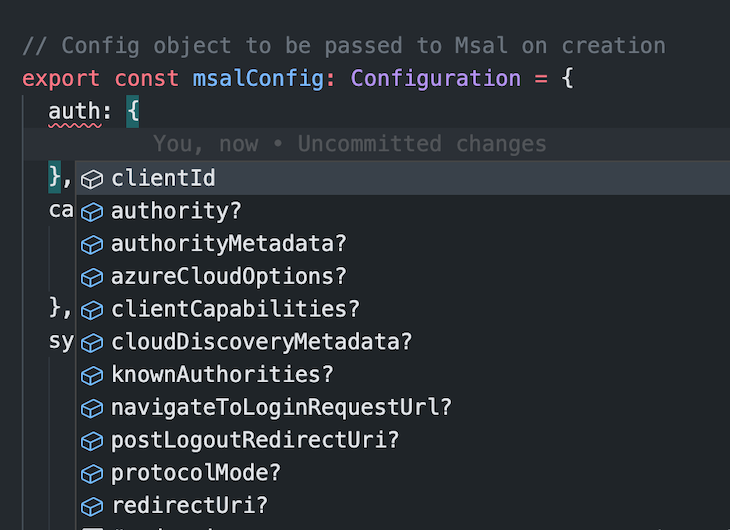
These examples assume that you’re additionally utilizing TypeScript in your undertaking. Utilizing vanilla JavaScript just isn’t an issue, however utilizing TypeScript and specifying the Configuration sort for this object will enable you see the fields out there so as to add to your configuration. You’ll be able to see this within the screenshot beneath:
The backend group will enable you determine what fields are vital for the configuration, so don’t fear if some items appear unclear.
As frontend builders, we would not even have entry to the Azure portal. What we should do, nonetheless, is to do our greatest to grasp what every discipline does and be sure that the authentication movement is dealt with correctly in our app.
This takes us to the following step: making certain that some elements of our app are solely out there to authenticated customers.
Utilizing AuthenticatedTemplate and UnauthenticatedTemplate
The msal-react library affords two elements that make controlling the entry to assets very straightforward in a React app. The names are pretty self-explanatory, however let’s go over them now.
You’ll use AuthenticatedTemplate to wrap the elements of our app that restrict entry to authenticated customers solely. Likewise, you’ll use UnauthenticatedTemplate for no matter is offered to everybody.
Within the following instance, we wish solely authenticated customers to entry the Dwelling part, whereas everybody can go to the Login part:
<AuthenticatedTemplate>
    <Dwelling />
</AuthenticatedTemplate>
<UnauthenticatedTemplate>
    <Login />
</UnauthenticatedTemplate>
Initializing the authentication movement
After configuring msal-react, we have to initialize the authentication movement. With a purpose to do that we’ll want the MSAL occasion. We will purchase it utilizing the useMsal hook.
We will initialize the authentication in two methods — both in a popup or by utilizing a redirect. You’ll be able to go for the popup technique whenever you would somewhat hold the person inside the app, thus preserving the present state.
Nonetheless, your customers may need popup blockers that forestall them from coming into the authentication movement easily. Additionally, the popup technique is thought to have points in Web Explorer, thus making the redirect choice preferable.
Within the following instance, we’re going to check out the redirect method, because it matches the configurations and the earlier examples. See the code:
import { useMsal } from '@azure/msal-react';

const LoginPage = () => {
  const { occasion } = useMsal();

  const initializeSignIn = () => {
    occasion.loginRedirect();
  };

  return (
    <>
      <div onClick={initializeSignIn}>Check in</div>
    </>
  );
};
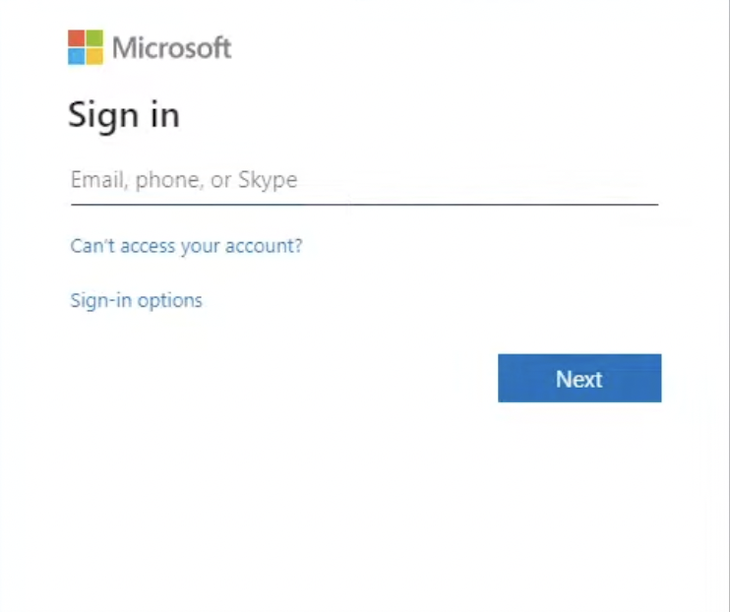
Within the above snippet, we enable the person to press on the Check in textual content and initialize the login redirect. This may take the person to the Microsoft id supplier, the place they may sign up or join.
The default id supplier login web page will appear to be the next:
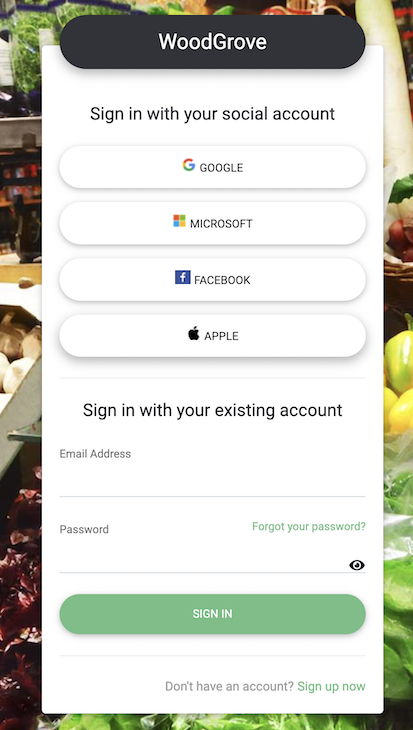
With some tweaks to the default template, you can even customise the appear and feel of the id supplier web page such that it could actually seize your model. Take, for instance, the Woodgrove template:
Microsoft has a tutorial on learn how to go in scopes to the loginRedirect technique for the APIs that the person should consent to when authenticating.
Dealing with person signout
We have now a distinct technique within the MSAL occasion to deal with when a person logs out. Merely name occasion.logoutRedirect() to clear the browser cache. The person can be navigated into the id supplier, after which again into the app.
The default post-logout redirect location is the web page the place the person initialized the redirect, so that you also needs to configure a postLogoutRedirectUri in your config object.
Constructing on the code snippet above, merely add the code beneath to redirect the person after logging out:
occasion.logoutRedirect();
Placing every part collectively
That is what a whole instance would appear to be based mostly on what now we have configured:
import React from "react";
import { MsalProvider } from "@azure/msal-react";
import { Configuration,  PublicClientApplication } from "@azure/msal-browser";

import App from "./App";

const msalConfiguration: Configuration = {
    auth: {
        clientId: "client_id" // the one necessary discipline on this object, uniquely identifies your app
        // right here you may add the opposite fields that you just may want based mostly on the Azure portal settings
    }
};

const pca = new PublicClientApplication(configuration);

const AppWithAuthentication = () => (
    <MsalProvider occasion={pca}>
        <App />
    </MsalProvider>
);

ReactDOM.render(<AppWithAuthentication />, doc.getElementById("root"));
Your App file will appear to be this:
import React from "react";
import { AuthenticatedTemplate, UnauthenticatedTemplate } from '@azure/msal-react';
// ...imports for Dwelling and Login elements

const App = () => {
      return (
<AuthenticatedTemplate>
    <Dwelling />
</AuthenticatedTemplate>
<UnauthenticatedTemplate>
    <Login />
</UnauthenticatedTemplate>
      );
}
The app has two important sections: Login and Dwelling. The Login part is public, whereas the Dwelling part is seen solely to customers who’re logged in.
Within the Dwelling part, you’ll most likely use the logoutRedirect technique, whereas within the Login part, you’ll use the loginRedirect technique. Additionally, you will most likely talk with the backend within the Dwelling part.
The authentication templates add a further layer of safety for the backend APIs, that are solely accessible if the request has a JWT token hooked up. The unauthenticated person can’t even attain the protected pages, not to mention try to speak with the backend.
The steps above are sufficient for integrating the msal-react library and making the authentication course of work in your app. Nonetheless, allow us to have a look at yet one more fascinating idea that this has to supply.
Utilizing msal-react hooks
The msal-react library additionally affords some hooks that may enable you remedy particular duties. We used the useMsal hook earlier, however let’s have a look at some extra detailed use instances for this and the useIsAuthenticated hook.
The useIsAuthenticated hook
Let’s think about a case by which you could have a part that’s proven each within the authenticated and unauthenticated elements of your app — for instance, a Drawer. The drawer’s content material will rely upon person authentication state.
The drawer might comprise fewer choices for the unauthenticated person, equivalent to a hyperlink to About Us and Contact pages. As compared, the authenticated person will discover some further choices right here, equivalent to a Logout button and a hyperlink to their profile web page.
How ought to we sort out this?
For this specific case, we are able to make use of the useIsAuthenticated hook. It returns a boolean whose worth is true if the person is logged in and false if they aren’t.
In our hypothetical Drawer, the code might appear to be this:
import React from 'react';
import { useIsAuthenticated } from '@azure/msal-react';

const Drawer = () => {
       const isAuthenticated = useIsAuthenticated();

       const renderAuthenticatedContent = () => {
          // ...return part
       }

       const renderUnauthenticatedContent = () => {
          // ...return part
       }

       return isAuthenticated ? renderAuthenticatedContent() : renderUnauthenticatedContent();
}
Now you’ll be able to safely use this Drawer each within the Login part and within the Dwelling part. No have to duplicate any code, and no have to retailer any authentication tokens in your native app state manually — msal-react takes care of this for us.
The useMsal hook
Let’s think about a brand new scenario by which you want to present a progress indicator in your app whereas the library checks if the person is authenticated — and, maybe, is making an attempt to retrieve an authentication token silently.
For this case, we are able to use the useMsal hook. It returns three objects:
- The
msal-reactPublic Shopper Software (pca) occasion - The listing of accounts which might be presently signed in
- Whether or not or not authentication or one other motion is in progress
Check out the next snippet:
import { useMsal } from "@azure/msal-react";
// ...import for the customized LoadingIndicator and PageContent elements

const LandingPage = () => {
      const { inProgress } = useMsal();

      return inProgress ? <LoadingIndicator /> : <PageContent />;
}
As you’ll be able to see, we retrieved the inProgress standing utilizing the useMsal hook. We additionally displayed a loading indicator whereas authentication is in progress.
Various to AuthenticatedTemplate and UnauthenticatedTemplate
In case you select to not use the AuthenticatedTemplate and UnauthenticatedTemplate elements, you would use the useIsAuthenticated hook with the useEffect React Hook to redirect the person to a particular place within the app based mostly on their authentication standing.
See the code beneath:
const isAuthenticated = useIsAuthenticated();

useEffect(() => {
   if (isAuthenticated) {
      // go to an authenticated-only place
   } else {
     // return to the general public touchdown web page the place the person can attempt to login once more
   }
}, [isAuthenticated]);
The above snippet may very well be helpful in, as an example, the part that handles the principle router swap of your app — the primary place {that a} person visits when accessing your internet app.
Within the transient moments that msal-react might want to examine what to do with the person, you’ll be capable of present a loading indicator utilizing the logic from the earlier part on the useMsal hook. You’ll be able to then deal with a redirect for the person based mostly on the authentication results of the msal-react library.
Conclusion
On this article, we reviewed utilizing msal-react for Azure AD authentication, public shopper purposes, learn how to get the configuration file for our frontend app, and learn how to combine the msal-react library in our React app such that customers can efficiently join and authenticate.
We additionally went over some code and specified what every line of configuration does, pinpointing how the templates and the hooks might be helpful — and vital — for good authentication practices in a frontend internet software.
Thanks for studying! I hope this text was helpful for you and that it cleared up crucial ideas associated to msal-react and Azure AD B2C.
Minimize via the noise of conventional React error reporting with LogRocket
LogRocket
is a React analytics resolution that shields you from the tons of of false-positive errors alerts to just some actually necessary objects. LogRocket tells you probably the most impactful bugs and UX points really impacting customers in your React purposes.


LogRocket
routinely aggregates shopper facet errors, React error boundaries, Redux state, gradual part load occasions, JS exceptions, frontend efficiency metrics, and person interactions. Then LogRocket makes use of machine studying to inform you of probably the most impactful issues affecting probably the most customers and gives the context you might want to repair it.
Deal with the React bugs that matter —
attempt LogRocket at this time.
