
Subsequent.js is among the best and hottest methods to construct production-ready React functions. Over current years, Subsequent.js has skilled exponential development, and plenty of corporations have adopted it to construct their functions. On this article, we’ll discover ways to add pagination to a Subsequent.js software. We’ll discuss tips on how to arrange a Subsequent.js mission, information fetching from an API endpoint with getStaticProps technique, and implementing the pagination itself.
Soar forward:
Initiating our Subsequent.js mission
First, we’ll create a new Subsequent.js app with the command npx create-next-app next-pagination. Then, we are able to go into the mission listing with the command cd next-pagination and run yarn dev or npm run dev to begin the mission on a improvement server. For this mission, we’ll use vanilla CSS for styling because it focuses extra on performance.
Information fetching with getStaticProps
The information that shall be used to implement our pagination will come from the {JSON} Placeholder API. The information shall be fetched utilizing the getStaticProps perform.
The getStaticProps perform at all times runs on the server, and Subsequent.js will pre-render the web page at build-time utilizing the props returned by getStaticProps. The Fetch API shall be used to get information from the beforehand talked about API endpoint:
import Head from "subsequent/head";
import Picture from "subsequent/picture";
import types from "../types/Dwelling.module.css";
import Pagination from "../src/parts/Pagination";
import { useState, useEffect } from "react";
import { paginate } from "../src/helpers/paginate";

export default perform Dwelling({ information }) {
console.log(information)
  return (
   <div className={types.container}>
     <Head>
       <title>Create Subsequent App</title>
       <meta title="description" content material="Generated by create subsequent app" />
       <hyperlink rel="icon" href="https://weblog.logrocket.com/favicon.ico" />
     </Head>

     <p>NextJS X Pagination</p>

export const getStaticProps = async () => {
 const res = await fetch("https://jsonplaceholder.typicode.com/todos");
 const information = await res.json();

 return {
   props: { information },
 };
};
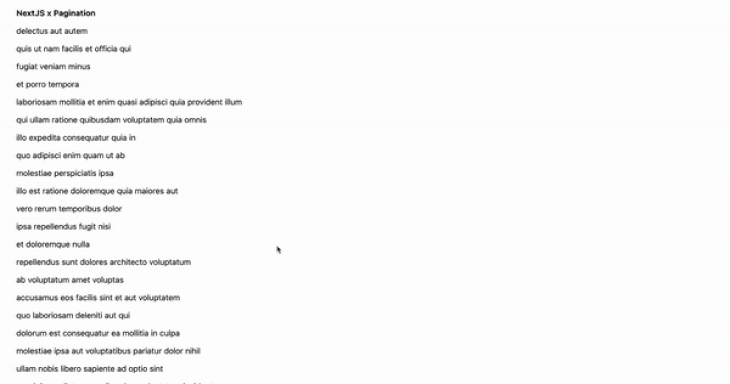
The information returned from the props shall be destructured within the dwelling part so it may be logged within the console. This can verify that the info has been fetched. So, within the console, we must always have a put up with an array of 100 objects because it was specified within the JSON Typicode web site:

Now, we are able to render this information on the webpage and see how they appear on the UI:
import Head from "subsequent/head";
import Picture from "subsequent/picture";
import types from "../types/Dwelling.module.css";
export default perform Dwelling({ information }) {
 return (
   <div className={types.container}>
     <Head>
       <title>Create Subsequent App</title>
       <meta title="description" content material="Generated by create subsequent app" />
       <hyperlink rel="icon" href="https://weblog.logrocket.com/favicon.ico" />
     </Head>

     <p>
       <sturdy>NextJS x Pagination</sturdy>
     </p>
     {information.map((merchandise) => {
       return <p key={merchandise.id}>{merchandise.title}</p>;
     })}
   </div>
 );
}

export const getStaticProps = async () => {
 const res = await fetch("https://jsonplaceholder.typicode.com/todos");
 const information = await res.json();

 return {
   props: { information },
 };
};
For the Pagination part implementation, we’ll create an src and part folder. Inside part, we’ll create a Pagination.js file, which shall be rendered within the index.js file:
const Pagination = () => {
 return (
   <div>Pagination</div>
 )
}
export default Pagination
The Pagination rendered in index.js could have 4 props: gadgets, currentPage, pageSize, and onPageChange. The gadgets would be the size of the info we’re getting from the API, which on this case, is 100:

The pageSize shall be set to 10 since we wish to have pagination from 1-10, and the currentPage shall be saved in a state with a default worth of 1 because the web page will begin from web page one.
The onPageChange shall be a perform to set the present web page we’re in, for instance, shifting from web page one to 2:
import Head from "subsequent/head";
import Picture from "subsequent/picture";
import types from "../types/Dwelling.module.css";
import Pagination from "../src/parts/Pagination";
import { useState } from "react";

export default perform Dwelling({ information }) {
 const [currentPage, setCurrentPage] = useState(1);
 const pageSize = 10;

 const onPageChange = (web page) => {
   setCurrentPage(web page);
 };

 return (
   <div className={types.container}>
     <Head>
       <title>Create Subsequent App</title>
       <meta title="description" content material="Generated by create subsequent app" />
       <hyperlink rel="icon" href="https://weblog.logrocket.com/favicon.ico" />
     </Head>

     <p>
       <sturdy>NextJS x Pagination</sturdy>
     </p>
     {information.map((merchandise) => {
       return <p key={merchandise.id}>{merchandise.title}</p>;
     })}
    <Pagination
       gadgets={information.size} // 100
       currentPage={currentPage} // 1
       pageSize={pageSize} // 10
       onPageChange={onPageChange}
        />
   </div>
 );
}

export const getStaticProps = async () => {
 const res = await fetch("https://jsonplaceholder.typicode.com/todos");
 const information = await res.json();

 return {
   props: { information },
 };
};
Then, we’ll destructure these 4 props in Pagination and use them for the pagination implementation:
import types from "../../types/Dwelling.module.css";

const Pagination = ({ gadgets, pageSize, currentPage, onPageChange }) => {
 const pagesCount = Math.ceil(gadgets / pageSize); // 100/10

 if (pagesCount === 1) return null;
 const pages = Array.from({ size: pagesCount }, (_, i) => i + 1);
console.log(pages)

 return (
   <div>
     <div>Pagination</div>
   </div>
 );
};

export default Pagination;
The gadgets shall be divided by the pageSize and saved in a pagesCount variable. The Array.from() static technique shall be used to create a brand new Array occasion from the pagesCount size, which is 10.
Let’s log the pages within the console and see what we now have:
![]()
Now, we are able to map over the pages array and render the worth (1-10) inside it. There shall be an anchor ingredient for every of the values the place the onClick perform shall be applied:
const Pagination = ({ gadgets, pageSize, currentPage, onPageChange }) => {
 const pagesCount = Math.ceil(gadgets / pageSize); // 100/10

 if (pagesCount === 1) return null;
 const pages = Array.from({ size: pagesCount }, (_, i) => i + 1);

  return (
   <div>
     <ul className={types.pagination}>
       {pages.map((web page) => (
         <li
           key={web page}
           className={
             web page === currentPage ? types.pageItemActive : types.pageItem
           }
         >
           <a className={types.pageLink} onClick={() => onPageChange(web page)}>
             {web page}
           </a>
         </li>
       ))}
     </ul>
   </div>
 );
};

export default Pagination;
The styling of the pagination bins shall be finished within the Dwelling.module.css:
.container {
 padding: 0 2rem;
}

.pagination {
 show: flex;
 justify-content: space-between;
 align-items: middle;
 list-style: none;
}

.pageLink {
 cursor: pointer;
}

/* pagination pageItem */
.pageItem {
 show: flex;
 justify-content: middle;
 align-items: middle;
 width: 2rem;
 peak: 2rem;
 border: 1px strong #eaeaea;
 border-radius: 0.5rem;
 cursor: pointer;
}

/* pagination web page merchandise when lively */
.pageItemActive {
 show: flex;
 justify-content: middle;
 align-items: middle;
 width: 2rem;
 peak: 2rem;
 border: 1px strong #eaeaea;
 border-radius: 0.5rem;
 cursor: pointer;
 background-color: purple;
}
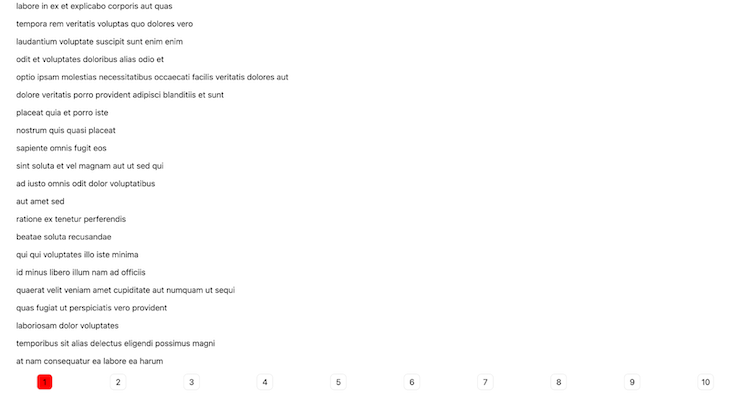
As soon as we scroll all the way down to the tip of the posts information, we must always see bins from 1-10 being rendered. The onPageChange perform is handed to the anchor ingredient with the argument of web page(1-10), so when any a part of the field is clicked, it is going to set the present web page to the web page quantity clicked.
Bear in mind, the onPageChange perform within the index.js file:
 const onPageChange = (web page) => {
   setCurrentPage(web page);
 };
Now, let’s see what we now have:
Now, we now have been in a position to implement the pagination in our app, however we nonetheless have 100 posts being rendered for the primary web page as a substitute of 10. To implement this, we’ll create a helper perform within the paginate.js file:
export const paginate = (gadgets, pageNumber, pageSize) => {
 const startIndex = (pageNumber - 1) * pageSize;
 return gadgets.slice(startIndex, startIndex + pageSize);
};
The paginate file could have three arguments: gadgets, pageNumber, and pageSize. This perform shall be known as within the index.js file and the argument shall be handed as follows:
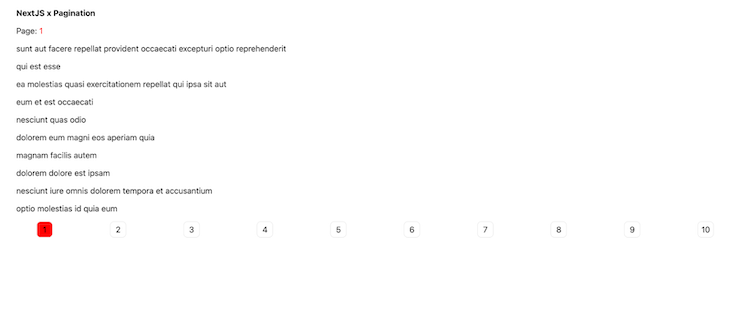
const paginatedPosts = paginate(information, currentPage, pageSize);
Right here, the information is handed because the gadgets, the array of information getting back from the API endpoint. The currentPage represents the pageNumber, and the pageSize is handed in because the pageSize.
Within the pagination perform, the startIndex is first extracted by subtracting the currentPage quantity from 1 and multiplying it by the pageSize(10). Then, we slice the gadgets. That is the array of information from the startIndex that we bought initially till we bought the startIndex+ pageSize worth.
For instance, on the primary web page, the pageNumber shall be 1, so startIndex shall be: 1-1 * 10 offers 0.
Then, startIndex (0) + pageSize (declared in index.js as 10) will end in 10. So, the slicing begins from the Array size of 0 until 9.
Let’s log the paginatedPosts to the console to see what we now have:

We are able to examine what we now have on the webpage:
And, we are able to paginate by all of the pages:

There we now have it!
Thanks for studying! I hope this tutorial offers you the information wanted so as to add pagination to your Subsequent.js app. You may customise the styling to your use case, as this tutorial majorly focuses on the logic of implementing the performance. You could find this mission’s full code in my repository and the deployed mission on Vercel right here. Blissful coding!
LogRocket: Full visibility into manufacturing Subsequent.js apps
Debugging Subsequent functions could be tough, particularly when customers expertise points which can be tough to breed. In the event you’re involved in monitoring and monitoring state, robotically surfacing JavaScript errors, and monitoring sluggish community requests and part load time, attempt LogRocket. 

LogRocket is sort of a DVR for net and cellular apps, recording actually every little thing that occurs in your Subsequent.js app. As an alternative of guessing why issues occur, you may mixture and report on what state your software was in when a problem occurred. LogRocket additionally displays your app’s efficiency, reporting with metrics like consumer CPU load, consumer reminiscence utilization, and extra.
The LogRocket Redux middleware package deal provides an additional layer of visibility into your consumer periods. LogRocket logs all actions and state out of your Redux shops.
Modernize the way you debug your Subsequent.js apps — begin monitoring without spending a dime.
