
Overlays are results used to create an extra layer on prime of photos. Their goal may very well be for aesthetics or to enhance textual content readability, particularly for folks with impaired imaginative and prescient.
We often create overlays in CSS to get photos behind textual content, icons, or different photos. This information will present you apply overlays properly on each background photos and common <img> components in CSS. We are going to cowl:
The positioning structure characteristic in CSS
Methods for creating overlays on photos contain understanding CSS structure options like positioning. When working with common <img> components, this structure characteristic is useful for putting a field component or one other <img> component on prime of the picture as an overlay.
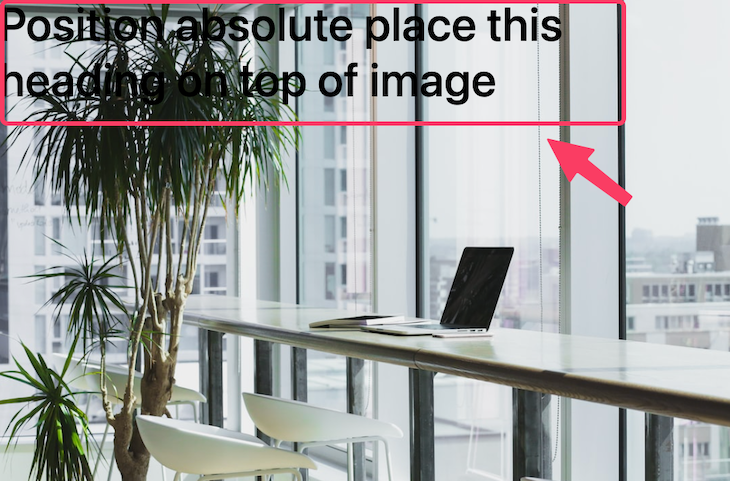
Let’s check out a fast instance. The next HTML has a picture and a few heading textual content, each in a container li component:
<li class="image_wrapper">
  <img src="https://supply.unsplash.com/VWcPlbHglYc" alt="" />
  <div class="overlay">
    <h3>Place absolute place this heading on prime of the picture</h3>
  </div>
</li>
Naturally, each component is a field specified by the order by which they seem within the supply code. For example, the <img> component within the above code will show earlier than the heading textual content.
Now, in a scenario the place we would like the textual content to look on prime of the picture, we’ll alter the default habits of the textual content component or its container by overriding its regular doc circulate utilizing the CSS place property like so:
.image_wrapper {
  place: relative;
}

.overlay {
  place: absolute;
  left: 0;
  prime: 0;
}
By including place: absolute; alongside the left and prime declarations on the textual content container component, we will transfer the heading textual content out of the doc circulate to a place relative to the dad or mum wrapper, like so:
With this positioning characteristic in thoughts, we will begin implementing picture overlays.
Exploring numerous picture overlay CSS results for <img> components
One factor we will see within the picture above is that the textual content on it’s not readable and, due to this fact, not good for the consumer’s expertise. To enhance consumer satisfaction, we’ll add an overlay to make sure textual content readability.
Ranging from the subsequent part, we’ll create totally different picture overlays with numerous results. You possibly can see the mission on Codepen right here:
See the Pen CSS picture overlay examples by Ibadehin Mojeed (@ibaslogic)
on CodePen.
Easy CSS picture overlay with textual content background colour
Textual content overlay may be so simple as including a background colour behind the textual content. Let’s check out the next markup:
<li class="image_wrapper">
  <img src="https://supply.unsplash.com/VWcPlbHglYc" alt="" />
  <div class="overlay overlay_0">
    <h3>10% OFF</h3>
  </div>
</li>
We will place the textual content over the picture the identical approach we did within the first instance, then add in a background colour:
.image_wrapper {
  place: relative;
}

img {
  show: block;
  object-fit: cowl;
  width: 100%;
  peak: auto;
}

.overlay {
  place: absolute;
}

.overlay_0 {
  left: 0;
  prime: 0;
  padding: .5rem;
  margin: 4px;
  background: #f4208f;
}
The output now seems like so:

This overlay impact is widespread on ecommerce web sites for promotional labels and different comparable makes use of.
Translucent title textual content overlay protecting a part of the picture
One other widespread overlay fashion incorporates a title or picture caption on prime of a translucent background. Think about the next markup:
<li class="image_wrapper">
  <img src="https://supply.unsplash.com/VWcPlbHglYc" alt="" />
  <div class="overlay overlay_1">
    <h3>Picture title</h3>
  </div>
</li>
With place: absolute;, left: 0;, backside: 0; declarations on the overlay, we will place the overlay textual content on the backside of the picture:
.overlay {
  place: absolute;
  background: rgba(57, 57, 57, 0.5);

  /* middle overlay textual content */
  show: flex;
  align-items: middle;
  justify-content: middle;
}

.overlay_1 {
  left: 0;
  backside: 0;
  width: 100%;
  padding: 1rem;
}
We’ve additionally utilized a semi-transparent background on the overlay. See the output under:

For aesthetics, we additionally utilized flexbox properties to put the picture caption within the middle.
The examples above are splendid when specializing in each the picture and overlay textual content. Nevertheless, when the main target is extra on the textual content than the picture, we could stretch the overlay to cowl the complete picture.
Translucent overlay protecting the complete picture
Think about the next markup:
<li class="image_wrapper">
  <img src="https://supply.unsplash.com/VWcPlbHglYc" alt="" />
  <div class="overlay overlay_2">
    <h3>Picture title</h3>
  </div>
</li>
On the overlay component, we’ll use the prime, proper, backside, and left declarations to stretch the overlay, so it covers the complete picture:
.overlay_2 {
  prime: 0;
  proper: 0;
  left: 0;
  backside: 0;
}
We will additionally use one declaration as a shorthand to switch the above CSS guidelines:
.overlay_2 {
  inset: 0;
}
The worth assigned to the inset might be utilized to all edges. The output ought to now appear to be so:

Keep in mind, within the earlier instance, we utilized flexbox properties on the overlay to put the textual content within the middle. Because the translucent overlay now covers the entire picture, the textual content is centered each vertically and horizontally over the entire picture as nicely.
Displaying a picture overlay impact on hover with CSS
Let’s learn to show an overlay solely when the consumer hovers over the picture. We can even add slide and zoom results.
Picture overlay displaying textual content on hover with a zoom impact
For this instance, we might be utilizing the next HTML markup:
<li class="image_wrapper">
  <img src="https://supply.unsplash.com/VWcPlbHglYc" alt="" />
  <div class="overlay overlay_3">
    <h3>Picture title</h3>
  </div>
</li>
Along with the standard overlay fashion declarations, the next CSS guidelines additionally embrace rework, transition, and backdrop-filter properties:
.overlay_3 {
  left: 0;
  backside: 0;
  width: 100%;
  padding: 1rem;
  rework: scale(0);
  transition: all .3s ease-in-out;
  backdrop-filter: blur(8px) brightness(80%);
}

.image_wrapper:hover .overlay_3 {
  rework: scale(1);
}
Altering the rework: scale() worth from 0 to 1 on hover offers the visible impact of the overlay textual content zooming into view. In the meantime, the backdrop-filter lets us apply a blur impact behind the overlay to extend textual content visibility additional. Lastly, the transition offers a easy hover impact.
The GIF under demonstrates the zoom impact on hover:

Picture overlay displaying textual content on hover with a slide impact
We’re utilizing the next HTML markup for this instance:
<li class="image_wrapper">
  <img src="https://supply.unsplash.com/VWcPlbHglYc" alt="" />
  <div class="overlay overlay_4">
    <h3>Picture title</h3>
  </div>
</li>
With the CSS rule under, the backside and peak properties allow us to obtain a slide-down impact once we hover over the picture:
.overlay_4 {
  left: 0;
  backside: 100%;
  peak: 0;
  width: 100%;
  overflow: hidden;
  backdrop-filter: blur(8px) brightness(80%);
  transition: all .3s ease-in-out;
}

.image_wrapper:hover .overlay_4 {
  backside: 0;
  peak: 100%;
}
The GIF under demonstrates the slide results on hover:

Picture overlay displaying icon on hover with a zoom impact
Much like the textual content overlay, we will even have icons seem over our photos. Beneath, we’ll create an overlay with a Font Superior icon that seems once we hover over a picture.
We might be utilizing the next HTML markup for this instance:
<li class="image_wrapper">
  <img src="https://supply.unsplash.com/VWcPlbHglYc" alt="" />
  <div class="overlay overlay_5">
    <a href="#" class="icon">
      <i class="fa-solid fa-camera"></i>
    </a>
  </div>
</li>
Within the CSS file, we’ll import the font-awesome CDN after which apply the CSS guidelines like so:
@import url(https://cdnjs.cloudflare.com/ajax/libs/font-awesome/6.2.0/css/all.min.css);

/* ... */

.overlay_5 {
  inset: 0;
  rework: scale(0);
  transition: all .3s ease-in-out;
}

.image_wrapper:hover .overlay_5 {
  rework: scale(1);
}

.icon i {
  border-radius: 50%;
  font-size: 40px;
  colour: #8c9e54;
  width: 70px;
  peak: 70px;
  background: #fff;
  show: flex;
  justify-content: middle;
  align-items: middle;
}
As you may see, the CSS implementation for an icon overlay is just like the textual content overlay with the zoom impact. The GIF under demonstrates the zoom results on hover:
![]()
Picture over picture displayed on hover with a zoom impact
Just like the icon overlay, we will even have a correct picture seem over one other picture on hover. We will discover a use case for this implementation on ecommerce web sites the place a variable product picture is displayed once we hover over a product like so:
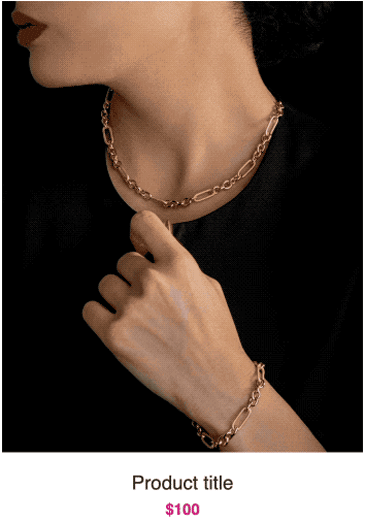
We might be utilizing the next HTML markup for this instance:
<div class="product-item">
  <div class="product-image">
    <a href="#">
      <img src="https://supply.unsplash.com/GtOo17K-vTg" width="600" peak="720">
      </a>
    <div class="hover-img">
      <a href="#">
        <img src="https://supply.unsplash.com/3_XeNGVbTQA" width="600" peak="720">
        </a>
    </div>
  </div>
  <h3>Product title</h3>
  <span>$100</span>
</div>
See the full code on Codepen.
The strategy for creating overlay is similar no matter whether or not we would like a textual content, icon, or picture overlay.
Within the HTML markup above, we added each photos in the identical product-image component container.
We are going to give this container a place: relative; property. Then, we’ll give the overlaid picture container — i.e hover-img — a place: absolute; whereas additionally positioning it utilizing inset: 0; or the equal prime, proper, backside, and left.
The CSS fashion guidelines will appear to be so:
.product-item {
  text-align: middle;
  width: 350px;
}

.product-image {
  place: relative;
  overflow: hidden;
}

img {
  max-width: 100%;
  peak: auto;
  vertical-align: center;
}

.hover-img {
  place: absolute;
  inset: 0;
  opacity: 0;
  transition: opacity .5s ease, rework 2s cubic-bezier(0,0,.44,1.18);
}

.product-image:hover .hover-img {
  opacity: 1;
  rework: scale(1.12);
}
After positioning the overlay picture over the first picture, we added opacity: 0; to cover it so it solely shows on hover with the opacity: 1;. Making use of rework: scale(1.12); on hover offers the visible impact of the overlay picture zooming into view. In the meantime, the transition property offers a easy hover impact.
Background picture overlay
In contrast to <img> components, a picture included as a background component will robotically dwell behind the containing textual content or icons. This makes it straightforward to use overlays, as we’ll see in a second.
We are going to create totally different background picture overlays with numerous results like making use of a gradient with linear-gradient() CSS perform and mixing with the CSS mix-blend-mode and background-blend-mode properties. We can even learn to use a pseudo-element to create a phenomenal background overlay.
You possibly can see the mission on Codepen:
See the Pen CSS background picture overlay examples by Ibadehin Mojeed (@ibaslogic)
on CodePen.
Background picture with a easy textual content overlay utilizing CSS
We’ll be beginning with the next HTML markup for this instance:
<part class="bg_image_1">
  <div class="content material">
    <h2>Hero title</h2>
    <p>Hero description right here</p>
  </div>
</part>
On the <part> container component, we’ll add a background picture utilizing CSS:
.bg_image_1 {
  background-image: url(https://supply.unsplash.com/VWcPlbHglYc);
  background-size: cowl;
  background-position: middle;
 }
The consequence ought to appear to be so:

For aesthetics, we’ve got additionally utilized CSS grid properties to put the picture content material within the middle.
As anticipated, the textual content overlay shouldn’t be so readable.
Let’s attempt to enhance the visibility of the textual content overlay by making use of a decrease opacity on the background component, like so:
.bg_image_1 {
  /* ... */
  opacity: .3;
}
The above addition will have an effect on each the picture and the containing textual content overlay, which is even worse:

To manage the picture’s opacity with out affecting the textual content, let’s see an answer utilizing a pseudo-element.
Utilizing a pseudo-element to manage background picture opacity
Utilizing this methodology, we’ll apply the background picture on the pseudo-element to decouple the picture and the textual content content material:
.bg_image_1 {
  place: relative;
 }

.bg_image_1::after {
  content material: '';
  place: absolute;
  inset: 0;
  z-index: -1;
  opacity: .4;
  background: pink;
  background-image: url(https://supply.unsplash.com/VWcPlbHglYc);
  background-size: cowl;
  background-position: middle;
}
With the inset property, the background is positioned relative to the dad or mum component and seems over the textual content content material. We then apply a adverse z-index to vary the stacking order and transfer the background picture behind the textual content.
Then, with the opacity property on the pseudo-element, we will scale back the distinction of the background picture:

Now, as we will see within the picture, we’ve got elevated the visibility of the textual content overlay.
Utilizing the background-blend-mode property
The pseudo-element strategy used above is usually a bit advanced. With the background-blend-mode CSS property, we will apply an overlay on the background picture with a small line of code. This property will mix the background picture with the component’s background colour.
Extra nice articles from LogRocket:
We might be utilizing the next HTML markup for this instance:
<part class="bg_image_2">
  <div class="content material">
    <h2>Hero title</h2>
    <p>Hero description right here</p>
  </div>
</part>
Then, specify the mixing mode of our background picture to be multiply:
.bg_image_2 {
  background-color: steelblue;
  background-image: url(https://supply.unsplash.com/VWcPlbHglYc);
  background-size: cowl;
  background-position: middle;
  background-blend-mode: multiply;
  colour: #fff;
}
The consequence ought to now appear to be so:

The overlay impact, as seen above, is because of mixing the background picture with the component’s background colour.
Utilizing the linear-gradient() CSS perform
With the linear-gradient() CSS perform, we will obtain a background overlay with only one line of code. It’s easy to implement and, just like the mix mode strategy, eliminates the necessity to use the pseudo-selector.
We might be utilizing the next HTML markup for this instance:
<part class="bg_image_3">
  <div class="content material">
    <h2>Hero title</h2>
    <p>Hero description right here</p>
  </div>
</part>
Then, we’ll add a linear gradient on the background picture alongside the background URL:
.bg_image_3 {
  background-image: linear-gradient(rgba(70, 130, 180, .8), rgba(178, 34, 34, .8)), url(https://supply.unsplash.com/VWcPlbHglYc);

  background-size: cowl;
  background-position: middle;
  colour: #fff;
}
The consequence ought to appear to be so:

With linear-gradient, we’ve got progressively transitioned between two semi-transparent colours to attain a gradient overlay impact.
Utilizing the mix-blend-mode CSS property
Just like the background-blend-mode property, mix-blend-mode lets us mix the component’s content material with its dad or mum background.
Let’s contemplate the next markup:
<part class="bg_image_4">
  <div class="content material content_4">
    <h2>Hero title</h2>
    <p>Hero description right here</p>
  </div>
</part>
With the next CSS, we’ve got added a background picture on the part container component and likewise utilized a pseudo-selector to overlap a background colour overlay:
.bg_image_4 {
  background-image: url(https://supply.unsplash.com/VWcPlbHglYc);
  background-size: cowl;
  background-position: middle;
  colour: #fff;
}

.content_4 {
  place: relative;
}

.content_4::after {
  content material: '';
  place: absolute;
  background: #074f57;
  inset: 0;
  z-index: -1;
}
If we check out the consequence, we could have one thing like the next:

With the adverse z-index utilized on the overlay, we could count on the background colour to look behind the textual content. Nevertheless, it goes far again behind the background picture.
If we briefly take away the background picture, we should always see the background colour:
.bg_image_4 {
  /* ... */
  background-size: cowl;
  background-position: middle;
  colour: #fff;
}
The results of eradicating the background picture:

To make sure the background colour goes behind the textual content and never the dad or mum background picture, we’ll use the CSS isolation property on the background component to create a new stacking context.
Let’s return the background picture and add the isolation property:
.bg_image_4 {
  background-image: url(https://supply.unsplash.com/VWcPlbHglYc);
  background-size: cowl;
  background-position: middle;
  colour: #fff;
  isolation: isolate;
}
At this level, the background picture now lives behind the background colour.
Now, we will apply the mix-blend-mode on the pseudo selector to mix the background colour with its dad or mum background picture:
.content_4::after {
  /* ... */
  mix-blend-mode: multiply;
}
The consequence ought to now appear to be so:

Now we’ve got a pleasant background picture overlay the place the textual content is readable.
Conclusion
Creating picture overlays is helpful in numerous designs and situations. It’s useful when making a webpage hero part, responsive picture galleries, and lots of different use circumstances.
This information mentioned create a pleasant overlay on the background photos and common <img> components in CSS. When you loved this lesson, share it across the internet. Lastly, we might love to listen to which of the overlay options is your favourite. Tell us within the remark part.
Is your frontend hogging your customers’ CPU?
As internet frontends get more and more advanced, resource-greedy options demand increasingly from the browser. When you’re fascinated by monitoring and monitoring client-side CPU utilization, reminiscence utilization, and extra for your whole customers in manufacturing, strive LogRocket. https://logrocket.com/signup/
LogRocket is sort of a DVR for internet and cell apps, recording every part that occurs in your internet app or web site. As an alternative of guessing why issues occur, you may combination and report on key frontend efficiency metrics, replay consumer periods together with software state, log community requests, and robotically floor all errors.
Modernize the way you debug internet and cell apps — Begin monitoring at no cost.
