
Because the early 2000s, software program engineers have been utilizing REST APIs to question and mutate information. There isn’t any doubt that REST is a good way to entry assets, however with regards to specificity, the REST mannequin isn’t environment friendly.
In comes GraphQL, a brand new instrument that offers builders the flexibility to entry assets with regard to specificity, which ends up in environment friendly useful resource consumption. On account of the pliability GraphQL presents, communities have began constructing utilities to make use of GraphQL of their favourite languages.
One such instance is Absinthe, a library developed in Elixir, a practical programming language constructed on Erlang. Absinthe is used with the Phoenix Internet Server, which is constructed with Elixir and is getting fashionable.
On this put up, we’ll construct our first GraphQL API utilizing Phoenix and join it with a React app.
Stipulations
To get essentially the most out of this tutorial, you’ll want:
- A fundamental understanding of JavaScript, React, and Docker
- Familiarity with the Elixir syntax
- Data of consumer and server interplay
We might be protecting:
Setting setup
To arrange the environment, we have to set up:
Putting in Elixir
Open your terminal and run the next instructions:
$ wget https://packages.erlang-solutions.com/erlang-solutions_2.0_all.deb && sudo dpkg -i erlang-solutions_2.0_all.deb
$ sudo apt-get replace
$ sudo apt-get set up esl-erlang
$ sudo apt-get set up elixir
Putting in Hex
Run the next command:
$ combine native.hex
To test the variations of Elixir and Erlang, run:
$ elixir -v
Erlang/OTP 25 [erts-13.0.4] [source] [64-bit] [smp:8:8] [ds:8:8:10] [async-threads:1] [jit:ns]

Elixir 1.13.4 (compiled with Erlang/OTP 25)
Putting in the Phoenix software generator
Run this command:
$ combine archive.set up hex phx_new
Putting in Node.js
Run these instructions:
$ curl -fsSL https://deb.nodesource.com/setup_19.x | sudo -E bash - &&
$ sudo apt-get set up -y nodejs
Checking the model of Node.js:
$ node -v
Putting in Docker and Docker Compose
Run these instructions to put in Docker:
$ sudo apt-get replace
$ sudo apt-get set up
    apt-transport-https
    ca-certificates
    curl
    gnupg
    lsb-release
$ curl -fsSL https://obtain.docker.com/linux/ubuntu/gpg | sudo gpg --dearmor -o /usr/share/keyrings/docker-archive-keyring.gpg
$ echo
  "deb [arch=amd64 signed-by=/usr/share/keyrings/docker-archive-keyring.gpg] https://obtain.docker.com/linux/ubuntu
  $(lsb_release -cs) steady" | sudo tee /and many others/apt/sources.record.d/docker.record > /dev/null
$ sudo apt-get replace
$ sudo apt-get set up docker-ce docker-ce-cli containerd.io
Run these instructions to put in Docker Compose:
$ sudo apt set up docker-compose
Phoenix software setup
Now, let’s arrange our Phoenix server and create assets that may be consumed by the GraphQL Workspace and our React app.
Run this command to create the server:
$ combine phx.new booklist -no-html
Enter “Y” when prompted to fetch and set up the dependencies.
Output:
We're nearly there! The next steps are lacking:

    $ cd booklist

Then configure your database in config/dev.exs and run:

    $ combine ecto.create

Begin your Phoenix app with:

    $ combine phx.server

It's also possible to run your app inside IEx (Interactive Elixir) as:

    $ iex -S combine phx.server
Putting in Absinthe and absinthe_plug dependencies
Absinthe is a GraphQL library written for Elixir that’s used for writing queries and mutations. Absinthe_plug helps us use GraphQL.
In Phoenix, dependencies need to be manually written within the combine.ex file, after which the deps.get command is used to put in the added dependencies. It doesn’t work like npm or Yarn.
To put in absinthe and absinthe_plug, open your challenge in your favourite code editor and, within the root of your challenge listing, replace the combo.ex file as proven:
# combine.ex
Defp deps do
[
...
{:absinthe, "~> 1.7"}
{:absinthe_plug, "~> 1.5"}
]
finish
Now, run this command to put in the dependencies:
$ combine deps.get
That is what our terminal ought to appear like now:
Resolving Hex dependencies...
Dependency decision accomplished:
Unchanged:
  castore 0.1.18
  connection 1.1.0
  cowboy 2.9.0
  cowboy_telemetry 0.4.0
  cowlib 2.11.0
  db_connection 2.4.2
  decimal 2.0.0
  ecto 3.9.1
  ecto_sql 3.9.0
  esbuild 0.5.0
  gettext 0.20.0
  jason 1.4.0
  mime 2.0.3
  phoenix 1.6.14
  phoenix_ecto 4.4.0
  phoenix_html 3.2.0
  phoenix_live_dashboard 0.7.1
  phoenix_live_view 0.18.2
  phoenix_pubsub 2.1.1
  phoenix_view 1.1.2
  plug 1.13.6
  plug_cowboy 2.5.2
  plug_crypto 1.2.3
  postgrex 0.16.5
  ranch 1.8.0
  swoosh 1.8.1
  telemetry 1.1.0
  telemetry_metrics 0.6.1
  telemetry_poller 1.0.0
New:
  absinthe 1.7.0
  absinthe_plug 1.5.8
  nimble_parsec 1.2.3
* Getting absinthe (Hex package deal)
* Getting absinthe_plug (Hex package deal)
* Getting nimble_parsec (Hex package deal)
Spin up Adminer and PostgreSQL utilizing docker-compose
Now we’ll spin up two Docker containers. One will run our PostgreSQL database, a relational database we are able to use with Phoenix, and the opposite will run Adminer, a fully-featrued database administration instrument.
In your challenge’s root listing, create a file utilizing the next command:
$ contact docker-compose.yaml
It’s also possible to create it utilizing your code editor’s person interface. Your alternative!
Now, paste this code in your docker-compose file:
model: "3"
companies:
  postgres:
    construct: ./postgres-dev
    container_name: postgres
    ports:
      - 5432:5432
    surroundings:
      POSTGRES_USER: postgres
      POSTGRES_PASSWORD: postgres
      POSTGRES_DB_LIST: booklist_dev

  adminer:
    picture: adminer
    container_name: adminer
    restart: at all times
    ports:
      - 8090:8080
    surroundings:
      ADMINER_DEFAULT_SERVER: postgres
Create a folder named postgres-dev in your root listing and create a Dockerfile and a Bash file, as follows:
$ mkdir postgres-dev
$ cd postgres-dev
$ contact Dockerfile
Within the Dockerfile, paste this code:
FROM postgres:newest
COPY setup-databases.sh /docker-entrypoint-initdb.d/
Now, create a brand new file in the identical folder:
$ contact setup-databases.sh
Within the Bash file, paste this code:
#!/bin/bash

set -e
set -u

operate create_user_and_database() {
    native DB=$1
    echo "  Creating person and database '$DB'"
    psql -v --username "$POSTGRES_USER" <<-EOSQL
        CREATE DATABASE $DB;
        GRANT ALL PRIVILEGES ON DATABASE $DB TO $POSTGRES_USER;
EOSQL
}

if [ -n "$POSTGRES_DB_LIST" ]; then
    echo "A number of database creation requested: $POSTGRES_DB_LIST"
    for DB in $(echo $POSTGRES_DB_LIST | tr ',' ' '); do
        create_user_and_database $DB
    accomplished
    echo "A number of databases created"
fi
Now, return to your root listing from the terminal and run this code:
$ docker-compose up -d -build
To test that our containers run, write the next:
$ docker ps
Our output ought to be:
CONTAINER ID   IMAGE      COMMAND                  CREATED          STATUS          PORTS                                       NAMES
d6831a68a985   adminer    "entrypoint.sh docke..."   13 seconds in the past   Up 12 seconds   0.0.0.0:8090->8080/tcp, :::8090->8080/tcp   adminer
dca9812e757a   postgres   "docker-entrypoint.s..."   13 seconds in the past   Up 12 seconds   0.0.0.0:5432->5432/tcp, :::5432->5432/tcp   postgres
Making a schema for Absinthe
Schemas are blueprints constructed with the identical course of by which queries are executed.
The GraphQL Workspace is a instrument packaged with GraphQL used to question and mutate information. This instrument is a person interface that may be accessed from the browser.
For now, we might be utilizing check information that’s hard-coded in our schema and can assist us perceive how GraphQL works. After efficiently querying the pattern information, we’ll head in direction of utilizing PostgreSQL.
Create a file referred to as schema.ex inside lib/booklist_web/. Copy and paste the next code into the file.
defmodule BooklistWeb.Schema do
  use Absinthe.Schema

  @desc "A Guide"
    object :e-book do
      subject :title, :string
      subject :writer, :string

    finish

  # Instance information
  @book_information %{
    "book1" => %{id: 1, title: "Harry Potter", writer: "JK Rowling"},
    "book2" => %{id: 2, title: "Charlie Manufacturing unit", writer: "Bernard"},
    "book3" => %{id: 3, title: "Sherlock Holmes", writer: "Sheikhu"}
  }

  question do
    subject :book_info, :e-book do
      arg :id, non_null(:id)
      resolve fn %{id: book_id}, _ ->
        {:okay, @book_information[book_id]}
      finish
    finish
  finish
 finish
Listed below are some necessary definitions for code we used above:
question: is a root question object macro, the place completely different queries are denied as fieldssubject: a subject within the enclosing object, right here it’s a question and objectarg: an argument for the enclosing subjectresolve: a operate to execute our question logicWe created a struct of objecte-bookand our check information containing the e-book data. The question block is a GraphQL question that can fetch this information in our GraphQL workspace.
Making a context for Guide data
Contexts are modules which have the enterprise logic and encapsulate information entry and its validation. It often talks to the database or API.
To create a context for our e-book schema, open your terminal and run this command:
$ combine phx.gen.context Guide Information data title:string writer:string
The output ought to be:
==> nimble_parsec
Compiling 4 recordsdata (.ex)
Generated nimble_parsec app
==> absinthe
Compiling 1 file (.erl)
Compiling 256 recordsdata (.ex)
Generated absinthe app
==> absinthe_plug
Compiling 18 recordsdata (.ex)
Generated absinthe_plug app
==> booklist
* creating lib/booklist/e-book/information.ex
* creating priv/repo/migrations/20221022130430_create_information.exs
* creating lib/booklist/e-book.ex
* injecting lib/booklist/e-book.ex
* creating check/booklist/book_test.exs
* injecting check/booklist/book_test.exs
* creating check/assist/fixtures/book_fixtures.ex
* injecting check/assist/fixtures/book_fixtures.ex

Keep in mind to replace your repository by working migrations:

    $ combine ecto.migrate
Working migrations
Migrations are database schemas/constructions which are populated right into a relational database. On this part, we’ll run a migration that can create our desk with the title data in our booklist_dev database. We are going to view it from adminer.
We’ll additionally use Ecto, an official Elixir challenge, which is an built-in question language and offers a database wrapper.
Run this command:
$ combine ecto.migrate
Our output ought to be:
warning: the :gettext compiler is not required in your combine.exs.

Please discover the next line in your combine.exs and take away the :gettext entry:

    compilers: [..., :gettext, ...] ++ Combine.compilers(),

  (gettext 0.20.0) lib/combine/duties/compile.gettext.ex:5: Combine.Duties.Compile.Gettext.run/1
  (combine 1.13.4) lib/combine/activity.ex:397: nameless fn/3 in Combine.Job.run_task/3
  (combine 1.13.4) lib/combine/duties/compile.all.ex:92: Combine.Duties.Compile.All.run_compiler/2
  (combine 1.13.4) lib/combine/duties/compile.all.ex:72: Combine.Duties.Compile.All.compile/4
  (combine 1.13.4) lib/combine/duties/compile.all.ex:59: Combine.Duties.Compile.All.with_logger_app/2
  (combine 1.13.4) lib/combine/duties/compile.all.ex:36: Combine.Duties.Compile.All.run/1


18:10:08.705 [info]  == Working 20221022130430 Booklist.Repo.Migrations.CreateInformation.change/0 ahead

18:10:08.708 [info]  create desk data

18:10:08.713 [info]  == Migrated 20221022130430 in 0.0s
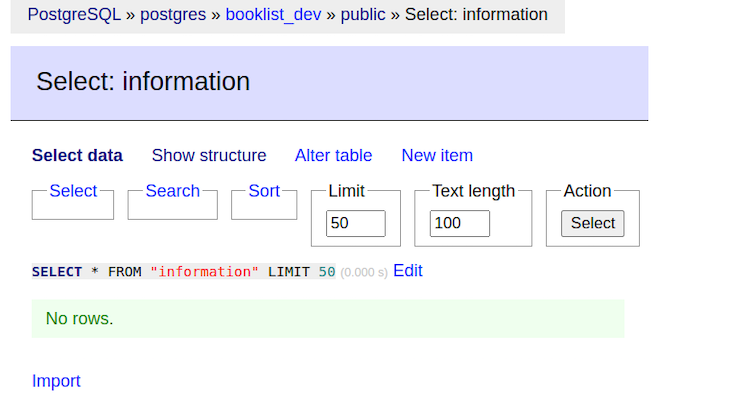
Under, you’ll be able to see what this output appears like throughout the Adminer UI:
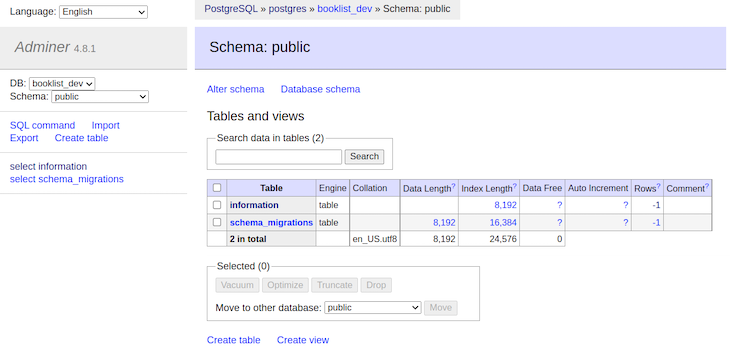
There’s a desk named data, which was created by the migration we ran within the earlier step. To entry the Adminer interface, enter the next tackle in your browser with the credentials we used within the Docker Compose file:
Run this command to start out your server:
$ combine phx.server
After the server has began, we are able to hit localhost on port 4000 to make use of the GraphQL workspace.
Extra nice articles from LogRocket:
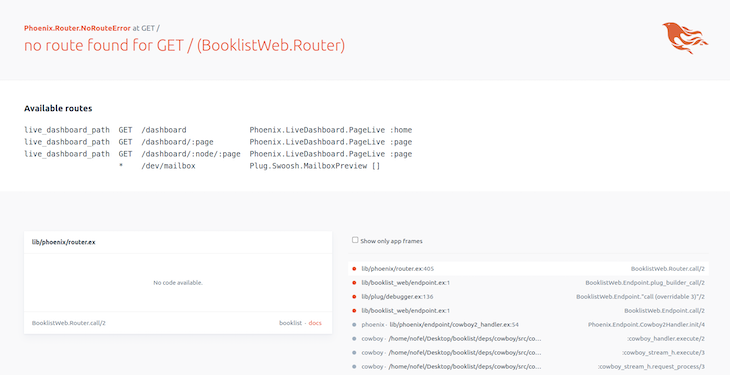
Phoenix will present you some endpoints that you would be able to hit and discover numerous functionalities out there by way of the person interface.
Route configuration and GraphQL testing
To entry GraphQL from its person interface and its API, we have now to configure the suitable routes. This part will inform you the way to correctly configure routes.
Configuring routes to entry GraphiQL UI and API
To make queries and mutate information, we have to add routes within the router.ex file inside /lib/booklist_web/.
Open the router.ex file and add the next traces of code:
scope "/api" do
    pipe_through :api
    ahead("https://weblog.logrocket.com/",Absinthe.Plug, schema: MenuxcardWeb.Schema)
  finish


scope "/gql" do
    ahead "/GraphiQL", Absinthe.Plug.GraphiQL, schema: MenuxcardWeb.Schema
  finish
We will now entry the GraphQL internet interface utilizing the second route. Enter the next URL in your tackle bar:http://localhost:4000/gql/GraphiQL
You must now see this:
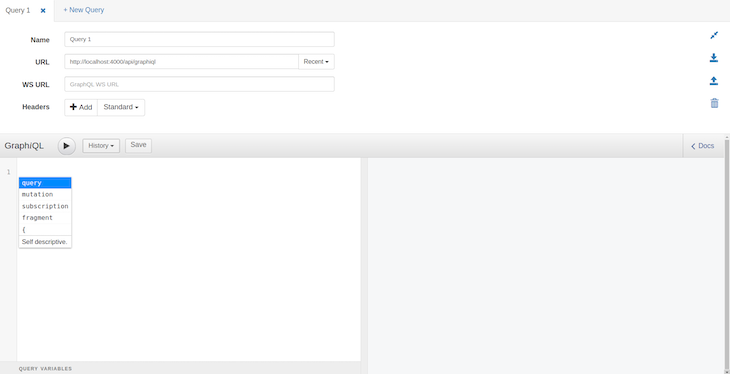
That is the GraphQL workspace, which fetches and mutates information for GraphQL similar to Postman does for REST APIs. For starters, we’ll question the dummy information we hard-coded in our schema within the earlier step.
Testing the GraphiQL UI for querying with pattern information
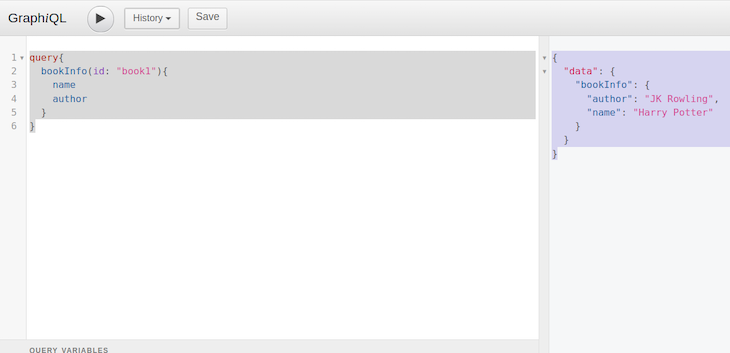
We are going to question book1 from our dummy information and fetch its title and writer from the server.
Run the next question within the left panel of the GraphQL interface:
question{
  bookInfo(id: "book1"){
    title
    writer
  }
}
You must obtain this information in return:
{
  "information": {
    "bookInfo": {
      "writer": "JK Rowling",
      "title": "Harry Potter"
    }
  }
}
Here’s what this output appears like in GraphiQL:
Information querying and mutation with PostgreSQL utilizing the GraphiQL UI
Till now, we have now been enjoying with dummy information. Now the true enjoyable begins!
We are going to question and mutate the info straight from, and to, our PostgreSQL database and test immediate adjustments.
The desk of knowledge is empty. Let’s populate it by working a mutation. First, we’ll create a mutation and question within the schema.ex file.
Clear the question we wrote within the schema file and paste the under code:
question do
    subject :get_book, :e-book do
      arg(:id, non_null(:id))
      resolve(fn args, _ ->
        {:okay, Booklist.Guide.get_info!(args)}
      finish)
    finish
  finish

  mutation do
    subject :create_book, :e-book do
      arg(:title, non_null(:string))
      arg(:writer, non_null(:string))
      resolve(fn args, _ ->
        {:okay, Booklist.Guide.create_info(args)}
      finish)
    finish
  finish
Paste this mutation within the GraphiQL interface and run it to see the magic.
mutation{
  createBook(title: "The Sunshine", writer: "Nofel"){
   title
   writer
  }
}
Test the database for adjustments:
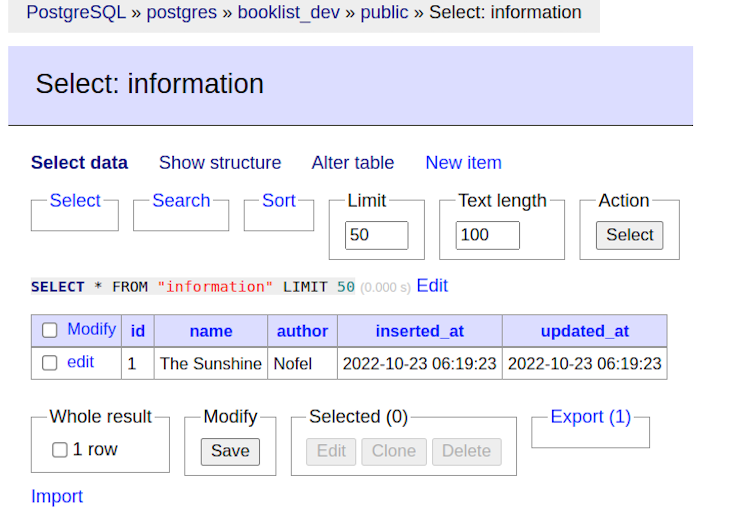
Our adjustments have been inserted into our database desk. Hurray!
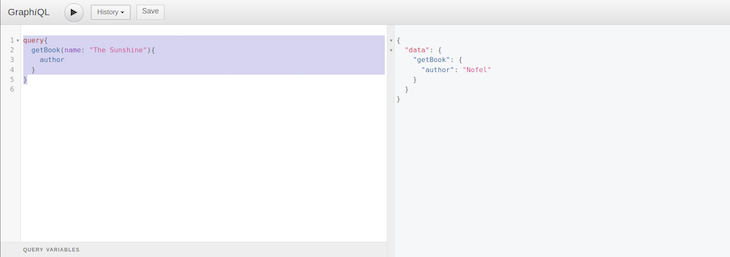
Now, to question this information, we’ll use the next question within the browser interface.
question{
  getBook(title: "The Sunshine"){
    writer
  }
}
Under is the output:
To date, we’ve configured the environment, setup a Phoenix internet server, and made a number of queries and mutations utilizing each pattern information and PostgreSQL information.
Within the subsequent part, we might be creating our React frontend and connecting it to our GraphQL server.
Making a React challenge
On this part we might be making a React app with a booklist element that can fetch the info from PostgreSQL utilizing a GraphQL library for React referred to as Apollo.
To create a React challenge, open your terminal and run the next instructions:
$ npx create-react-app my-gql-project
I’ve named my challenge my-gql-project. You possibly can title it as you would like.
Putting in dependencies
Purposes that use the Apollo consumer require two dependencies:
@apollo/consumer: This package deal has every thing our software must arrange the Apollo consumer’s entry GraphQL API, similar to native state administration, error dealing with, in-memory cache, and a React view layer- GraphQL: This package deal handles the question parsing logic
Run this command to put in these packages:
$ yarn set up @apollo/consumer GraphQL
Utilizing Apollo to hook up with our GraphQL API server
We will now initialize the Apollo consumer. Go to src/index.js and import the next, or simply copy and paste this code:
import { ApolloClient, InMemoryCache, ApolloProvider, gql } from '@apollo/consumer';
After importing the mandatory symbols, we’ll initialize our Apollo consumer, passing a set of configurations to its constructor object.
const consumer = new ApolloClient({
  uri: 'http://localhost:4000/api/GraphiQL',
  cache: new InMemoryCache(),});
Hurray! Our consumer is able to join with the GraphQL API we configured on the Phoenix server.
Connecting your consumer to React
To attach our React app to our Apollo consumer, we have to wrap our React app with an <ApolloProvider> element. This element locations the Apollo consumer within the context that allows entry to it from wherever within the element tree.
import React from 'react';
import * as ReactDOM from 'react-dom/consumer';
import { ApolloClient, InMemoryCache, ApolloProvider } from '@apollo/consumer';
import App from './App';

const consumer = new ApolloClient({
  uri: 'http://localhost:4000/api/GraphiQL',
  cache: new InMemoryCache(),
});

// Supported in React 18+
const root = ReactDOM.createRoot(doc.getElementById('root'));

root.render(
  <ApolloProvider consumer={consumer}>
    <App />
  </ApolloProvider>
);
Information querying with useQuery
Now that ApolloProvider is hooked, we are able to begin requesting information utilizing useQuery. useQuery is a React Hook that shares GraphQL information with the frontend and UI.
Swap over to App.js and change the present code with the next code:
import { useQuery, gql } from "@apollo/consumer";

const GET_BOOKS = gql`
  question {
    getBook(title: "The Sunshine") {
      title
      writer
    }
  }
`;
We have now outlined the question inside a gql template literal. This can fetch the info we have to question on each web page reload of our frontend app.
Subsequent, we’ll outline a element named DisplayBookList that can execute our GET_BOOKS question with useQuery Hook.
  const { loading, error, information } = useQuery(GET_BOOKS);
  if (loading) return <p>Loading...</p>;
  if (error) return <p>Error :(</p>;
  return information.places.map(({ title, writer }) => (
    <div key={title}>
      <h3>{title}</h3>
      <br />
      <b>About this Guide:</b>
      <p>Writer: {writer}</p>
      <br />
    </div>
  ));
Lastly, we’ll add the DisplayBookList element to our present element tree:
export default operate App() {
  return (
    <div>
      <h2>My first Apollo app 🚀</h2>
      <DisplayBookList />
    </div>
  );
}
Our remaining App.js will look one thing like this:
import emblem from "./emblem.svg";
import "./App.css";
// Import every thing wanted to make use of the `useQuery` hook
import { useQuery, gql } from "@apollo/consumer";

const GET_BOOKS = gql`
  question {
    getBook(id: "1") {
      title
      writer
    }
  }
`;

operate DisplayBookList() {
  const { loading, error, information } = useQuery(GET_BOOKS);
  if (loading) return <p>Loading...</p>;
  if (error) return <p>Error :(</p>;
  return information.places.map(({ title, writer }) => (
    <div key={title}>
      <h3>{title}</h3>
      <br />
      <b>About this Guide:</b>
      <p>{writer}</p>
      <br />
    </div>
  ));

  export default operate App() {
  return (
    <div>
      <h2>My first Apollo app 🚀</h2>
      <DisplayBookList />
    </div>
  );
}
Now that our code is prepared, let’s begin our React app and see the magic occur.
Run:
$ yarn begin
Open the browser and go to http://localhost:3000 to see the output.
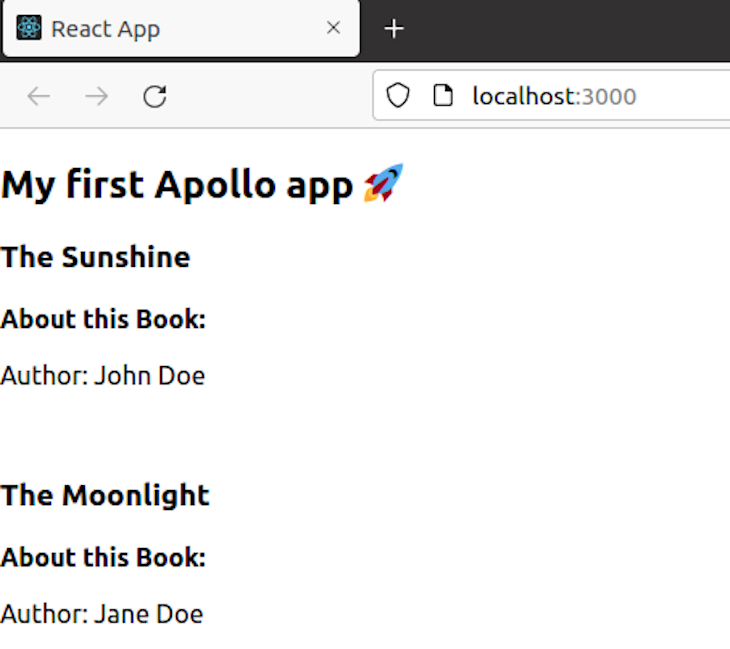
As you’ll be able to see, our React app efficiently queried the info from the Phoenix server on which GraphQL was arrange.
Conclusion
On this tutorial, we realized the way to create a GraphQL API with React and Phoenix, utilizing schemas and contexts to construct our enterprise logic. We additionally realized the way to use Docker to immediately spin up PostgreSQL and Adminer with out putting in something apart from Docker on our working system. Lastly, we used Apollo Shopper to hook up with and fetch information from our Phoenix server that hosted GraphQL.
To discover Elixir additional, go to the Elixir homepage or go to their documentation web page.
Good luck studying! 😇
Full visibility into manufacturing React apps
Debugging React functions may be troublesome, particularly when customers expertise points which are onerous to breed. For those who’re involved in monitoring and monitoring Redux state, mechanically surfacing JavaScript errors, and monitoring gradual community requests and element load time, strive LogRocket. 

LogRocket is sort of a DVR for internet and cell apps, recording actually every thing that occurs in your React app. As a substitute of guessing why issues occur, you’ll be able to combination and report on what state your software was in when a problem occurred. LogRocket additionally displays your app’s efficiency, reporting with metrics like consumer CPU load, consumer reminiscence utilization, and extra.
The LogRocket Redux middleware package deal provides an additional layer of visibility into your person classes. LogRocket logs all actions and state out of your Redux shops.
Modernize the way you debug your React apps — begin monitoring without cost.
Monitor failed and gradual GraphQL requests in manufacturing
Whereas GraphQL has some options for debugging requests and responses, ensuring GraphQL reliably serves assets to your manufacturing app is the place issues get harder. For those who’re involved in guaranteeing community requests to the backend or third social gathering companies are profitable, strive LogRocket. https://logrocket.com/signup/
LogRocket is sort of a DVR for internet and cell apps, recording actually every thing that occurs in your web site. As a substitute of guessing why issues occur, you’ll be able to combination and report on problematic GraphQL requests to rapidly perceive the foundation trigger. As well as, you’ll be able to monitor Apollo consumer state and examine GraphQL queries’ key-value pairs.
LogRocket devices your app to file baseline efficiency timings similar to web page load time, time to first byte, gradual community requests, and likewise logs Redux, NgRx, and Vuex actions/state. Begin monitoring without cost.
