
Have you ever ever used recursive elements in React? I’ve. My first expertise with them gave me a wholly new perspective on engaged on frontend tasks. So, I believed it might be a good suggestion to jot down an article a few real-world instance utilizing recursive elements in React to assist people change into extra aware of working with them.
On this article, we’ll discover the main points of recursive elements in React and their utilization in a real-world utility. We are going to have a look at an instance of a recursive and non-recursive element in React and consider their modularity, readability, and maintainability. After that, we’ll construct a real-world recursive element, a nested file explorer just like VS Code.
Soar forward:
What are recursive elements in React?
Recursion is asking a perform repeatedly inside itself till a base situation is met (base case). Every time the recursive perform calls itself, it takes a brand new argument. For instance, the factorial perform under works by repeatedly calling itself with a distinct argument till a base situation is met:
perform factorial(num) {
    if (num <= 1) { // base situation
        return 1;
    }
    return num * factorial(num - 1); // perform calling itself with new enter worth.
}
console.log(factorial(6)); // 720
Now that we’ve laid down the inspiration for understanding recursion elements let’s have a look at them in React. As it’s possible you’ll know, React elements are features. When a React element repeatedly renders inside itself with totally different props till a base situation is met, it’s known as a recursive element.
A recursive element is exclusive as a result of it might probably name itself and helps render deeply nested information. These elements should not restricted to easily rendering dad or mum information on the UI; additionally they render the dad and mom’ kids’s information till the depth restrict is reached. In these elements, kids may be set by passing props.
Let’s have a look at a easy instance of a recursive element in React:
import React from "react";

const RecursiveComponent = ({kids}) => {
  return (
    <div>
      {kids.size > 0 && <RecursiveComponent kids={kids} />}
    </div>
  );
};

export default RecursiveComponent;
In case you’re curious in regards to the real-world purposes of this idea, you may see them in motion as nested remark programs in Reddit and file explorers just like VS Code.
Now that you’ve got a basic understanding of recursive elements, we’ll discover their makes use of and construct a real-world instance.
How are recursive elements in React totally different from loops?
You could be questioning in regards to the crucial variations between loops and recursion. On this part, we’ll check out these variations. In distinction to loops, recursion contains calling a perform that calls itself, whereas loops require repeatedly calling the identical code till a particular situation is met.
With loops, we should first outline our management variable earlier than we are able to use it in any of the iterations of the loop. For example, after we create for loop to loop by way of an array, we’ve got to declare a counter variable, let i=0, to maintain observe of the variety of iterations. This enables us to make use of the counter variable after we loop by way of our array. In any other case, we gained’t be capable of use it when we have to, and we’ll have to increment or decrement these management variables to keep away from infinite loops.
Then again, we shouldn’t have to declare any variables to hold out recursive operations when utilizing recursion. It is because recursive operations don’t rely upon variables and solely want a base situation to cease calling a perform.
- Returnability: With loops, we can’t return something. Nevertheless, after we use recursion, we are able to return a price from a perform
- Readability and modularity: The code turns into extra readable and modular with recursion. Nevertheless, utilizing loops makes code longer
Why and when to make use of recursive elements in React
In React, elements are the first constructing blocks for constructing consumer interfaces. They’re superior as a result of they assist us take into consideration our app holistically and construct it from smaller code chunks which are simpler to motive.
You could suppose, “why would we ever need to make recursive elements?” The primary causes for utilizing recursive elements in React are that they make code DRY, extra readable, and modular.
With that out of the way in which, let’s deal with understanding when to make use of recursive elements in React. The commonest state of affairs is when we’ve got information nested a number of ranges deep.
Suppose we’ve got an array of objects, and every object has a kids key corresponding to a different array of objects. Every object a part of that array has a kids key corresponding to a different array of objects. Likewise, these objects can equally comprise extra kids’s arrays.
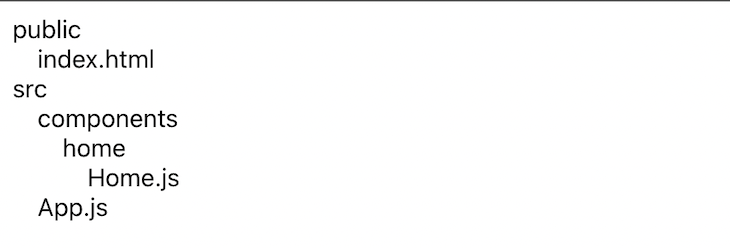
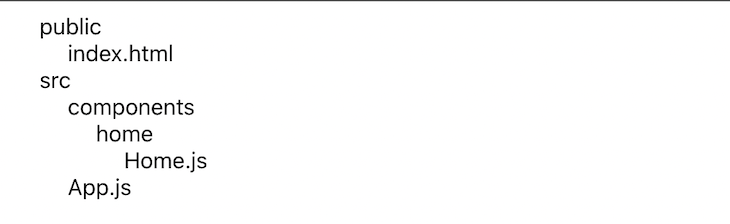
An instance of such information appears like this:
export const information = [
  {
    isFolder: true,
    name: "public",
    children: [
      {
        isFolder: false,
        name: "index.html",
      },
    ],
  },
  {
    isFolder: true,
    title: "src",
    kids: [
      {
        isFolder: true,
        name: "components",
        children: [
          {
            isFolder: true,
            name: "home",
            children: [
              {
                isFolder: false,
                name: "Home.js",
              },
            ],
          },
        ],
      },
      {
        isFolder: false,
        title: "App.js",
      },
    ],
  },
];
As you may see, the above information has numerous nested kids’s arrays. These nested objects can go deeper, however I saved it to solely 4 ranges deep to clarify issues clearly.
Utilizing loops on this state of affairs isn’t a good selection as a result of it requires writing quite a lot of nested loops to loop by way of every degree of information. This makes your code bigger and tougher to learn. As well as, if we’re uncertain of how deep our information goes, it’s difficult to loop by way of all of the nested information utilizing a loop. So, on this case, it’s higher to make use of recursion.
Constructing a nested file explorer utilizing commonplace React elements
On this part, we’ll construct a nested file explorer app utilizing commonplace React elements. Within the subsequent part of this tutorial, we’ll construct the identical React app through the use of recursive elements.
First, create a brand new React app and a information folder within the src folder. Then, create information.js contained in the information and replica and paste the info from the “Why and when to make use of recursive elements in React” part into the later.
Now, substitute the code of your App.js file with the code under:
import React from "react";
import { information } from "./information/information";

const NonRecursiveComponent = ({ information }) => {
  return <div>Non Recursive Part</div>;
};

const App = () => {
  return (
    <div type={{ margin: "8px" }}>
      <NonRecursiveComponent information={information} />
    </div>
  );
};
export default App;
We created a NonRecursiveComponent within the above code and rendered it contained in the App element. Then, we handed the information prop from the App to the NonRecursiveComponent.
Now, let’s begin engaged on rendering the info on the UI. Within the NonRecursiveComponent, substitute the prevailing code with the next:
const NonRecursiveComponent = ({ information }) => {
  return (
    <div>
      {information.map((dad or mum) => {
        return (
          <div key={dad or mum.title}>
            <span>{dad or mum.title}</span>
          </div>
        );
      })}
    </div>
  );
};
The above code will render all of the dad or mum (first degree) information and show this on the UI:

Now, let’s render the kids through the use of the map methodology contained in the second return assertion. Your code ought to appear like this:
const NonRecursiveComponent = ({ information }) => {
  return (
    <div>
      {information.map((dad or mum) => {
        return (
          <div key={dad or mum.title}>
            <span>{dad or mum.title}</span>
            {dad or mum.kids.map((little one) => { // rendering kids of the dad or mum
              return (
                <div key={little one.title} type={{ paddingLeft: "20px" }}>
                  <span>{little one.title}</span>
                </div>
              );
            })}
          </div>
        );
      })}
    </div>
  );
};
From there, it’s best to see all of the kids of the dad or mum on the UI:

Let’s render the grandchildren. So, to do this, we have to do the identical factor we did for kids. Your code ought to look one thing like this:
const NonRecursiveComponent = ({ information }) => {
  return (
    <div>
      {information.map((dad or mum) => { // rendering dad or mum information
        return (
          <div key={dad or mum.title}>
            <span>{dad or mum.title}</span>
            {dad or mum.kids.map((little one) => { // rendering kids of the dad or mum
              return (
                <div key={little one.title} type={{ paddingLeft: "20px" }}>
                  <span>{little one.title}</span>
                  {little one.kids && // rendering grandchildren of the dad or mum
                    little one.kids.map((grandChild) => {
                      return (
                        <div key={grandChild.title} type={{ paddingLeft: "20px" }}>
                          <span>{grandChild.title}</span>
                        </div>
                      );
                    })}
                </div>
              );
            })}
          </div>
        );
      })}
    </div>
  );
};
It’s best to see one thing like this on the UI:

Now, the very last thing we have to do is render great-grandchildren on the UI. We have to do the identical factor we did for rendering kids and grandchildren. After doing this, your code ought to appear like this:
const NonRecursiveComponent = ({ information }) => {
  return (
    <div>
      {information.map((dad or mum) => { // rendering dad or mum information
        return (
          <div key={dad or mum.title}>
            <span>{dad or mum.title}</span>
            {dad or mum.kids.map((little one) => { // rendering kids of the dad or mum
              return (
                <div key={little one.title} type={{ paddingLeft: "20px" }}>
                  <span>{little one.title}</span>
                  {little one.kids && // rendering grandchildren of the dad or mum
                    little one.kids.map((grandChild) => {
                      return (
                        <div
                          key={grandChild.title}
                          type={{ paddingLeft: "20px" }}
                        >
                          <span>{grandChild.title}</span>
                          {grandChild.kids && // rendering great-grandchildren
                            grandChild.kids.map((greatGrandChild) => {
                              return (
                                <div
                                  key={greatGrandChild.title}
                                  type={{ paddingLeft: "20px" }}
                                >
                                  <span>{greatGrandChild.title}</span>
                                </div>
                              );
                            })}
                        </div>
                      );
                    })}
                </div>
              );
            })}
          </div>
        );
      })}
    </div>
  );
};
Your UI ought to appear like this:
Thus far, we’ve constructed a fundamental nested file explorer element utilizing common React elements. Nevertheless, as you may see, the NonRecursiveComponent code seems to be repeating itself for every nested degree of information. Because the nesting degree of our information goes up, this code will get longer, making it extra obscure and keep.
So, how can we clear up this downside? Within the subsequent part, we’ll have a look at how recursive elements in React will help.
Utilizing recursive elements in React to construct a nested file explorer
On this part, we’ll construct the identical nested file explorer utilizing recursive elements and implement a present/disguise performance for the nested recordsdata and folders.
Let’s begin by creating a brand new RecursiveComponent within the App.js file. Then, swap out the NonRecursiveComponent rendered within the App with the RecursiveComponent.
Extra nice articles from LogRocket:
Your code ought to appear like this:
const RecursiveComponent = ({ information }) => {
  return (
    <div type={{ paddingLeft: "20px" }}>
      Recursive Part
    </div>
  );
};

const App = () => {
  return (
    <div type={{ margin: "8px" }}>
      <RecursiveComponent information={information} />
    </div>
  );
};
Now, let’s render all of the dad or mum information on the UI:
const RecursiveComponent = ({ information }) => {
  return (
    <div type={{ paddingLeft: "20px" }}>
      {information.map((dad or mum) => {
        return (
          <div key={dad or mum.title}>
            <span>{dad or mum.title}</span>
          </div>
        );
      })}
    </div>
  );
};
Subsequent, let’s use recursion to render all of the nested recordsdata and folder information. To try this, we have to do two issues: first, render the RecursiveComponent from inside itself with a distinct information prop. Second, we’d like a base situation to cease rendering the RecursiveComponent.
In our case, the bottom situation can be when the size of the kids is zero or once they don’t exist, at which level we gained’t name the RecursiveComponent.
Your code ought to appear like this:
const RecursiveComponent = ({ information }) => {
  return (
    <div type={{ paddingLeft: "20px" }}>
      {information.map((dad or mum) => {
        return (
          <div key={dad or mum.title}>
            <span>{dad or mum.title}</span>
            {/* Base Situation and Rendering recursive element from inside itself */}
            <div>
              {dad or mum.kids && <RecursiveComponent information={dad or mum.kids} />}
            </div>
          </div>
        );
      })}
    </div>
  );
};
Your UI ought to appear like this:
 Shock! With just a few strains of code, we achieved the identical output. That is the magic of recursion in React.
Now, let’s implement present/disguise to the nested recordsdata and folders. We have to make some modifications to our code earlier than we are able to begin doing that. First, we have to use the button tag for the folder’s title and the span tag for the file’s title conditionally utilizing the isFolder key in our information. We’ll do that as a result of we’ll solely add the onClick occasion to the folders and to not the recordsdata to point out or disguise all of the recordsdata and folders inside a selected folder.
Your up to date code ought to appear like this:
const RecursiveComponent = ({ information }) => {
  return (
    <div type={{ paddingLeft: "20px" }}>
      {information.map((dad or mum) => {
        return (
          <div key={dad or mum.title}>
            {/* rendering folders */}
            {dad or mum.isFolder && <button>{dad or mum.title}</button>}
            {/* rendering recordsdata */}
            {!dad or mum.isFolder && <span>{dad or mum.title}</span>}
            <div>
              {dad or mum.kids && <RecursiveComponent information={dad or mum.kids} />}
            </div>
          </div>
        );
      })}
    </div>
  );
};
Now, let’s implement present/disguise by making a state utilizing the useState Hook contained in the RecursiveComponent like this:
import { useState } from "react";

const RecursiveComponent = ({ information }) => {
  const [showNested, setShowNested] = useState({});
  // ...
  // remainder of the code
  // ...
};
This showNested state variable will retailer all of the opened folders like this:
{
  public: true, // if the folder is opened, set it equal to true
  src: false // if the folder just isn't opened, set it equal to false
}
Now, create a perform to deal with present/disguise:
const RecursiveComponent = ({ information }) => {
  const [showNested, setShowNested] = useState({});

  // deal with present/disguise performance
  const toggleNested = (title) => {
    setShowNested({ ...showNested, [name]: !showNested[name] });
  };
  // ...
  // remainder of the code
  // ...
};
The toggleNested perform accepts the folder’s title as an argument after which updates the worth of that folder in showNested utilizing the setShowNested perform. This modifications it from false to true or vice versa.
Now, let’s add an onClick occasion to the button to invoke toggleNested. Then, cross the title of the folder as an argument when a consumer clicks any of the folders, as proven under:
const RecursiveComponent = ({ information }) => {
  // ...
  // Remainder of the code
  return (
    <div type={{ paddingLeft: "20px" }}>
      {information.map((dad or mum) => {
        return (
          <div key={dad or mum.title}>
            {dad or mum.isFolder && (
              <button onClick={() => toggleNested(dad or mum.title)}>
                {dad or mum.title}
              </button>
            )}
            // ...
            // Remainder of the code
            // ...
          </div>
        );
      })}
    </div>
  );
};
The ultimate step is to replace the show CSS property that we’ll add to the div wrapping the RecursiveComponent that’s contained in the RecursiveComponent. When a consumer selects the folder, we’ll replace the showNested object by including the folder title as a key to that object. We’ll additionally set its worth to true and add a verify to see if the folder title is current in showNested.
Then, we’ll set the show to block. In any other case, we’ll set it to none to cover the nested recordsdata and folders:
const RecursiveComponent = ({ information }) => {
  // ...
  // Remainder of the code
  return (
    <div type={{ paddingLeft: "20px" }}>
      {information.map((dad or mum) => {
        return (
          <div key={dad or mum.title}>
            // ...
            // Remainder of the code
            // ...

            // Updating the show property utilizing the showNested state
            <div type={{ show: !showNested[parent.name] && "none" }}>
              {dad or mum.kids && <RecursiveComponent information={dad or mum.kids} />}
            </div>
          </div>
        );
      })}
    </div>
  );
};
Hopefully, it’s best to be capable of toggle by way of all of the directories. And with that, this weblog is completed!
Conclusion
On this article, you’ve realized about recursive elements in React, the best way to construct them, and why we would use them. As well as, I confirmed how recursive elements are totally different from loops with a real-world instance. Hopefully, you realized one thing new that can be helpful to your subsequent React venture.
I hope you loved this text, and thanks for taking the time to learn it. You probably have any points whereas following the article or have additional questions, let me know within the feedback part. In case you like what I’m doing right here and need to assist me preserve doing it, don’t overlook to hit that share button.
Full visibility into manufacturing React apps
Debugging React purposes may be tough, particularly when customers expertise points which are onerous to breed. In case you’re desirous about monitoring and monitoring Redux state, robotically surfacing JavaScript errors, and monitoring sluggish community requests and element load time, attempt LogRocket. 

LogRocket is sort of a DVR for net and cellular apps, recording actually all the pieces that occurs in your React app. As a substitute of guessing why issues occur, you may mixture and report on what state your utility was in when a problem occurred. LogRocket additionally screens your app’s efficiency, reporting with metrics like consumer CPU load, consumer reminiscence utilization, and extra.
The LogRocket Redux middleware bundle provides an additional layer of visibility into your consumer periods. LogRocket logs all actions and state out of your Redux shops.
Modernize the way you debug your React apps — begin monitoring free of charge.
