
Are you constructing microservices however nonetheless need to use a monorepo? Let me make it easier to with that! Utilizing a monorepo is a handy strategy to handle a number of associated initiatives beneath a single code repository.
This weblog demonstrates the right way to create separate CD pipelines for the sub-projects in your monorepo, which makes it rather more possible to make use of a monorepo to your small or early-stage microservices utility, and to proceed utilizing that monorepo for so long as potential.
Included with this weblog publish are a collection of working instance code you can fork in your individual GitHub account to check out the automated deployment pipeline for your self.
Leap forward:
Microservices allow straightforward, unbiased deployment
Why can we use microservices? There are numerous the reason why microservices may suit your challenge, however one of the necessary causes is that utilizing microservices reduces our deployment threat.
If you deploy a monolith, you threat breaking the entire thing and leaving your prospects and not using a working product (till you possibly can repair it). This isn’t good financially or reputationally to your firm.
If you deploy a microservice, you threat breaking solely a small a part of your utility as a result of one microservice is barely a small a part of your utility. The half you threat breaking is small — and infrequently not even buyer dealing with — so the danger it represents is smaller as properly.
Small issues are additionally simpler to repair (and fewer annoying) than massive issues, so rolling again a damaged microservice to a working state can typically be simpler than rolling again a monolith.
For this to work although, our microservices will need to have unbiased deployment pipelines. That’s to say, every microservice should be capable of be deployed individually from the others.
If, as a substitute, you might have one deployment pipeline that deploys all of your microservices directly — properly, that’s not significantly better than having a monolith. To benefit from microservices, each wants its personal separate and unbiased steady deployment (CD) pipeline.

Can we use a monorepo with microservices? Certain, after all we are able to. Actually, utilizing a monorepo containing all of your microservices is a really handy and simple strategy to begin a brand new microservices challenge. I’ve began a number of new microservices initiatives this manner.
Historically although, the issue is {that a} monorepo has one CD pipeline that’s invoked when code modifications are pushed to the code repository. So, irrespective of which microservice modifications, all microservices shall be deployed.
This isn’t too unhealthy within the early days of the appliance when all microservices are being developed and alter continuously. However as the appliance matures, you want to have the ability to deploy microservices individually — not solely as a result of deploying all microservices is time consuming (particularly because the variety of microservices begins to blow up), however since you need to mitigate, reduce, and management your deployment threat.
Scaling CD pipelines and microservices
There often comes a time — a sure degree of maturity, or simply too many microservices — the place the only CD pipeline of a microservice turns into a serious hindrance to the scalability of your utility. Sadly, this time typically comes in a short time with microservices!
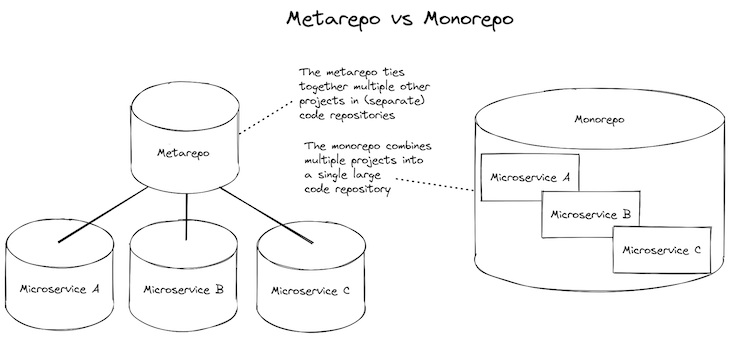
At this level, we’d often begin to restructure by pulling stabilized microservices out to their very own code repository the place they’ll have their very own CD pipeline. After we separate our microservices out to their very own code repositories, we would then convey them again collectively right into a metarepo (see the meta bundle for particulars).
Metarepos mix the comfort of a monorepo with the pliability of separate code repositories. However nonetheless, having separate code repositories provides complexity, and it might be higher if we might persist with the easier monorepo for so long as potential.
There are different causes to separate out the monorepo. For a rising firm, splitting out to separate repositories can help you scale throughout a rising improvement crew.
But when it’s simply the separate CD pipelines that you really want, wouldn’t it’s good to have the ability to keep on with the easier monorepo for longer and be capable of have separate CD pipelines for every sub-project?
Effectively, the excellent news is that it is potential. You may have a number of CD pipelines — not less than you possibly can utilizing GitHub Actions — which permits us to retain the simplicity of our monorepo for for much longer.
Extra nice articles from LogRocket:
Creating separate CI/CD pipelines in GitHub Actions
After we host our code on GitHub, we are able to use GitHub Actions to create workflows which can be robotically invoked when code is pushed to our code repository. We are able to use these to create pipelines for steady integration (CI) and steady deployment (CD).
To make this easier, I like to clarify this as “robotically working a shell script within the cloud.” Specify the instructions in a script, after which that script is robotically executed by GitHub Actions every time it detects modifications to your code.
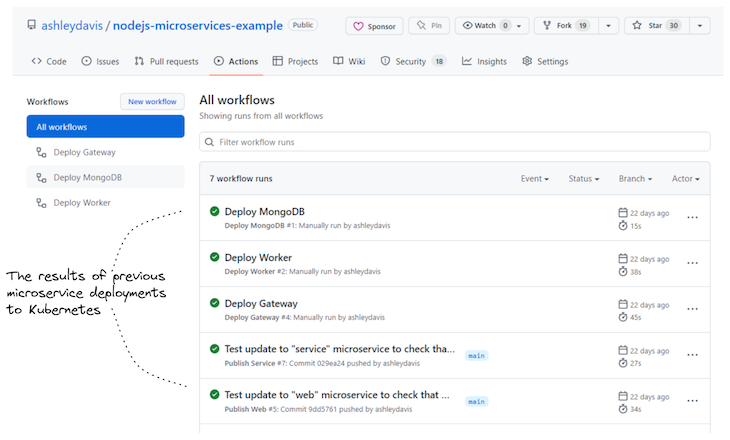
The output of every workflow is displayed within the GitHub Actions person interface; an instance is proven beneath in Determine 3. This collects and shows the output and state (success or failure) of every workflow invocation. Usually, when a workflow has failed, GitHub will robotically ship an e mail to the crew to tell them somebody has damaged one thing.
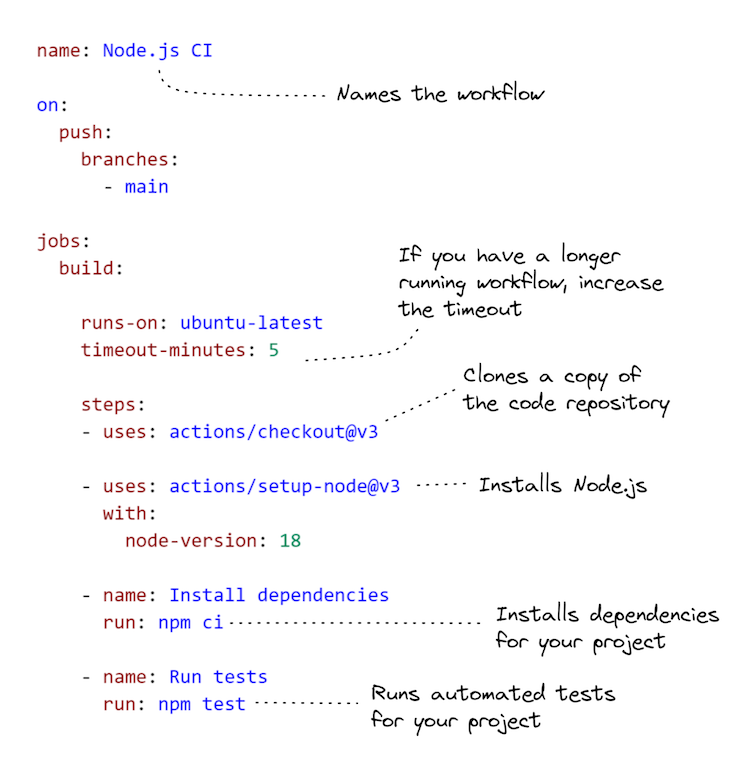
To heat up, let’s see what fundamental workflow configuration appears like. The instance code beneath reveals a workflow to run automated assessments for a Node.js challenge. We are able to have as many workflows as we’d like in a code repository, so the one beneath could possibly be simply one in every of many in a specific code repository.
The instance challenge
This publish comes with a working instance you possibly can strive for your self. The instance challenge is a monorepo containing two microservices. Every one has its personal separate CD pipeline that deploys the microservice to a Kubernetes cluster.
The code is out there on GitHub. Clone a neighborhood copy of the instance repo like this:
git clone https://github.com/ashleydavis/nodejs-microservices-example.git
You can even obtain the zip file or, in case you simply need to see what the GitHub Actions workflow historical past appears like, I’ve linked there to the instance in GitHub.
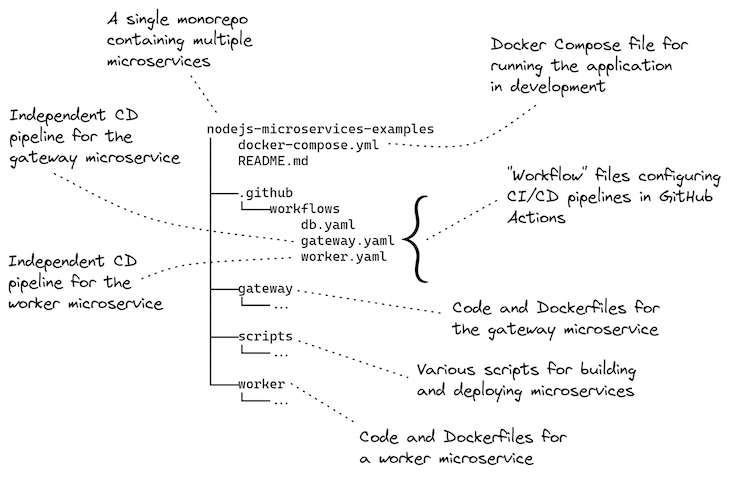
Under, Determine 4 offers an outline of the instance challenge. It reveals the workflow configurations in relation to the initiatives for every of the 2 microservices, and the configuration for his or her deployment to Kubernetes.
Conditions
What do it’s essential run the instance challenge?
Effectively, that will depend on the way you need to run it!
In case you’d prefer to run the microservices utility domestically in your improvement laptop, you’ll need:
In case you’d prefer to deploy it to Kubernetes by working the deployment scripts out of your improvement laptop, you’ll want:
In case you’d prefer to have the GitHub Actions workflows working for your self, you’ll need:
In the remainder of this publish, we’ll work by every of those examples in additional element.
Operating the app domestically for improvement
In case you’d prefer to strive working this microservices utility domestically in improvement, you simply want to put in Docker Desktop.
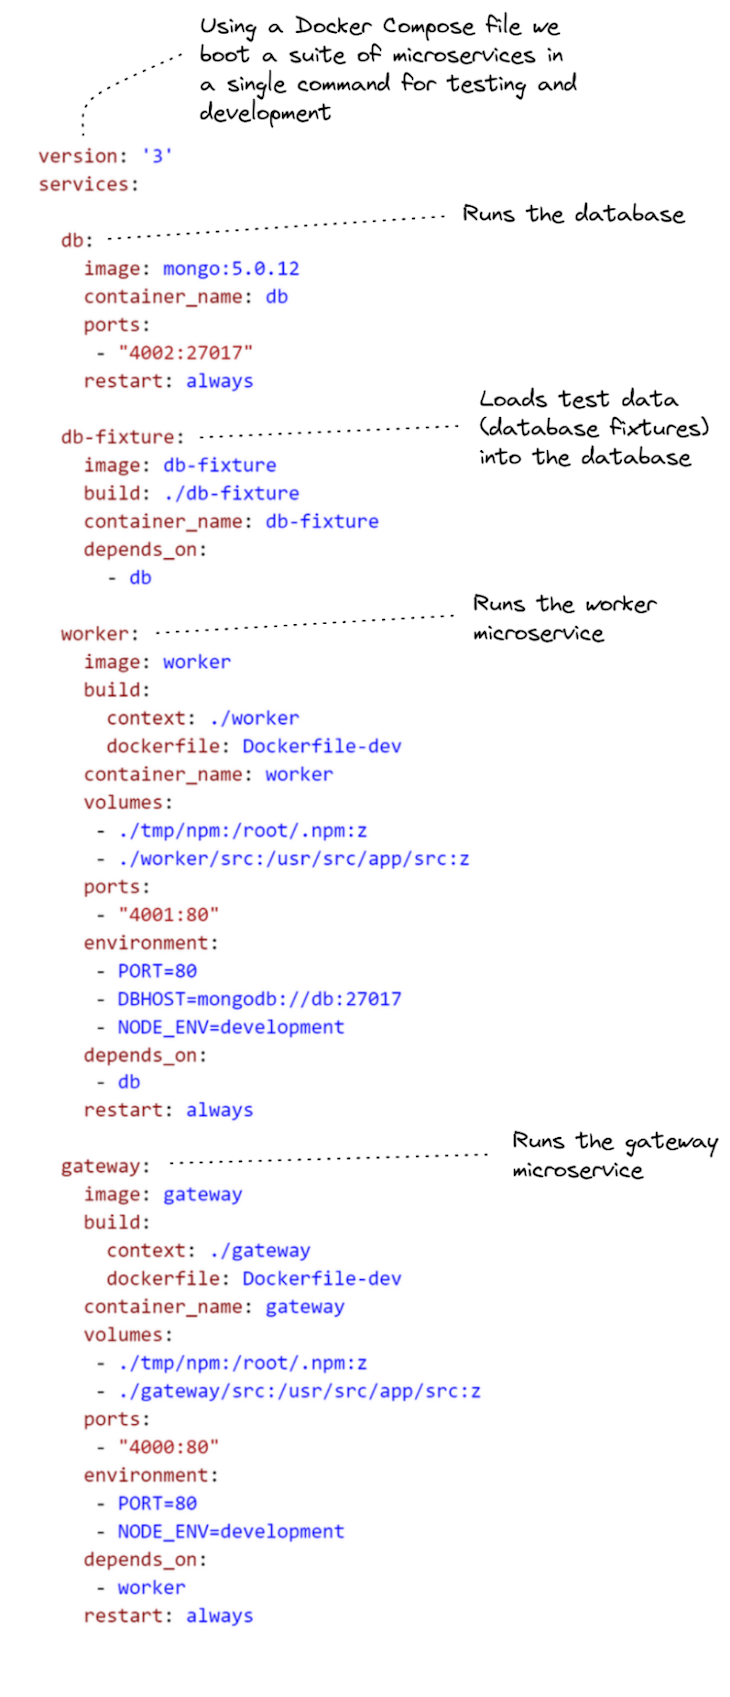
Itemizing 1 reveals the Docker Compose file that makes this potential. You may see the way it begins a number of “providers”: one for a MongoDB database server, and one for every of our microservices. It additionally begins a service for loading check knowledge into our database (the one named db-fixture).
To run this, first change listing into your native copy of the code repository:
cd nodejs-microservices-example
Then, boot the native microservices utility beneath Docker Compose:
docker compose up --build
As soon as working, you possibly can check it by opening your net browser and navigating to http://localhost:4000/. It’s best to see “Howdy laptop!” printed within the net web page. It’s easy, nevertheless it reveals you the gateway microservice is serving an online web page.
There may be an instance REST API out there by the gateway microservice beneath the route /api/knowledge; navigate your browser to http://localhost:4000/api/knowledge to see its output.
The gateway microservice forwards the REST API request to the employee microservices, which you’ll be able to entry instantly at http://localhost:4001/api/knowledge. Notice that we are able to solely entry the employee microservice instantly like this when working the microservices utility in improvement. After we deploy the appliance to Kubernetes, it’s configured in order that solely the gateway microservice is accessible from the surface world, and the employee microservice is accessible solely throughout the Kubernetes cluster.
Be at liberty to strive experimenting with the code whilst you have the microservices utility working domestically. It’s configured for stay reload, so any modifications you make to the code for every microservice will trigger that microservice to robotically reload to include your modifications.
When completed you possibly can take down the native microservices utility:
docker compose down
Docker Compose is a really handy strategy to begin and cease a neighborhood microservices utility.
Deploy to Kubernetes out of your improvement laptop
Earlier than creating an automatic deployment pipeline (say, utilizing GitHub Actions), it’s a good suggestion to first apply the instructions that we’ll be automating.
If you wish to run these instructions from your individual improvement laptop, you’ll want:
You don’t want to do that, after all. You would leap on to getting this instance working in GitHub Actions (if that’s the case skip to the subsequent part). However you possibly can simply run into issues, like points authenticating along with your Kubernetes cluster. These sorts of issues are troublesome and sluggish to debug if we try to unravel them beneath GitHub Actions.
It’s faster and simpler to experiment and clear up issues by first practising the deployment from our native improvement laptop. This units us up for fulfillment earlier than we attempt to automate our deployment scripts in GitHub Actions.
Deploying the database
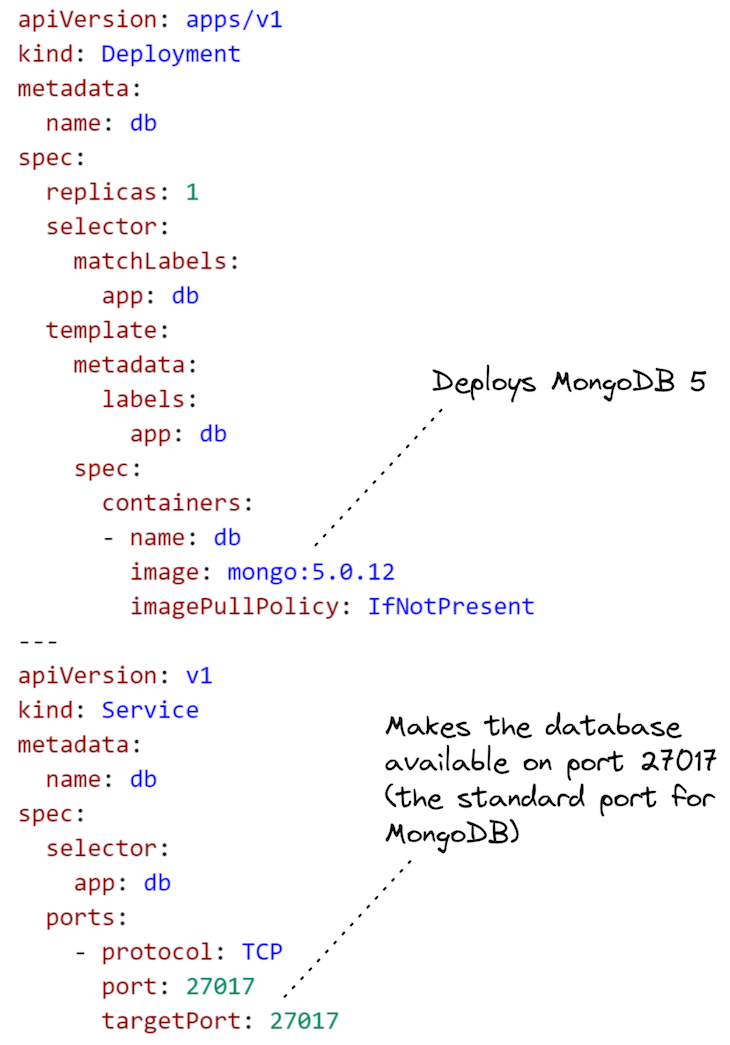
Let’s begin by deploying a MongoDB database to our Kubernetes cluster. That is a simple place to begin as a result of we don’t must construct a Docker picture for it (we reuse the pre-built picture out there on DockerHub) and we don’t must parameterize the Kubernetes configuration file for the deployment.
We deploy this configuration utilizing Kubectl:
kubectl apply -f ./scripts/kubernetes/db.yaml
Now, let’s deploy our two microservices. This isn’t fairly as easy as a result of their deployment configurations want parameters, and we should fill the gaps in these configurations earlier than deploying them.
Increasing our templated configuration
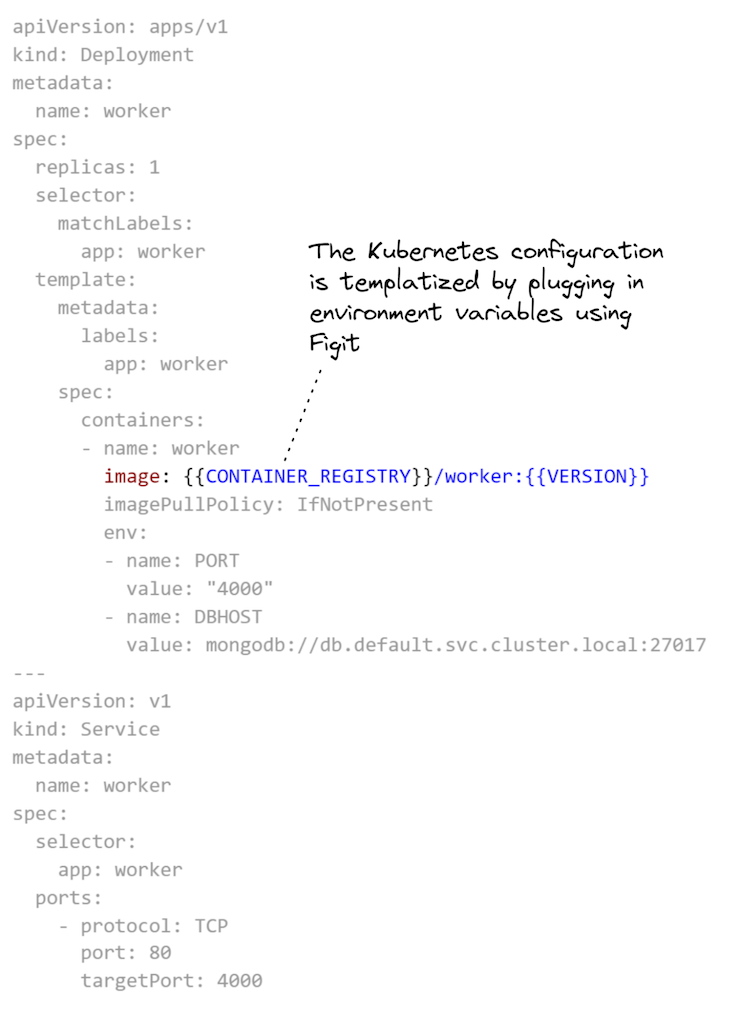
I created my very own device, referred to as Figit, for increasing templated configurations. Figit is a command line device that runs beneath Node.js. We enter YAML recordsdata to Figit and it fills out the parameters from the surroundings variables.
Why can we even have to parameterize our configuration recordsdata? Effectively, for one factor, it’s good to have the ability to reuse our configuration recordsdata in several circumstances. However on this weblog publish, we’ll use it to “plug in” the URL for our container registry and the model for every Docker picture.
You may see in Itemizing 3 that configuration for the employee microservice is much like the configuration for the database (from Itemizing 2), besides that we parameterize the reference to the Docker picture. That half is highlighted beneath in Itemizing 3 so you possibly can simply see it.
Earlier than deploying, we should develop the configuration template in Itemizing 3. To try this, we have to set the surroundings variables CONTAINER_REGISTRY and VERSION:
export CONTAINER_REGISTRY=<url-to-your-container-registry>
export VERSION=1
Or on Home windows, like this:
set CONTAINER_REGISTRY=<url-to-your-container-registry>
set VERSION=1
Now we are able to do a trial run of the growth and see the outcome. To run figit, we should set up Node.js dependencies:
npm set up
Now we are able to develop the YAML configuration template and see the outcome:
npx figit ./scripts/kubernetes/employee.yaml
The output in your terminal ought to present that CONTAINER_REGISTRY and VERSION within the configuration have been changed with the values set for the surroundings variables.
Constructing and publishing the microservices
The instance challenge contains shell scripts to construct and publish Docker photos for every of the microservices.
To construct every microservice:
./scripts/build-image.sh employee
./scripts/build-image.sh gateway
These shell scripts received’t work on Home windows, although. If you wish to do that on Home windows, you may like to make use of the Linux terminal beneath WSL2 or invoke the docker construct command instantly (peek contained in the shell script for the small print of the command).
To publish, it’s essential to first set some surroundings variables with the username and password to your container registry:
export REGISTRY_UN=<container-registry-username>
export REGISTRY_PW=<container-registry-password>
On Home windows, use the set command as a substitute of export.
Then, to publish the pictures for the microservices to your container registry, use the next:
./scripts/publish-image.sh employee
./scripts/publish-image.sh gateway
With the microservice constructed and revealed, we at the moment are able to deploy them.
Deploying the microservices
Let’s deploy the microservices to Kubernetes. For this, we should use figit to develop the configuration templates and pipe the expanded configuration to kubectl, deploying our microservices to the Kubernetes cluster:
npx figit ./scripts/kubernetes/employee.yaml --output yaml | kubectl apply -f -

npx figit ./scripts/kubernetes/gateway.yaml --output yaml | kubectl apply -f -
To examine the deployment, invoke kubectl get pods and kubectl get deployments to see if our deployment to Kubernetes was profitable.
All going properly, our microservices ought to now be working in Kubernetes. The employee microservice is hidden and never accessible, however the gateway microservice is open to the world so we are able to check it from our net browser. To search out the IP tackle, invoke kubectl get providers, search for gateway within the checklist. Navigate your net browser to that IP tackle to see the net web page for the gateway microservice.
In case you’d like to vary the code and take a look at deploying an up to date model of one of many microservices, remember to increment your VERSION surroundings variable earlier than constructing, publishing, and deploying the microservice.
Cleansing up the Kubernetes cluster
This has been a apply run of our deployment to make certain our deployment course of works earlier than automating it. In a second we’ll arrange the actual deployment in a second to run beneath GitHub Actions.
First although, we should always clear up our Kubernetes cluster and take away the microservices we deployed in our apply run:
npx figit ./scripts/kubernetes/employee.yaml --output yaml | kubectl delete -f -

npx figit ./scripts/kubernetes/gateway.yaml --output yaml | kubectl delete -f -
Implementing separate CD pipelines with GitHub Actions
And now, for the primary occasion! On this ultimate half, we automate the deployment of our microservices utilizing GitHub Actions.
To do this out for your self, you’ll need:
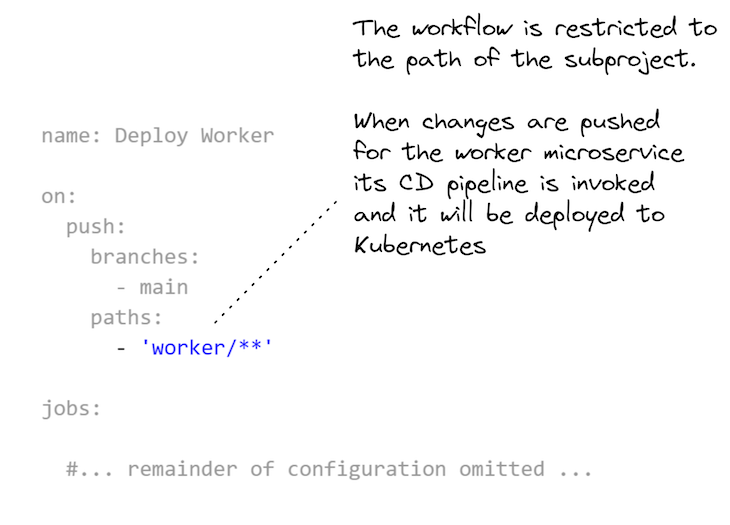
A very powerful half is how every GitHub Actions workflow is scoped to the sub-directory for every sub-project within the monorepo. You may see how that is laid out in Itemizing 4. That is what permits every microservice within the monorepo to have its personal separate CD pipeline.
You may add as many microservices to this monorepo as you want, however all of them want their very own workflow configuration that’s scoped to their subdirectory within the monorepo.
Kubernetes deployment workflow for GitHub Actions
Itemizing 4, above, was simply an extract to spotlight the necessary half. Itemizing 5, beneath, reveals the entire workflow configuration for the employee microservice’s CD pipeline, together with:
- Setting surroundings variables from GitHub Secrets and techniques;
- Constructing and publishing the Docker picture;
- Configuring Kubectl, after which;
- Increasing the Kubernetes deployment configuration template and deploying the employee microservice to Kubernetes
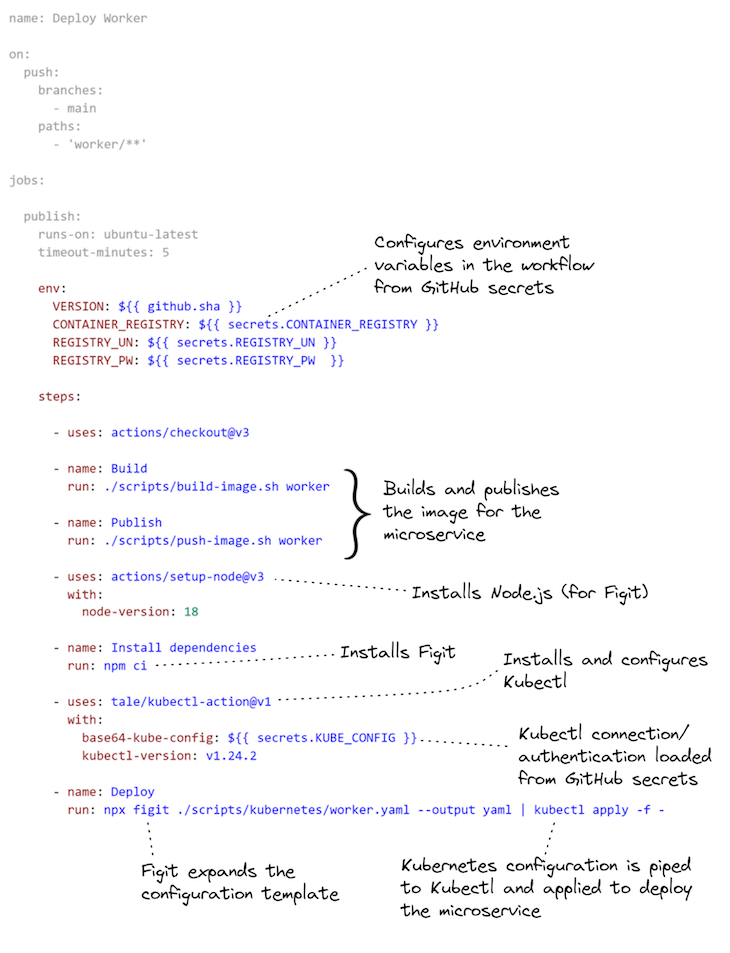
For extra info on utilizing the kubectl-action in GitHub Actions, please see the documentation.
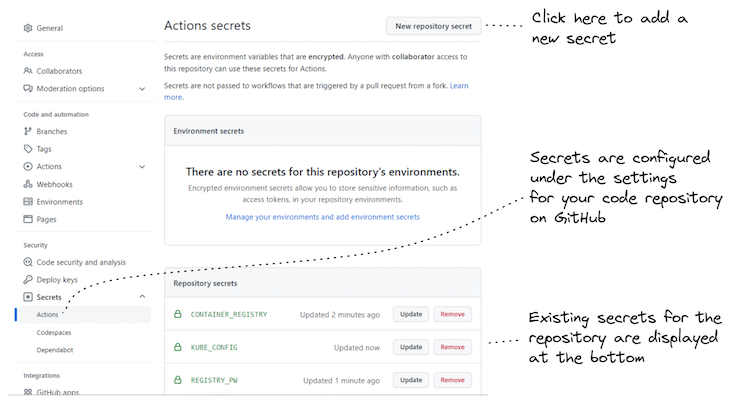
Setting secrets and techniques and different configuration in GitHub Secrets and techniques
To have the ability to run the workflow for every microservice in GitHub Actions, we should add the required surroundings variables to GitHub Secrets and techniques for the code repository. These are the surroundings variables CONTAINER_REGISTRY, REGISTRY_UN and REGISTRY_PW that we set earlier, when practising the deployment from our native laptop.
Don’t fear about setting VERSION, although — that’s robotically set within the workflow configuration from the commit hash of the latest change to the code repository. That’s a pleasant method to verify we at all times have a brand new model quantity for our Docker photos and we don’t have to fret about incrementing them manually.
Determine 5 reveals the right way to set a GitHub Secret on the code repository.
Invoking deployments manually by the GitHub UI
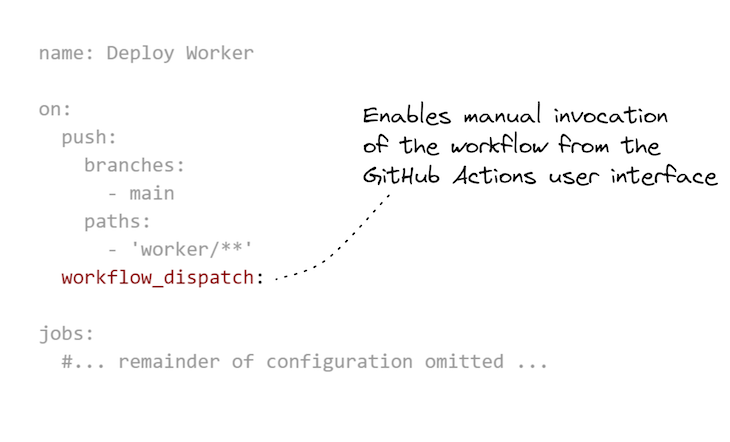
There’s one final thing that’s value mentioning: we are able to make a small replace to our GitHub Actions workflow configuration that enables us to invoke it manually. That is actually helpful from time to time to have the ability to click on a button to invoke the deployment of a microservice even when its code hasn’t modified.
One cause to do that is after we need to reconfigure an surroundings variable by GitHub Secrets and techniques. Altering the worth of an surroundings variable from a secret doesn’t robotically set off a re-deployment, so after we try this, we have to manually set off it our deployment pipeline.
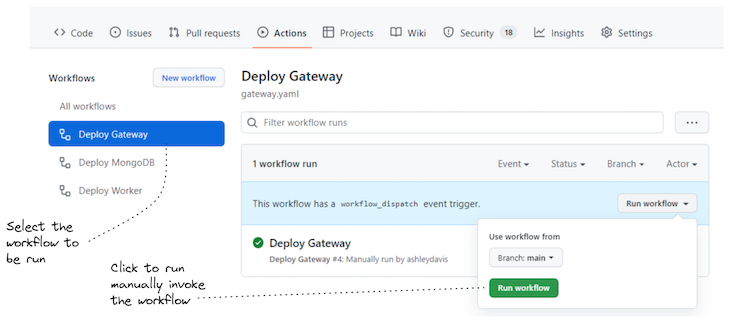
Itemizing 6 reveals the addition we have to make to allow handbook invocation of a GitHub Actions workflow. In Determine 6, you possibly can see how we invoke the workflow by the GitHub Actions UI to redeploy the employee microservice.
Making an attempt out GitHub Actions for your self
Now you possibly can check out GitHub Actions for your self. Earlier than you do that, you need to actually work by the sooner part, Working towards deployment to Kubernetes out of your improvement laptop. Deploying to Kubernetes out of your native laptop helps to work out all of the kinks which can be harder to determine when it runs beneath GitHub Actions since you don’t have direct entry to the pc that’s working the deployment pipeline.
For this, you want your individual GitHub Account, after which fork the repo for the instance challenge.
Now, add GitHub Secrets and techniques to your forked repository to set CONTAINER_REGISTRY, CONTAINER_UN, CONTAINER_PW and KUBE_CONFIG. The primary three surroundings variables have been talked about earlier; the brand new one, KUBE_CONFIG, is the base64-encoded Kubernetes configuration that configures kubectl to entry your Kubernetes cluster.
That is straightforward sufficient to generate. In case you are have already got kubectl configured domestically, you possibly can encode your native configuration like this:
cat ~/.kube/config | base64
Then copy the base64-encoded configuration out of your terminal and put that within the KUBE_CONFIG secret.
That’s mainly it!
Now you might have two methods to set off the deployment pipeline for a microservice:
- Push code modifications for one of many microservices
- Set off the workflow manually by the GitHub person interface
After all, many issues can go unsuitable — simply configuring the connection to Kubernetes is troublesome once you haven’t executed it earlier than. That’s why you need to apply domestically earlier than attempting to get your deployment pipeline working in GitHub Actions.
Abstract
Utilizing a monorepo is a handy strategy to begin a microservices challenge, however often, earlier than too lengthy, we now have to separate it into a number of repos in order that we are able to make unbiased deployment pipelines for our microservices to get the complete good thing about the microservices structure sample.
Nevertheless, this weblog publish reveals a unique strategy. Now we have demonstrated the right way to create separate CD pipelines for microservice in a monorepo utilizing GitHub Actions and this implies we are able to keep on with our monorepo, and the continued comfort that it affords, a lot additional into the lifecycle of our microservices challenge.
