
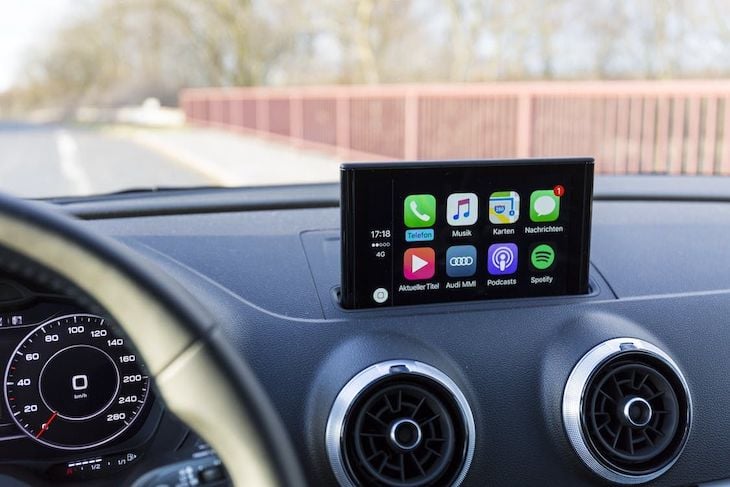
It wasn’t so way back that the best degree of integration that you possibly can count on between your cellphone and your automobile was enjoying music out of your cellphone to your automobile audio system.
As time has gone on, this has modified drastically, with the introduction of applied sciences like Android Auto and Apple CarPlay. Now your chosen audio, fast-food, or navigation app can beam itself on to your automobiles leisure system for simple interactions.
Whereas the intent between Apple CarPlay and Android Audio are comparable, on this article we’ll have a look at how we will complement our Flutter app with some CarPlay performance. We’ll cowl:
Setting our expectations
Now, as the author of this text, I’d simply love to leap into the thrilling technical particulars of how to do that (as I’m positive you wish to examine them!). Nonetheless, earlier than I do this, we have to briefly point out a number of the issues that would probably hinder you from ever getting your Flutter CarPlay app off the bottom.
As builders, we’re all the time eager to discover a approach ahead to ship a sure product or characteristic. After we’re informed that we will’t do one thing, or that one thing isn’t supported, we’re tempted to do it anyway simply to see if we may be the primary to do one thing, or as a result of we actually need to ship for our prospects.
Nonetheless, within the case of creating an app that makes use of Apple CarPlay, we have to outline some real looking expectations. This text pertains to Flutter apps, however would apply to any app that leverages CarPlay. Let’s dive in.
Your CarPlay app requires Apple’s particular approval
Making a Flutter app that has a CarPlay element will not be as simple as simply pulling a package deal in, organising some values, and deploying it out to your customers. Any app that makes use of CarPlay should particularly be authorised by Apple.
This approval course of may be lengthy, generally to the order of months. There are additionally studies of Apple merely not getting again to builders who request this performance. There’s nothing you are able to do or say to hurry up this course of — you might be fully on Apple’s timeline.
Even nonetheless, it’s not so simple as checking a field declaring that your app makes use of CarPlay. Your app should fall right into a set of classes that Apple has pre-defined, which brings us to our subsequent level.
You may’t run any kind of app on CarPlay
To utilize CarPlay inside your app, it has to suit right into a sure set of classes that Apple prescribes. These classes are, primarily:
- Audio app
- Communication app (like Groups, Slack, or Discord)
- “Driving Job” app (similar to logging mileage within the consumer’s automobile — new in iOS 16)
- EV charging app
- Fueling app (to pay for gasoline from CarPlay — new in iOS 16)
- Navigation app (like Google Maps or Apple Maps)
- Parking app (to pay for parking)
- Fast meals ordering app (like DoorDash or Uber Eats)
And that’s it.
Maybe you’re feeling that it’s draconian of Apple to implement such restrictions on what you may and can’t develop for CarPlay. Nonetheless, contemplate the premise of CarPlay: it’s one thing that individuals use of their automobile to finish fundamental duties that ought to not distract them from driving.
For those who developed an app that allow individuals play Flappy Fowl on their infotainment programs as they have been driving, they usually crashed their automobile, it’s true that the motive force could be at fault for being so careless. However wouldn’t Apple bear some accountability for permitting the app within the first place? In that gentle, the restrictions appear warranted.
So, contemplating the above, we’d solely contemplate including CarPlay to our Flutter app if:
If we ignore the above and simply ship apps out for Apple’s endorsement, they are going to possible not take the time to assist your app change into compliant. They may reject your utility, or worse, simply by no means get again to you, leaving your app stranded with out an official approval (which you should utilize) or a rejection (which you’ll be able to probably escalate).
In case Apple doesn’t approve our app, it’s essential for us to not pin the success or failure of our app on having the CarPlay characteristic, particularly contemplating that Apple could not inform us why the app was rejected.
With all of that out of the way in which, let’s dig in to the way to really add CarPlay to our Flutter app.
Organising the fundamentals of our CarPlay Flutter app
For right now’s instance, we’ll be bringing CarPlay performance to our fast-food ordering app, which is known as EatUp. On our cellphone, that is what the app appears to be like like:
The main target of this text isn’t on Flutter app improvement itself, however slightly on the way to add CarPlay to the app. You might be welcome to peruse the supply code to know how we achieved the format proven above, however we gained’t go into additional element right here.
Including CarPlay to our Flutter mission
The configuration steps for flutter_carplay are out there on pub.dev, so let’s undergo them now.
Word that in doing this, you’ll be making adjustments to your Flutter mission. In case you are including CarPlay to an present app, now could be a perfect time to commit your adjustments to supply management. This fashion, you may simply revert your adjustments in the event that they trigger issues.
To begin with, we need to add a reference to our pubspec.yaml in our dependencies:
dependencies:
  flutter:
    sdk: flutter
  ...different dependencies...
  flutter_carplay: ^1.0.3
Then, we should always run the flutter pub get command inside our mission. It will create a Podfile that helps combine the native elements of flutter_carplay with our mission.
Let’s open the ios/Podfile file and uncomment the highest line, and set the worldwide platform to iOS 14.0:
# Uncomment this line to outline a worldwide platform on your mission
platform :ios, '14.0'
Change directories into the ios folder and run pod set up --repo-update.
Modifying our XCode mission
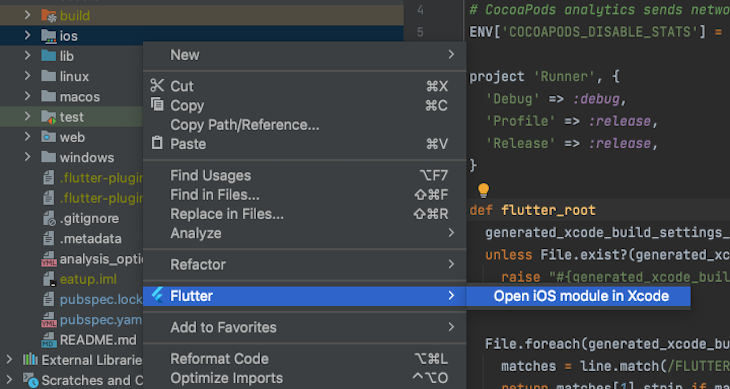
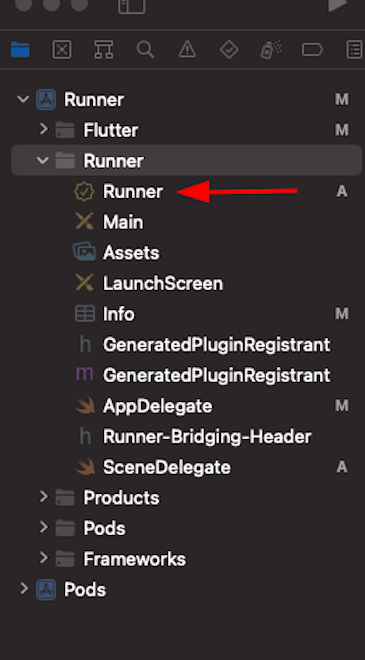
As a result of CarPlay is a local iOS characteristic, we might want to make adjustments to our XCode mission. Proper-click on the ios folder, after which select Flutter > Open iOS module in Xcode:
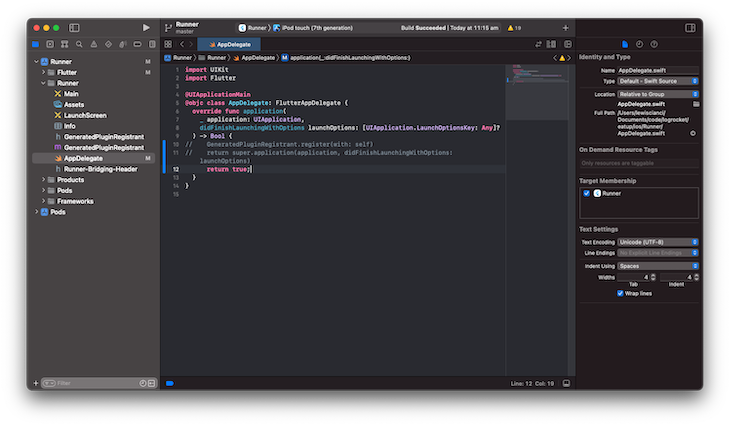
Inside our mission, navigate to Runner > Runner > AppDelegate and exchange the contents of our utility perform with a easy return true. In my case, I commented out the outdated code and added the brand new code straight beneath it, so it ought to look the identical for you:
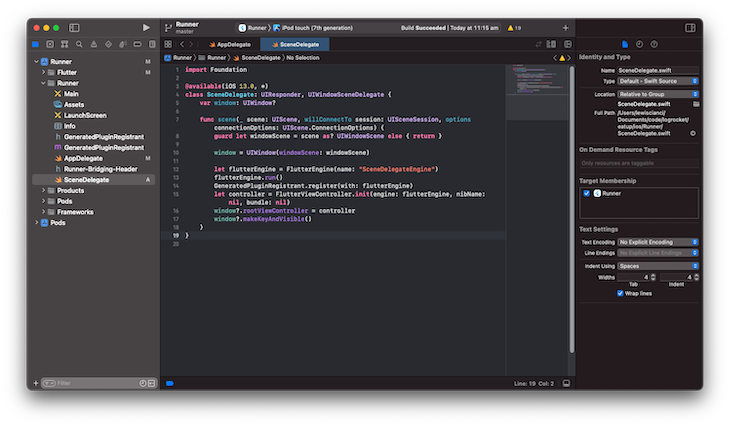
Inside our Runner folder (not the topmost one, however the one which exists one degree down), create a SceneDelegate.swift file, and set the contents to the under:
@out there(iOS 13.0, *)
class SceneDelegate: UIResponder, UIWindowSceneDelegate {
    var window: UIWindow?

    func scene(_ scene: UIScene, willConnectTo session: UISceneSession, choices connectionOptions: UIScene.ConnectionOptions) {
        guard let windowScene = scene as? UIWindowScene else { return }

        window = UIWindow(windowScene: windowScene)

        let flutterEngine = FlutterEngine(title: "SceneDelegateEngine")
        flutterEngine.run()
        GeneratedPluginRegistrant.register(with: flutterEngine)
        let controller = FlutterViewController.init(engine: flutterEngine, nibName: nil, bundle: nil)
        window?.rootViewController = controller
        window?.makeKeyAndVisible()
    }
}
After you may have completed this, the SceneDelegate ought to appear like this:
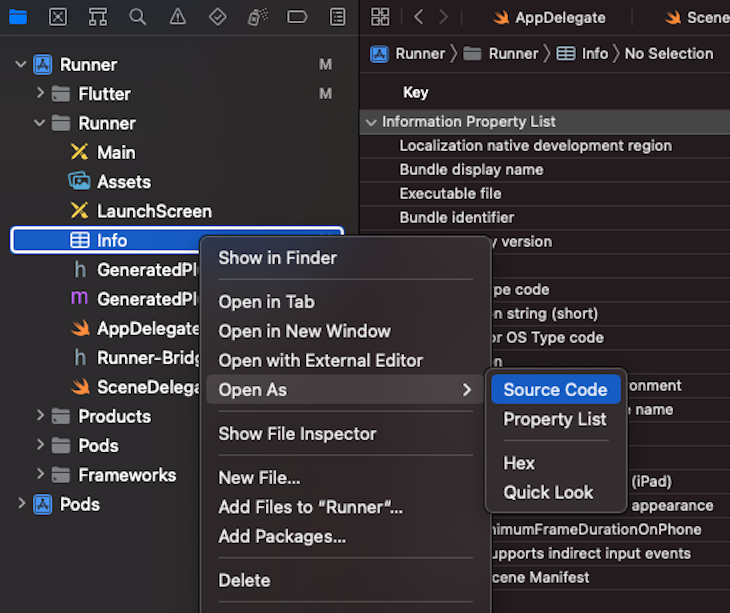
Now, right-click on the Data.plist file and click on on Open As > Supply Code. It will open the Data.plist in plain textual content so to simply paste the subsequent configuration into the file.
Extra nice articles from LogRocket:
We needs to be additional cautious throughout this step as a result of it’s very simple to by chance break this file if we kind the improper factor into it:
Earlier than the closing </dict>, add the next textual content. That is the default configuration, and we are going to come again to this later to customise it:
<key>UIApplicationSceneManifest</key>
<dict>
  <key>UIApplicationSupportsMultipleScenes</key>
  <true />
  <key>UISceneConfigurations</key>
  <dict>
    <key>CPTemplateApplicationSceneSessionRoleApplication</key>
    <array>
      <dict>
        <key>UISceneConfigurationName</key>
        <string>CarPlay Configuration</string>
        <key>UISceneDelegateClassName</key>
        <string>flutter_carplay.FlutterCarPlaySceneDelegate</string>
      </dict>
    </array>
    <key>UIWindowSceneSessionRoleApplication</key>
    <array>
      <dict>
        <key>UISceneConfigurationName</key>
        <string>Default Configuration</string>
        <key>UISceneDelegateClassName</key>
        <string>$(PRODUCT_MODULE_NAME).SceneDelegate</string>
        <key>UISceneStoryboardFile</key>
        <string>Primary</string>
      </dict>
    </array>
  </dict>
</dict>
Organising our entitlements
Even in improvement, we have to allow our app to work together with the CarPlay simulator on our pc. Let’s configure these entitlements now.
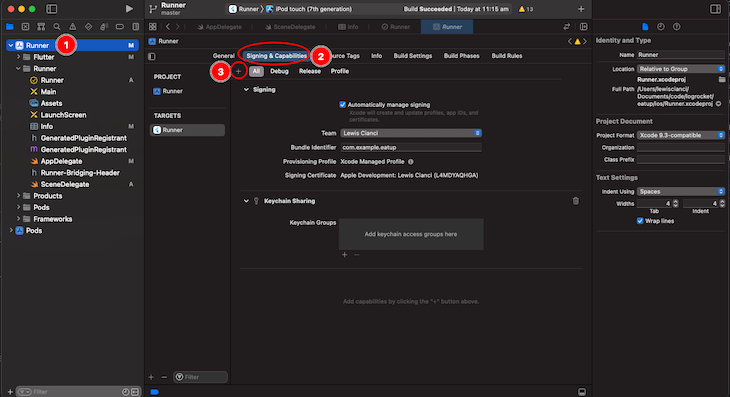
Inside XCode, click on on Runner, then click on on Signing & Certificates, after which click on on the + button to the left of All:
Within the checklist that comes up, choose Keychain Sharing. Your app doesn’t really use keychain sharing, however doing this units you up with a Runner.entitlements file in your mission:
Inside this file, take away the Keychain Entry Teams and add a brand new entitlement, relying on what kind of app you might be creating. You may examine Apple’s checklist of accessible entitlements to see which one to make use of on your mission.
When you find yourself completed, your Runner.entitlements file ought to appear like the next:
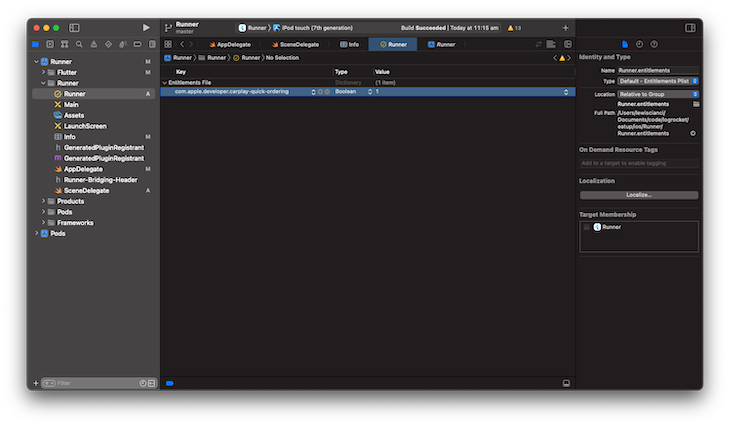
Now we’re lastly prepared so as to add some performance to our Flutter app! 🎉
Calling CarPlay performance from our Flutter app
Now, we’ll add the next UI into the CarPlay element of our app.
Right here’s we might want to do in an effort to obtain this:
- Set a
RootTemplatethat can type the premise of our CarPlay expertise - Add particulars to the template
- Arrange callbacks inside our app
Let’s go forward and handle these steps now.
Setting a RootTemplate
Inside our most important.dart file, we’ll create a brand new FlutterCarplay object. This object shall be liable for dealing with our connection to CarPlay, and can allow us to management what is going on inside our CarPlay expertise:
ultimate FlutterCarplay _flutterCarplay = FlutterCarplay();
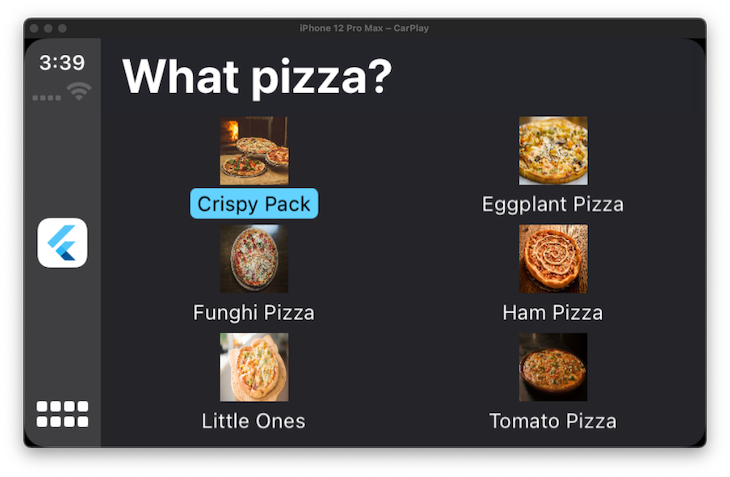
Subsequent, inside our initState for our widget, we need to arrange the RootTemplate with some choices to faucet on. It’s pretty simple to create a grid template, set a title, after which describe some buttons that we want to have the ability to be pressed:
@override
void initState() {
  FlutterCarplay.setRootTemplate(
    rootTemplate: CPGridTemplate(
      title: "What pizza?",
      buttons: [
        ...Data.FoodItems.map(
          (e) => CPGridButton(
            titleVariants: [e.name],
            picture: 'belongings/photos/${e.asset}',
            onPress: () {
              showOrderingConfirmationSheet(e);
              // showActionSheet();
            },
          ),
        )
      ],
    ),
    animated: true,
  );

  _flutterCarplay.forceUpdateRootTemplate(); // This makes the CarPlay expertise reload on scorching reload, helpful throughout improvement.

  // TODO: implement initState
  tremendous.initState();
}
As anticipated, that is the outcome:
Now, let’s implement showOrderingConfirmationSheet:
void showOrderingConfirmationSheet(FoodItem meals) {
  FlutterCarplay.showActionSheet(
    template: CPActionSheetTemplate(
      title: "Order ${meals.title}?",
      message: "Your pizza shall be prepared quickly after affirmation.",
      actions: [
        CPAlertAction(
          title: "Cancel",
          style: CPAlertActionStyles.cancel,
          onPress: () {
            // print("Cancel pressed in action sheet");
            FlutterCarplay.popModal(animated: true);
          },
        ),
        CPAlertAction(
          title: "Ok",
          style: CPAlertActionStyles.normal,
          onPress: () {
            print("Ok pressed in action sheet");
            FlutterCarplay.popModal(animated: true);
            FlutterCarplay.showAlert(
                template: CPAlertTemplate(titleVariants: [
              '${food.name} ordered!'
            ], actions: [
              CPAlertAction(
                title: "Dismiss",
                style: CPAlertActionStyles.destructive,
                onPress: () {
                  print("Dismiss pressed in action sheet");
                  FlutterCarplay.popModal(animated: true);
                },
              ),
            ]));
          },
        ),
      ],
    ),
  );
}
This ends in the actual meals merchandise being opened and a affirmation message being displayed. You can even name native performance inside your Flutter app at this stage, similar to including or eradicating gadgets from an inner database, relying in your wants.
Conclusion
As all the time, you may retrieve a full copy of the supply code on Github. There’s a commit earlier than I applied CarPlay, and a commit after I had applied it, so you should utilize this to match what modified. This comparability may be helpful in case you expertise difficulties in implementing CarPlay.
So, that’s the way you add CarPlay to your Flutter app. Probably the most time-consuming element of including CarPlay is getting Apple to approve your use of CarPlay inside your app. If you wish to begin utilizing CarPlay inside your Flutter app, that’s one thing it is best to begin engaged on as quickly as you may.
Including CarPlay to your Flutter app may be fairly a course of, but when CarPlay is an effective match on your app, it may well add lots of worth to your app’s expertise.
LogRocket: Full visibility into your net and cell apps

LogRocket is a frontend utility monitoring answer that permits you to replay issues as in the event that they occurred in your personal browser. As an alternative of guessing why errors occur, or asking customers for screenshots and log dumps, LogRocket allows you to replay the session to shortly perceive what went improper. It really works completely with any app, no matter framework, and has plugins to log extra context from Redux, Vuex, and @ngrx/retailer.
Along with logging Redux actions and state, LogRocket data console logs, JavaScript errors, stacktraces, community requests/responses with headers + our bodies, browser metadata, and customized logs. It additionally devices the DOM to document the HTML and CSS on the web page, recreating pixel-perfect movies of even essentially the most advanced single-page and cell apps.
