
Have you ever ever puzzled how a chatbot assistant works if you’ve visited a web site that makes use of one?
Nicely, on this article I’m going to be exhibiting you how you can construct a chatbot assistant utilizing Dialogflow. And the very best half? We’re going to be doing this with React. We’ll go over what Dialogflow is, clarify its varied parts, and combine it with a React app.
By the tip of this text, you’ll have a functioning Dialogflow chatbot assistant, constructed with React, so as to add to your portfolio. Yay!!!
You may clone this venture from my GitHub, please go away a star if you happen to prefer it. 😊
Stipulations
To arrange our Dialogflow chatbot, we are going to want the next:
- A Gmail account (this can allow us to create a Dialogflow CX agent)
- Entry to Google Cloud
However first, let’s discover out what Dialogflow CX is…
What’s Dialogflow CX?
Dialogflow CX is a conversational AI Platform, CAIP for brief, used for constructing conversational UIs. It may be used to implement a number of kinds of digital brokers, similar to voice bots, chatbots, and cellphone gateways, and the very best half is that it helps over 50 completely different languages.
Now that we all know what Dialogflow CX is, let’s arrange our surroundings.
Establishing our surroundings
Step one is opening up a Google Cloud Venture.
You’ll be requested to check in, and when you have a Gmail account, log in together with your credentials. After that, you’ll be redirected to a dashboard.
Subsequent, click on on CREATE PROJECT.
After that, now we have to enter the venture title. In our case, we’ll use blog-post-bot.
The second factor to decide on is the mum or dad group, then click on CREATE:

After that, you’ll see a dashboard just like the beneath picture:
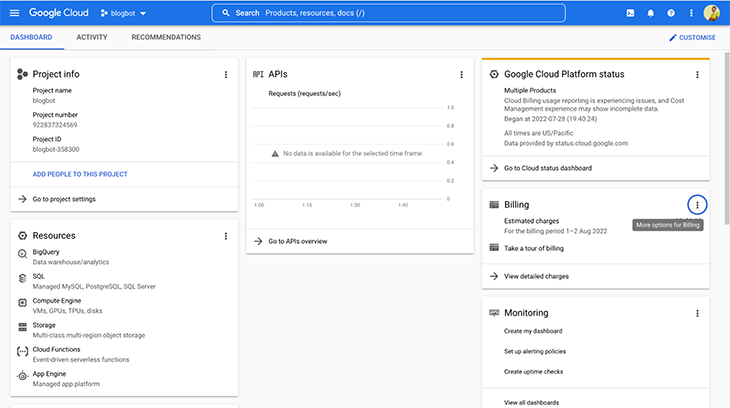
Now let’s allow the Dialogflow API.
To utilize Dialogflow, now we have to Allow Dialogflow API for our venture. We are able to do this on the dashboard that pops up, just like the beneath picture:
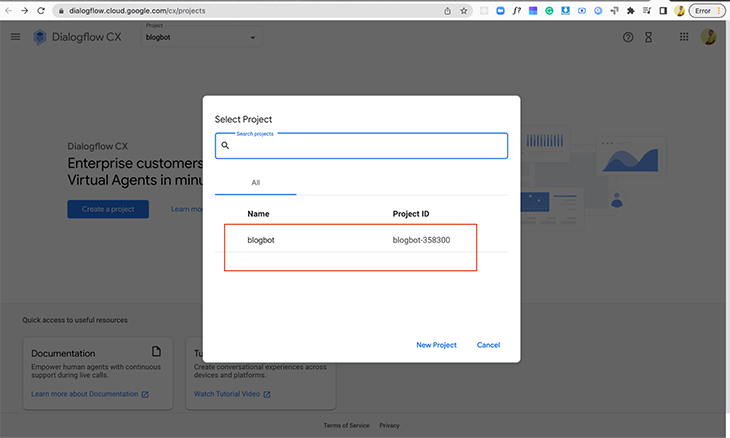
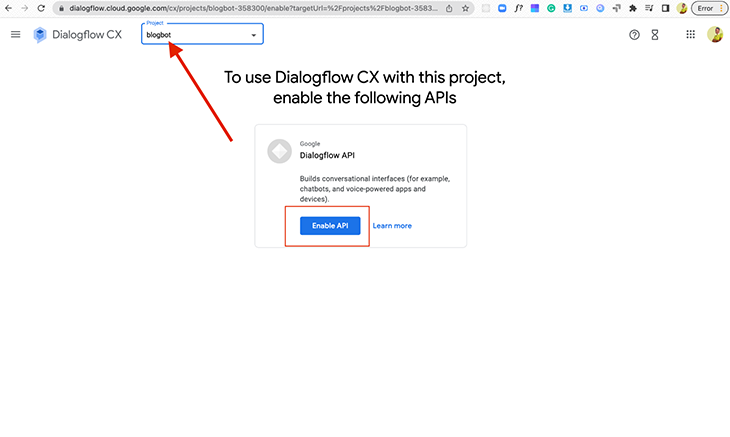
Choose the venture we created initially, and also you’ll be introduced with the beneath display. Click on on Allow API:
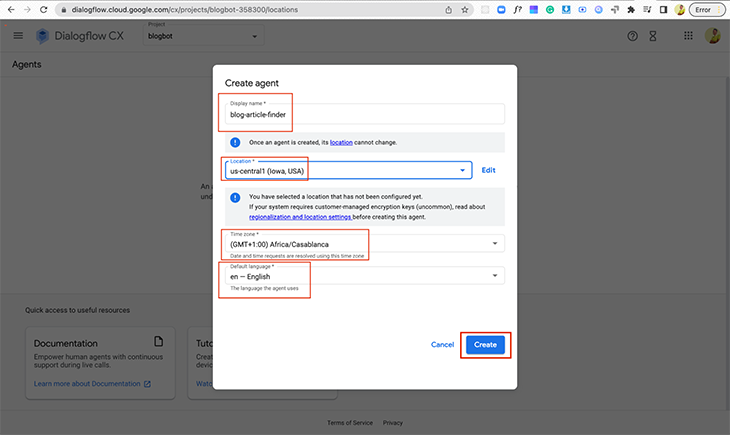
You’ll then be prompted with one other display asking to create an agent. Full the shape for the preliminary fundamental agent settings:
- Set a show title
- Go away location because the default:
us-central1 (Iowa, USA) - Set your most well-liked time zone. I set mine to
(GMT+1:00) Africa/Casablanca - Go away the language because the default or be happy to set your personal
- Click on Create
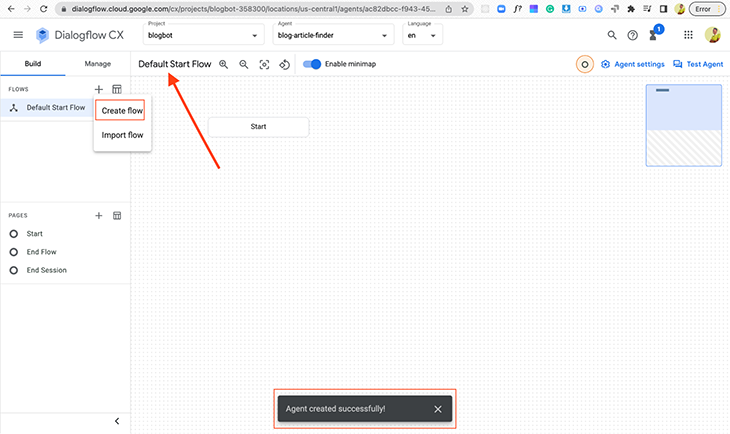
After our agent is created, we’re introduced with a dashboard referred to as the “Default Begin Stream.” A mini pop-up on the backside of the dashboard tells us that our agent is efficiently created:
What are flows in Dialogflow CX?
Flows are a brand new idea in Dialogflow CX. They permit us to create complicated dialogs that contain numerous matters.
The bot we’re constructing will give us completely different articles, similar to weblog put up articles classes, article ideas, and hottest articles.
With this, we could have three dialog matters that we’ll break into three completely different flows:
- Classes
- Steered articles
- Finest articles
Subsequent, we’ll arrange our flows.
Creating our flows
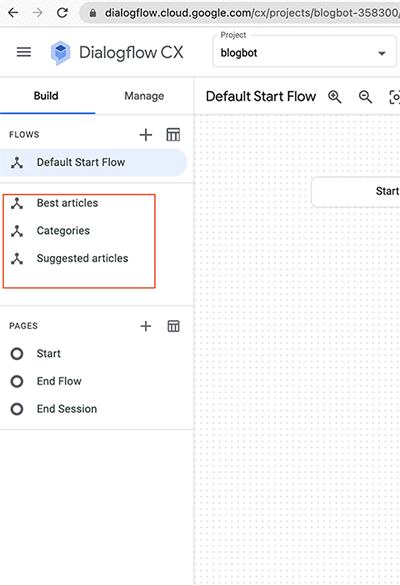
Within the above picture, you may see the + icon on the left sidebar. Click on on Create movement and enter the title “Classes.” Hit the Enter key.
We’ve got efficiently created our first movement! Now, go forward and do the identical for “Steered articles” and “Finest articles.”
The Dialogflow Simulator
On the Dialogflow CX dashboard, now we have a simulator. This permits us to simulate our bot and take a look at our conversations.
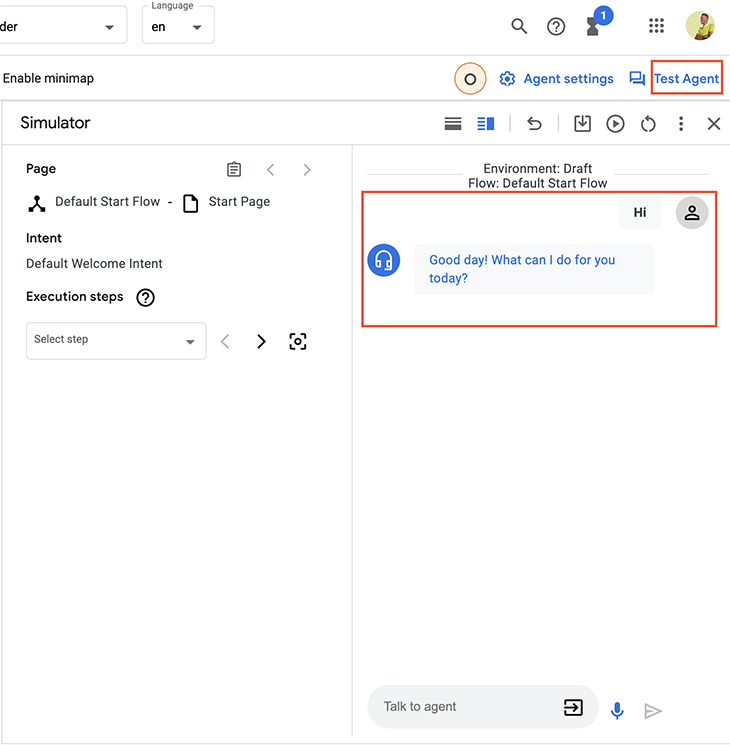
On the high proper of our dashboard, click on on Check Agent.
To rapidly take a look at our bot we are able to say Hello. Our digital agent will reply with a default welcome message, similar to the picture beneath:
Let’s change our welcome textual content to one thing extra customized — one thing extra pleasant, welcoming, and enjoyable.
Extra nice articles from LogRocket:
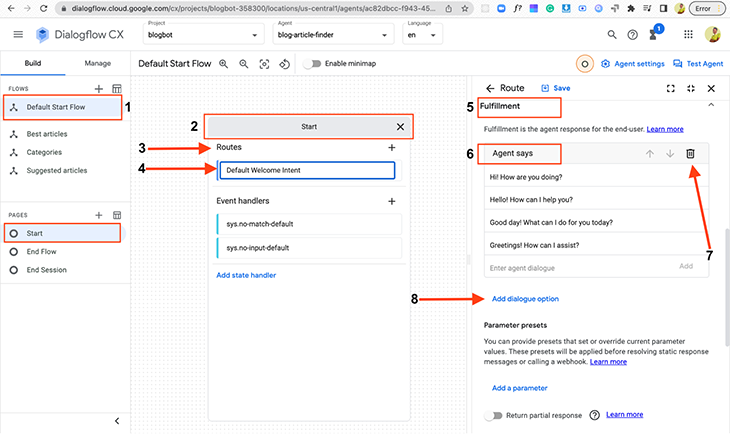
On the left of your dashboard, click on on Default Begin Stream, then click on on the Begin Tree node to open the web page.
N.B., on the Pages part within the left sidebar, it routinely selects Begin
In Begin, beneath Routes, click on Default Welcome Intent. To the precise, one other panel will open, and on this panel search for the Achievement part and delete all of the Agent says entries. Add our customized textual content beneath:
You might be most welcome, I'm Chinedu, a weblog bot. I can do many issues. You may learn tech articles from many classes, get the very best articles, and I can counsel nice articles in case you haven't any in thoughts, I am certain you'd adore it! Let's get studying…
Subsequent, we make some fast reply buttons just like what we see on common bots. We name them suggestion chips.
Underneath the Achievement, there’s a hyperlink referred to as Add dialogue choices. Click on on it, then click on on Customized payload and paste within the beneath code snippet earlier than hitting Save:
{
    "richContent": [
      [
        {
          "type": "chips",
          "options": [
            {
              "text": "Categories"
            },
            {
              "text": "Best articles"
            },
            {
              "text": "Suggested articles"
            }
          ]
        }
      ]
    ]
  }
Now let’s go forward and take a look at our welcome intent within the simulator:
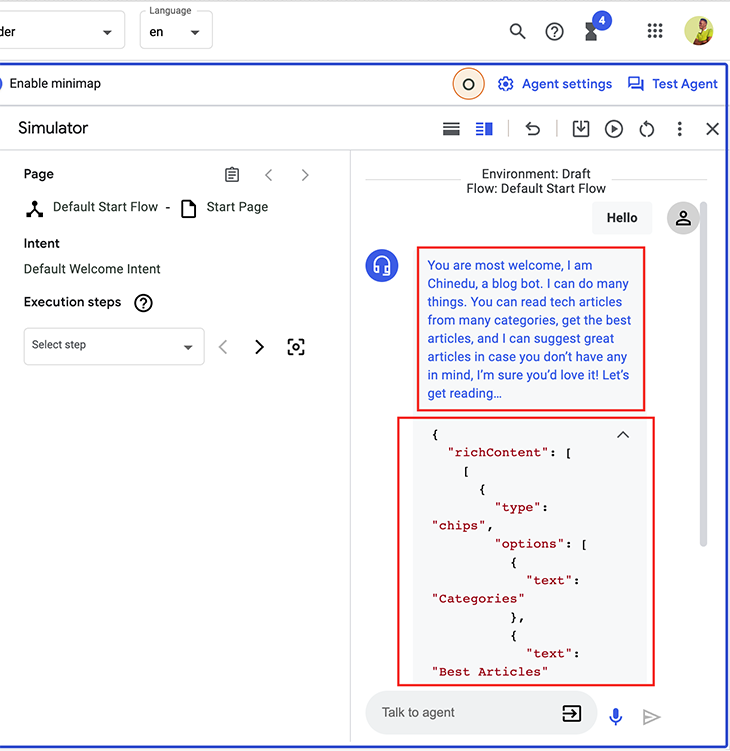
Once we ship Hello, we get our customized message. You will have seen that we are able to’t view our chip. For us to have the ability to obtain that, we want integration. We’ll be utilizing React for this, and we’ll arrange our React app to combine with our Dialogflow bot.
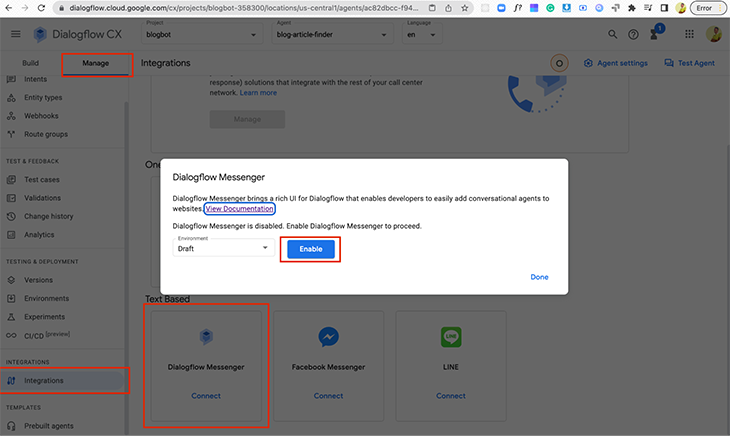
However earlier than we do this, we have to allow an online integration as such:
- Within the left sidebar, click on on Handle
- Scroll right down to Integrations
- Choose Dialogflow Messenger from the dashboard
- Click on on Join
- A pop-up will seem, click on Allow
After this, one other pop-up can be proven that comprises the JavaScript code we want for the combination:
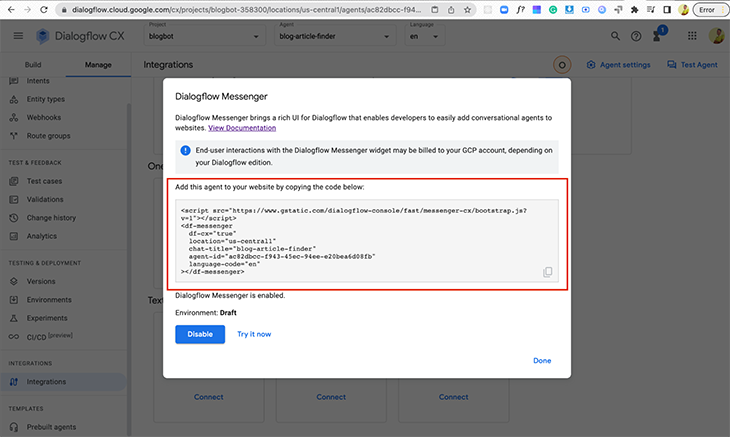
To do a fast demo, we are able to click on on the Attempt it now button.
Establishing our React app
In your terminal, create a brand new React venture by working the beneath code:
npx create-react-app blogbotapp
Subsequent, cd into our software, open it together with your favourite code editor and sort run npm begin.
Subsequent, we add our code snippet to the physique of our HTML file within the public folder inside our React software:
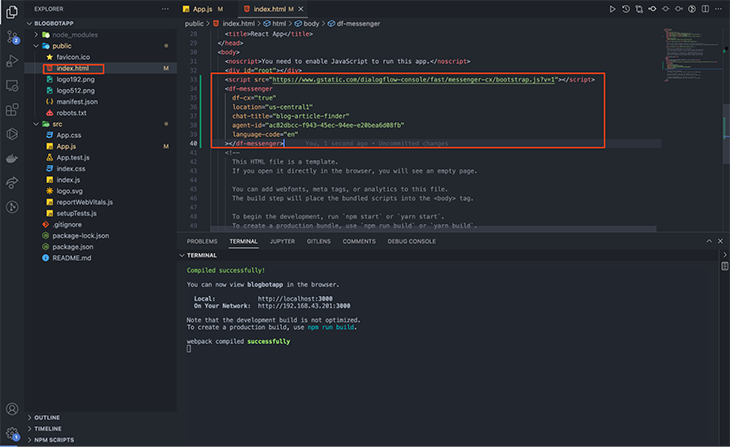
All set! With this, now we have efficiently arrange our React app, and we are able to see that all the pieces works effectively like in our simulator on the Dialogflow CX dashboard.
Let’s get again to configuring our bot and organising our entities.
What are the three entity sorts?
Entities are used for figuring out and extracting helpful knowledge from consumer enter.
We can be creating our entities shortly, however Dialogflow supplies ones that can be utilized to match dates, emails, colours, forex, cellphone numbers, addresses, and so forth.
There are three kinds of entities in Dialogflow:
- System entities
- Session entities
- Developer entities
Let’s go forward and create our customized entities for our class, finest articles, and instructed articles choices.
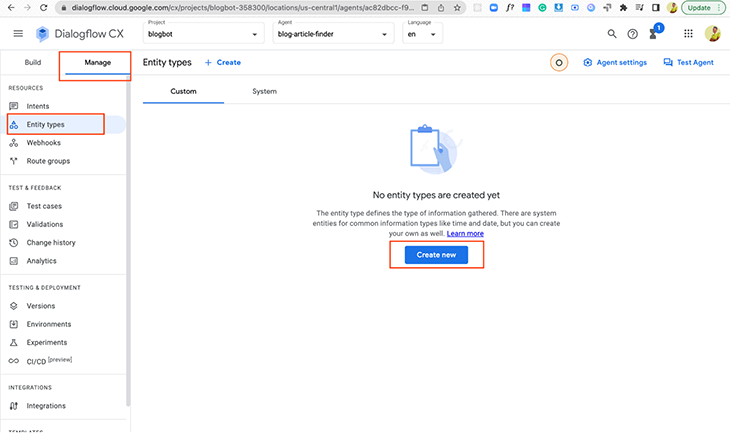
Entity for “Class”
First, click on on Handle after which Entity sorts. If the dashboard opens up, click on the button that claims Create new.
A dashboard will present up the place you may enter the show title. Within the desk that exhibits the entity, enter the next entities and their synonyms:
- React.js (with synonyms: react, React, React.js, reactjs, Reactjs, React.JS)
- Node.js (with synonyms: Node,node.js, Node.js, Node.JS, NODE.JS, nodejs, Nodejs, NODEJS)
- Information Buildings and Algorithms (with synonyms: algorithms, Algorithms, algorithm, Algorithm, knowledge, Information, knowledge constructions, Information constructions, Information constructions & Algorithms, DSA, constructions, dsa, knowledge constructions & Algorithms, Information constructions and Algorithms, knowledge constructions & algorithms)
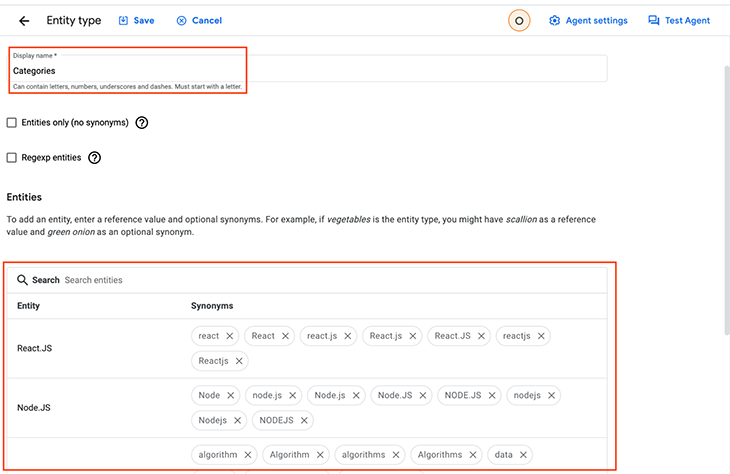
After that, click on on the Superior settings dropdown, and test the Fuzzy matching and Redact in Log checkbox.
Fuzzy matching helps within the case the place if we spell a reputation unsuitable, it may well match it to the precise entity.
Redact in log helps to right the title within the log in a case the place we spell them unsuitable.
After that, click on Save and do the identical for the opposite two entities.
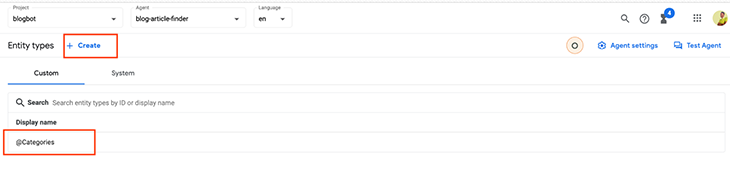
After saving our first entity, return to the dashboard and we are able to see our first entity, @Classes. To create a brand new entity, click on + Create.
Entity for “Finest articles”
- JavaScript: Methods to implement a queue (with synonyms: Javascript queue, Javascript: Methods to implement a queue, queue, Queue, queues, Queues, QUEUES, QUEUE)
- 70+ JavaScript libraries (with synonyms: 70+ JavaScript library frameworks instruments and plugins, plugins, PLUGINS, PLUGIN, Plugins, Plugin, instruments, TOOLS, TOOL, Instruments, Instrument, instrument, frameworks, FRAMEWORKS, FRAMEWORK, Frameworks, Framework, frameworks, framework. Library, libraries, javascript library)
- Large O Notation (with synonyms: Large O, huge O, Large O Notation, Notation, huge o notation)
Entity for “Steered articles”
- Cache (with synonyms: Cache, Redis, CACHE, REDIS, cache, redis)
- Nest.js vs. Loopback (with synonyms: Nestjs vs Loopback, NESTJS, nestjs, loopback, loopback4)
Subsequent, we arrange our intents.
What are intents?
In Dialogflow CX, intents comprise the logic that detects what the consumer needs. They solely comprise coaching phrases and are subsequently reusable.
N.B., In accordance with the documentation, coaching phrases in intents make use of entities. This helps to get variable inputs, subsequently it’s good apply to create entity sorts earlier than creating intents
Coaching phrases are instance phrases of what the consumer would possibly kind or say. If the consumer enter is just like one of many outlined phrases, Dialogflow matches the intent.
Additionally, we don’t must match all the pieces as a result of Dialogflow has an inbuilt machine studying performance that expands our record with different comparable phrases.
Intents use three completely different prefixes:
- Redirect (for intents that use NLU to fetch a web page)
- Affirm/decline (for intents which can be sure or no coaching phrases)
- Supp (in a case the place the intent is a further query that may come again anytime within the movement)
How will we create intents?
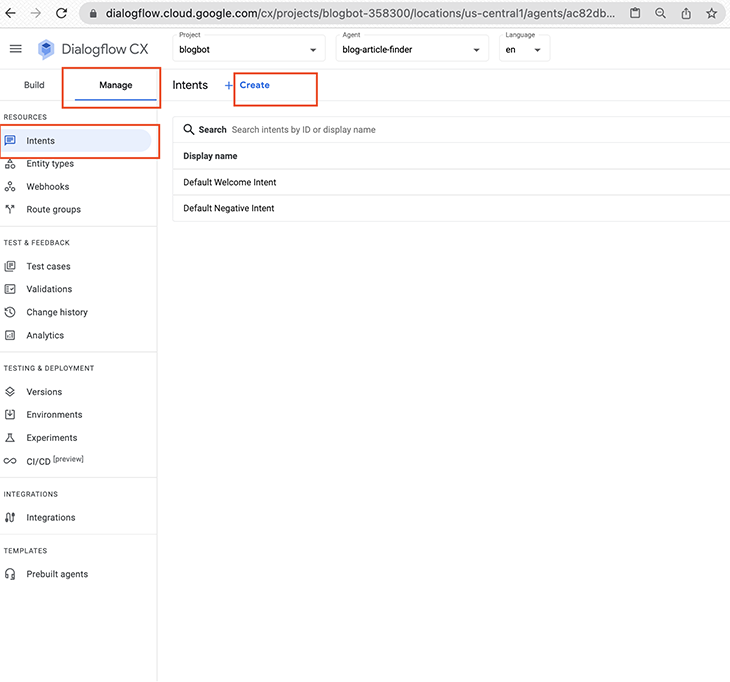
To create intents, click on on Handle after which Intents. On the high of the dashboard, click on on the + Create button.
I’ll go forward and create the intents for the @Catergories entity, then I’ll give phrases for the opposite entities to allow you to try this by yourself.
You may add your creativeness for extra coaching phrases. It’s advisable to have greater than 10 coaching phrases for every intent to cowl the alternative ways the consumer would possibly set off it.
Within the enter field that claims Show title, enter redirect.classes.overview.
Do the identical for the outline:
Classes.description: The kinds of articles now we have.
After that, we scroll down and create the coaching phrases:
Can I see an inventory of all of the accessible classes of articles?What articles can I learn?I want to see the classes of articles accessibleWhich classes of tech articles do you will haveWhich classes are at present accessibleWhich classWhich articlesWhat articles can I learn?
In any case, that is performed, click on on Save.
Now, go forward and create new intents.
Pages and state handlers
Dialogflow CX conversations will be described as finite-state automation.
Let me clarify with an instance…
Take an automatic teller machine (ATM). The ATM has the next states: ready for credit score/debit playing cards, inputting your pin/passcode, deciding on your financial institution, deciding on the withdrawal quantity, giving cash, and when a sure enter is supplied by the consumer, shifting between completely different states.
Slotting in your card will change the state of the ATM Machine from ready for credit score/debit playing cards to inputting your pin/passcode.
In Dialogflow CX digital agent, we use pages to mannequin these states.
There are three kinds of routes that management the dialog state by dealing with the transition between pages:
- Situation routes: altering the web page happens primarily based on a sure situation saved within the session
- Intent routes: altering the web page happens primarily based on what the consumer says/needs
- Occasion handlers: altering the web page happens when a sure occasion needs to be dealt with, (for instance, dealing with no match, dealing with no enter)
The response despatched again to the consumer is called the dialog utterances. And they’re outlined by success which will be of two sorts:
- Dynamic success: when a success webhook known as to get a dynamic response
- Static success: when a static success response is supplied
We received’t be going into creating dynamic success. For our weblog bots, we are going to give attention to static success responses.
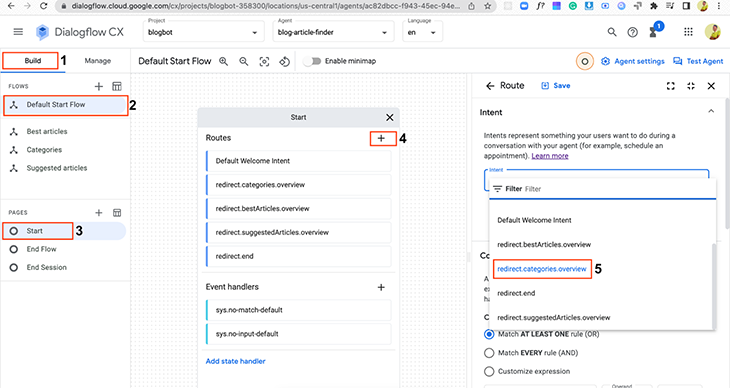
We’ll create the pages within the default begin movement:
- First click on Construct
- Click on on Default Begin Stream
- Click on the Begin beneath PAGES within the left sidebar part
- Subsequent, click on the + icon subsequent to Routes
- Click on on the Intents enter dropdown
- Add
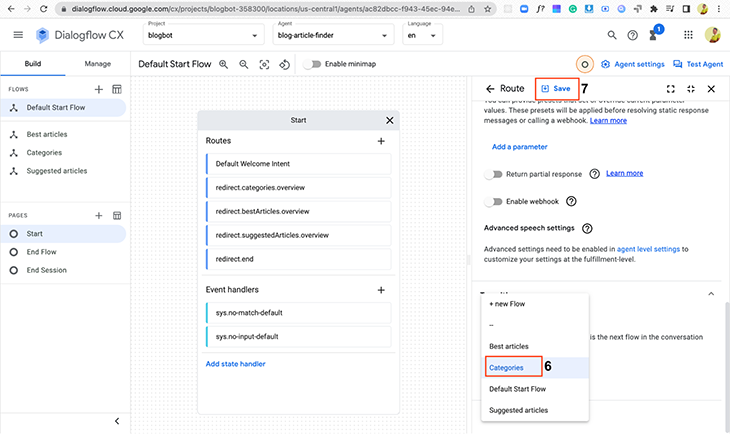
redirect.classes.overview - Scroll right down to Transition and choose the Classes movement that we created initially
- Lastly, hit Save
- We repeat the identical course of for
redirect.bestArticles.overview,redirect.reactjs,redirect.nodejs,redirect.datastructures-and-algorithims,redirect.suggestedArticles.overview, andredirect.finish
You may need seen Finish Session and Stream. Finish Stream closes the movement and jumps again to the final energetic movement, whereas Finish Session closes the complete chat session.
Subsequent, we create pages for flows, beginning with Class. The beneath chat transcript is for the “Class” movement:
Message from consumer: "Hiya"

Bot response: "You might be most welcome, I'm Chinedu, an authorized comrade and a weblog bot. I can do many issues. You may learn tech articles from many classes, get the very best articles, and I can counsel nice articles in case you haven't any in thoughts, I am certain you'd adore it! Let's get studying…"

Message from consumer: "Can I see an inventory of all of the accessible classes of articles?"

Bot response: "We've got the next classes you could possibly learn from: React.js, Node.js, Information Buildings and Algorithms.Which classes would you like to learn from?"

Message from consumer: "React.js"

Bot response: "Superior! Everybody loves React.js"
Let’s join our pages:
- First click on on Construct
- Click on on Classes
- Click on the Begin beneath PAGES
- Subsequent, click on the + icon subsequent Routes
- Click on on the Intents enter dropdown
- Add
redirect.classes.overview - Scroll right down to Transition, choose the Web page and select + New web page.
- Use the web page title:
Class Overview - Lastly, hit Save
- We repeat the identical course of for the
redirect.bestArticles.overview,redirect.reactjs,redirect.nodejs,redirect.datastructures-and-algorithims, andredirect.suggestedArticles.overview
We’ll proceed including static fulfilments:
- In Classes, click on on Class Overview
- Click on on Edit success beneath the Entry success part
- Paste the static success message:
We've got the next classes you could possibly learn from: React.js, Node.js, Information Buildings and Algorithms. - Click on Save
We do the identical factor for the “Finest articles” overview and “Steered articles” overview:
Do you need to learn a few of our greatest articles?You do not have something in thoughts to learn? I may counsel articles so that you can learn.
Let’s have a look at the parameters and what they’re used for.
Parameters are used to seize values that we count on to be provided by the consumer in a session.
Every parameter has an entity and title.
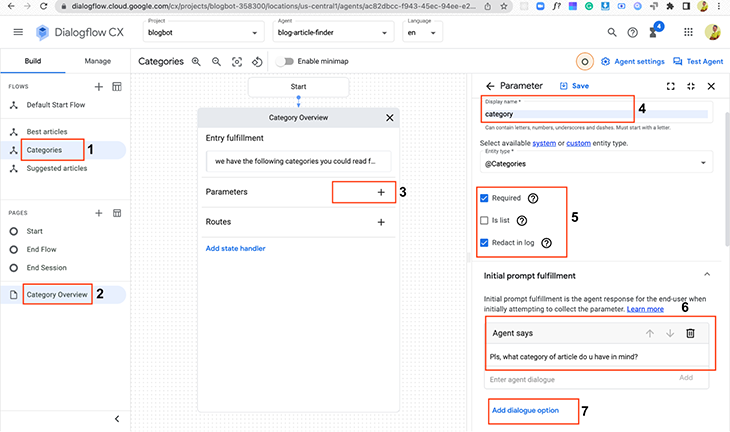
Let’s create parameters for the “Class Overview” web page:
- Click on the Class Overview web page
- Click on the + within the Parameter block. Add the class parameter
- Enter a show title:
class - Choose an entity kind:
@Class - Test the field for Required
- Test the field for Redact in Log
If the digital agent hasn’t collected the class parameter, we may ship the consumer a response:
Please, what class of article do you take into consideration?
Subsequent, let’s add a dialogue choice that’ll present wealthy ideas.
Click on Add dialogue choice and add the beneath JSON code:
{
  "richContent": [
    [
      {
        "options": [
          {
            "text": "React.js"
          },
          {
            "text": "Node.js"
          },
          {
            "text": "Data Structures and Algorithms"
          }
        ],
        "kind": "chips"
      }
    ]
  ]
}
We are able to deal with completely different fallback success prompts. We do that with parameter occasion handlers. There are numerous inbuilt occasion handlers to select from, similar to no-match default and no-input default, which we’re going to be utilizing.
- On the identical web page, scroll right down to the Occasion handlers part
- Click on on Add occasion handler
- Choose the occasion:
No-match default - Then paste within the following static success textual content:
I couldn't get that, are you able to specify the class you want? You may select React.js, Node.js, and Information Buildings and Algorithms. What class of articles would you prefer to learn? - Click on Save
- Click on on Add occasion handler
- Choose the occasion:
No-input default - Then paste within the static message:
I'm sorry, I couldn't get the class you want. You may select React.js, Node.js, and Information Buildings and Algorithms. What class of articles would you prefer to learn? - Click on Save
Web page situation routes
Parameters are typically very highly effective when mixed with a web page conditional route. When a situation evaluates to true, the respective web page route known as.
For our weblog bot, we gather a sequence of parameters, therefore we are going to create a type to test if our situation is met.
Creating the conditional routes on the “Class Overview” web page.
Right here, we’re making a conditional route that may transition to the following web page as soon as the artist is thought.
After now we have chosen the class we would like, our bot does one thing actually easy. It sends us a pleasant message “React.js, good selection.”
Within the “Finest articles” movement, we click on bestArticle, hit the + beside the route, and paste the next into the customized payload:
{
  "richContent": [
    [
      {
        "options": [
          {
            "link": "https://blog.logrocket.com/add-redis-cache-nestjs-app/",
            "text": "Redis in Nestjs"
          },
          {
            "link": "https://blog.logrocket.com/build-strongly-typed-polymorphic-components-react-typescript/",
            "text": "React.js polymorphic component"
          }
        ],
        "kind": "chips"
      }
    ]
  ]
}
Change the intent to the “Finest articles” web page that we created initially and set the situation to No less than match one rule.
After that, we need to create one other route the place we finish the session.
We do the identical factor for the instructed article. Creating a brand new intent referred to as “Steered articles” whereas pasting the beneath payload and creating the tip session route:
{
  "richContent": [
    [
      {
        "options": [
          {
            "link": "https://www.ddevguys.com/bigo-notation-summarized",
            "text": "Big O Notation Summarized"
          },
          {
            "link": "https://www.ddevguys.com/javascript-how-to-implement-the-linked-list-data-structure-part3",
            "text": "Linked-list"
          },          {
            "link": "https://www.ddevguys.com/javascript-how-to-implement-a-queue",
            "text": "Implement a queue."
          }
        ],
        "kind": "chips"
      }
    ]
  ]
}
With this, now we have been in a position to construct a quite simple bot that sends us a cool message after now we have chosen a class, sends us our greatest articles, and in addition suggests articles to us.
Phew…
Conclusion
We went over the method of constructing a chatbot utilizing Dialogflow CX and React. This app and chatbot could possibly be improved in numerous methods relying in your venture requirement and the purpose you need to obtain.
This was only a fundamental overview of what may and will be performed with Dialogflow CX and the way highly effective it’s.
In case you received so far, you might be certainly a legend, as a result of this was a protracted one. And I actually recognize you for taking the time to learn this.
Do go away suggestions if you happen to loved it! Attain out on Twitter if you wish to dive actually deep into Dialogflow CX, I’d love to listen to from you all.
Till then, maintain coding. A lot love.
Full visibility into manufacturing React apps
Debugging React purposes will be troublesome, particularly when customers expertise points which can be exhausting to breed. In case you’re desirous about monitoring and monitoring Redux state, routinely surfacing JavaScript errors, and monitoring sluggish community requests and element load time, attempt LogRocket. 

LogRocket is sort of a DVR for net and cell apps, recording actually all the pieces that occurs in your React app. As a substitute of guessing why issues occur, you may mixture and report on what state your software was in when a problem occurred. LogRocket additionally screens your app’s efficiency, reporting with metrics like shopper CPU load, shopper reminiscence utilization, and extra.
The LogRocket Redux middleware bundle provides an additional layer of visibility into your consumer periods. LogRocket logs all actions and state out of your Redux shops.
Modernize the way you debug your React apps — begin monitoring without spending a dime.
