
Pop-up menus have turn out to be an vital and customary a part of cell functions as we speak. A pop-up menu will be helpful when we have to present some menu choices after a button is clicked, primarily so we don’t have to make use of an additional drawer navigator.
A pop-up menu is normally proven on the prime of the aspect that’s triggering it, as proven under on this instance from Twitter:
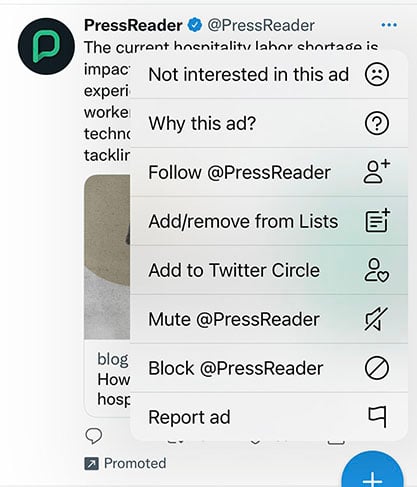
Pop-up menus are an effective way to enhance the UI of your React Native utility. They supply an overflow menu as proven above, and these can be utilized as a secondary motion for an merchandise or a button.
On this article, we shall be exploring the best way to create pop-up menus in React Native with completely different examples. We are going to create a primary pop-up menu, a customized pop-up menu with icons and dividers, in addition to a pop-up menu with a scroll view (together with icons and dividers as effectively).
Establishing our surroundings
To arrange the event setting, we shall be utilizing Expo to bootstrap our undertaking. First, we’ll run this command within the terminal:
npx create-expo-app rn-popup-menu
This may create an Expo undertaking with the identify rn-popup-menu.
Shifting on, we’ll set up the wanted library for creating the pop-up menu. This library is react-native-popup-menu, discovered on its GitHub repo right here:
npm set up react-native-popup-menu --save
To begin the undertaking within the simulator/emulator, we’ll run the command npx expo begin and choose i for iOS and a for Android. Now, we should always have this within the iOS simulator:
Subsequent, we’ll create a folder named parts. That is the place we’ll create our completely different pop-up menu examples.
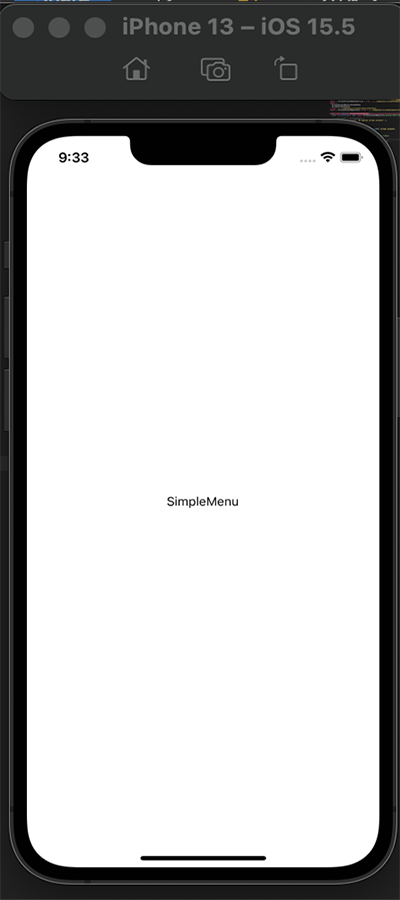
To create a primary pop-up menu that’s triggered by the clicking of a button, we’ll create a file referred to as SimpleMenu.js in our element folder. The element will then be rendered within the App.js file:
// SimpleMenu.js
import { StyleSheet, Textual content, View } from "react-native";
import React from "react";

const SimpleMenu = () => {
 return (
   <View type={kinds.container}>
     <Textual content>SimpleMenu</Textual content>
   </View>
 );
};

export default SimpleMenu;

const kinds = StyleSheet.create({
 container: {
   flex: 1,
   backgroundColor: "#fff",
   justifyContent: "heart",
   alignItems: "heart",
 },
});
// App.js
import { StyleSheet, Textual content, View } from "react-native";
import SimpleMenu from "./parts/SimpleMenu";

export default perform App() {
 return (
   <View type={kinds.container}>
     <SimpleMenu />
   </View>
 );
}

const kinds = StyleSheet.create({
 container: {
   flex: 1,
   backgroundColor: "#fff",
 },
});
Now, this shall be rendered in our simulator/emulator:
Subsequent, to start with the pop-up menu implementation, we’ll check out a few of the inbuilt APIs for this library:
MenuProvider: that is an API that gives the strategies to deal with the pop-up menus imperativelyMenu: serves as the basis menu element used to outline menu names and different essential occasionsMenuTrigger: permits us to outline the place of the airing pop-up menuMenuOptions: encloses all of the menu choicesMenuOption: a wrapper element for all menu choices
You possibly can learn extra about these APIs right here. Now, we’ll make use of those APIs to create a SimpleMenu.js file:
// SimpleMenu.js
import { StyleSheet, Textual content, View } from "react-native";
import React from "react";
import {
 Menu,
 MenuProvider,
 MenuOptions,
 MenuOption,
 MenuTrigger,
} from "react-native-popup-menu";

const SimpleMenu = () => {
 return (
   <MenuProvider type={kinds.container}>
     <Menu>
       <MenuTrigger
         textual content="Click on for Choice menu"
         customStyles={{
           triggerWrapper: {
             prime: -20,
           },
         }}
       />
       <MenuOptions>
         <MenuOption onSelect={() => alert(`Save`)} textual content="Save" />
         <MenuOption onSelect={() => alert(`Delete`)} textual content="Delete" />
       </MenuOptions>
     </Menu>
   </MenuProvider>
 );
};

export default SimpleMenu;

const kinds = StyleSheet.create({
 container: {
   flex: 1,
   backgroundColor: "#fff",
   justifyContent: "heart",
   alignItems: "heart",
   padding: 30,
   flexDirection: "column",
 },
});
Right here, we’re making a easy pop-up menu with the above APIs. MenuProvider wraps all of the menu content material. In MenuTrigger, we’re passing the textual content choice that we wish to be displayed, which is Click on for Choice menu.
We’re additionally utilizing customized kinds to outline the MenuTrigger content material type. MenuOptions has two MenuOption kids; these are what is going to pop up when the MenuTrigger is clicked.
Lastly, the onSelect occasion triggers the menu choice when it’s chosen. We’ll show an alert message after we choose every menu choice:
MenuTrigger and MenuOption can have personalised kids, i.e. we are able to outline the kid construction the best way we wish alongside its styling. Allow us to use an icon instead of the textual content (Click on for Choice menu) for the MenuTrigger:
// SimpleMenu.js
import {
 Menu,
 MenuProvider,
 MenuOptions,
 MenuOption,
 MenuTrigger,
} from "react-native-popup-menu";
import { Entypo } from "@expo/vector-icons";

const SimpleMenu = () => {
 return (
   <MenuProvider type={kinds.container}>
     <Menu>
       <MenuTrigger
         customStyles={{
           triggerWrapper: {
             prime: -20,
           },
         }}
       >
         <Entypo identify="dots-three-vertical" measurement={24} colour="black" />
       </MenuTrigger>
       <MenuOptions>
         <MenuOption onSelect={() => alert(`Save`)} textual content="Save" />
         <MenuOption onSelect={() => alert(`Delete`)} textual content="Delete" />
       </MenuOptions>
     </Menu>
   </MenuProvider>
 );
};

export default SimpleMenu;
Now, we could have a menu icon displayed in our emulator/simulator that can be utilized to set off the menu choices:
![]()
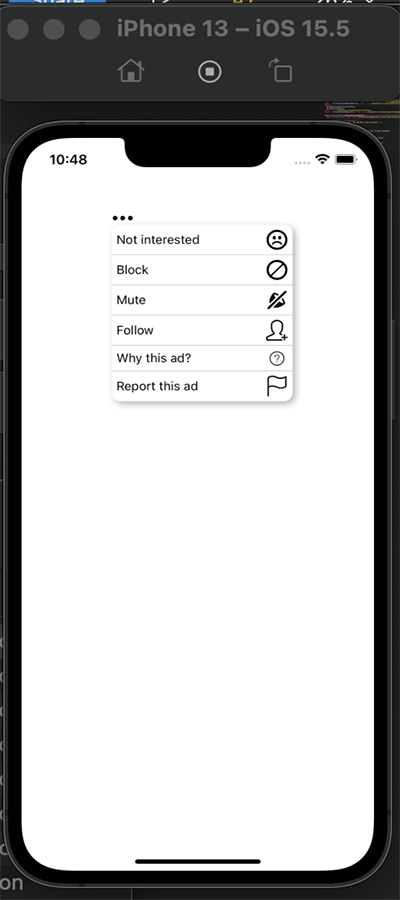
We will take the pop-up menu that we created a step ahead, similar to the instance menu we displayed initially of the article. To do that, we’ll customise the MenuTrigger and MenuOption to have a textual content divider and icon.
For this, we’ll create two new recordsdata CustomMenu.js and CustomContents.js. In CustomMenu.js, we’ll import the APIs as regular, create an icon for the MenuTrigger, and provides it customStyles.
For MenuOptions, we could have six choices that shall be displayed. Every choice shall be a element created in CustomContents.js:
// CustomContents.js
import { MenuOption } from "react-native-popup-menu";
import { Textual content } from "react-native";
import { Entypo } from "@expo/vector-icons";
import { SimpleLineIcons } from "@expo/vector-icons";
import { EvilIcons } from "@expo/vector-icons";

export const Block = ({ textual content, iconName, worth }) => (
 <MenuOption
   onSelect={() => alert(`You clicked ${worth}`)}
   customStyles={{
     optionWrapper: {
       flexDirection: "row",
       alignItems: "heart",
       justifyContent: "space-between",
     },
   }}
 >
   <Textual content>{textual content}</Textual content>
   <Entypo identify={iconName} measurement={24} colour="black" />
 </MenuOption>
);

export const Mute = ({ textual content, iconName, worth }) => (
 <MenuOption
   onSelect={() => alert(`You clicked ${worth}`)}
   customStyles={{
     optionWrapper: {
       flexDirection: "row",
       alignItems: "heart",
       justifyContent: "space-between",
     },
   }}
 >
   <Textual content>{textual content}</Textual content>
   <Entypo identify={iconName} measurement={24} colour="black" />
 </MenuOption>
);
export const Comply with = ({ textual content, iconName, worth }) => (
 <MenuOption
   onSelect={() => alert(`You clicked ${worth}`)}
   customStyles={{
     optionWrapper: {
       flexDirection: "row",
       alignItems: "heart",
       justifyContent: "space-between",
     },
   }}
 >
   <Textual content>{textual content}</Textual content>
   <SimpleLineIcons identify={iconName} measurement={24} colour="black" />
 </MenuOption>
);

export const Why = ({ textual content, iconName, worth }) => (
 <MenuOption
   onSelect={() => alert(`You clicked ${worth}`)}
   customStyles={{
     optionWrapper: {
       flexDirection: "row",
       alignItems: "heart",
       justifyContent: "space-between",
     },
   }}
 >
   <Textual content>{textual content}</Textual content>
   <EvilIcons identify={iconName} measurement={24} colour="black" />
 </MenuOption>
);
export const Query = ({ textual content, iconName, worth }) => (
 <MenuOption
   onSelect={() => alert(`You clicked ${worth}`)}
   customStyles={{
     optionWrapper: {
       flexDirection: "row",
       alignItems: "heart",
       justifyContent: "space-between",
     },
   }}
 >
   <Textual content>{textual content}</Textual content>
   <SimpleLineIcons identify={iconName} measurement={24} colour="black" />
 </MenuOption>
);
export const NotInterested = ({ textual content, iconName, worth }) => (
 <MenuOption
   onSelect={() => alert(`You clicked ${worth}`)}
   customStyles={{
     optionWrapper: {
       flexDirection: "row",
       alignItems: "heart",
       justifyContent: "space-between",
     },
   }}
 >
   <Textual content>{textual content}</Textual content>
   <Entypo identify={iconName} measurement={24} colour="black" />
 </MenuOption>
);
For every element right here, we’re destructuring three props: textual content, iconName, and worth, coming from every of the parts we handed to CustomMenu.js.
Mainly, we’re displaying a textual content and an icon and utilizing onSelect to fireplace an occasion when the choice is clicked.
Within the CustomMenu.js file, we’re importing all of the parts (Block, Mute, Comply with, Why, Query, and NotInterested) and utilizing them because the MenuOptions youngster. Then, we go the worth for the three props we destructured earlier.
We additionally created a divider element and gave it its type:
import { StyleSheet, Textual content, View } from "react-native";
import React from "react";
import {
 Menu,
 MenuProvider,
 MenuOptions,
 MenuTrigger,
} from "react-native-popup-menu";
import { Entypo } from "@expo/vector-icons";
import {
 Block,
 Mute,
 Comply with,
 Why,
 Query,
 NotInterested,
} from "./CustomContents";

const Divider = () => <View type={kinds.divider} />;
const CustomMenu = () => {
 return (
   <MenuProvider type={kinds.container}>
     <Menu>
       <MenuTrigger
         customStyles={{
           triggerWrapper: {
             prime: -20,
           },
         }}
       >
         <Entypo identify="dots-three-horizontal" measurement={24} colour="black" />
       </MenuTrigger>
       <MenuOptions
         customStyles={{
           optionsContainer: {
             borderRadius: 10,
           },
         }}
       >
         <NotInterested
           textual content="Not "
           worth="Not "
           iconName="emoji-sad"
         />
         <Divider />
         <Block textual content="Block" worth="Block" iconName="block" />
         <Divider />
         <Mute textual content="Mute" worth="Mute" iconName="sound-mute" />
         <Divider />
         <Comply with textual content="Comply with" worth="Comply with" iconName="user-follow" />
         <Divider />
         <Why textual content="Why this advert?" worth="why this advert" iconName="query" />
         <Divider />
         <Query
           textual content="Report this advert"
           worth="Report this advert"
           iconName="flag"
         />
       </MenuOptions>
     </Menu>
   </MenuProvider>
 );
};

export default CustomMenu;

const kinds = StyleSheet.create({
 container: {
   flex: 1,
   backgroundColor: "#fff",
   marginVertical: 100,
   marginHorizontal: 100,
 },
 divider: {
   peak: StyleSheet.hairlineWidth,
   backgroundColor: "#7F8487",
 },
});
Now, we are able to examine what we now have:
For the rendering of the pop-up menu with a scroll view, we are able to use both FlatList or ScrollView.
Identical to regular, we’ll create a ScrollViewMenu.js file. We can even create a information.js file the place we shall be getting the info used for the scroll view. Inside this file, we’ll do the ScrollView implementation utilizing each FlatList and ScrollView.
The information we’ll use to create the scroll view shall be created within the information.js file:
// information.js
import { Entypo } from "@expo/vector-icons";
export const information = [
 {
   id: 1,
   name: "Mute",
   icon: <Entypo name="sound-mute" size={24} color="black" />,
 },
 {
   id: 2,
   name: "Block",
   icon: <Entypo name="block" size={24} color="black" />,
 },
 {
   id: 3,
   name: "Attachment",
   icon: <Entypo name="attachment" size={24} color="black" />,
 },
 {
   id: 4,
   name: "Battery",
   icon: <Entypo name="battery" size={24} color="black" />,
 },
 {
   id: 5,
   name: "Behance",
   icon: <Entypo name="behance" size={24} color="black" />,
 },
 {
   id: 6,
   name: "Bookmark",
   icon: <Entypo name="bookmark" size={24} color="black" />,
 },
 {
   id: 7,
   name: "Chat",
   icon: <Entypo name="chat" size={24} color="black" />,
 },
 {
   id: 8,
   name: "Camera",
   icon: <Entypo name="camera" size={24} color="black" />,
 },
];
For FlatList, we’ll import the info from the newly created information.js file and import the menu pop-up APIs. The array of information shall be handed to the FlatList API element and shall be mapped over so every merchandise will be rendered within the scroll view:
// ScrollViewMenu.js
import { StyleSheet, Textual content, View, FlatList, ScrollView } from "react-native";
import React from "react";
import {
 Menu,
 MenuProvider,
 MenuOptions,
 MenuOption,
 MenuTrigger,
} from "react-native-popup-menu";
import { Entypo } from "@expo/vector-icons";
import { information } from "../information";

const ScrollViewMenu = () => {
 return (
   <MenuProvider type={kinds.container}>
     <Menu>
       <MenuTrigger
         customStyles={{
           triggerWrapper: {
             prime: -40,
           },
         }}
       >
         <Entypo identify="dots-three-vertical" measurement={24} colour="black" />
       </MenuTrigger>
       <MenuOptions>
         <FlatList
           information={information}
           keyExtractor={(merchandise) => merchandise.id}
           type={{ peak: 200 }}
           renderItem={({ merchandise }) => (
             <MenuOption
               onSelect={() => alert(merchandise.identify)}
               customStyles={{
                 optionWrapper: {
                   flexDirection: "row",
                   alignItems: "heart",
                   justifyContent: "space-between",
                 },
               }}
             >
               <Textual content>{merchandise.identify}</Textual content>
               <Textual content>{merchandise.icon}</Textual content>
             </MenuOption>
           )}
         />
       </MenuOptions>
     </Menu>
   </MenuProvider>
 );
};

export default ScrollViewMenu;

const kinds = StyleSheet.create({
 container: {
   flex: 1,
   backgroundColor: "#fff",
   marginVertical: 200,
   marginHorizontal: 100,
 },
});
Now, we are able to examine what we now have in our simulator/emulator:
For ScrollView, the identical course of shall be repeated besides we’ll use the ScrollView API element:
import { StyleSheet, Textual content, View, FlatList, ScrollView } from "react-native";
import React from "react";
import {
 Menu,
 MenuProvider,
 MenuOptions,
 MenuOption,
 MenuTrigger,
} from "react-native-popup-menu";
import { Entypo } from "@expo/vector-icons";
import { information } from "../information";

const ScrollViewMenu = () => {
 return (
   <MenuProvider type={kinds.container}>
     <Menu>
       <MenuTrigger
         customStyles={{
           triggerWrapper: {
             prime: -40,
           },
         }}
       >
         <Entypo identify="dots-three-vertical" measurement={24} colour="black" />
       </MenuTrigger>
       <MenuOptions>
          <ScrollView type={{ peak: 200 }}>
           {information.map((merchandise) => (
             <MenuOption
               key={merchandise.key}
               customStyles={{
                 optionWrapper: {
                   flexDirection: "row",
                   alignItems: "heart",
                   justifyContent: "space-between",
                 },
               }}
             >
               <Textual content>{merchandise.identify}</Textual content>
               <Textual content>{merchandise.icon}</Textual content>
             </MenuOption>
           ))}
         </ScrollView>
       </MenuOptions>
     </Menu>
   </MenuProvider>
 );
};

export default ScrollViewMenu;

const kinds = StyleSheet.create({
 container: {
   flex: 1,
   backgroundColor: "#fff",
   marginVertical: 200,
   marginHorizontal: 100,
 },
});
Lastly, we’ve efficiently applied a pop-up menu in React Native with a scroll view as seen within the simulator/emulator above!
Conclusion
I hope this text has given you the perception to construct your personal React Native pop-up menu designed on your choice!
They definitely turn out to be useful when constructing cell apps in React Native which have a number of choices contained in the pop-up menu. Pop-up menus permit the person to scroll to their most popular choices as effectively.
Hopefully, this text additionally confirmed you the best way to implement icons within the pop-up menu, and use issues like dividers.
You possibly can try the complete code right here.
LogRocket: Immediately recreate points in your React Native apps.

LogRocket is a React Native monitoring answer that helps you reproduce points immediately, prioritize bugs, and perceive efficiency in your React Native apps.
LogRocket additionally helps you improve conversion charges and product utilization by displaying you precisely how customers are interacting along with your app. LogRocket’s product analytics options floor the the explanation why customers do not full a specific move or do not undertake a brand new function.
Begin proactively monitoring your React Native apps — strive LogRocket free of charge.
