Selenium is a well-liked browser automating device that’s primarily used for automating internet functions for testing functions. Selenium helps most working techniques and browsers, together with Chrome, Firefox, Edge, and others.
Selenium Grid is a device that lets you run checks in parallel throughout a number of machines. It permits the execution of browser session scripts on distant machines by routing instructions despatched by the consumer to distant browser situations.
Docker, as I defined in this text, is an open supply software program containerization platform that means that you can bundle functions into standardized, remoted items known as containers. These containers mix the functions’ supply code with the working system libraries and dependencies required to run that code in any setting.
On this tutorial, you’ll be taught why and the best way to use Selenium and Docker to check a web site. Additionally, you will discover ways to begin a Selenium Grid that may permit you to take a look at a web site on a number of browsers on the similar time.
To leap forward:
Why must you use Selenium with Docker?
You must use Selenium with Docker to keep away from points reminiscent of session creation, cross-browser testing, and scalability.
Session creation points
Let’s assume that you simply want to use Selenium to check how a web site behaves on a Chrome browser. To try this, you would need to obtain the right ChromeDriver model that’s suitable with the Chrome browser model that you’ve put in in your machine. In any other case, you wouldn’t be capable to run your checks in any respect. With Docker, you solely need to run one Docker command to tug the picture containing the Chrome browser model that you really want.
Cross-browser testing points
Now, let’s assume that you simply want to take a look at how a web site behaves on a Chrome browser model that’s solely supported in a particular working system and on a Firefox browser model that’s solely supported in one other working system. On this case, you would need to set up two completely different working techniques on two separate machines simply to check the web site. With Docker, you’ll simply have to tug the pictures of the precise browsers, begin a Selenium Grid, and take a look at the web site with a single machine.
Scalability points
What if you wish to take a look at a web site on a number of browser variations on the similar time? Once more, Docker means that you can simply try this by providing you with the best approach to configure and begin a Selenium Grid.
Stipulations
To comply with this tutorial, you’ll want the next:
Creating the undertaking root listing
On this part, you’ll create a listing, and inside it, you’ll create a brand new Node undertaking, and set up the required dependencies. Within the subsequent sections, this listing will probably be used to retailer the scripts that may permit you to take a look at a web site.
Open a terminal window and create a brand new listing known as selenium-docker:
mkdir selenium-docker
Navigate into the listing:
cd selenium-docker
Use the npm init command to create a brand new node undertaking with default settings:
npm init -y
Now, use the npm set up command to put in the dependencies selenium-webdriver and jest:
npm set up selenium-webdriver jest
After working the command above, you have got put in the next dependencies:
selenium-webdriver: is a node module that means that you can management one in every of Selenium’s automated browser situations. You’ll use this module to manage a browser occasion working inside a Docker containerjest: is a JavaScript testing framework with a concentrate on simplicity. You’ll use this framework alongside Selenium to check a web site
Open your bundle.json file and exchange the contents of the take a look at property inside scripts like the next:
"scripts": {
    "take a look at": "jest"
}
Right here, you specified that, whenever you run the command npm run take a look at, you wish to name the jest command and execute your take a look at.
Working Selenium checks on Chrome
On this part, you’ll first pull a Docker picture named selenium/standalone-chrome, that may permit you to management a Chrome browser occasion working inside a container. After pulling the picture, you’ll create a container with the picture. Lastly, you’ll write a script that may permit you to take a look at Wikipedia’s homepage.
Return to your terminal window and run the next Docker command:
docker pull selenium/standalone-chrome
With the Docker command above, you pulled the picture that may permit you to management a Chrome browser occasion working inside a container.
Now use the next Docker command to create a container with the picture you have got simply pulled:
docker run -d -p 4444:4444 -p 7900:7900 --shm-size="2g" selenium/standalone-chrome
Right here, you specified that you really want the Docker container to run in indifferent mode.
After specifying the mode, you mapped the container’s ports 4444 and 7900 together with your machine’s ports 4444 and 7900, respectively. It is possible for you to to manage a Selenium browser occasion by pointing your checks to the URL http://localhost:4444 and see what is occurring in your container by visiting the URL http://localhost:7900 (The password is secret).
Lastly, you set the shared reminiscence dimension to 2g as a result of a container working a selenium/standalone-chrome picture requires extra shared reminiscence than the default 64M that Docker containers have allotted.
With the container prepared for use, it’s now time to jot down the script that may permit you to take a look at Wikipedia’s homepage.
The script that you’re going to write to check Wikipedia’s homepage will use Selenium to automate the next duties:
- Begin a Chrome browser occasion
- Navigate to Wikipedia’s homepage
- Take a screenshot of the webpage and reserve it in your working listing
- Get the webpage’s title
Create a file named chrome.take a look at.js and add the next code to it:
const webdriver = require('selenium-webdriver');
const { Builder, Capabilities } = webdriver
let capabilities = Capabilities.chrome();
Within the block of code above, you required the selenium-webdriver module and saved it in a variable named webdriver. Every webdriver gives automated management over a browser session.
After importing the module, you used a destructuring project to unpack the Builder and capabilities properties that the webdriver object has.
Lastly, you used the capabilities property to specify that you simply wish to use Selenium to automate a Chrome browser and saved this specification in a variable named capabilities.
Add the next code under the capabilities variable:
describe("Check if Wikipedia's dwelling web page's title is right", () => {
    let driver;

    beforeAll(async () => {
        driver = new Builder()
            .usingServer('http://localhost:4444')
            .withCapabilities(capabilities)
            .construct();
        await driver.get("https://www.wikipedia.org/");
    }, 30000);

    afterAll(async () => {
        await driver.stop();
    }, 40000);
});
Right here, you first used the describe operate offered by Jest to jot down an outline for the take a look at.
After writing the outline, you created a variable named driver. Then, you used the beforeAll operate offered by Jest to specify the setup work that should occur earlier than the take a look at can run. Contained in the beforeAll operate, you used the Builder property to create a brand new webdriver, and handed the URL http://localhost:4444 and the capabilities as arguments. Then, you saved the brand new webdriver in a variable named driver, and then you definately used the driver.get() methodology to navigate to Wikipedia’s homepage.
Lastly, you used the afterAll operate offered by Jest to specify the work that should occur after working the take a look at. Contained in the afterAll operate, you used the driver.stop() methodology to terminate the browser session.
Extra nice articles from LogRocket:
Add the next code under the afterAll operate:
it('take a look at', async () => {
    strive {
        await driver.takeScreenshot().then(
            operate (picture) {
                require('fs').writeFileSync('screenshot.png', picture, 'base64');
            }
        );
        let title = (await driver.getTitle()).trim()
        anticipate(title).toEqual("Wikipedia");
    } catch (err) {
        throw err;
    }
}, 35000);
Within the code above, you used the it operate offered by Jest to specify the take a look at that must be run on this take a look at file.
First, you used the driver.takeScreenshot() methodology to take a screenshot of the webpage, and then you definately used the fs module to avoid wasting the screenshot in your working listing underneath the identify screenshot.png.
After taking and saving the screenshot, you used the driver.getTitle() methodology to get the webpage’s title, and saved the worth returned in a variable named title.
Lastly, you used the anticipate operate offered by Jest to verify if the webpage’s title is the same as “Wikipedia.” The take a look at will solely go if the webpage’s title is the same as “Wikipedia.”
After including this final little bit of code, your chrome.take a look at.js file ought to seem like the next :
const webdriver = require('selenium-webdriver');
const { Builder, Capabilities } = webdriver
let capabilities = Capabilities.chrome();

describe("Check if Wikipedia's dwelling web page's title is right", () => {
    let driver;
    beforeAll(async () => {
        driver = new Builder()
            .usingServer('http://localhost:4444')
            .withCapabilities(capabilities)
            .construct();
        await driver.get("https://www.wikipedia.org/");
    }, 30000);

    afterAll(async () => {
        await driver.stop();
    }, 40000);

    it('take a look at', async () => {
        strive {
            await driver.takeScreenshot().then(
                operate (picture) {
                    require('fs').writeFileSync('screenshot.png', picture, 'base64');
                }
            );
            let title = (await driver.getTitle()).trim()
            anticipate(title).toEqual("Wikipedia");
        } catch (err) {
            throw err;
        }
    }, 35000);
});
Use both of the next instructions to run the take a look at:
npm run take a look at
Or:
npm take a look at
You must see an output just like the next:
PASS  ./chrome.take a look at.js (7.399 s)
  Check if Wikipedia's dwelling web page's title is right
    ✓ take a look at (189 ms)

Check Suites: 1 handed, 1 complete
Checks:       1 handed, 1 complete
Snapshots:   0 complete
Time:        7.44 s
Ran all take a look at suites.
In case your output is just like the one above, because of this the take a look at you wrote to check Wikipedia’s homepage in a Chrome browser has handed.
In your working listing, you’ll discover that a picture named screenshot.png was created, and in case you open it, it should seem like the next:
Working Selenium checks on Firefox
On this part, you’ll first pull a Docker picture named selenium/standalone-firefox, that may permit you to management a Firefox browser occasion working inside a container. After pulling the picture, you’ll create a container with the picture. Lastly, you’ll write a script that may permit you to take a look at Wikipedia’s search bar, after which you’ll discover ways to watch what is occurring contained in the container.
Return to your terminal window and run the next Docker command:
docker pull selenium/standalone-firefox
With the Docker command above, you pulled the picture that may permit you to management a Firefox browser occasion working inside a container.
Earlier than you’ll be able to create a container with this picture, it’s important to cease the container that you simply created within the earlier part:
docker cease container_id
Now use the next Docker command to create a container with the picture you have got simply pulled:
docker run -d -p 4444:4444 -p 7900:7900 --shm-size="2g" selenium/standalone-firefox
Right here, you created a Docker container with the selenium/standalone-firefox picture with the identical configurations you used within the earlier part.
With the container prepared for use, it’s now time to jot down the script that may permit you to take a look at Wikipedia’s search bar.
The script that you’re going to write to check Wikipedia’s search bar will use Selenium to automate the next duties:
- Begin a Firefox browser occasion
- Navigate to Wikipedia’s homepage
- Click on the search bar
- Write the subject “Programming language” within the search bar
- Submit the shape containing the search bar ingredient and navigate to a brand new web page
- Get the title of the article present in a component situated on the brand new web page
Create a file named firefox.take a look at.js and add the next code to it:
const webdriver = require('selenium-webdriver');
const { By, till, Builder, Capabilities } = webdriver
let capabilities = Capabilities.firefox();
Within the block of code above, you probably did the identical factor you probably did within the earlier part, solely this time you additionally unpacked the properties By and till and specified that you simply wish to use a Firefox browser.
Add the next code under the capabilities variable:
describe('Check if the search bar is working accurately', () => {
  let driver;

  beforeAll(async () => {
    driver = new Builder()
      .usingServer('http://localhost:4444/')
      .withCapabilities(capabilities)
      .construct();
    await driver.get("https://www.wikipedia.org/");
    await driver.wait(till.titleMatches(/Wikipedia/i), 5000);
  }, 30000);

  afterAll(async () => {
    await driver.stop();
  }, 40000);
});
Right here, you used the describe operate offered by Jest to jot down the outline of the take a look at.
Within the beforeAll operate, first, you created a brand new webdriver, similar to you probably did within the earlier part. After creating a brand new webdriver, you used the driver.get() methodology to navigate to Wikipedia’s dwelling web page. Lastly, you used the driver.wait() methodology alongside the till property to make that webdriver wait to maneuver to the following step till the webpage title matches the phrase “Wikipedia.”
Within the afterAll operate, you probably did the identical factor you probably did within the earlier part.
Add the next code under the afterAll operate:
it('take a look at', async () => {
  strive {
    const searchBar = await driver.wait(till.elementLocated(By.id('searchInput')), 5000);
    await searchBar.click on()
    await searchBar.sendKeys("Programming language")
    await searchBar.submit()
    let span = await driver.wait(till.elementLocated(By.className('mw-page-title-main')), 5000)
    let title = await span.getText()
    anticipate(title).toEqual("Programming language");
  } catch (err) {
    throw err;
  }
}, 35000);
Within the code above, you used the it operate offered by Jest to specify the take a look at that must be run on this take a look at file.
First, you used the driver.wait() methodology alongside the till and By properties to make the webdriver wait to maneuver to the following step till the search bar ingredient is situated. As soon as this ingredient is situated, you saved it in a variable named searchBar.
After finding the search bar, you used the click on() methodology to simulate a mouse click on within the search bar ingredient, used the sendKeys() methodology to jot down textual content within the search bar, and then you definately used the submit() methodology to submit the shape the place this search bar ingredient is situated and navigate to a brand new web page.
Within the new web page, you used the driver.wait() methodology alongside the till and By properties to make the webdriver wait to maneuver to the following step till a component on this new web page is situated. You saved the ingredient present in a variable named span. This ingredient is the place the title of an article is saved.
As soon as the ingredient was saved in a variable named span, you used the getText() methodology to retrieve this ingredient’s textual content after which saved the textual content in a variable named title.
Lastly, you used the anticipate operate offered by Jest to verify if the worth saved within the variable named title is the same as “Programming language.” The take a look at will solely go if the worth saved within the variable title is the same as “Programming language.”
Your firefox.take a look at.js file ought to seem like the next:
const webdriver = require('selenium-webdriver');
const { By, till, Builder, Capabilities } = webdriver
let capabilities = Capabilities.firefox();

describe('Check if the search bar is working accurately', () => {
    let driver;

    beforeAll(async () => {
        driver = new Builder()
            .usingServer('http://localhost:4444/')
            .withCapabilities(capabilities)
            .construct();
        await driver.get("https://www.wikipedia.org/");
        await driver.wait(till.titleMatches(/Wikipedia/i), 5000);
    }, 30000);

    afterAll(async () => {
        await driver.stop();
    }, 40000);

    it('take a look at', async () => {
        strive {
            const searchBar = await driver.wait(till.elementLocated(By.id('searchInput')), 5000);
            await searchBar.click on()
            await searchBar.sendKeys("Programming language")
            await searchBar.submit()
            let span = await driver.wait(till.elementLocated(By.className('mw-page-title-main')), 5000)
            let title = await span.getText()
            anticipate(title).toEqual("Programming language");
        } catch (err) {
            throw err;
        }
    }, 35000);
});
Use the next command to run the take a look at:
npm take a look at firefox.take a look at.js
Right here it’s good to specify the filename as a result of, by default, Jest will run all of the recordsdata with the .take a look at.js extension in your working listing.
After working the command, you will note an output like this:
PASS  ./firefox.take a look at.js (14.673 s)
  Check if the search bar is working accurately
    ✓ take a look at (1563 ms)

Check Suites: 1 handed, 1 complete
Checks:       1 handed, 1 complete
Snapshots:   0 complete
Time:        14.719 s, estimated 18 s
Ran all take a look at suites matching /firefox.take a look at.js/i.
For those who get an output just like the one above, it implies that the take a look at you wrote handed. Please be aware that, on the time of writing, this take a look at is passing however this may change if Wikipedia decides to alter the web site’s code sooner or later.
To see what is occurring contained in the container, open your internet browser and navigate to the URL http://localhost:7900, enter the password secret, and run your take a look at once more.
You must see one thing just like the next:

Please be aware that within the gif above, you might be solely in a position to see the brand new web page containing the searched subject as a result of a line asking the webdriver to attend just a few seconds was added under the road of code the place the variable named span was initialized.
Working Selenium checks on Chrome and Firefox in parallel
On this part, you’ll first pull the Selenium Docker photos that may permit you to begin a Selenium Grid and run your checks on each Chrome and Firefox browsers. After pulling the pictures, you’ll use them to begin a grid. Lastly, you’ll use the script that you simply wrote within the earlier part to check Wikipedia’s search bar on each Chrome and Firefox on the similar time.
A Selenium Grid has the next two most important distinct parts: hub and node.
- A hub is the central level within the Selenium Grid that controls the nodes of a grid. It receives the take a look at instructions and sends them to the nodes
- A node is the employee of the Selenium Grid and it receives and executes the take a look at instructions despatched by the hub. The node is the place a brand new distant browser session is created every time a take a look at must be executed
Please be aware that the standalone Docker photos that you simply used within the earlier sections already include a hub and node mixed.
Return to your terminal window and cease the container that you simply began within the earlier part with the next command:
docker cease container_id
Now, pull the picture that may permit you to create a hub:
docker pull selenium/hub
Pull the picture that may permit you to create a Chrome browser node:
docker pull selenium/node-chrome
Then, pull the picture that may permit you to create a Firefox browser node:
docker pull selenium/node-firefox
After pulling the required Docker photos, you’ll use Docker Compose to create the Selenium Grid.
Create a Docker Compose file named docker-compose.yml and add the next code to it:
model: "3"
providers:
  chrome:
    picture: selenium/node-chrome
    shm_size: 2gb
    depends_on:
      - selenium-hub
    setting:
      - SE_EVENT_BUS_HOST=selenium-hub
      - SE_EVENT_BUS_PUBLISH_PORT=4442
      - SE_EVENT_BUS_SUBSCRIBE_PORT=4443
  firefox:
    picture: selenium/node-firefox
    shm_size: 2gb
    depends_on:
      - selenium-hub
    setting:
      - SE_EVENT_BUS_HOST=selenium-hub
      - SE_EVENT_BUS_PUBLISH_PORT=4442
      - SE_EVENT_BUS_SUBSCRIBE_PORT=4443
  selenium-hub:
    picture: selenium/hub
    container_name: selenium-hub
    ports:
      - "4442:4442"
      - "4443:4443"
      - "4444:4444"
With the code above, you specified the pictures that you simply wish to use to begin a Selenium Grid and which ports the node containers ought to hearken to for occasions. You additionally mapped the hub container ports 4442, 4443, and 4444 to the identical ports in your machine.
Run the next command to begin a Selenium Grid:
docker compose up
Earlier than you employ the grid to run the checks, exchange all of the content material of your chrome.take a look at.js file with the next:
const webdriver = require('selenium-webdriver');
const { By, till, Builder, Capabilities } = webdriver
let capabilities = Capabilities.chrome();


describe('Check if the search bar is working accurately', () => {
  let driver;

  beforeAll(async () => {
    driver = new Builder()
      .usingServer('http://localhost:4444/')
      .withCapabilities(capabilities)
      .construct();
    await driver.get("https://www.wikipedia.org/");
    await driver.wait(till.titleMatches(/Wikipedia/i), 5000);
  }, 30000);

  afterAll(async () => {
    await driver.stop();
  }, 40000);

  it('take a look at', async () => {
    strive {
      const searchBar = await driver.wait(till.elementLocated(By.id('searchInput')), 5000);
      await searchBar.click on()
      await searchBar.sendKeys("Programming language")
      await searchBar.submit()
      let span = await driver.wait(till.elementLocated(By.className('mw-page-title-main')), 5000)
      let title = await span.getText()
      anticipate(title).toEqual("Programming language");
    } catch (err) {
      throw err;
    }
  }, 35000);
});
Right here, you pasted the contents of the firefox.take a look at.js file within the chrome.take a look at.js file and then you definately altered the road the place you specify the browser to be Chrome as an alternative of Firefox.
Run the checks with the next command:
npm take a look at
Open your browser and navigate to the URL http://localhost:4444/ui and it’s best to see one thing just like:
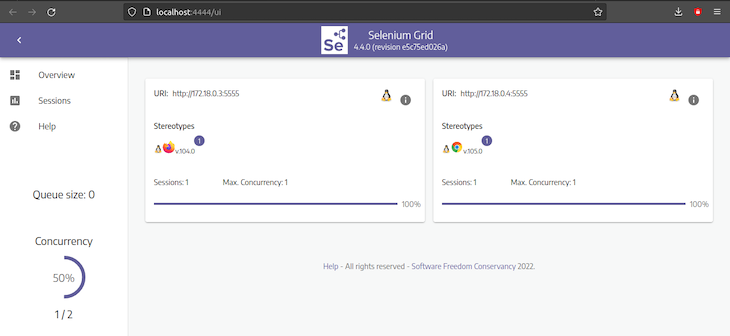
The picture above reveals that you’re working the checks in each Chrome and Firefox browsers in parallel.
Return to your terminal window and it’s best to see the next output:
PASS  ./chrome.take a look at.js (18.977 s)
PASS  ./firefox.take a look at.js (23.387 s)

Check Suites: 2 handed, 2 complete
Checks:       2 handed, 2 complete
Snapshots:   0 complete
Time:        23.682 s
Ran all take a look at suites.
The output above reveals that the take a look at you wrote for Wikipedia’s search bar handed on each Chrome and Firefox.
Conclusion
On this tutorial, you discovered why it’s best to use Selenium with Docker to check a web site. You then used these instruments to check a web site on the Chrome and Firefox browsers individually, and whereas doing so, you additionally discovered the best way to visualize the checks working inside a Docker container. Lastly, you discovered the best way to take a look at a web site on each Chrome and Firefox browsers on the similar time.
LogRocket: Full visibility into your internet and cellular apps

LogRocket is a frontend utility monitoring answer that permits you to replay issues as in the event that they occurred in your personal browser. As a substitute of guessing why errors occur, or asking customers for screenshots and log dumps, LogRocket helps you to replay the session to shortly perceive what went flawed. It really works completely with any app, no matter framework, and has plugins to log extra context from Redux, Vuex, and @ngrx/retailer.
Along with logging Redux actions and state, LogRocket data console logs, JavaScript errors, stacktraces, community requests/responses with headers + our bodies, browser metadata, and customized logs. It additionally devices the DOM to report the HTML and CSS on the web page, recreating pixel-perfect movies of even probably the most complicated single-page and cellular apps.
