This text will chronicle my experiences learning D3.js, a JavaScript framework that produces high-quality diagrams and graphics fueled by information.
Though D3 is a JavaScript library, we are going to use TypeScript as a result of it handles information and information sorts extra effectively than plain outdated JavaScript.
This tutorial will present you the right way to create visualizations utilizing D3 and TypeScript. First, we’ll create a easy boilerplate mission, add information, after which construct a totally interactive instance. We’ll host the code on CodePen for optimum interactivity as a stylistic resolution.
Every instance will run within the browser, saving you the fuss of putting in something onto your pc. In fact, you’ll be capable of fork a Pen and work in your code model.
Leap forward:
Creating and exporting the boilerplate mission in D3
We’ll primarily concentrate on including dependencies and getting acquainted with the surroundings with the boilerplate Pen. There will likely be HTML on the left, CSS within the center, and TypeScript on the correct. That is the place many of the motion will happen.
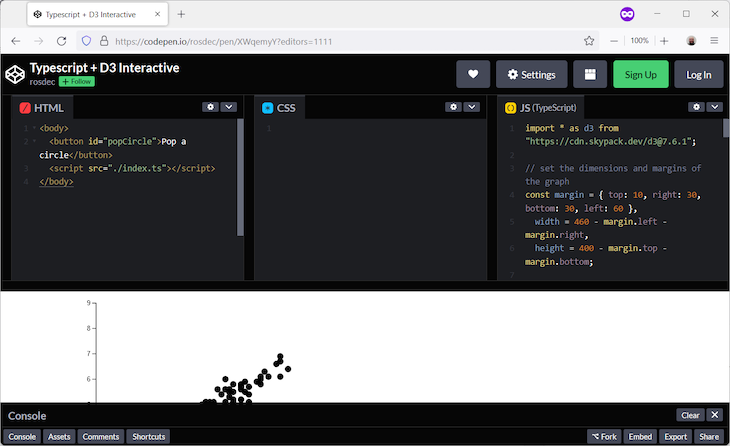
Subsequent, make sure that the JavaScript pane is about to TypeScript and add D3 as a dependency. You are able to do this by deciding on the gear icon on the highest proper.
Right here’s an interactive instance of the code:
See the Pen
Typescript + D3 Boilerplate by rosdec (@rosdec)
on CodePen.
The code is easy, so we are going to solely concentrate on TypeScript as a result of the HTML and CSS are irrelevant.
import * as d3 from "https://cdn.skypack.dev/[email protected]";

const svg = d3.choose("physique")
  .append("svg")
  .attr("width", 500)
  .attr("peak", 500);

svg
  .append("textual content")
  .attr("x", 100)
  .attr("y", 100)
  .textual content("Hey d3js");

svg
  .append("circle")
  .attr("r", 30)
  .attr("cx", 60)
  .attr("cy", 50);
The import addresses the D3 library dependency. Within the following block of code, we added the svg element to the physique tag to accommodate our graphics in every code instance.
The final two traces of code add the textual content and circle to supply the outcomes seen within the Pen. That’s every part we have to arrange the surroundings to play with D3.
Including information to D3
To remain true to the D3 philosophy, we’ve got so as to add information to our graphics. To do that, we’ll use the code under. This downloads a CSV file and manipulates it to visualise it as a scatter plot.
See the Pen
Typescript + D3 Interactive by rosdec (@rosdec)
on CodePen.
import * as d3 from "https://cdn.skypack.dev/[email protected]";

// set the scale and margins of the graph
const margin = { high: 10, proper: 30, backside: 30, left: 60 },
  width = 460 - margin.left - margin.proper,
  peak = 400 - margin.high - margin.backside;

// append the svg object to the physique of the web page
const svg = d3
  .choose("physique")
  .append("svg")
  .attr("width", width + margin.left + margin.proper)
  .attr("peak", peak + margin.high + margin.backside)
  .append("g")
  .attr("remodel", `translate(${margin.left}, ${margin.high})`);

// Learn the information
d3.csv(
"https://uncooked.githubusercontent.com/holtzy/D3-graph-gallery/grasp/DATA/iris.csv"
).then(perform (csvdata) {
  // Add X axis
  const x = d3.scaleLinear().area([3, 9]).vary([0, width]);
  const xAxis = svg
    .append("g")
    .attr("remodel", `translate(0, ${peak})`)
    .name(d3.axisBottom(x));

  // Add Y axis
  const y = d3.scaleLinear().area([0, 9]).vary([height, 0]);
  svg.append("g").name(d3.axisLeft(y));

  // Add dots
  svg.append("g")
     .selectAll("circle")
     .information(csvdata)
     .be part of("circle")
     .attr("cx", perform (d) {
       return x(d.Sepal_Length);
    })
    .attr("cy", perform (d) {
       return y(d.Petal_Length);
    })
    .attr("r", 5);
});
After we’ve completed the import, we are going to outline the floor to attract our graphics on. We are able to do that by calculating the world’s width and peak together with the margins. These values add svg to the HTML physique and specify a metamorphosis. On this case, it’s a translate operation to position g underneath svg.
Our final operation is to map the factors within the scatterplot. The info is immediately downloaded from a URL as a CSV file. D3 can manipulate CSV information, which turns out to be useful more often than not. As soon as the information is accessible, three operations are carried out: including the x-axis, including the y-axis, and plotting the information.
The primary two operations are carried out consecutively to outline the x and y-axes as scaleLinear. Then, for every axis, the vary is specified by the variety of pixels that such axes will occupy. The x-axis may have a site of 3 to 9, and the y-axis will likely be 0 to 9.
Binding information to graphics utilizing D3
Including the dots to the scatter plot could seem a bit convoluted, however we are able to do it with a particular sequence of operations. The thought is to bind a graphic element — a circle, some extent, and a line — to information. Then, the information will modify some facets of the graphic element, reminiscent of colour, thickness, sample, and place. Within the supply code above, we:
- Use
.selectAllto outline the kind of factor that may be part of every factor of the information - Use
.informationto outline the array - Use
.be part ofto affix the information and the graphics components. That is the placeHTMLorSVGare dynamically added and eliminated
Now, we outline how the worth of the information influences the graphics factor. Within the instance above, you’ll be able to see that we .selectAll circle components, we name .information to assign the csvdata as the information supply of the be part of, after which we .be part of the information to the graphics factor.
Our closing and most inventive step is defining how the information affect graphics. At this level, we solely have a circle for every entry within the csvdata. To change the circles, we use .attr. The primary two will modify the attributes cx and cy on the middle of the circle coordinates, then modify the radius by setting it to 5.
Interacting with the visualizations with D3
Subsequent, let’s add an interplay to discover the true prospects of D3. First, let’s have a look at the ultimate outcome:
See the Pen
Typescript + D3 Interactive by rosdec (@rosdec)
on CodePen.
Along with the scatterplot, we’ve got a button to take away one circle from the information. That is completed in D3 with out entry to exterior sources. The button is added in HTML however is sure to the code it’s going to execute within the TypeScript supply.
The interplay happens in popCircle() and can take away the final factor from the csvdata array. It will then be part of the circles within the scatterplot to information, however with a bit addition — the .exit operation. This defines what occurs when a datum exits the graphics array.
The semantics of the code is easy: every part after .exit() will apply to the graphics components exiting from the array. Right here, we ask D3 to use a transition on the circle radius specified by .attr that may grow to be 0 earlier than eradicating graphics from the illustration.
The ultimate impact is visually satisfying. When you click on the button, the scatterplot circles disappear, and the transition alerts the consumer to the place modifications are occurring.
Conclusion
On this tutorial, we discovered the right way to arrange a stripped-down mission primarily based on TypeScript and D3. We additionally noticed the right way to go from a primary illustration to a sophisticated and interactive data-driven one. Though the instance is easy, I hope it clearly reveals the place to intervene to supply data-driven graphical representations.
LogRocket: Full visibility into your net and cellular apps

LogRocket is a frontend software monitoring resolution that allows you to replay issues as in the event that they occurred in your personal browser. As an alternative of guessing why errors occur, or asking customers for screenshots and log dumps, LogRocket helps you to replay the session to shortly perceive what went unsuitable. It really works completely with any app, no matter framework, and has plugins to log extra context from Redux, Vuex, and @ngrx/retailer.
Along with logging Redux actions and state, LogRocket data console logs, JavaScript errors, stacktraces, community requests/responses with headers + our bodies, browser metadata, and customized logs. It additionally devices the DOM to report the HTML and CSS on the web page, recreating pixel-perfect movies of even probably the most advanced single-page and cellular apps.
