
When beginning a brand new undertaking, CSS is straightforward to write down. Nonetheless, because the undertaking grows in scale and the variety of elements, type sheets, and features of code will increase, CSS turns into a nightmare to keep up. Fortunately, CSS methodologies create pointers for writing modular, reusable, and scalable code.
There are a number of fashionable methodologies, together with Atomic Design, BEM, SMACSS, and OOCSS. On this article, we’ll deal with Atomic Design, study its ideas, and apply them to create a fundamental weblog web page in a Subsequent.js software.
Soar forward:
Conditions
To observe together with this tutorial, you’ll want information of Subsequent.js, CSS, SCSS, and the Atomic Design methodology.
What’s Atomic Design in CSS?
Atomic Design is a CSS methodology created by Brad Frost. It gives course for creating scalable techniques, reusable elements, and design techniques. Atomic Design was impressed by chemistry, which is why the constructing blocks are known as atoms, molecules, organisms, templates, and pages.
Atoms are the smallest constructing blocks and are composed of HTML tags and HTML components. Examples of atoms embrace inputs, buttons, and headings.
Just like their chemical inspiration, Atomic Design’s molecules are a mixture of atoms. For instance, a kind is a molecule as a result of it combines the label, enter, and button components.
Once we mix molecules or atoms, we get organisms. Organisms are teams of molecules and atoms joined to kind comparatively complicated, distinct UI elements and sections of an interface.
Persevering with with the chemical theme, templates are made up of organisms. They’re the construction of the content material and are used to create a web page’s layouts, blueprints, and wireframes.
Lastly, pages are the ultimate product. Within the architectural world, for instance, a template could be the blueprint of a constructing, and a web page could be the finished constructing.
Making a Subsequent.js software
Now, let’s construct the Subsequent.js software.
First, create a brand new Subsequent.js undertaking by operating this command within the terminal:
npx create-next-app atomic-next-app
Subsequent, we navigate into the undertaking listing:
cd atomic-next-app
We’ll use Sass for styling, so set up that under:
npm set up --save-dev sass
Then, run the command to start out the applying:
npm run dev
Utilizing Atomic Design in Subsequent.js
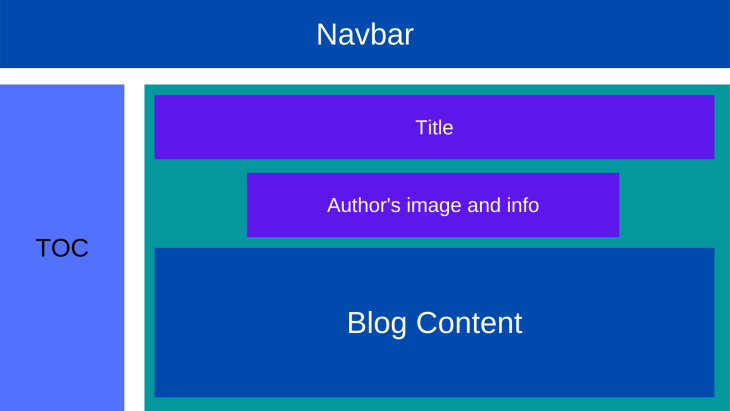
We’ll create a fundamental weblog web page with a navigation bar, a desk of contents, weblog content material, and the writer’s particulars. Our title would be the solely atom we create, whereas the navbar, desk of contents, writer’s particulars, and weblog content material will likely be our molecules. The weblog container will include these molecules and will likely be our organism. The construction of the weblog ought to seem like this:
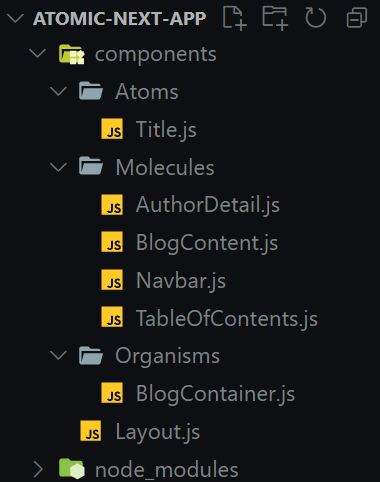
The folder construction for the undertaking ought to seem like this:
Now that we’ve outlined the atoms, molecules, organisms, templates, and pages, let’s create the elements. You should use any part library, CSS processor, or instrument. For this text, we’ll use Sass and CSS Modules.
Creating the title atom
We’ll set our weblog web page title utilizing the title atom. As an atom, it can solely have one h1 component. To create the title, add a elements/Title.js file to the applying’s root and paste this code:
Extra nice articles from LogRocket:
import types from "../../types/title.module.scss";

export default operate Title() {
  return (
    <h1 className={types.blogTitle}>
      The way to Monitor Your Frontend and Carry out Product Evaluation with LogRocket
    </h1>
  );
}
Then, for styling, add a title.module.scss file to the types folder and enter the types under:
.blogTitle {
  font-size: 2.5rem;
  font-weight: 500;
  margin-bottom: 1rem;
  show: inline-block;
}
Establishing the navbar molecule
The navbar molecule contains the nav, an a HTML component, and Subsequent.js’ Hyperlink part.
Create a elements/Navbar.js file and paste the code:
import types from "../../types/navbar.module.scss";
import Hyperlink from "subsequent/hyperlink";

export default operate Navbar() {
  return (
    <nav className={types.navbarContainer}>
      <Hyperlink href="#">
        <a>The Coolest Weblog Ever</a>
      </Hyperlink>
    </nav>
  );
}
To edit the styling, add a navbar.module.scss file to types and paste the types under:
.navbarContainer {
  padding: 1.6rem;
  background-color: #8652ff;
  box-shadow: 0 4px 16px 0 rgba(41, 0, 135, 0.12);
  background-image: linear-gradient(150deg, rgba(99, 31, 255, 0.6), #8652ff);

  a {
    colour: rgb(241, 235, 255);
    font-size: 2rem;
  }
}
Constructing the desk of contents molecule in Subsequent.js
Just like the navbar molecule, this molecule consists of the nav, ul, the a HTML components, and Hyperlink elements.
To set it up, create a elements/TableOfContents.js file and paste the code under:
import types from "../../types/tableOfContents.module.scss";
import Hyperlink from "subsequent/hyperlink";

const TableofContentRoutes = [
  { label: "Introduction", href: "#" },
  { label: "Getting Started", href: "#" },
  { label: "What is LogRocket", href: "#" },
  { label: "How to Monitor Frontend with LogRocket", href: "#" },
  { label: "How to Perform Product Analysis with LogRocket", href: "#" },
  { label: "Why LogRocket is Awesome", href: "#" },
  { label: "Conclusion", href: "#" },
];

export default operate TableOfContents() {
  return (
    <div className={types.tableOfContentsContainer}>
      <h2>Desk of Contents</h2>
      <nav>
        <ul>
          {TableofContentRoutes.map((route) => (
            <Hyperlink href={route.href} key={route.label}>
              <a>{route.label}</a>
            </Hyperlink>
          ))}
        </ul>
      </nav>
    </div>
  );
}
We created a TableofContentRoutes array within the code above with label and href. Then, we mapped via the TableofContentRoutes routes and rendered a hyperlink for each.
Now, for styling, add a tableOfContents.module.scss file to types and insert the types:
.tableOfContentsContainer {
  ul {
    show: flex;
    flex-direction: column;
    list-style: none;
    a {
      colour: inherit;
      text-decoration: underline;
    }
  }

  @media (min-width: 768px) {
    width: 300px;
  }
}
Including the writer’s particulars molecule
The writer’s molecule will comprise the writer’s picture and title. On this tutorial, we’ll title our writer John Doe. We’ll use the Picture part and a span tag to set this up.
First, add an Creator.js file to the elements folder and insert the next code:
import types from "../../types/authorDetail.module.scss";
import Picture from "subsequent/picture";

export default operate AuthorDetail() {
  return (
    <div className={types.authorDetailContainer}>
      <div className="img-box">
        <Picture
          alt="Creator's avatar"
          src="https://weblog.logrocket.com/writer.jpg"
          width="50px"
          top="50px"
        />
      </div>
      <span>John Doe</span>
    </div>
  );
}
To edit the styling, add authorDetail.module.scss to types and paste the types under:
.authorDetailContainer {
  show: flex;
  hole: 0.5rem;
  margin-bottom: 2rem;

  .img-box {
    place: relative;
    border-radius: 50%;
  }
}
Designing the weblog content material molecule
Subsequent, we’ll arrange the weblog content material molecule to deal with the weblog’s texts, that are a set of p tags. For this, add BlogContent.js to the elements folder:
import types from "../../types/blogContent.module.scss";

export default operate BlogContent() {
  return (
    <div className={types.blogContentContainer}>
      <p>
        Eu amet nostrud aliqua in eiusmod consequat amet duis culpa dolor.
        Excepteur commodo proident aliquip aliquip fugiat ex exercitation amet
        velit. Mollit id cupidatat duis incididunt. Excepteur irure deserunt
        fugiat cillum id. Aliquip nulla pariatur sunt ex. Nulla id ut minim
        cupidatat laboris culpa laboris. Anim consectetur veniam ipsum
        exercitation ipsum consequat magna quis pariatur adipisicing.
      </p>
    </div>
  );
}
Now that we’ve arrange the molecule for our textual content, we have to edit the styling. To do that, add a blogContent.module.scss file to types and embrace the next code:
.blogContentContainer {
  p {
    margin-bottom: 1rem;
    font-size: 1rem;
  }
}
Constructing the weblog container
We arrange all of our weblog web page’s molecules within the steps above. To create the weblog container organism, we’ll mix the Title, Creator, and BlogContent elements. For this, add a BlogContainer.js file to the elements folder:
import Title from "../Atoms/Title";
import AuthorDetail from "../Molecules/AuthorDetail";
import BlogContent from "../Molecules/BlogContent";

export default operate BlogContainer() {
  return (
    <div className="blog-container">
      <Title />
      <AuthorDetail />
      <BlogContent />
    </div>
  );
}
Right here, we imported Title, AuthorDetail, and BlogContent and plugged them into BlogContainer. As you may see, no styling is required for this part. Now, we’ll construct the structure template!
Creating the structure template with Atomic Design
The structure template is the place we outline the positioning of each different part on the web page. To set it up, create a Structure.js file within the elements folder:
import types from "../types/structure.module.scss";
import Navbar from "../elements/Molecules/Navbar";
import TableOfContents from "../elements/Molecules/TableOfContents";
import BlogContainer from "../elements/Organisms/BlogContainer";

export default operate Structure() {
  return (
    <div className={types.layoutContainer}>
      <header>
        <Navbar />
      </header>
      <most important>
        <apart>
          <TableOfContents />
        </apart>
        <article>
          <BlogContainer />
        </article>
      </most important>
    </div>
  );
}
Right here, we imported the Navbar, TableOfContents, and BlogContainer elements and plugged them into the Structure part.
Subsequent, for the styling, add a structure.module.scss to types and paste the types under:
.layoutContainer {
  most important {
    show: flex;
    flex-direction: column;
    hole: 2rem;
    padding: 1.6rem;

    @media (min-width: 768px) {
      flex-direction: row;
      justify-content: space-between;
    }
  }
}
Finalizing the Subsequent.js weblog undertaking
To complete up, we’ll put Structure into the index.js file to create the web page.
import Head from "subsequent/head";
import Structure from "../elements/Structure";

export default operate Dwelling() {
  return (
    <div>
      <Head>
        <title>The Coolest Weblog Ever</title>
      </Head>
      <Structure />
    </div>
  );
}
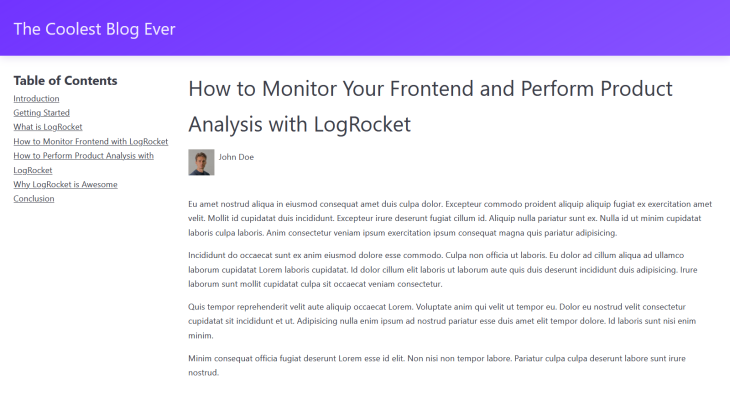
With that, we’ve got efficiently utilized the ideas of Atomic Design to create a weblog in Subsequent.js. Our weblog will seem like this:
Conclusion
On this article, we utilized the ideas of Atomic Design to create the UI of a Subsequent.js weblog. By breaking internet pages into separate elements, Atomic Design prevents repetition and promotes consistency and scalability.
Whereas we utilized Atomic Design to an internet growth undertaking on this article, its ideas also can create design techniques for UI/UX design.
LogRocket: Full visibility into manufacturing Subsequent.js apps
Debugging Subsequent purposes may be troublesome, particularly when customers expertise points which are troublesome to breed. In case you’re fascinated with monitoring and monitoring state, mechanically surfacing JavaScript errors, and monitoring gradual community requests and part load time, strive LogRocket. 

LogRocket is sort of a DVR for internet and cell apps, recording actually all the pieces that occurs in your Subsequent app. As an alternative of guessing why issues occur, you may mixture and report on what state your software was in when a difficulty occurred. LogRocket additionally screens your app’s efficiency, reporting with metrics like consumer CPU load, consumer reminiscence utilization, and extra.
The LogRocket Redux middleware package deal provides an additional layer of visibility into your person periods. LogRocket logs all actions and state out of your Redux shops.
Modernize the way you debug your Subsequent.js apps — begin monitoring at no cost.
